
Coconut Cake
This post may contain affiliate links. As an Amazon Associate I earn from qualifying purchases. Please read my disclosure policy.
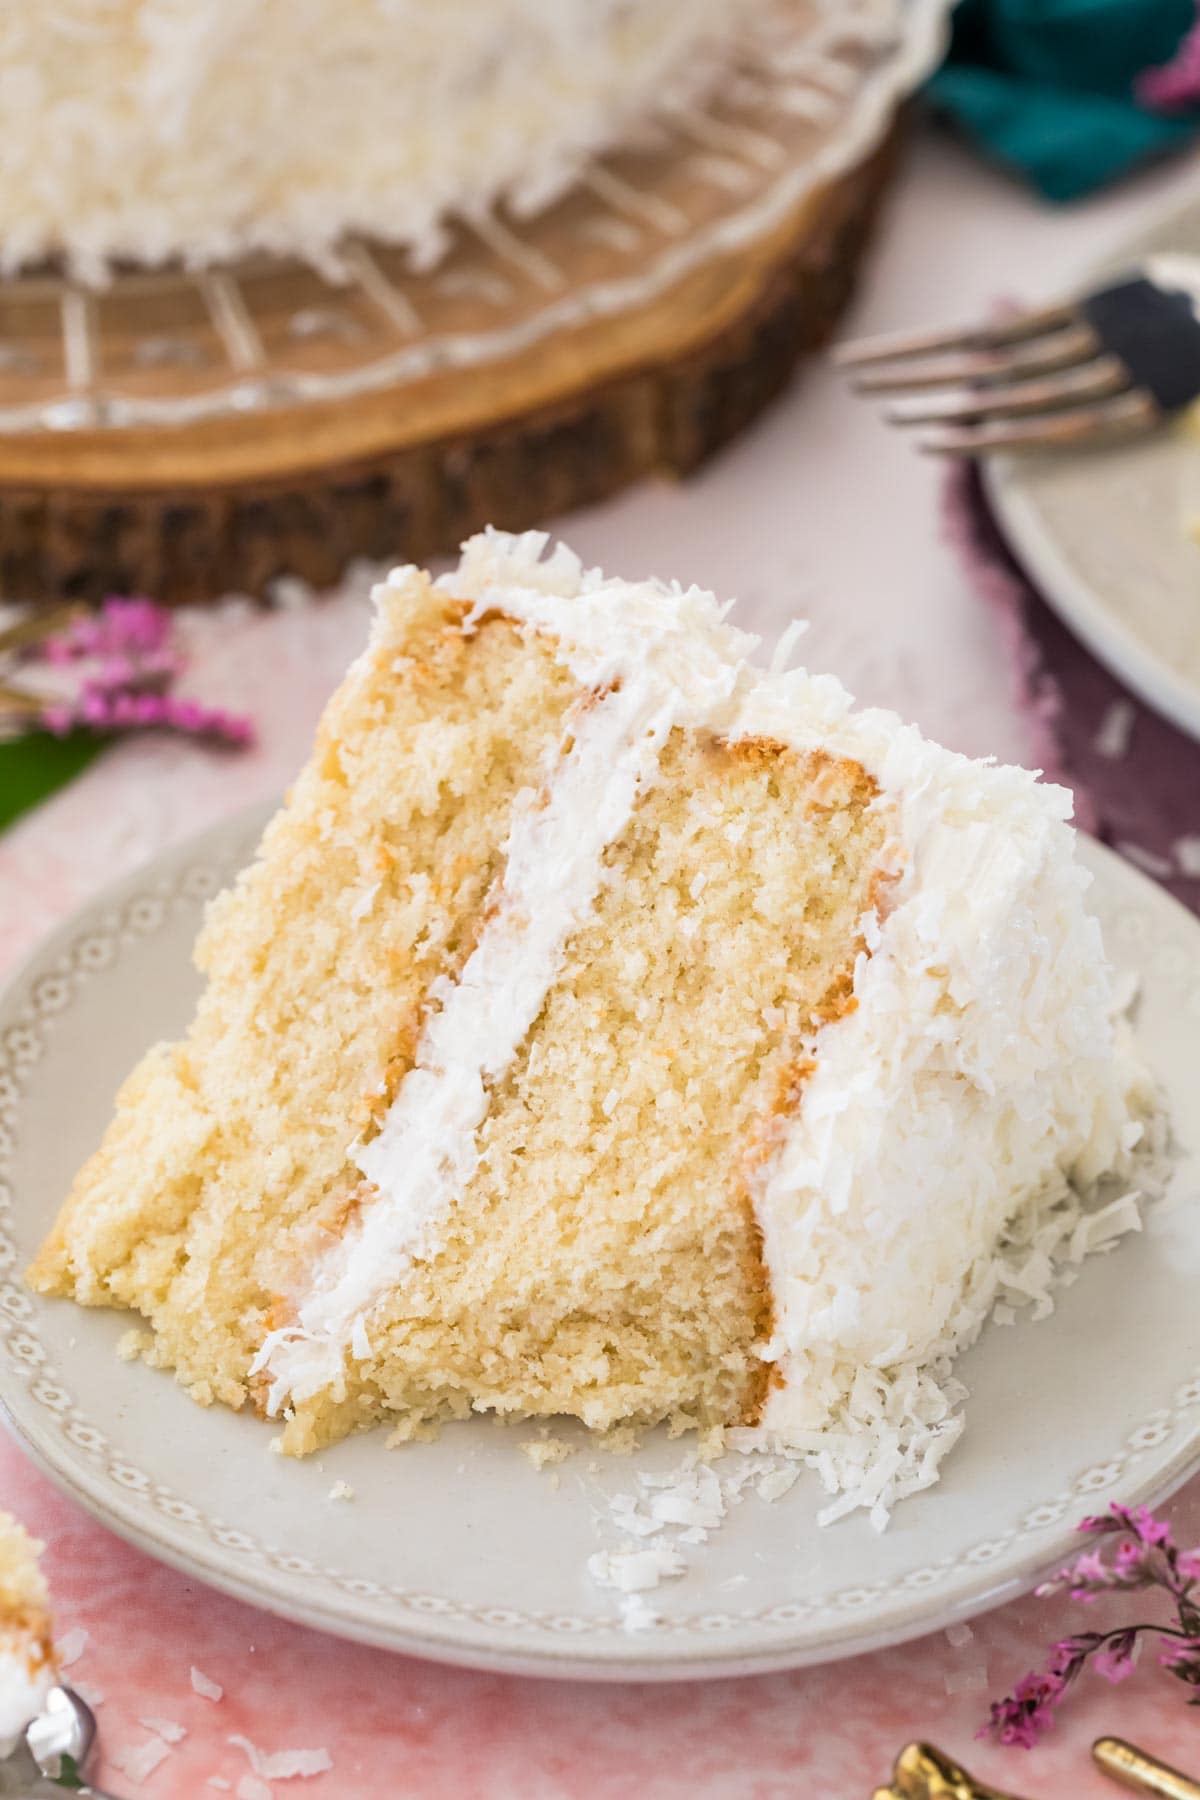
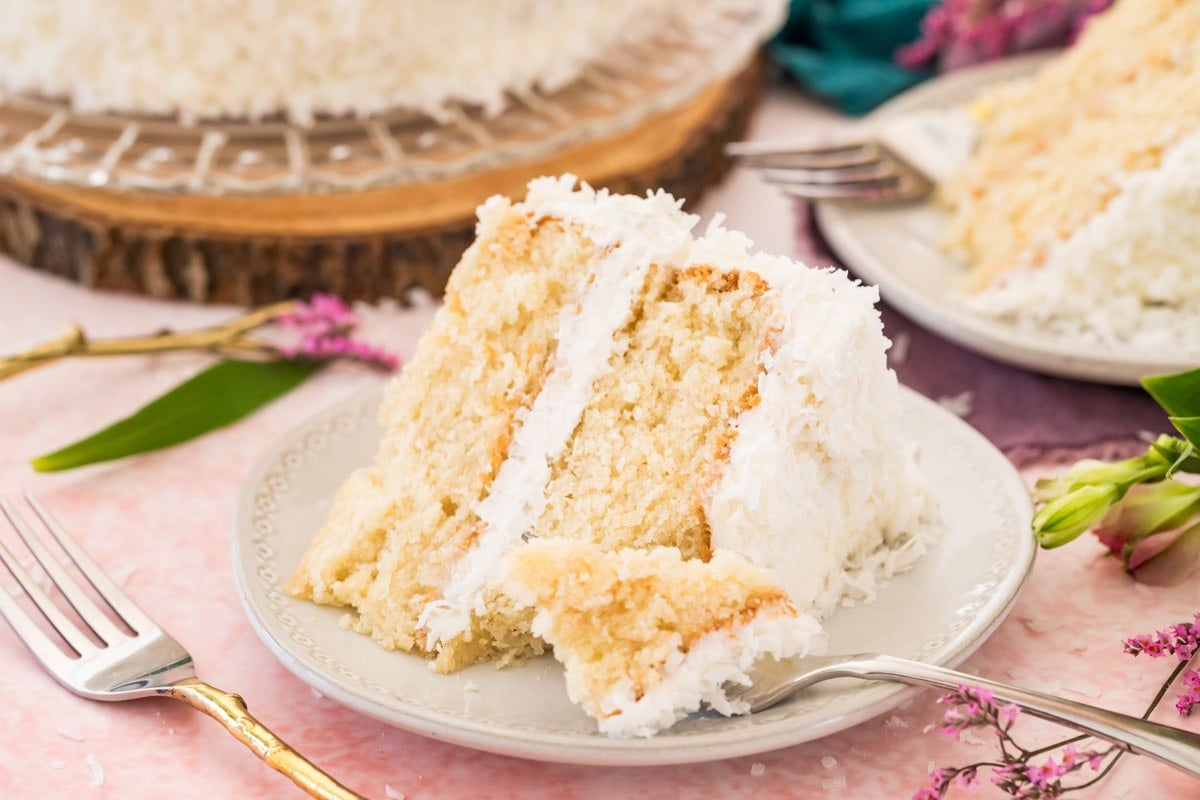
An old-fashioned coconut cake recipe, made with soft, fluffy cake layers, iced with an old-fashioned frosting, and covered in sweet shredded coconut. My recipe includes plenty of tips and tricks for flawless results and includes a how-to video tutorial.
Soft, Fluffy Coconut Cake
Those of you who follow the blog regularly (💗) are familiar with a lot of my grandmother’s recipes. Maybe you’ve tried her hot milk cake, potato candy, or apple dumplings, but her coconut cake with its unique, silky-smooth frosting was always one of my favorites. However, her cake layers always came from a box!
We don’t do box-mixes here, so, after years of testing cake recipes, I finally developed a super soft, super moist, sturdy and stable cake with a tender, melt-in-your-mouth crumb that works as the perfect base for today’s coconut cake.
It’s a stunning, but also simple cake, with tender, soft, fluffy layers and an old-fashioned frosting.
Why You’ll Love This Recipe
- Incredible texture. If you’ve ever struggled in the past with dense, dry, cornbread-esque cakes, you’re in for a pleasant surprise with this one. Not only is it carefully designed to be soft, tender, and so moist, I also include notes in the recipe and video to help prevent some classic mistakes bakers run into when making cakes from scratch.
- The BEST flavor. It’s tricky to balance the flavors of coconut cake when coconut has such a distinct flavor that can quickly become overwhelming. We lightly flavor the cake layers with a bit of coconut extract, then use coconut milk in the frosting and cover everything in shredded, sweetened coconut. The perfect balance.
- A proven recipe. I first shared this recipe in 2016 and it’s since not only been a favorite with my family but has received dozens of five star reviews ⭐️⭐️⭐️⭐️⭐️.
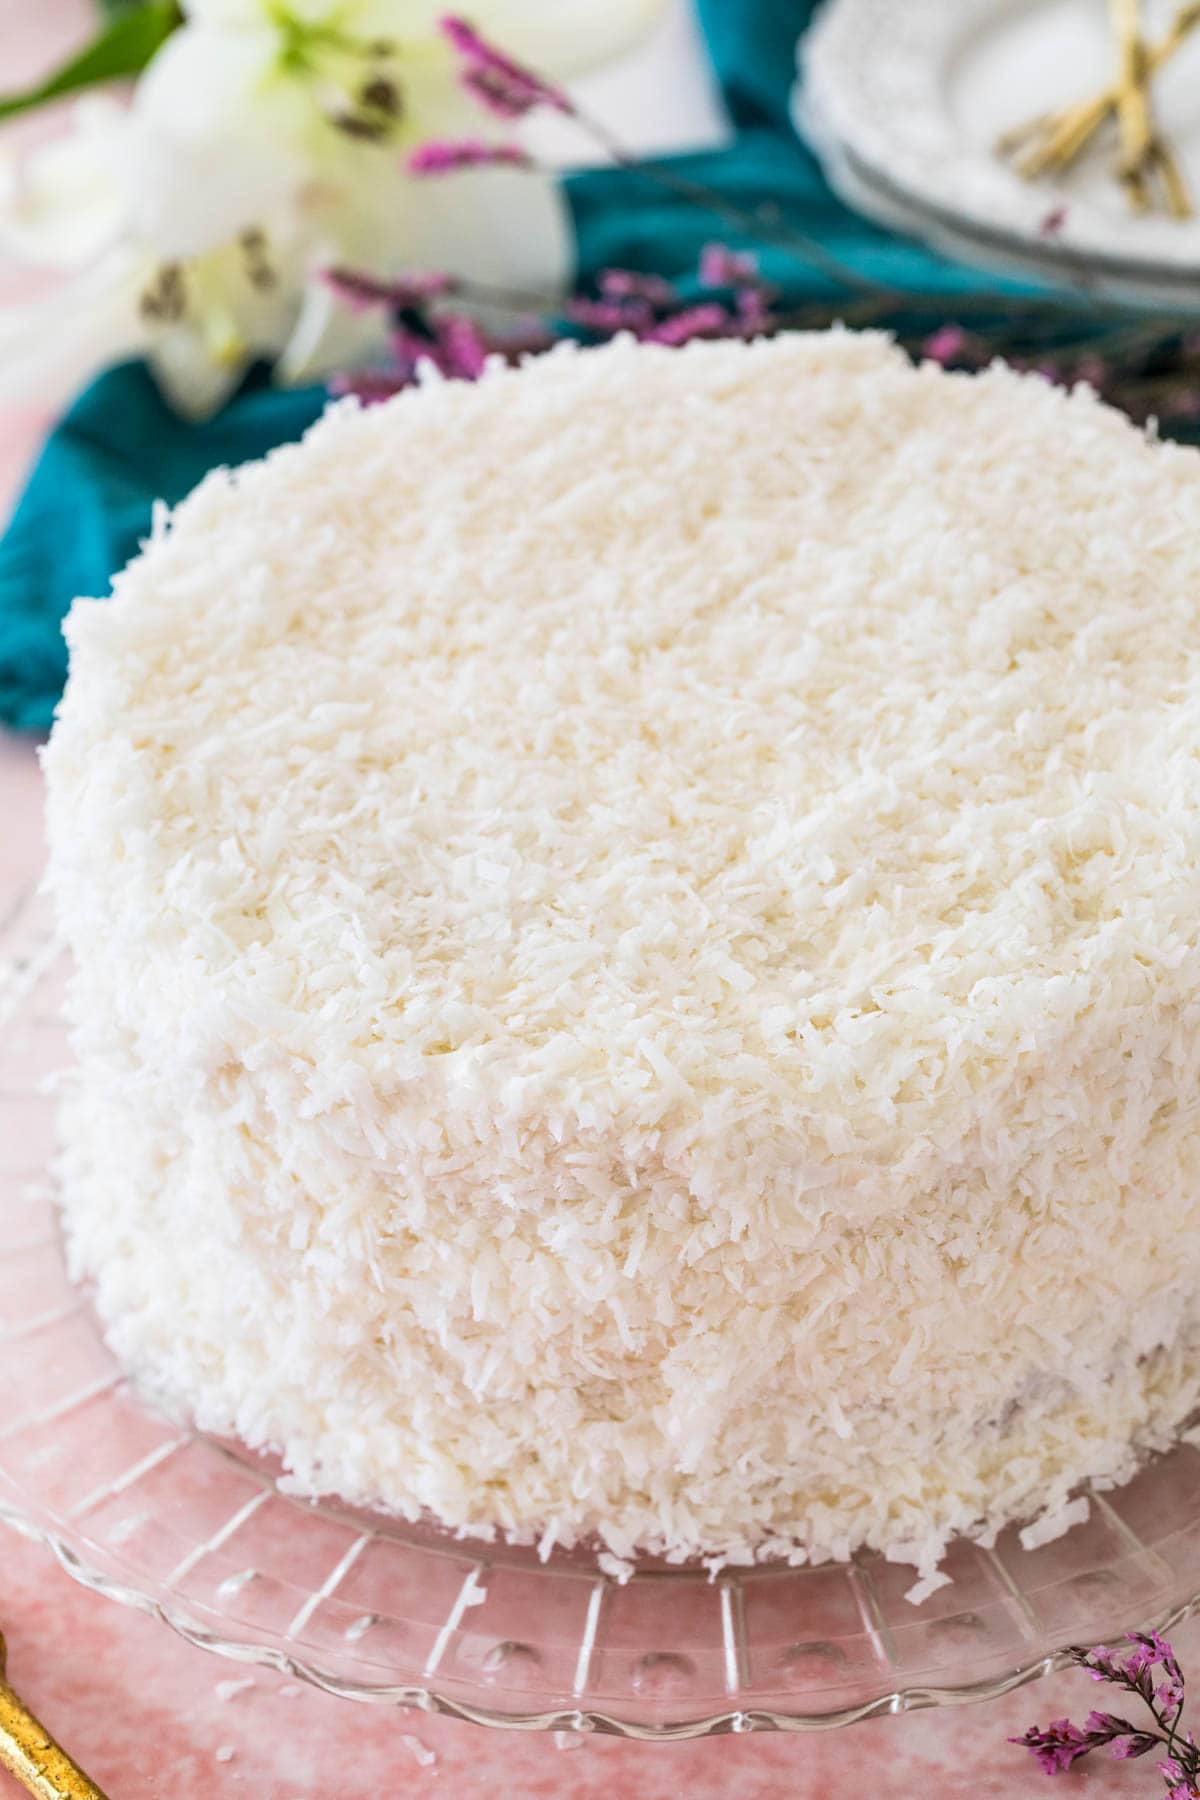
- It’s just cute! It looks like a giant, fluffy snowball and tastes like heaven. It’s a beautiful dessert to grace your Easter (or any holiday) dessert table.
While this cake is great any time of the year, something about it just feels like springtime to me. Maybe it’s the fresh coconut flavor, maybe my grandmother made it around Easter every year, but to me it belongs in the ranks of other spring recipes like my hummingbird cake, carrot cake, and carrot cupcakes (all great springtime dessert options!).
What You Need
For the Cake Layers
This is a moist fluffy cake comprised of two thick layers. I adapted it from my gender reveal cupcakes because I loved the fluffy crumb and taste of those. Here’s an overview of what goes into the cake layers.
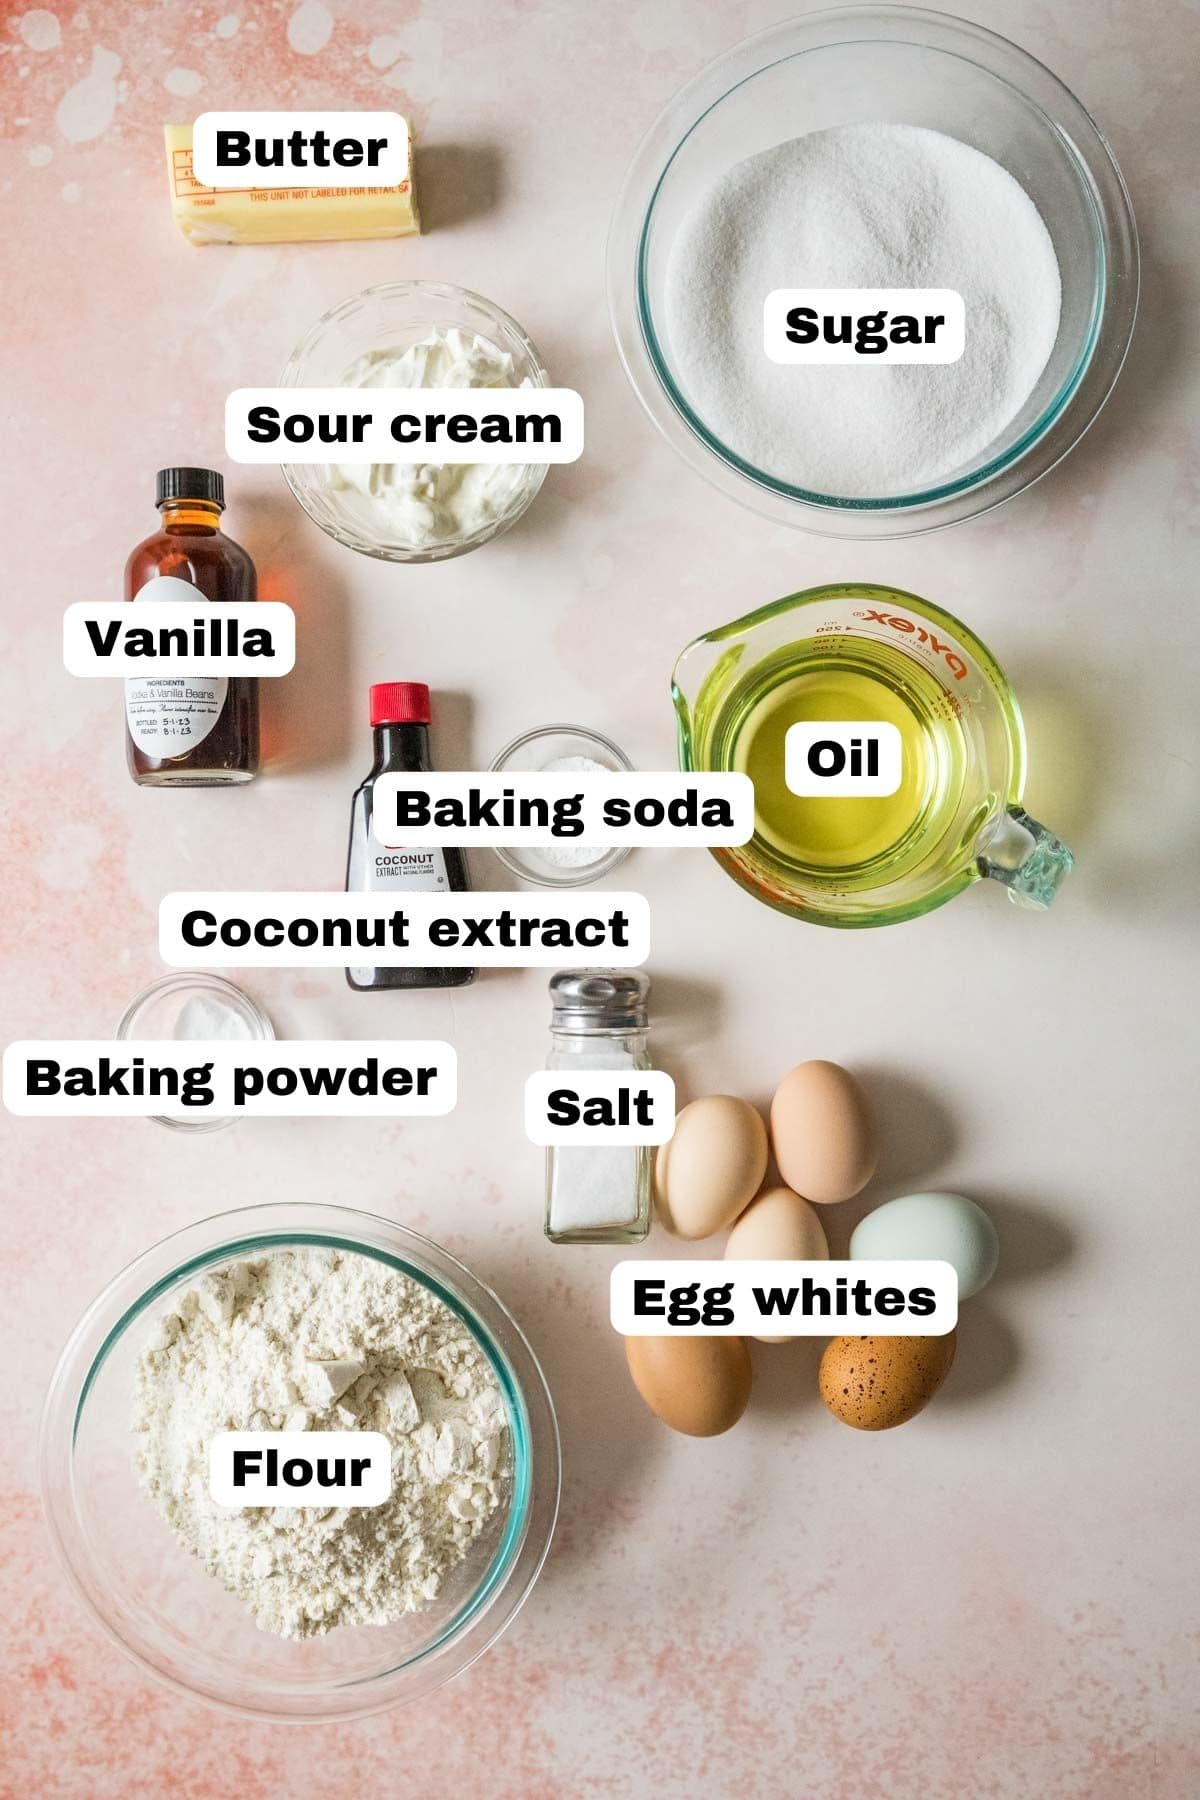
- Butter and oil. I took a page from my vanilla cake and chocolate cake and used a blend of butter and oil for best flavor and texture (the oil really helps keep the cake moist since it ideally is refrigerated).
- Flavor. Vanilla extract is essential for flavor. While my grandmother never used coconut extract in her cake, I like the lovely tropical flavor a splash of it adds to my coconut cake and recommend using it.
- Sour cream. Full-fat sour cream (or a plain, full-fat Greek yogurt) works best here. Sour cream adds a lovely depth of flavor in addition to moisture (and that’s why it’s such a key ingredient in my yellow cake, too!).
- Egg whites. You’ll need just the whites for this recipe, discard the yolks or save them to make creme brulee or chocolate pie. While this cake isn’t a white cake in color, it’s similar to that one in that it get much of its fluffy structure from whipped egg whites.
For the Frosting
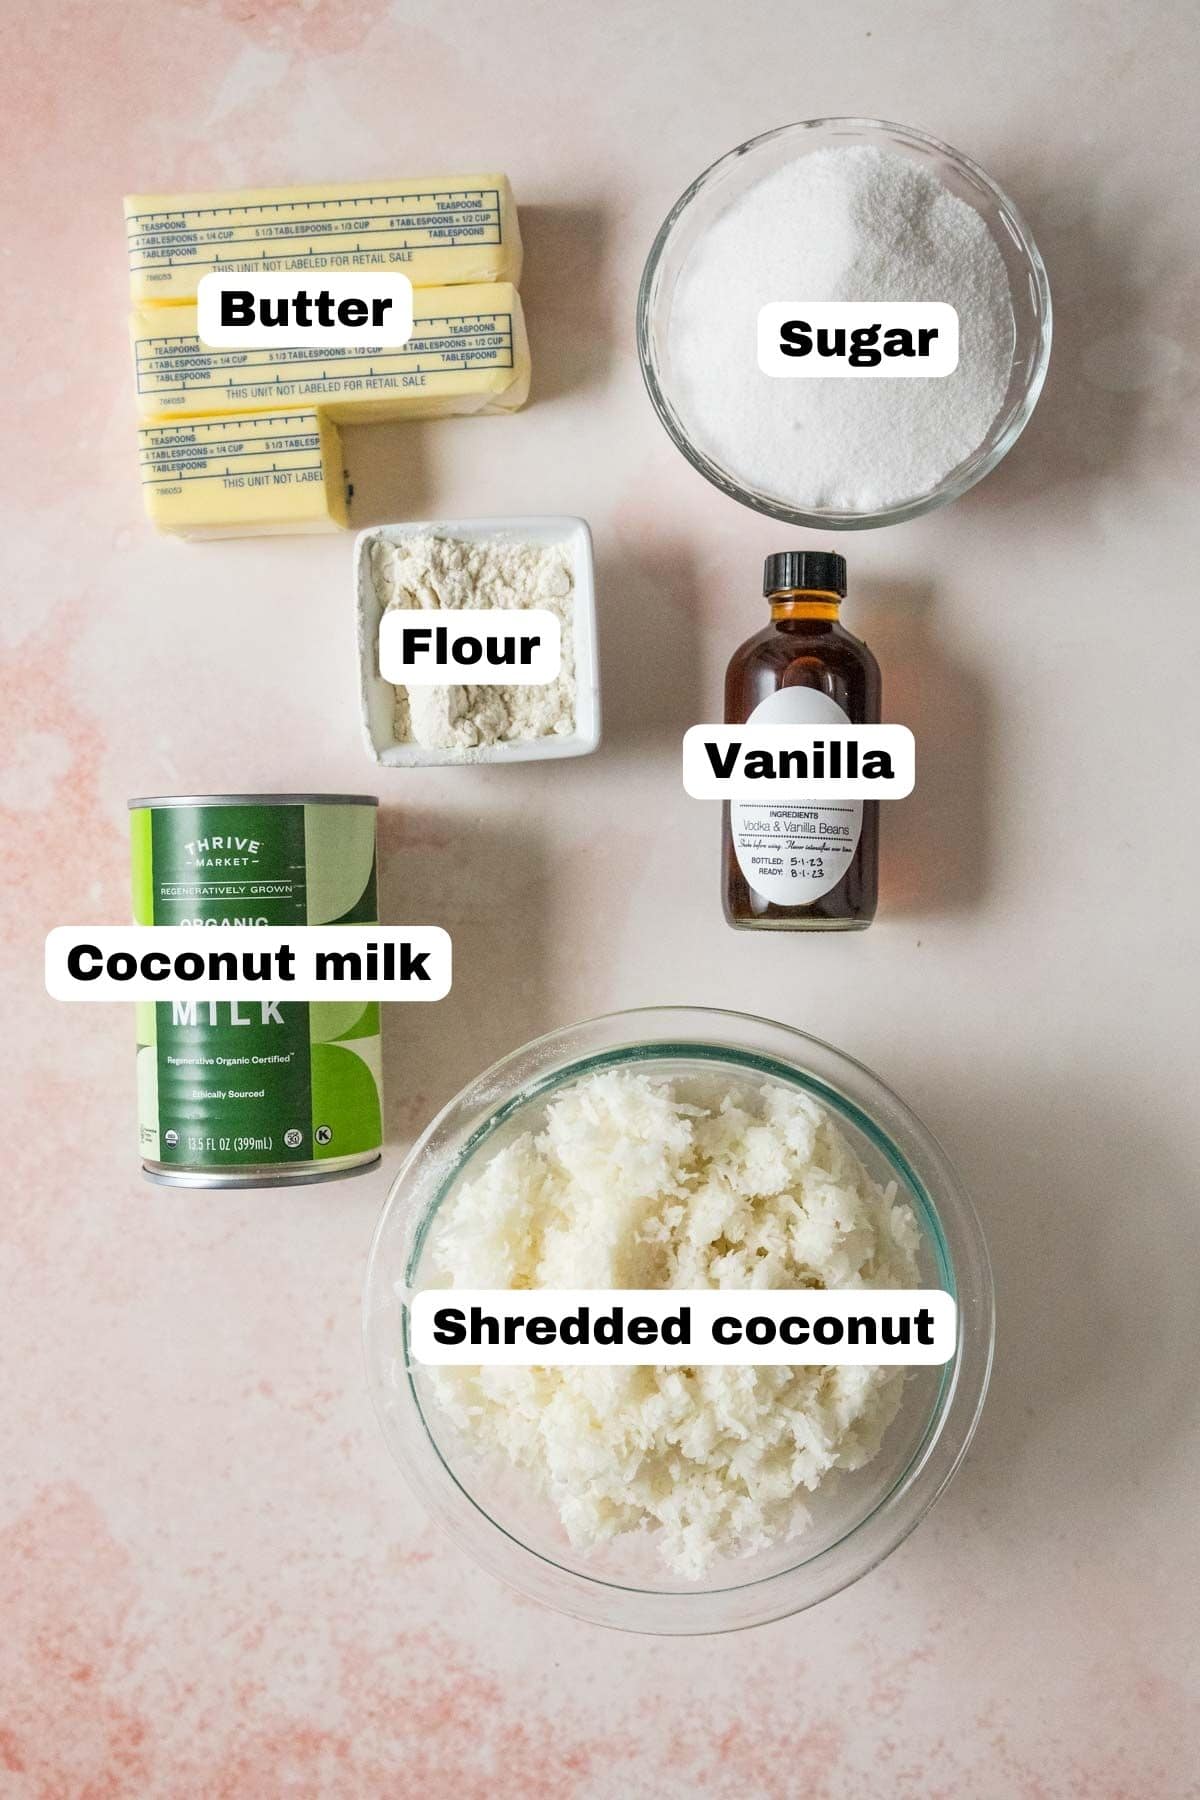
The frosting that I use (and my grandmother used) for coconut cake is a bit unique so I thought it deserved its own section. It uses flour and is quite similar to my ermine frosting in taste and texture, only there’s no need to make a roux!
- Butter. When I first shared this recipe I used a mix of butter and shortening (I think my grandmother only used Crisco). I don’t prefer to use this in my baking anymore so switched everything over to butter and have been very happy with the results. I use salted butter, but if you only have unsalted just add 1/4 teaspoon of salt into the frosting.
- Sugar. We’re using granulated sugar, not powdered sugar. Because of this, the frosting needs to be beaten for an extended amount of time (over 10 minutes!) so that the sugar can fully dissolve.
- Flour. Since raw flour was in the news a few years ago for being contaminated, I now recommend heat-treating any flour that isn’t baked into your baked good (like edible cookie dough). This can quickly be done in the microwave in under a minute and I explain how to in the recipe card.
- Coconut milk. You can substitute whole milk instead, but I prefer to stay in coconut-theme since this is a coconut cake, after all, and opt for coconut milk. Shake the can very well before opening!
- Extract. I use just vanilla extract and skip the coconut extract here. You could certainly add a small amount if you wanted, but I felt it overpowered the cake and made things too coconut-y
- Coconut. My grandmother always used frozen shredded coconut, but I can’t ever find that in my grocery store. I use sweetened shredded coconut. Since that can be a bit stringy, I’ll often pulse it in my food processor for several seconds before using it on my cake.
SAM’S TIP: If you have a stand mixer, use it to make the frosting! This recipe requires a minimum of 12 minutes of stirring to properly dissolve the sugar. It’s great to have a machine do the heavy lifting!
This is just an overview of the ingredients I used and why. For the full recipe please scroll down to the bottom of the post!
Helpful Tips When Making Coconut Cake
Coconut cake comes together pretty quickly and easily, but there are a few things that I wanted to cover in more detail before we begin:
- Tips for the egg whites: This recipe calls for egg whites that need to be whipped to stiff peaks. Set yourself up for success and use a stainless steel or glass bowl (avoid plastic or silicone) and make sure it is completely clean, dry, and grease free. Make sure not even a tiny drop of egg yolk gets in with the whites or they won’t reach stiff peaks. (these are tips I’ve also shared when whipping egg whites for macarons and meringues). I demonstrate how I do this in the video in the recipe card, if that is helpful.
- Shred the coconut (again). Sweetened shredded coconut can sometimes be a bit stringy, lending itself to a texture that many people just don’t love. To help with this, I sometimes like to chop the coconut even finer; a few blitzes in the food processor usually does the trick!
- Bring in the machines (for the frosting). As I mentioned above, the coconut cake frosting is made with granulated sugar, which must be dissolved for the frosting to have its signature, smooth consistency. This has never taken me less than 12 minutes. Save yourself a major arm workout and use your stand mixer if you have one. If you don’t have a stand mixer or an electric mixer, you may want to opt for one of my other frosting recipes (I give a few options below!).
- The frosting WILL become smooth. Just keep mixing and be patient! It takes time but will ultimately be silky smooth.
Frequently Asked Questions
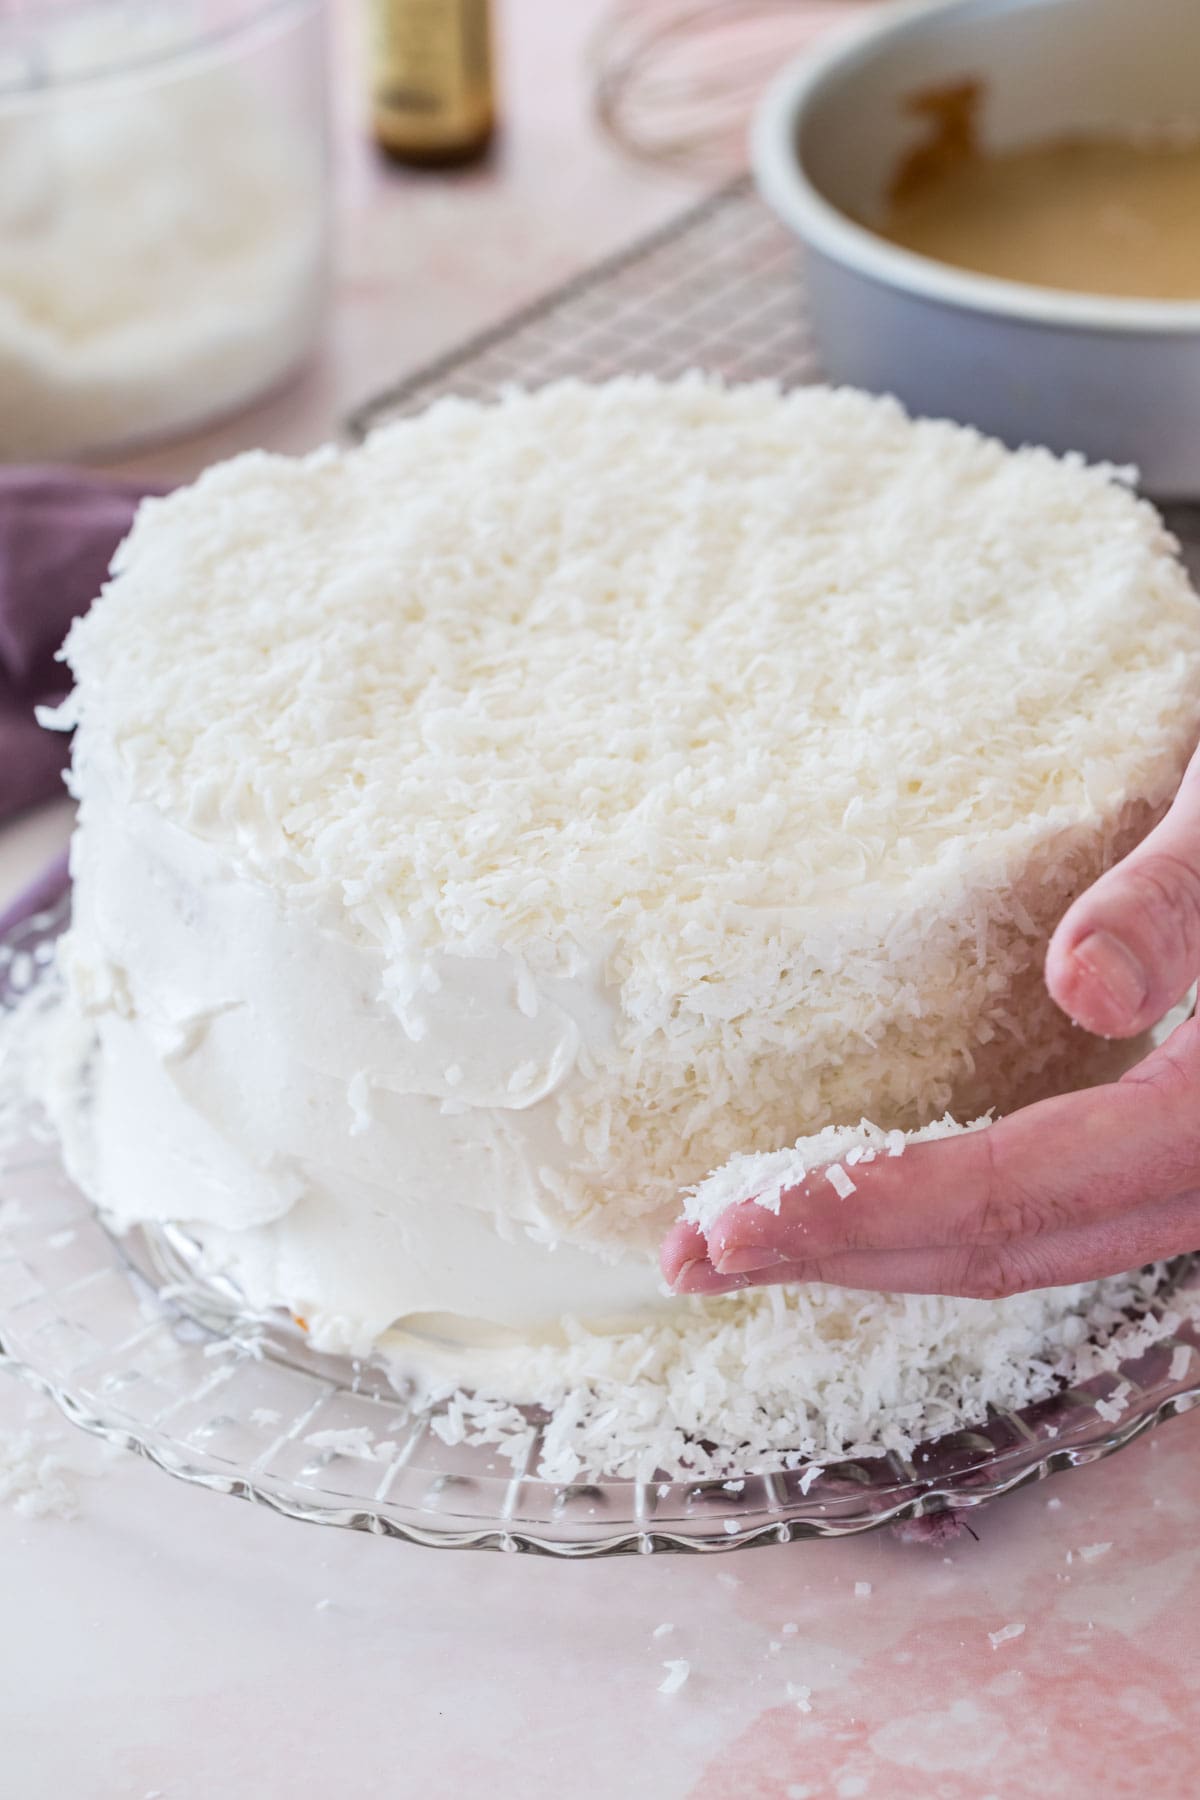
Use your hands and don’t be afraid of a mess. I scoop the coconut up the sides of the cake with my hands and gently press it into the frosting (make sure you apply the coconut immediately after applying the frosting so it sticks). Since coconut can sometimes be quite stringy, I find it helpful to cut it finer with a food processor before applying, which helps give an even coverage, too.
If you follow the instructions as written you shouldn’t run into any issues, but there are 2 main reasons homemade cakes (of any variety) sometimes turn out dry:
1) Over-measuring the flour. Never scoop your flour, which can pack it into the measuring cup! Instead, use a kitchen scale or stir the flour then spoon it into measuring cup and level off the excess flour.
2) Over-baking the cake. Bake both cake layers at the same time in the center rack and make sure our oven isn’t running hot (many ovens do! An oven thermometer is your best friend). Even 1 or 2 minutes too long in the oven can make the cake dry out.
Avoid these two classic pitfalls and you shouldn’t have any problem!
Yes! Cream cheese frosting would be an excellent alternative, or for a tropical fruit theme cover it with strawberry frosting or lemon frosting!
Enjoy!
Let’s bake together! Subscribe to my newsletter to be notified of all the newest recipes, and find my free recipe tutorials on YouTube 💜
Coconut Cake Recipe

Equipment
Ingredients
- 6 Tablespoons (85 g) unsalted butter, softened to room temperature
- ⅔ cup (157 ml) avocado, vegetable, or canola oil
- 2 cups (400 g) granulated sugar
- 1 cup (240 g) sour cream
- 2 teaspoons vanilla extract
- ½ teaspoon coconut extract
- 2 ¾ cup (344 g) all-purpose flour
- 1 teaspoon baking powder
- ½ teaspoon baking soda
- 1 teaspoon table salt
- 6 (190 g) large egg whites, room temperature
FROSTING (see alternatives note)
- 4 Tablespoons (31 g) all-purpose flour
- 1 ¼ cup (282 g) salted butter, softened (this is typically 2 ½ sticks of butter)
- 1 ½ cups (300 g) granulated sugar, (300g)
- 1 cup (236 ml) coconut milk, (235ml)
- ¾ teaspoon vanilla extract
- 3 cups (300 g) sweetened shredded coconut, divided
Instructions
- Preheat oven to 350F (175C) and grease and flour the sides of two 8” cake pans (or spray with baking spray) and line the bottom with rounds of parchment paper.
- Combine butter, oil, and sugar in the bowl of your stand mixer fitted with paddle attachment (or in a large bowl and use an electric mixer) and beat until ingredients are creamy and well-combined.6 Tablespoons (85 g) unsalted butter, ⅔ cup (157 ml) avocado, vegetable, or canola oil, 2 cups (400 g) granulated sugar
- Scrape down the sides and bottom of the bowl and then stir in sour cream, vanilla extract, and coconut extract.1 cup (240 g) sour cream, 2 teaspoons vanilla extract, ½ teaspoon coconut extract
- In a separate, medium-sized bowl, whisk together flour, baking powder, baking soda and salt.2 ¾ cup (344 g) all-purpose flour, 1 teaspoon baking powder, ½ teaspoon baking soda, 1 teaspoon table salt
- Using a spatula and stirring by hand, gradually, gently stir the dry ingredients into the wet (butter/sugar mixture) until completely combined. I'll usually add the dry ingredients in 3-4 parts.
- Scrape the sides and bottom of the bowl to ensure that all of your ingredients are well-combined. Set aside.
- Pour egg whites into a medium-large sized glass or stainless steel bowl that is completely clean, dry, and grease-free. Using an electric mixer, beat on high-speed until stiff peaks form (meaning that if you remove the beater from the mixture, the peak that forms holds its shape and does not fold over or dissolve back in on itself).6 (190 g) large egg whites
- Add the whipped egg whites to the batter and use a spatula to gently fold the egg whites into the batter. While you do not want to over-mix this batter, it is important that the egg whites are completely combined. Use a gentle hand and stir until you can’t see any streaks of egg whites in the batter.
- Divide batter evenly into prepared cake pans.
- Bake on 350F (175C) for 33-37 minutes or until a toothpick inserted in the center comes out mostly clean or with a few moist crumbs (no wet batter).
- Allow cakes to cool in pans for 10-15 minutes before running a knife around the edge to loosen the cakes and carefully inverting onto a cooling rack to cool completely before frosting.
Frosting
- Heat treat the flour: Place flour in a microwave-safe dish and heat for 30 seconds. Stir, then use an instant-read thermometer to check the temperature (must exceed 160F (71C)). If not warm enough, continue to heat in 10-second intervals until temperature is reached. Allow flour to cool completely before using (if it is lumpy, run it through a sifter before using). This "heat-treats" the flour in case it was contaminated. Set aside.4 Tablespoons (31 g) all-purpose flour
- Combine butter and sugar in the bowl of a stand mixer fitted with a paddle attachment. Beat on medium-speed until creamy and well-combined.1 ¼ cup (282 g) salted butter, 1 ½ cups (300 g) granulated sugar
- Add flour, one tablespoon at a time, beating on medium speed for 15 seconds after each addition. Scrape down sides and bottom of bowl and beat again for 20 seconds.
- Add coconut milk and vanilla extract and stir to combine1 cup (236 ml) coconut milk, ¾ teaspoon vanilla extract
- Turn mixer speed up to medium-high and beat for 6 minutes. Scrape down the sides and bottom of the bowl and beat again at least another 6 minutes, until frosting is smooth.
- Test the frosting by tasting or rubbing between your fingers, it should not be gritty or grainy at all. If it still is, carefully scrape the sides and bottom of your mixing bowl again and stir again on high speed until no longer grainy.
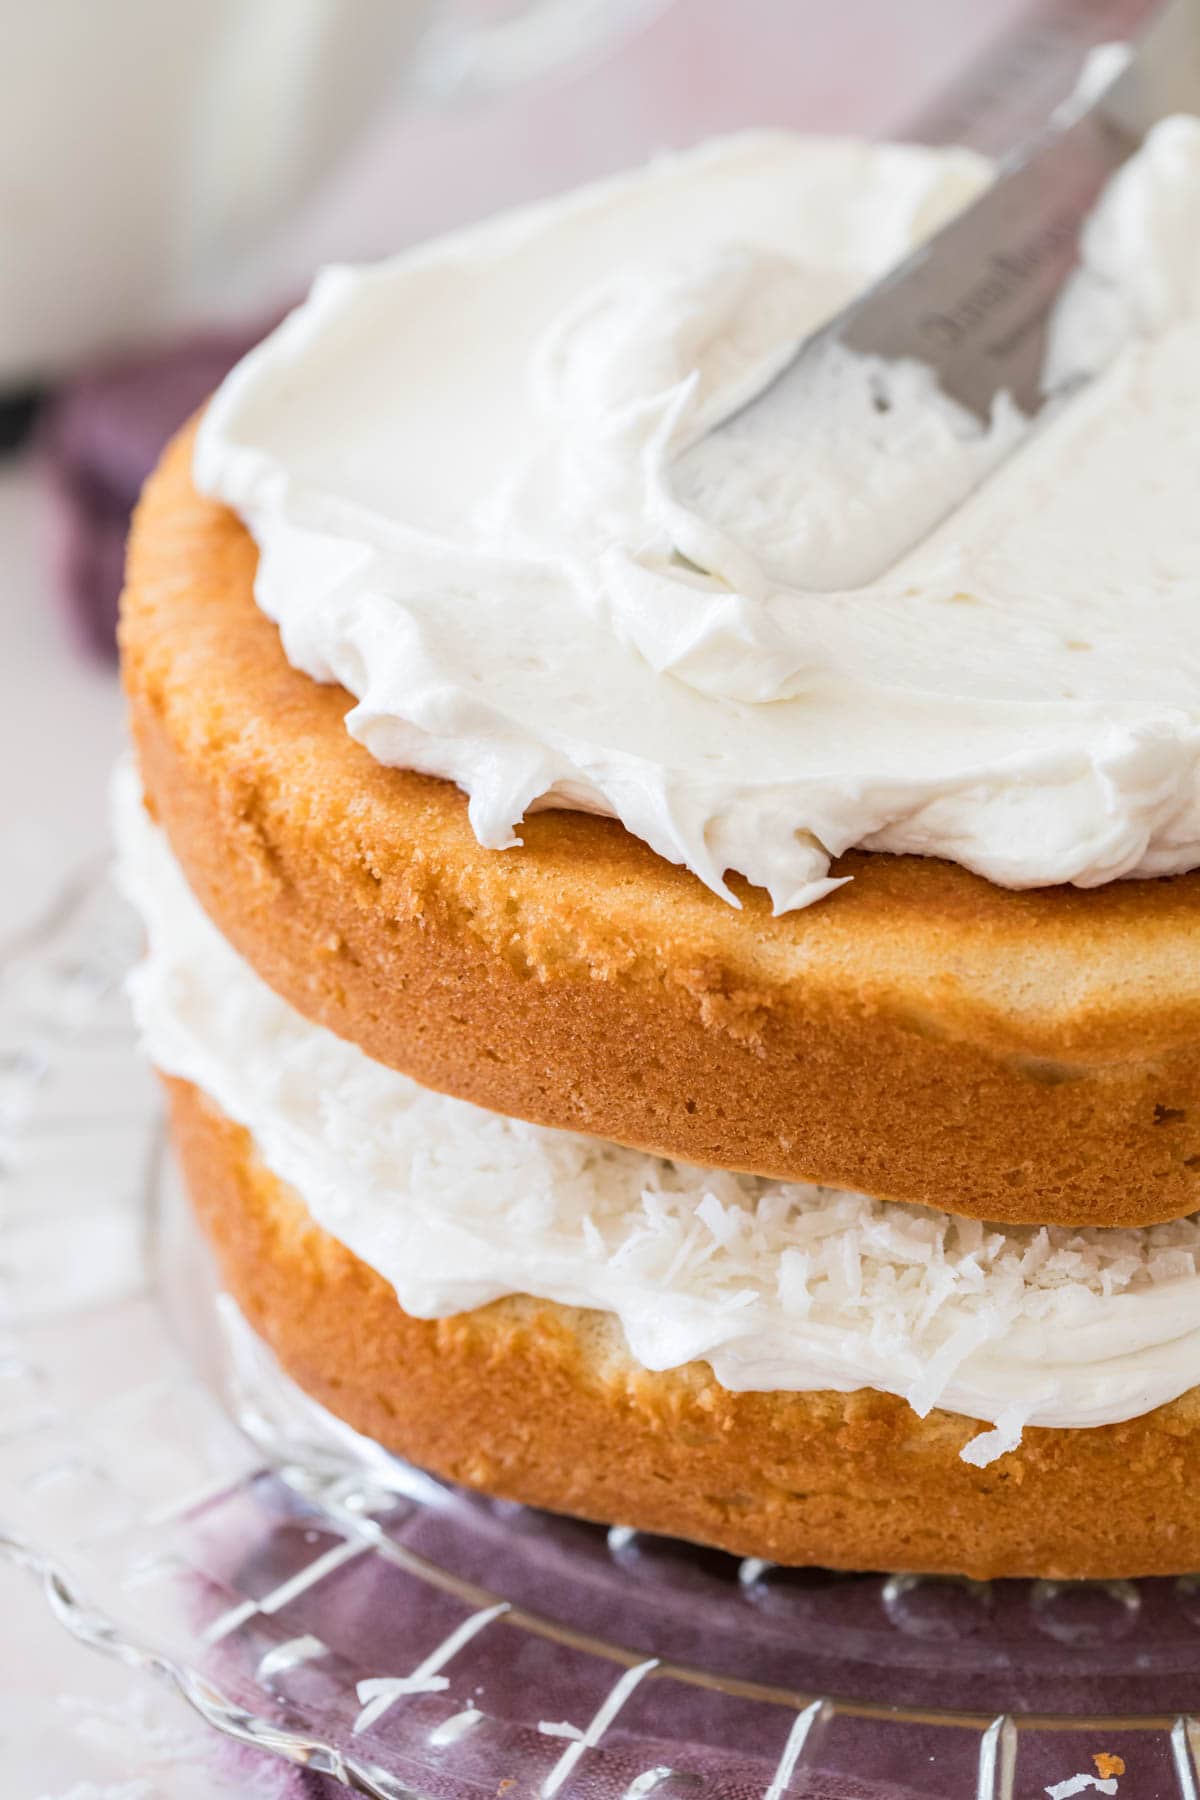
- Once your cakes are cool, ice them by placing one layer on your serving dish and applying an even layer of frosting to the top. Sprinkle liberally with some of the shredded coconut.3 cups (300 g) sweetened shredded coconut, divided
- Place your second layer on top of the first and apply an even layer of frosting around the top and sides of the cake. Sprinkle remaining coconut over the top of the cake, and then use your hands to press coconut all around the sides.
Notes
Frosting: Butter vs Shortening
In the original version of this recipe (and the one I recorded in the video) I originally used 3/4 cup of butter and 9 Tablespoons of vegetable shortening (Crisco). I don’t prefer to use shortening in my baking any longer so have tested and updated the recipe to use all butter. Feel free to use whichever you prefer.Frosting – Stand Mixer Note
If you have a stand mixer, definitely use it for this recipe as the frosting requires a long period of mixing. It *can* be done with an electric hand mixer, but may take longer than indicated and will be an arm workout!Frosting alternatives
For me, coconut cake just wouldn’t be coconut cake without this old-fashioned frosting. However, I know it’s not for everyone. This cake could also be covered with any of these frostings below, just make sure to cover with coconut shavings!- Use a double batch of the coconut cream cheese frosting listed in my coconut cupcakes.
- Cream Cheese Frosting (a splash of coconut extract would be a good addition for coconut flavor)
- Vanilla Frosting
- Swiss Meringue Buttercream
- Chocolate Frosting (of course the cake won’t have that pristine white appearance outside, but I love the chocolate/coconut pairing!).
Coconut
The shreds of coconut are often a bit too long for my liking so I’ll typically pulse them in my food processor for a few seconds to make the shreds finer. My grandmother always used 18 oz of frozen shredded coconut for the outside of the cake, but that’s not easily accessible near me any longer. Just thaw it first before using.What To Do With Those Leftover Egg Yolks?
Here are some great recipes that use a lot of egg yolks!Storing
Store in an airtight container in the refrigerator for up to 5 days. This cake may also be tightly wrapped and frozen for several months.Gluten-free note
I have not tried it myself, but others have successfully made this recipe with Cup4Cup gluten-free flour.Nutrition
Nutrition information is automatically calculated, so should only be used as an approximation.
Like this? Leave a comment below!
I originally published this recipe in April of 2016. In 2019 I made some improvements to the cake recipe and in 2024 updated the post to be more helpful.


Dad and husband loved it, will be making it for father’s day for both of them!
I wanted to love this recipe so badly! But it just didn’t work for me- I’m guessing that’s me and not the recipe because I have never had a recipe fail from this website! The cake itself was delicious and perfect. But the frosting was just …. Odd. The flavor was so good but the texture was not good at all. It was greasy.. and just never got fluffy, in spite of me beating it for probably 15+ minutes. I’d love to know what I did wrong, but I doubt i will try this recipe again to find out. Only posting a review in case anyone else has results like mine- you aren’t alone 😅
Oh no! I’m sorry to hear this one wasn’t a hit, Laurel! This frosting isn’t supposed to get fluffy. It’s really more like a silky smooth frosting. It may have been slightly over-beaten. 🙁
Sam can you use the whole egg in the recipe instead of just the whites
Hi Nancy! You need to whip the egg whites for the structure of this cake. It won’t work if you use whole eggs. 🙁
Hi Sam, is it okay to use 9 inch pans instead of 8?
Thank you!
Andrea
Hi Andrea! 9 inch pans will work your bake time will just be reduced. 🙂
Hi Sam, I’m wondering if you’ve ever made your favorite cream cheese frosting and used coconut milk as part of the ingredients to create a combo cream cheese/coconut frosting?
Hi Andrea! I actually have a coconut cupcake recipe that has a coconut frosting. I would probably double that recipe for a cake though. 🙂
Hi Sam! I’m planning to make this for my son‘s birthday party, and I’m wondering if I make the cakes a couple days in advance would they be OK to freeze overnight for two days in an airtight container or tight wrapping saran wrap and foil?
Hi Sarah! If you are just making them 2 days in advance I would probably just let the cakes cool completely and then wrap in plastic wrap and keep at room temperature. You could freeze them if you’d like as well. You would need to wrap them tightly for freezing as well.
do you think I could successfully freeze slices of this cake to eat another time?
Absolutely! Just make sure to wrap them well and store in a freezer-safe container.
I like coconut cake
I do not know where I am going wrong with this icing. Everything is fine with the creamed butter and granulated sugar. I used Thai Kitchen brand unsweetened coconut milk (just water and coconut) and it is at room temperature. Every time after I add the coconut milk and start the mixer, it starts looking like cheese curds, after 6 mins it looks like greasy cheese curds, after 12 mins it’s smoother but still greasy. I tossed out the first batch and started over, and it did the same thing after adding the coconut milk the second time. Has anyone else experienced this problem? I watched your video and my icing did not look like yours. I’m not sure what I am doing wrong.
Hi Christie! That’s quite odd. I just want to check that you are allowing your heat treated flour to cool completely before adding it to the butter and sugar?
Hi Sam, I think I figured it out! Yes, I did let the flour cool after heat treating. However, I think it was a combination of 2 things. 1st – I don’t think I shook the coconut milk up enough and got more water than the actual coconut milk part. 2nd – I needed to mix it longer than 12 mins. I attempted it again and shook the coconut milk really well, but it started to separate again after I added the coconut milk, but I kept mixing. After 6 mins I scraped down the sides and it went probably another 10 mins but it finally solidified & was delicious. My mom doesn’t even like coconut cake and she really enjoyed it, especially the icing!
Oh yay! I’m glad it turned out. 🙂
Can I use cake flour instead of all purpose flour?
Hi Mary! I think it could work if you substitute it properly. 🙂
Hi Sam,
I recently made this cake and it was delicious. However, I wanted to point out that the butter measurements for the frosting are incorrect. I ended up buying frosting, which goes against what I do, but timing was of the essence. In the recipe you have 1-1/4 C. of butter, or 2-1/2 sticks. When I watched the video you say 3/4 C or 1-1/2 sticks of butter. This makes a huge difference. I haven’t had the time to make this again, but definitely will, as I love coconut cake. I wanted to let you know about the discrepancy.
Hi Bev! I’m glad you enjoyed the cake! In the original version of this recipe (and the one I recorded in the video) I originally used ¾ cup of butter and 9 Tablespoons of vegetable shortening (Crisco). I don’t prefer to use shortening in my baking any longer so have tested and updated the recipe to use all butter. Feel free to use whichever you prefer. I hope that helps clear it up. 🙂
Hi Sam! I was wondering if I could use food coloring gel in the frosting?
Hi Gina! That will work fine. 🙂
Thanks! I was also wondering if I could make cupcakes instead of cake?
Hi Gina! I actually have a coconut cupcake you can use. 🙂
Hi Sam. I’m wondering if I can use Coconut oil instead of Canola?
Hi Lisa! I think it could work, but the cake may be a bit more dense.
Hi Sam! I absolutely love your coconut cupcakes! I was hoping to use the coconut cake recipe because I will be making the cake and cupcakes for a baby shower. I’m not sure how long to bake the coconut cake cupcakes?
While I haven’t personally done it, I would guess they would take around 17-19 minutes just like the cupcakes. I may check them a little sooner and just be sure to keep an eye on them. 🙂
Thank you, made this cake for my mums 81st birthday, used a mix of desiccated coconut & blended down coconut flakes to give a more textured look and taste, it was truly amazing, the best sponge cake I have made, will definitely be making again 😋
I’m so glad it was such a hit, Nicky! 🙂
hello there! can i reduce the sugar in the cake? thanks!
Hi Toni! I haven’t personally done it so I can’t say for sure how to do it. 🙁
Hi, I’m planning on making this cake for my mum’s birthday but can’t get shredded coconut anywhere, will dedicated coconut be ok?
Hi Nicky! Desiccated coconut will work. That’s actually what my grandmother used to use when making this cake. 🙂