
Whoopie Pies (AKA “Gobs”)
This post may contain affiliate links. As an Amazon Associate I earn from qualifying purchases. Please read my disclosure policy.

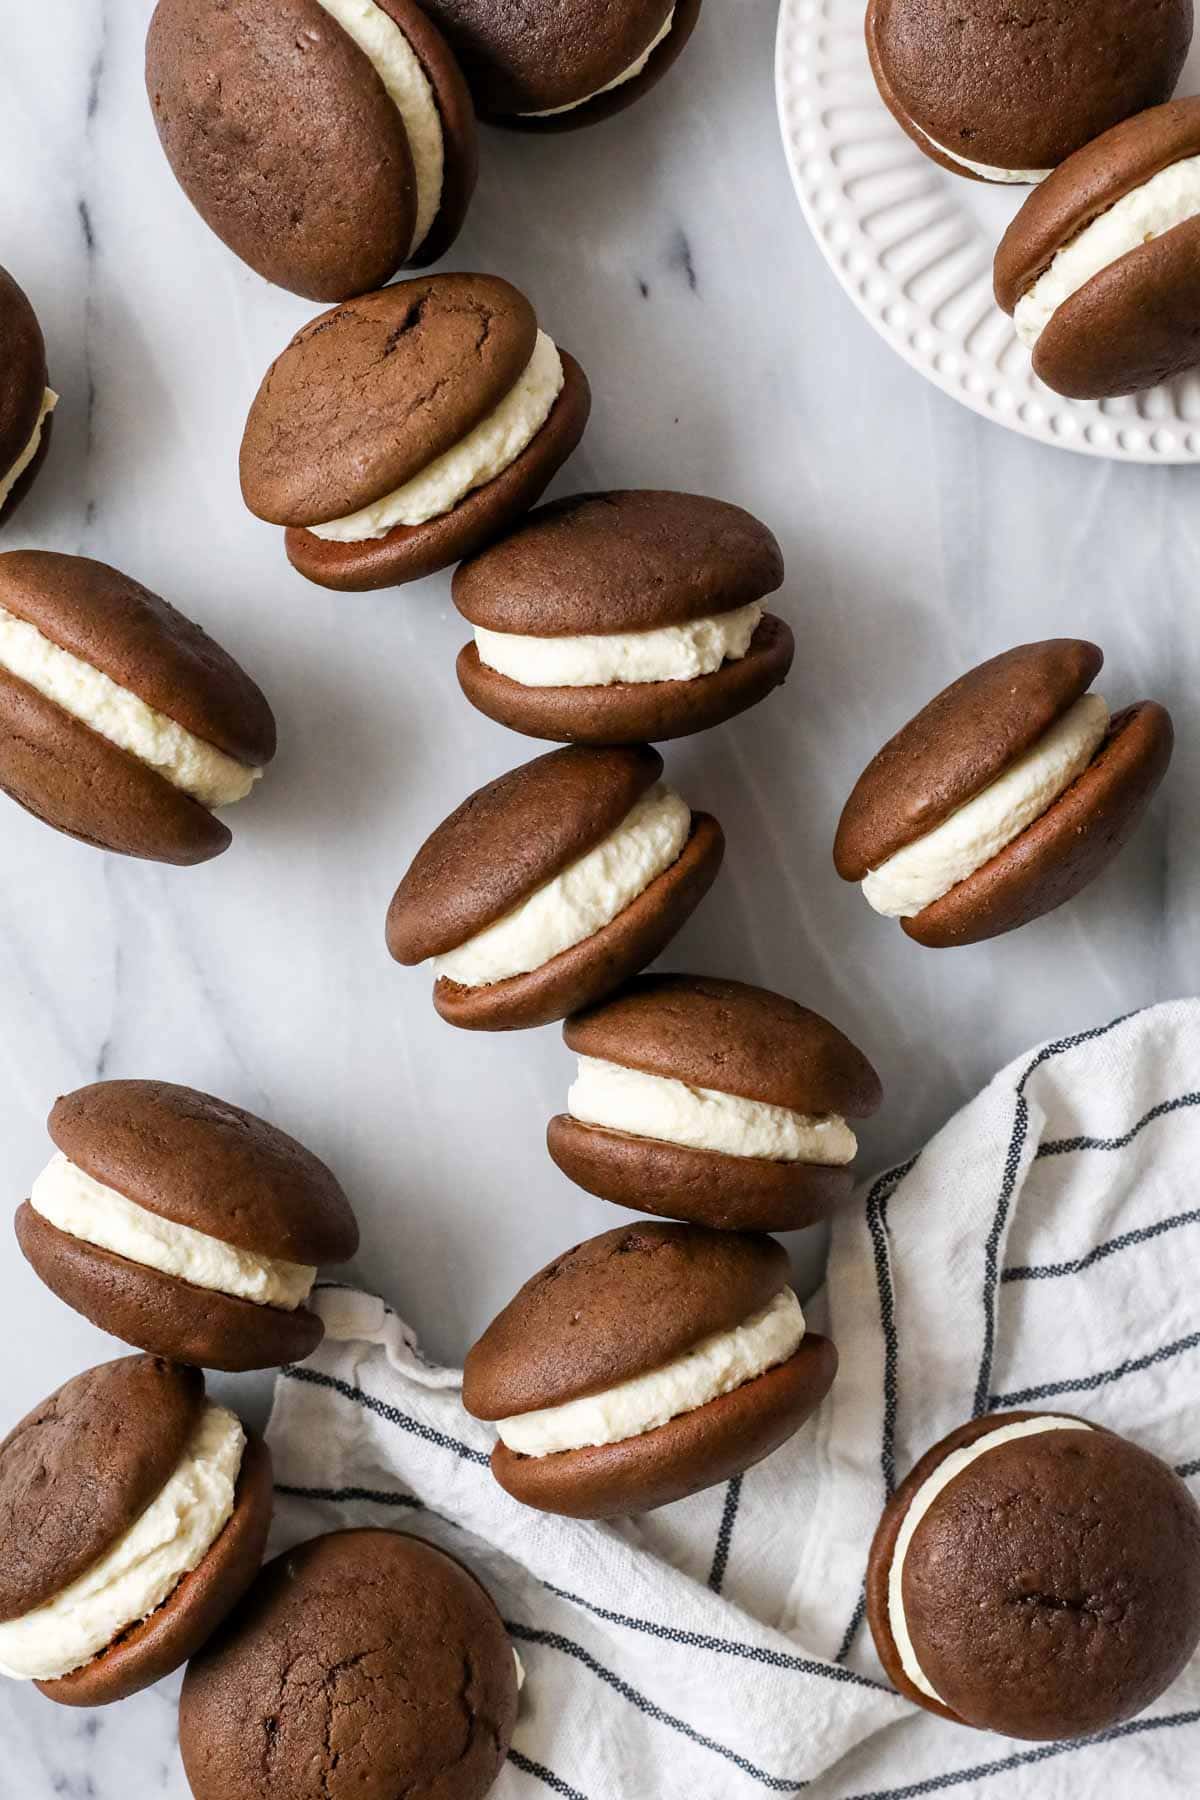
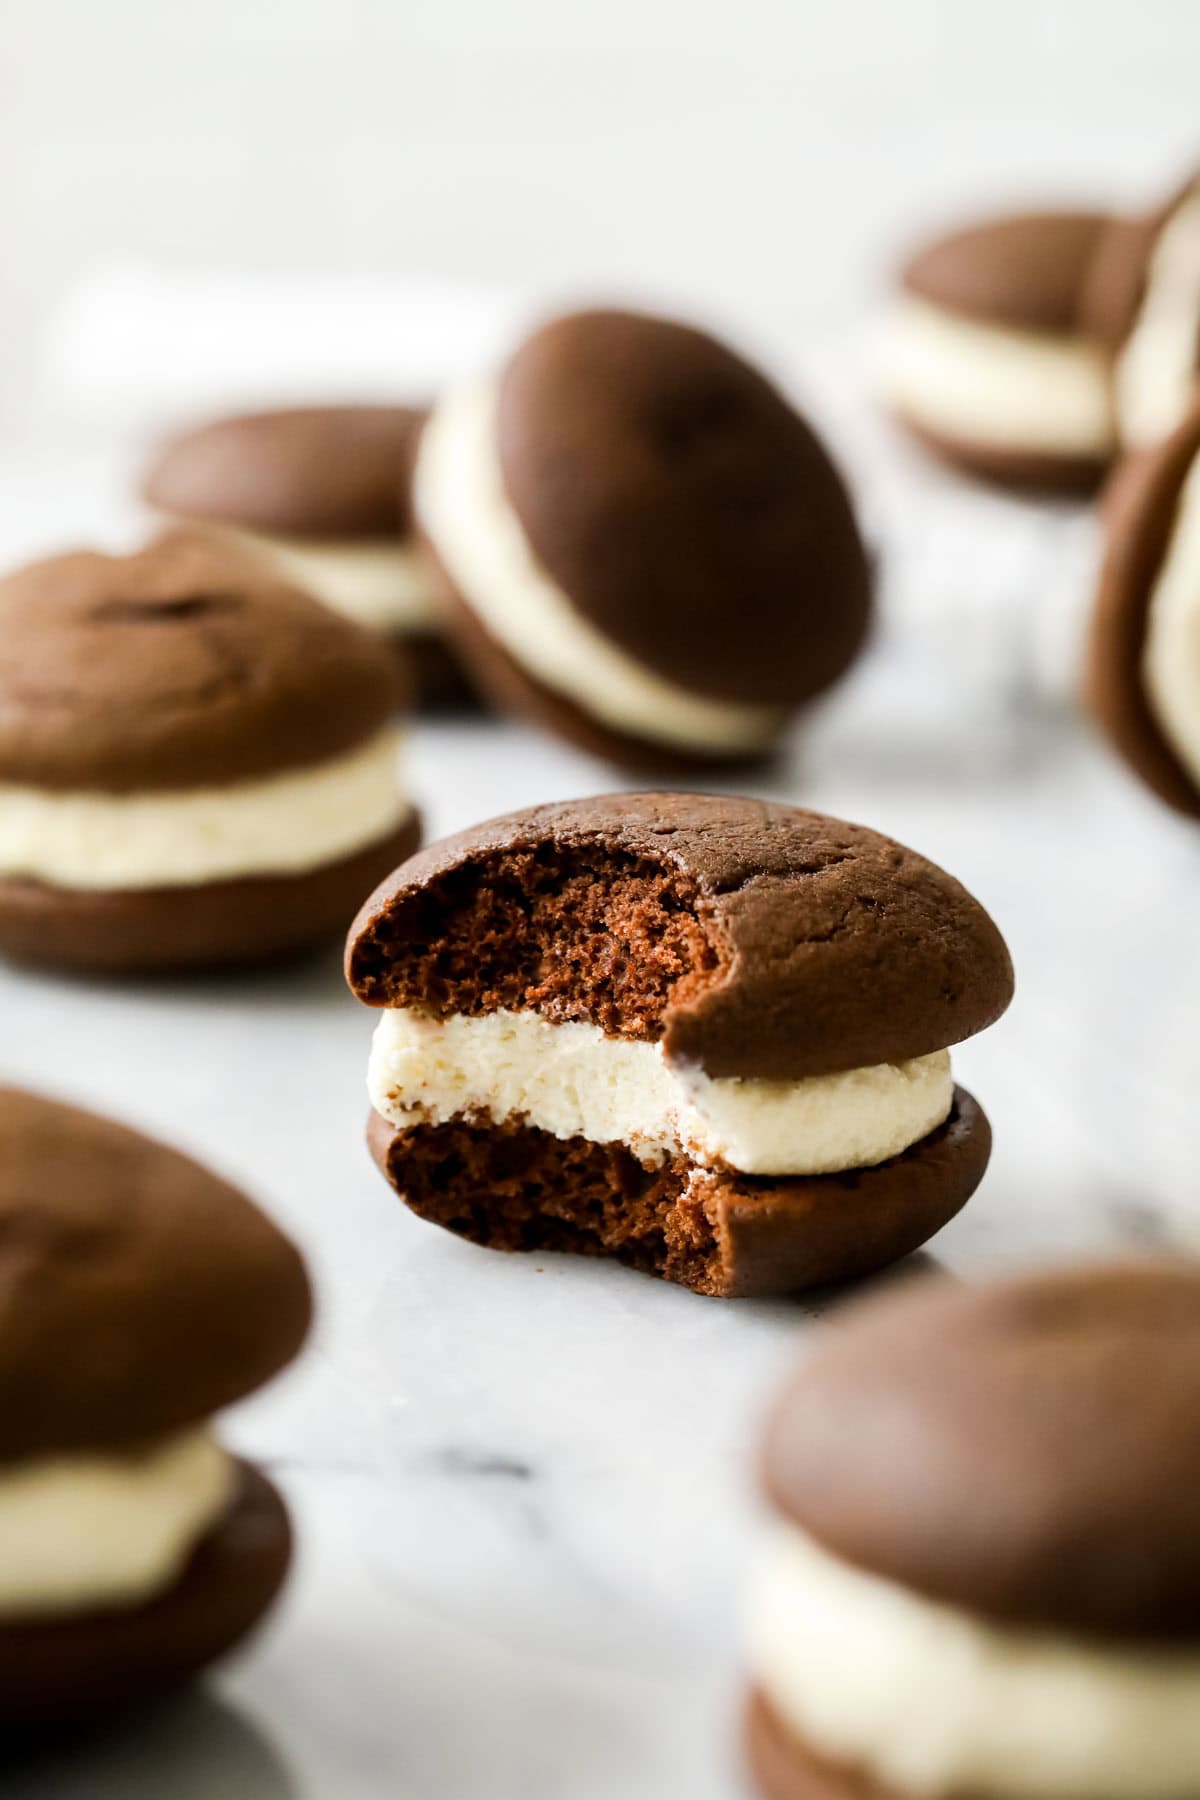
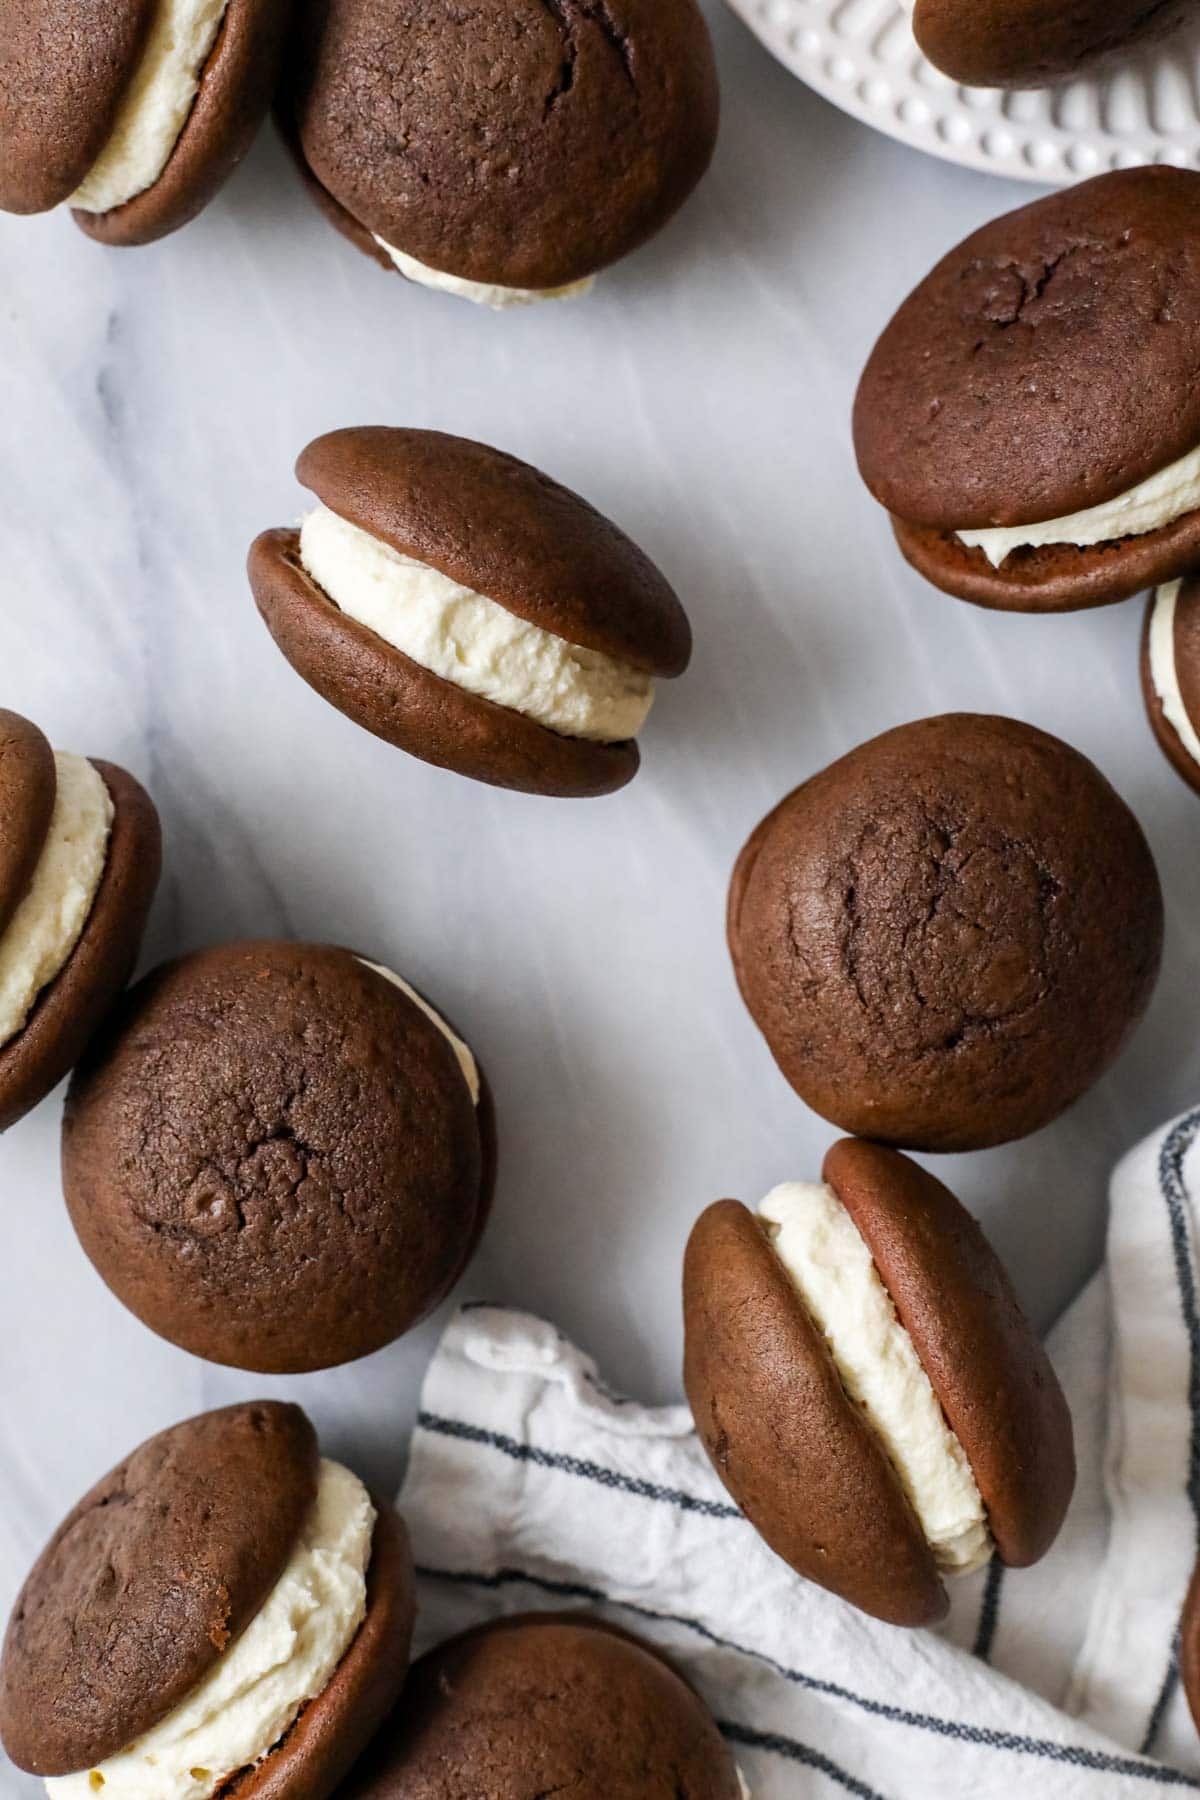
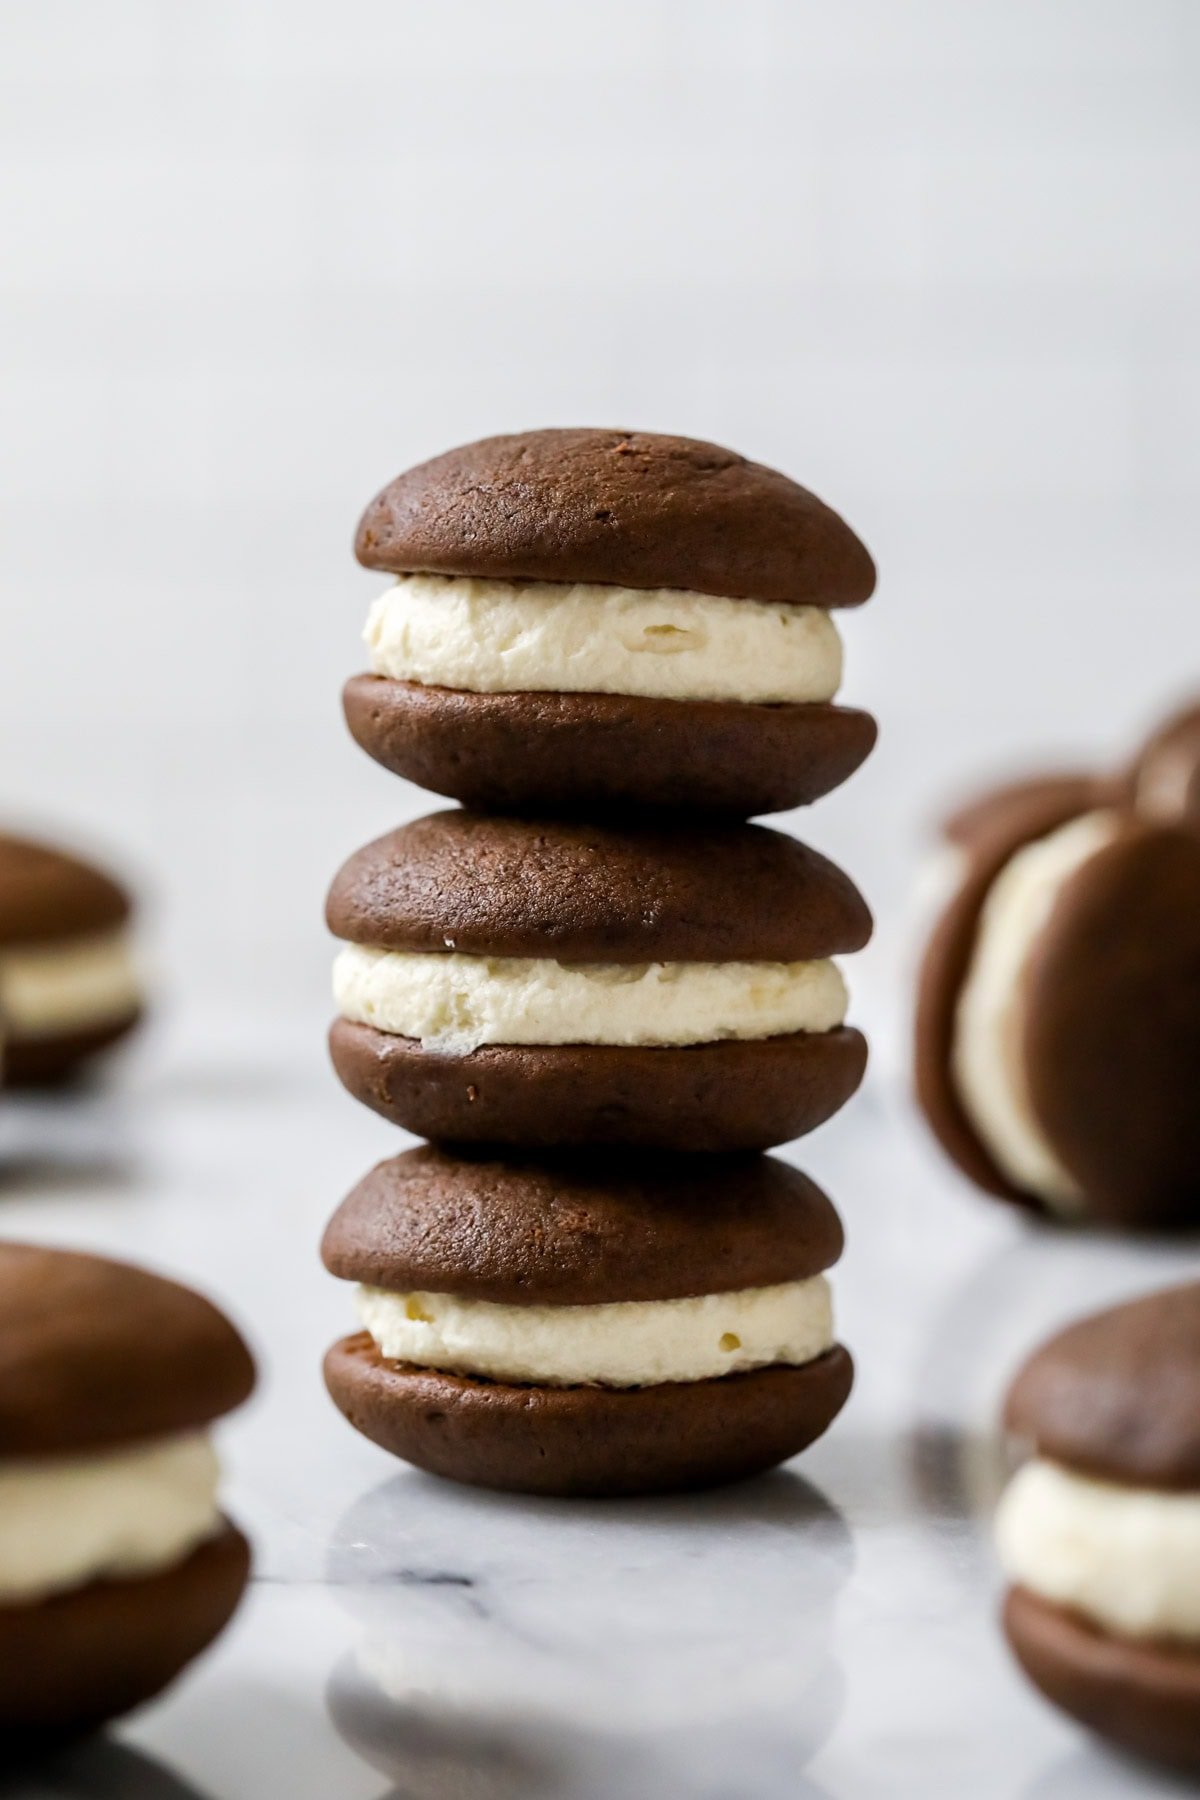
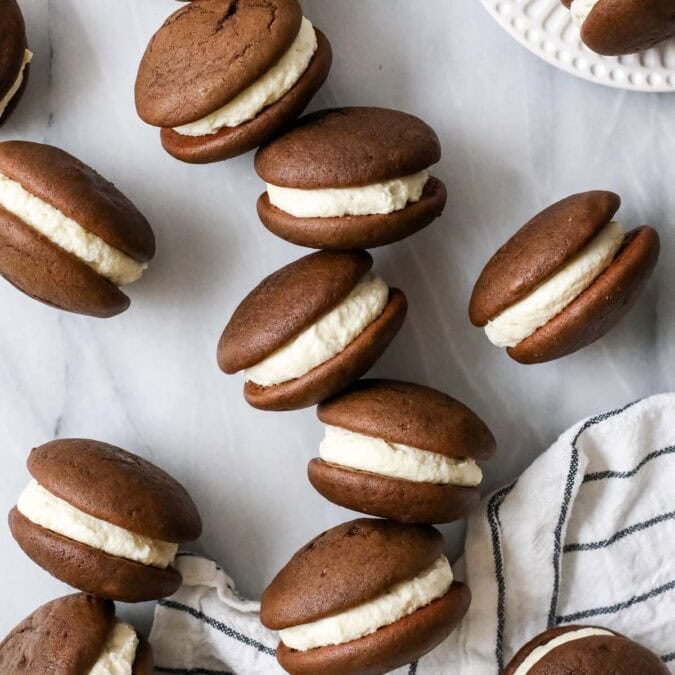
These are real deal, authentic whoopie pies (also known as gobs). Cakey chocolate cookies with an old-fashioned, flour-based (NOT marshmallow!) filling –a classic! Recipe includes a how-to video!
Authentic Whoopie Pies
So what do you call them, whoopie pies or gobs? Or maybe this big, fat, Oreo cookie-looking thing on your screen is totally unfamiliar? If that’s the case, I have a treat for you today!
Growing up near the Mason/Dixon line, whoopie pies (we called them “gobs”!) were a staple at all of our family gatherings. My grandmother’s original recipe used shortening, and today I’ve tweaked it (just a tiny bit!) to use butter instead. The result? Soft, cakey, and tender chocolate cookies sandwiched around a not-too-sweet cream filling. Essentially, whoopie pie perfection!
Why You Can Trust My Recipe
- Authentic whoopie pie filling: while some recipes claim that a marshmallow filling is best, real gobs are made with a not-too-sweet, cooked flour filling like I’m sharing today. It balances perfectly with the chocolate cookies!
- Unparalleled flavor: I made some tiny adjustments from the original recipe to use butter instead of shortening. Many bakers avoid shortening, and butter has a much better flavor anyway! I also do this with my peanut butter cookie recipe, and that has 100+ 5-star reviews! 🌟
- Timed just right so your roux (for the filling) is perfectly cooled in time for you to make the frosting. I was careful to include this first in the recipe so you can keep rolling!
- Simple: I’m not overcomplicating anything here–the classic technique is best! Equipment wise, a mixer is about as fancy as it gets in my recipe.
Table of Contents
Ingredients
All pantry staples here today, though I am going to go over a few in case you have questions about them. If you’re ready to bake, keep scrolling!

- Buttermilk. Use real buttermilk (while my buttermilk substitute will work in a pinch, the cookies will be a bit flatter) and let it come to room temperature before adding it to your batter. It’s really best if all of your ingredients are the same temperature for this recipe (except for the hot water, of course!).
- Cocoa powder. Stick with natural cocoa powder for the most authentic flavor.
- Boiling water. Just like when making my chocolate cake, a bit of boiling water makes all the difference in the chocolate flavor here. The heat extracts the flavor from the cocoa powder (“blooming” it) similar to how you would brew coffee or steep tea.
- Whole milk. I recommend whole milk for the filling; I haven’t tried this recipe with alternative milks like almond or oat, so I can’t say for sure how they would work.
- Sugar. You’ll need granulated sugar for the cookies and powdered sugar for the filling/frosting. Compared to a traditional buttercream, the frosting we are making today has a fraction of the amount of sugar–just 1 cup!
This recipe originally was made with shortening, I’ve since swapped it out for butter, which I think gives the whoopie pies a better flavor.
SAM’S TIP: Let your butter soften to room temperature, but don’t let it get too warm (for the frosting, anyway) or you may run into issues.
How to Make Whoopie Pies
While I did tweak my grandmother’s recipe for the chocolate cookie shells, I kept the filling as traditional as possible. Many recipes call for a marshmallow frosting, and some simply use a fluffy vanilla buttercream. Both are just too sweet! Instead, we’ll stick with the classic flour-based filling, which is actually pretty similar to ermine frosting, if you’ve ever made that before.
Make the roux and cookies
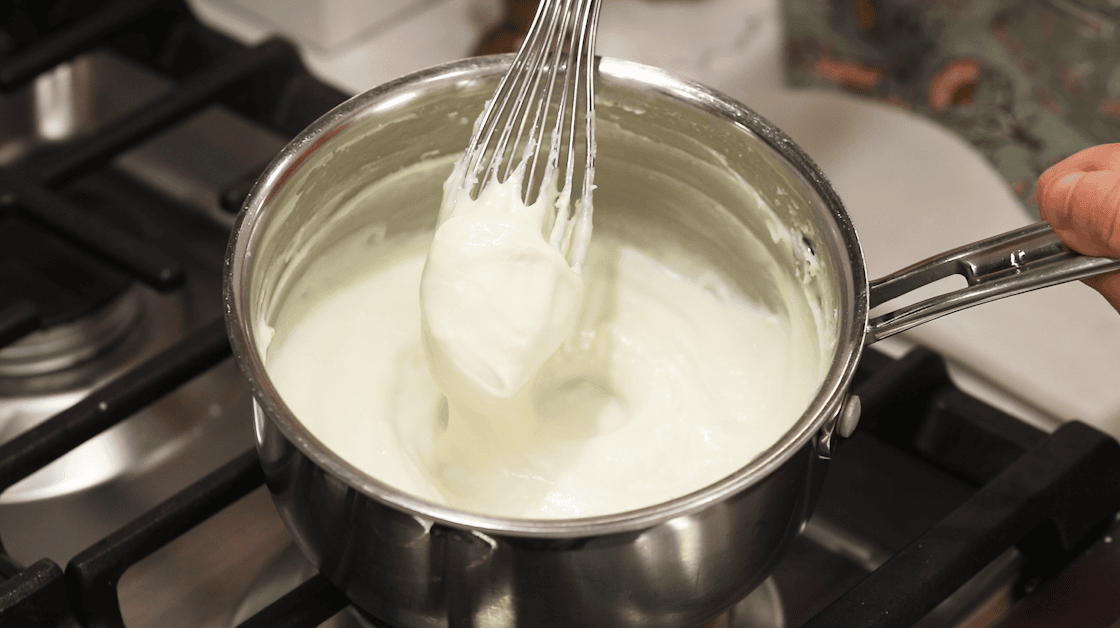
- Step 1: Prep the roux. Whisk together the flour and milk over medium-low heat until thickened, then pour into a heatproof bowl to cool completely. I recommend stirring this occasionally as it cools to prevent a skin from forming on top.
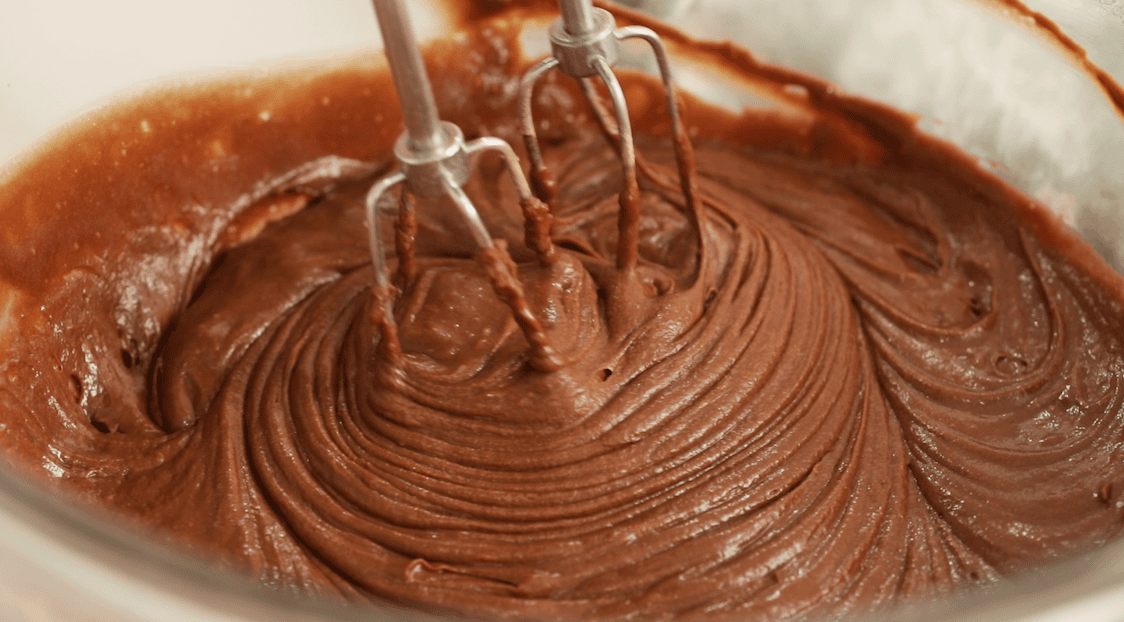
- Step 2: Make the cookie batter. Cream the butter and sugar until well combined, then stir in the egg and vanilla. Slowly pour in the buttermilk, then gradually add the dry ingredients. Carefully stir the hot water into the batter until everything is cohesive–the batter will be thin like a cake batter.
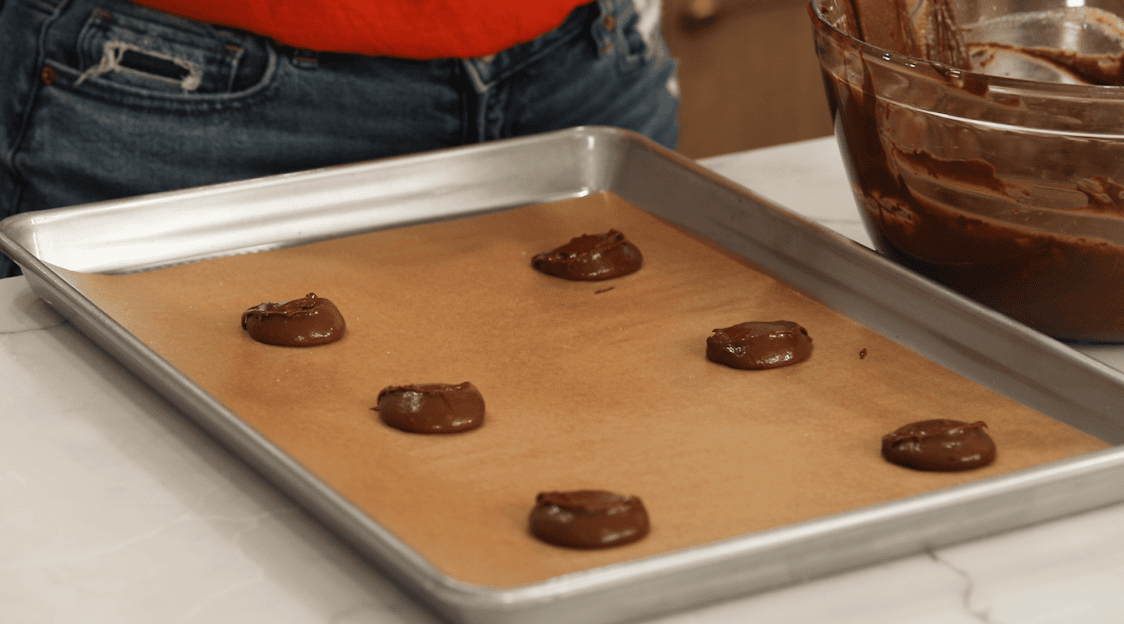
- Step 3: Portion & bake. Drop the batter onto parchment lined baking sheets using a heaping tablepsoon cookie scoop. Bake for about 5 minutes.

- Step 4: Cool & pair off cookies. Let the cookies cool completely on the baking sheet before removing. Pair off the cookies so you have cookies of similar size/shape together for your sandwiches.
Make the frosting
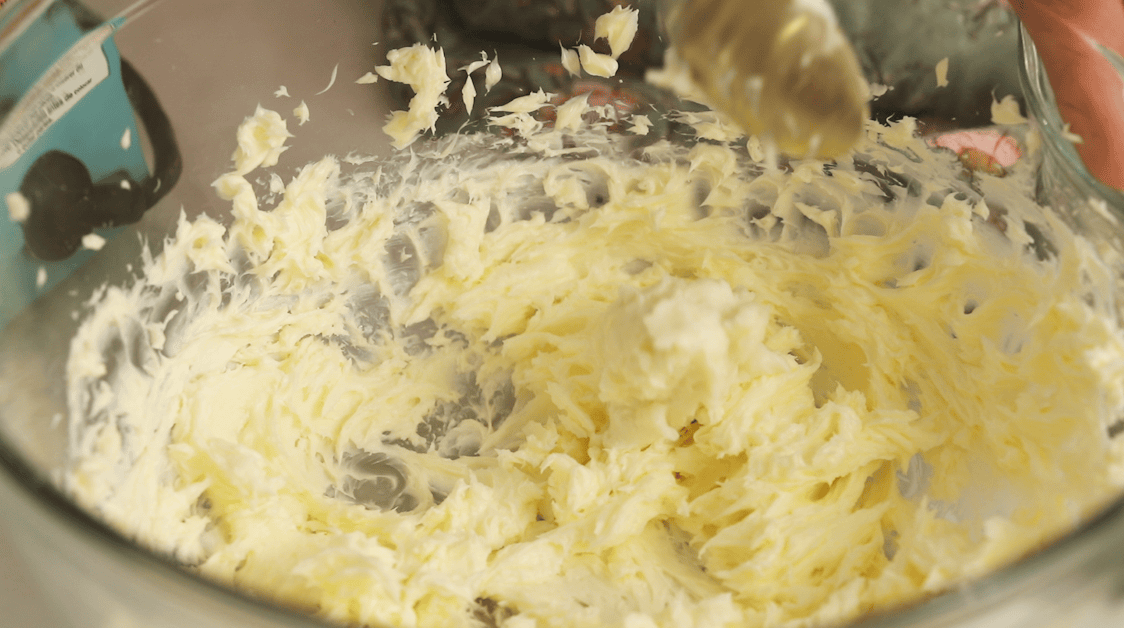
- Step 5: Add the cooled roux to the frosting. Beat the butter until smooth and creamy, then gradually add the roux about a tablespoon at a time. Stir in the salt, vanilla, and sugar until completely combined.
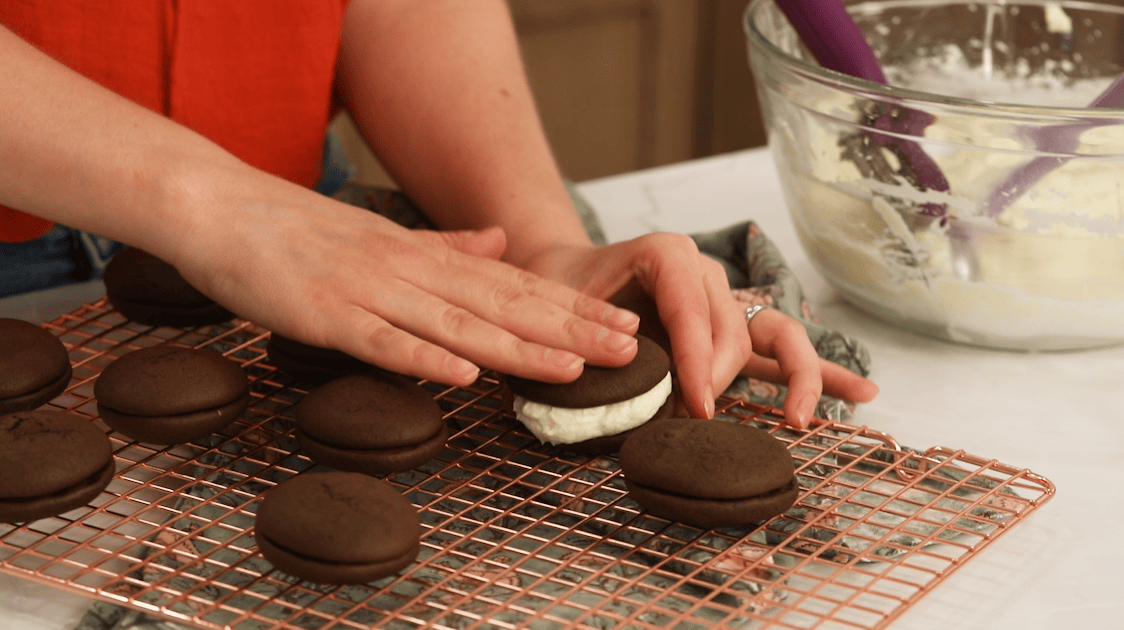
- Step 6: Assemble and serve! Add a heaping tablespoon of filling to the bottom of one cookie, then top with the second cookie. Repeat until sandwiches/pies are assembled.
SAM’S TIP: It’s very important that your butter and roux are the same temperature before you combine them. Let your butter sit out to soften (don’t let it get too warm though!) and make sure you let your roux cool completely. If your filling splits or separate, follow the tips for recovery in the recipe notes below or see the troubleshooting section in my ermine frosting.
Frequently Asked Questions
Several different states lay claim to the creation of whoopie pies, with both Maine and Pennsylvania make strong cases (as a former PA resident guess who I’m siding with).
The name “whoopie pie” is sometimes cited as having Amish origins (another vote for PA 😉), but with so many different origination stories, it’s hard to know for sure.
Yes! Just make sure you wrap them in plastic wrap or keep them in an airtight container so they don’t dry out. To thaw, let sit at room temperature until soft.
I’ve seen SO many flavors in the amish markets near me like chocolate peanut butter, pumpkin whoopie pies, mint chocolate, red velvet, shoofly pie, and more. I’ve also made a few of my own flavors, like cookie dough whoopie pies and peppermint bark whoopie pies.
More Pennsylvania-Dutch Recipes
If you like this flavor combination, give my Ding Dong cake a try next! The flavors are very similar to this recipe.
Enjoy!
Let’s bake together! Subscribe to my newsletter to be notified of all the newest recipes, and find my free recipe tutorials on YouTube 💜
Whoopie Pies
Ingredients
For the roux (for the filling)
- 1 cup (236 ml) whole milk
- ⅓ cup (42 g) all-purpose flour
For the chocolate cookie shells
- 1 cup (200 g) granulated sugar
- ⅓ cup (75 g) unsalted butter, softened
- 1 large egg, room temperature
- 1 teaspoon vanilla extract
- ½ cup (118 ml) buttermilk
- 2 cups (250 g) all-purpose flour
- ½ cup (50 g) natural cocoa powder
- 1 teaspoon baking soda
- ¼ teaspoon baking powder
- ½ teaspoon table salt
- ½ cup (118 ml) steaming hot or boiling water
For the filling
- Roux, from above
- 1 cup (226 g) unsalted butter, softened
- ¼ heaping teaspoon table salt
- 1 teaspoon vanilla extract
- 1 cup (125 g) powdered sugar
Instructions
Prepare the roux
- Combine milk and flour in saucepan and whisk until combined. Set over medium-low heat and whisk constantly until mixture is thickened to a near paste-like consistency that wants to cling together.1 cup (236 ml) whole milk, ⅓ cup (42 g) all-purpose flour
- Remove from heat and allow to cool completely, stirring occasionally to prevent a skin from forming. Set aside while you prepare your cookies.
For the cookie shells:
- Preheat your oven to 450F (235C) and line several baking sheets with parchment paper. Set aside.
- In a large mixing bowl, combine sugar and butter and use an electric mixer to beat until well-combined.1 cup (200 g) granulated sugar, ⅓ cup (75 g) unsalted butter
- Add egg and vanilla extract and beat again until pale yellow and well-combined.1 large egg, 1 teaspoon vanilla extract
- With mixer on low-speed, gradually stir in buttermilk. Set aside.½ cup (118 ml) buttermilk
- In a separate, medium-sized bowl whisk together the flour, cocoa powder, baking soda, baking powder, and salt.2 cups (250 g) all-purpose flour, ½ cup (50 g) natural cocoa powder, 1 teaspoon baking soda, ¼ teaspoon baking powder, ½ teaspoon table salt
- Gradually add the dry ingredients to the batter until completely combined.
- Add very hot water (carefully) and stir until batter is well-combined and smooth. It will be thin like a cake batter. Use a spatula to scrape the sides and bottom of the bowl to ensure ingredients are well-combined.½ cup (118 ml) steaming hot or boiling water
- Drop cookie batter by a heaping Tablespoon onto prepared baking sheets, spacing cookies at least 2” (5cm) apart.
- Bake for 5-6 minutes in center rack of 450F (235C) preheated oven, then remove from oven and allow to cool completely before removing from baking sheet. As the cookies cool, prepare your filling.
For the filling
- Important note: The roux must be completely cooled before proceeding.
- Place butter in a large mixing bowl (or the bowl of a stand mixer) and use an electric mixer to beat until smooth, light, and creamy.1 cup (226 g) unsalted butter
- While mixing on medium/low speed, add the flour mixture, a Tablespoon at a time, waiting until each spoonful is incorporated before adding the next.Roux
- Scrape sides and bottom of bowl and stir in salt and vanilla extract.¼ heaping teaspoon table salt, 1 teaspoon vanilla extract
- Gradually stir in powdered sugar until completely combined.1 cup (125 g) powdered sugar
- Pipe or spoon filling onto the bottom of one chocolate cookie and sandwich with another (about 1 ½ Tablespoon of filling per cookie). Enjoy!
Notes
Nutrition
Nutrition information is automatically calculated, so should only be used as an approximation.
Like this? Leave a comment below!
I originally published this recipe in March of 2019. I’ve since updated the post to include more helpful information, added a video tutorial, and slightly modified the recipe to use all butter and no shortening (which I think improves texture and flavor).


Very yummy recipe that turned out picture perfect. Had people asking me for the recipe.
Best filling reciepe
Thank you so much, Patti! We appreciate this review 😊
Never heard them called Gobs but very close to my Grandmother/Mothers old Fashioned New England Authentic Whoopie Pie recipe. Except we cooked the paste in a double boiler and then refrigerated it. I think our recipe is a double or triple batch since it was a lot of work -might as well make a lot. Traditionally wrapped individually in waxed paper and some could be frozen. My mom used to send them to my father when he was deployed
We’d like to make this for my mom’s funeral. She loved gobs but wasn’t a baker. Can we make cookies and filling ahead of time? We have to travel for the funeral. and then assemble when we get there? There would be about a 2 day delay. Your advice? We won’t have a kitchen on site.
Hi Lori! Personally I like them fully assembled and refrigerated. They will do well in an air tight container in the refrigerator, but if you’d like to assemble them later you can make the filling and cookies in advance. The filling will need to stay refrigerated. I’m sorry for your loss. 🙁
Ive successfully frozen them (wrapped individually) and they were still perfect upon thawing. Sorry for your loss.
Hello, I’m not a person who bakes a lot so I have a question. When you say sift/whisk flour into milk are you actually using a sifter or do you mean to just whisk flour in? Thank you so much. Making these for bake sale fundraiser.
Hi Wendy! You can just whisk them in. You can see how I do it in the video. 🙂
These were amazing! New favorite go-to recipe! When my husband hadn’t eaten for three weeks because of Covid and his hospitalization, the only thing he asked for when he got home was these! Thank you (and your grandmother) for a wonderful treat!
Wow, what a compliment! We hope your husband is feeling much better now that he’s home and had his whoopie pies 😊 Thanks so much for commenting, Kimberly! Take care ❤️
Do any of the ingredients need to be room temperature, or is everything used cold? Thanks!
Hi Rebecca! I like my eggs to be at room temperature and I’ll normally let the buttermilk warm up a little bit too. 🙂
Have you ever had your gobs come out flat? I’ve been making gobs for years from a family recipe and never had issues. This year they are flat!!!! I’m embarrassed to give them away lol. The only thing I did different was I made sour milk because I had forgotten to get buttermilk.
Hi Stephanie! I’m so sorry this happened. I am wondering if the sour milk was the issue. It can be thinner than the buttermilk so it could cause flatter results. 🙁
Hi, if you used vinegar to sour your milk, you may have added a little too much, which could use up all the leavening. I add a little extra baking soda when I have to do this.
Hi! PA native here, grew up with my grandmother’s or maybe it was my great-grandmother’s GOB recipe. It is almost the same as this one, nothing compares! Never called them whoopie pies, my personal whoopie pie experience (and I’ve tried dozens) always has a sickening sweet filling, not the classic gob filling. That is the difference between the two. Thanks for posting, so people can experience a real GOB!
Enjoy!!
Hi! My mom used this recipe. Just wondering if you can use almond milk? And why mine gets lumpy?
Hi Bonnie! I would be worried about the whoopie pies spreading too much and being too dry. I haven’t tried the frosting with almond milk, but I know others have done it with success. I include tips in the post for a smooth frosting. 🙂
I have this recipe from my grandmother who lived in Pennsylvania. My daughters, now grown, absolutely love it! My oldest always asks for them on her birthday. A note to some of the previous comments concerning runny filling: I made the mistake of using 1% milk one time. BIG mistake! I even have problems with 2% milk if the weather is hot. Whole milk is the solution. Regardless of the humidity and temps, whole milk makes a consistently fluffy filling every time. And if you want to be decadent, add a touch of heavy cream!
So yummy. Just made today. I don’t know why my filling is weird. I followed the recipe, and I know that my paste was definitely cold. But it kind of separated into a weird looking mixture. I dunno. Any ideas?
Oh no! We’re so sorry this happened, Heather. 😞 Was your paste cold or just cool when you added it? If it’s too cold, it might separate when added to the rest of the ingredients. This could also happen if your kitchen is too warm. Sometimes if you keep whipping you can get it to come back together, or you could try popping everything in the fridge for a few minutes before whipping again. We’re happy to hear they still tasted good though!
Sometimes the temperature of the house is the issue,or,heat in the kitchen.I make cookies one day,and,icing the next.The frosting usually also doesn’t work when humid.We mostly make these as a treat for Winter. holidays…Add sugar slowing..This icing very temperamental.I never double icing .I always make two separate icing batches.I have used half and half. And have ok results,but your milk needs fat,so skim,2%,1% will not work.
Hi, born and raised in Pa. Pa Dutch/Mennonite family. Learned to make gobs from my grandma and still make them, no butter, all shortening, same filing as you. Nothing like it, store bought does not compare! Thanks for sharing your recipe.
They are soooo good! Thanks for commenting. 🙂
Delicious! Will definitely be making these again soon. Made these in August in Florida and had no problems. Just curious to know if you’ve ever tried making a red velvet version?
Hi Darlene! I have not actually tried it, but it sounds delicious. I’m glad you enjoyed these. 🙂
I love butter too!! I am wondering if you can make the filling with all shortening? .
Hi Terry! All shortening will work in the filling. 🙂
Could I make these into cupcakes instead of whoopie pies?
Hi Patty! I’m not sure how it would work. I would recommend my chocolate cupcakes instead. 🙂
Hi! looks delicious but i don’t keep shortening on hand? wondering if you could recommend a substitute? thank you:)
Hi Nidhi! You can substitute butter. Be sure to check the section in the post on substituting butter for exactly how to do it. 🙂