
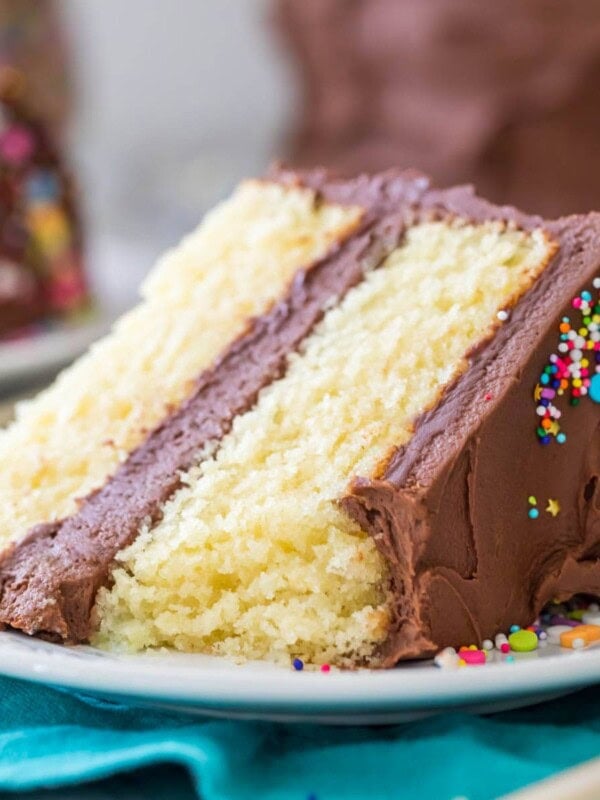
Peanut Butter Chocolate Cake
This post may contain affiliate links. As an Amazon Associate I earn from qualifying purchases. Please read my disclosure policy.

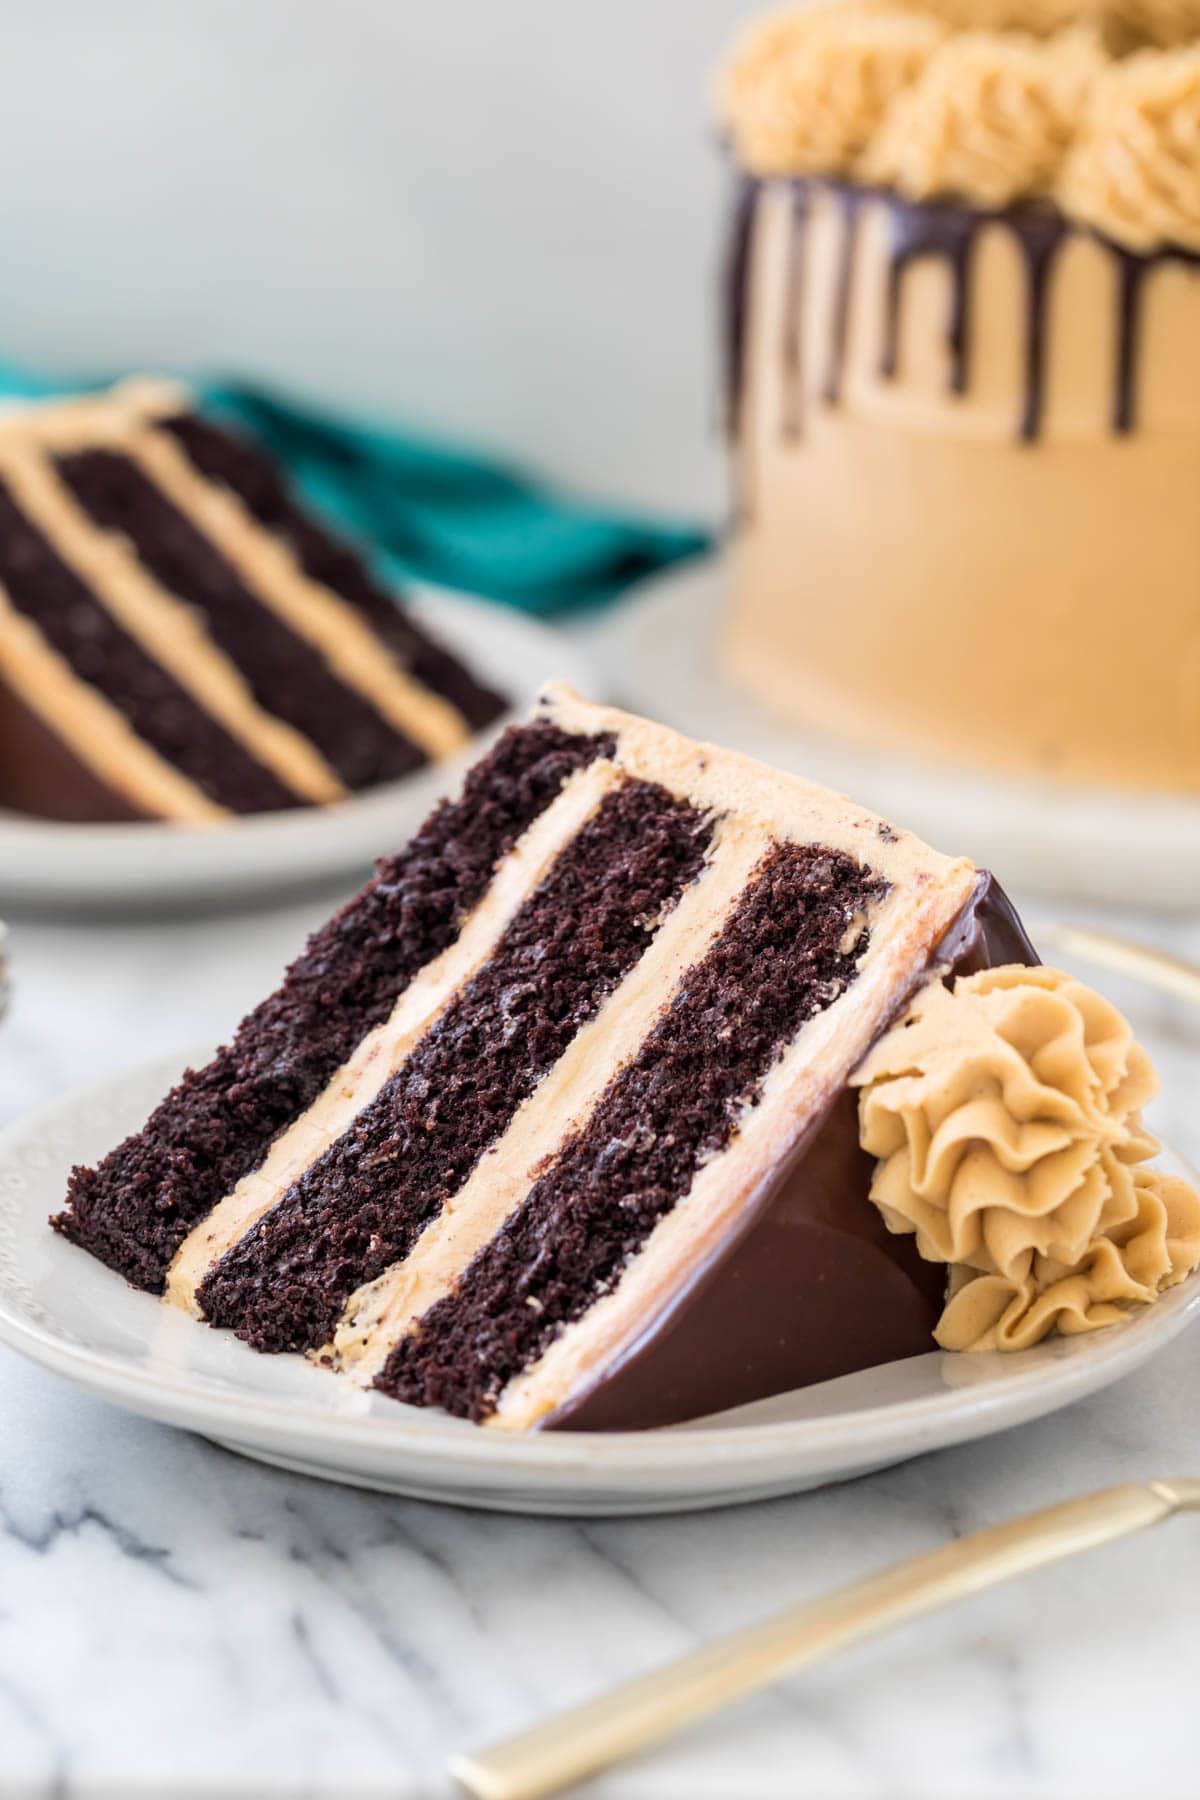
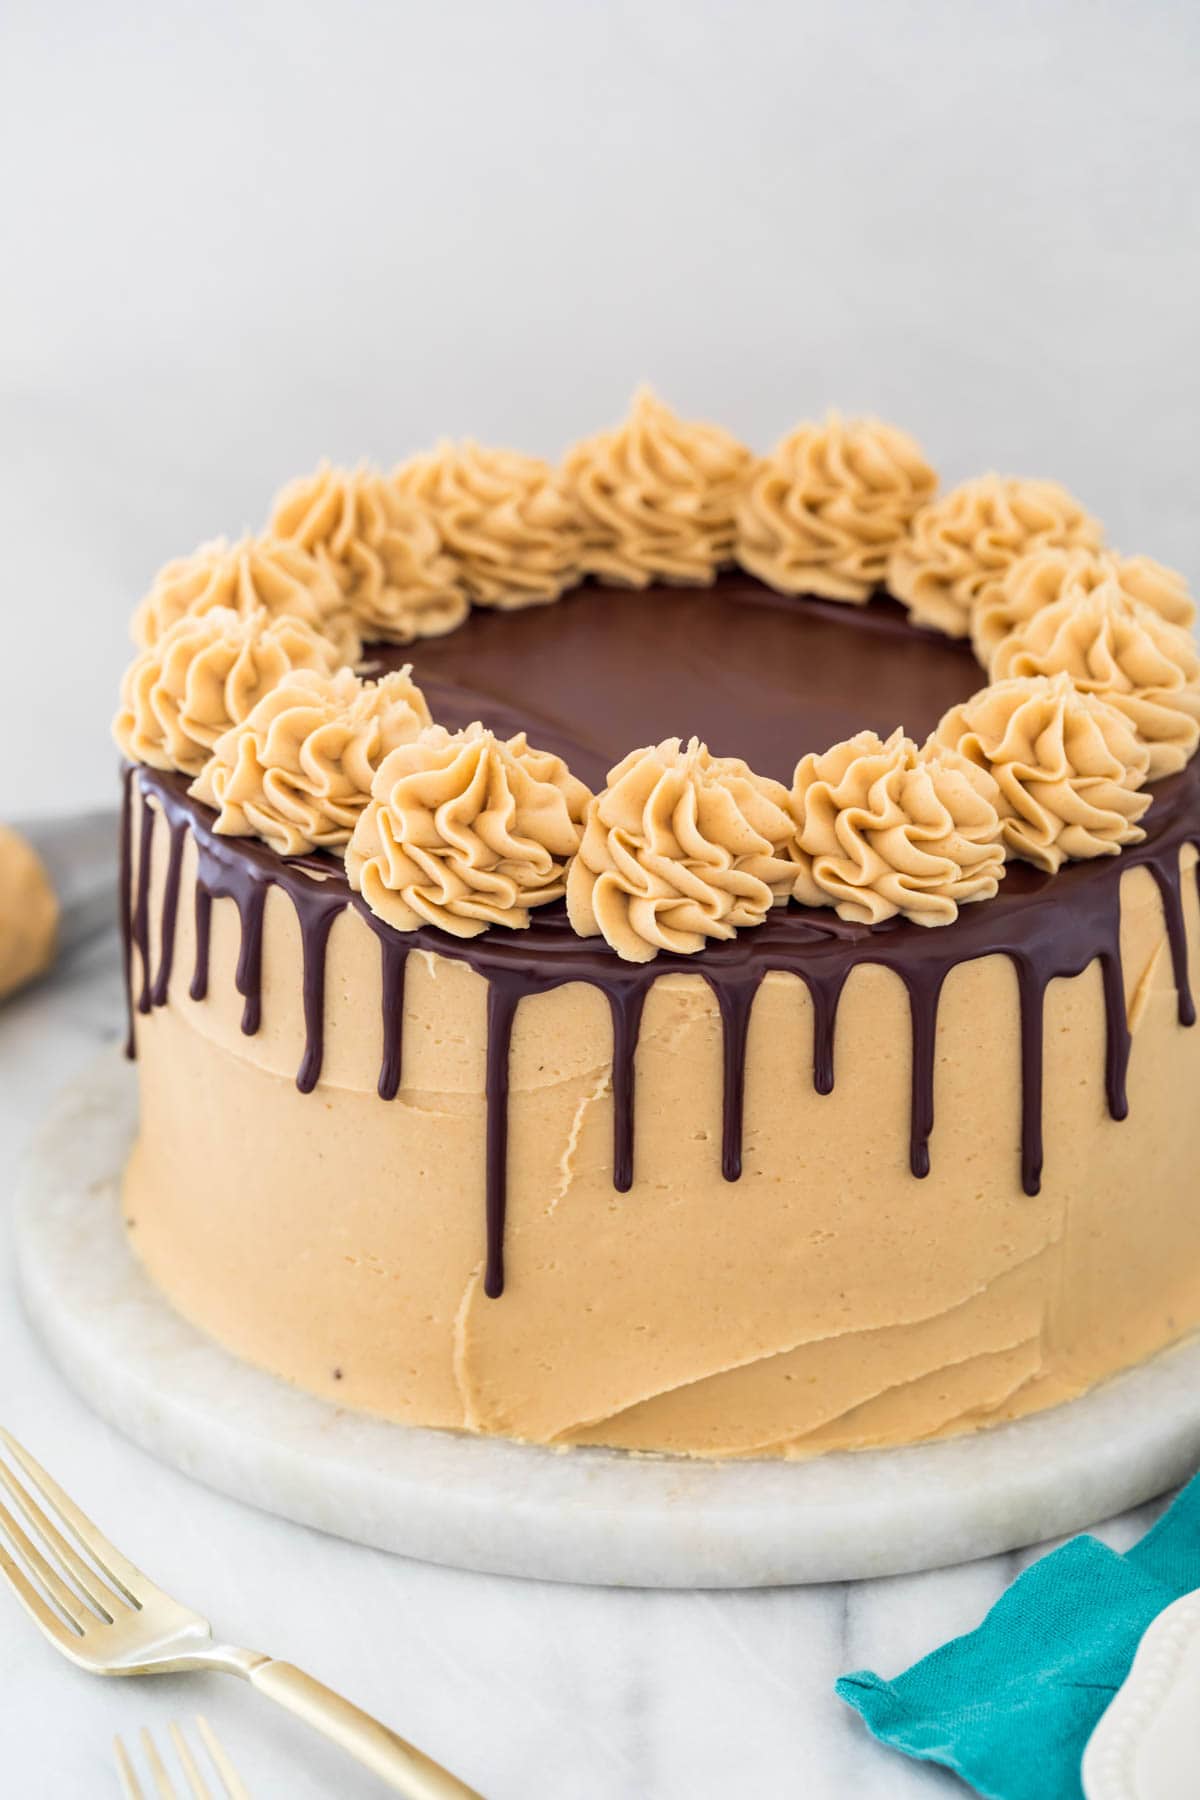
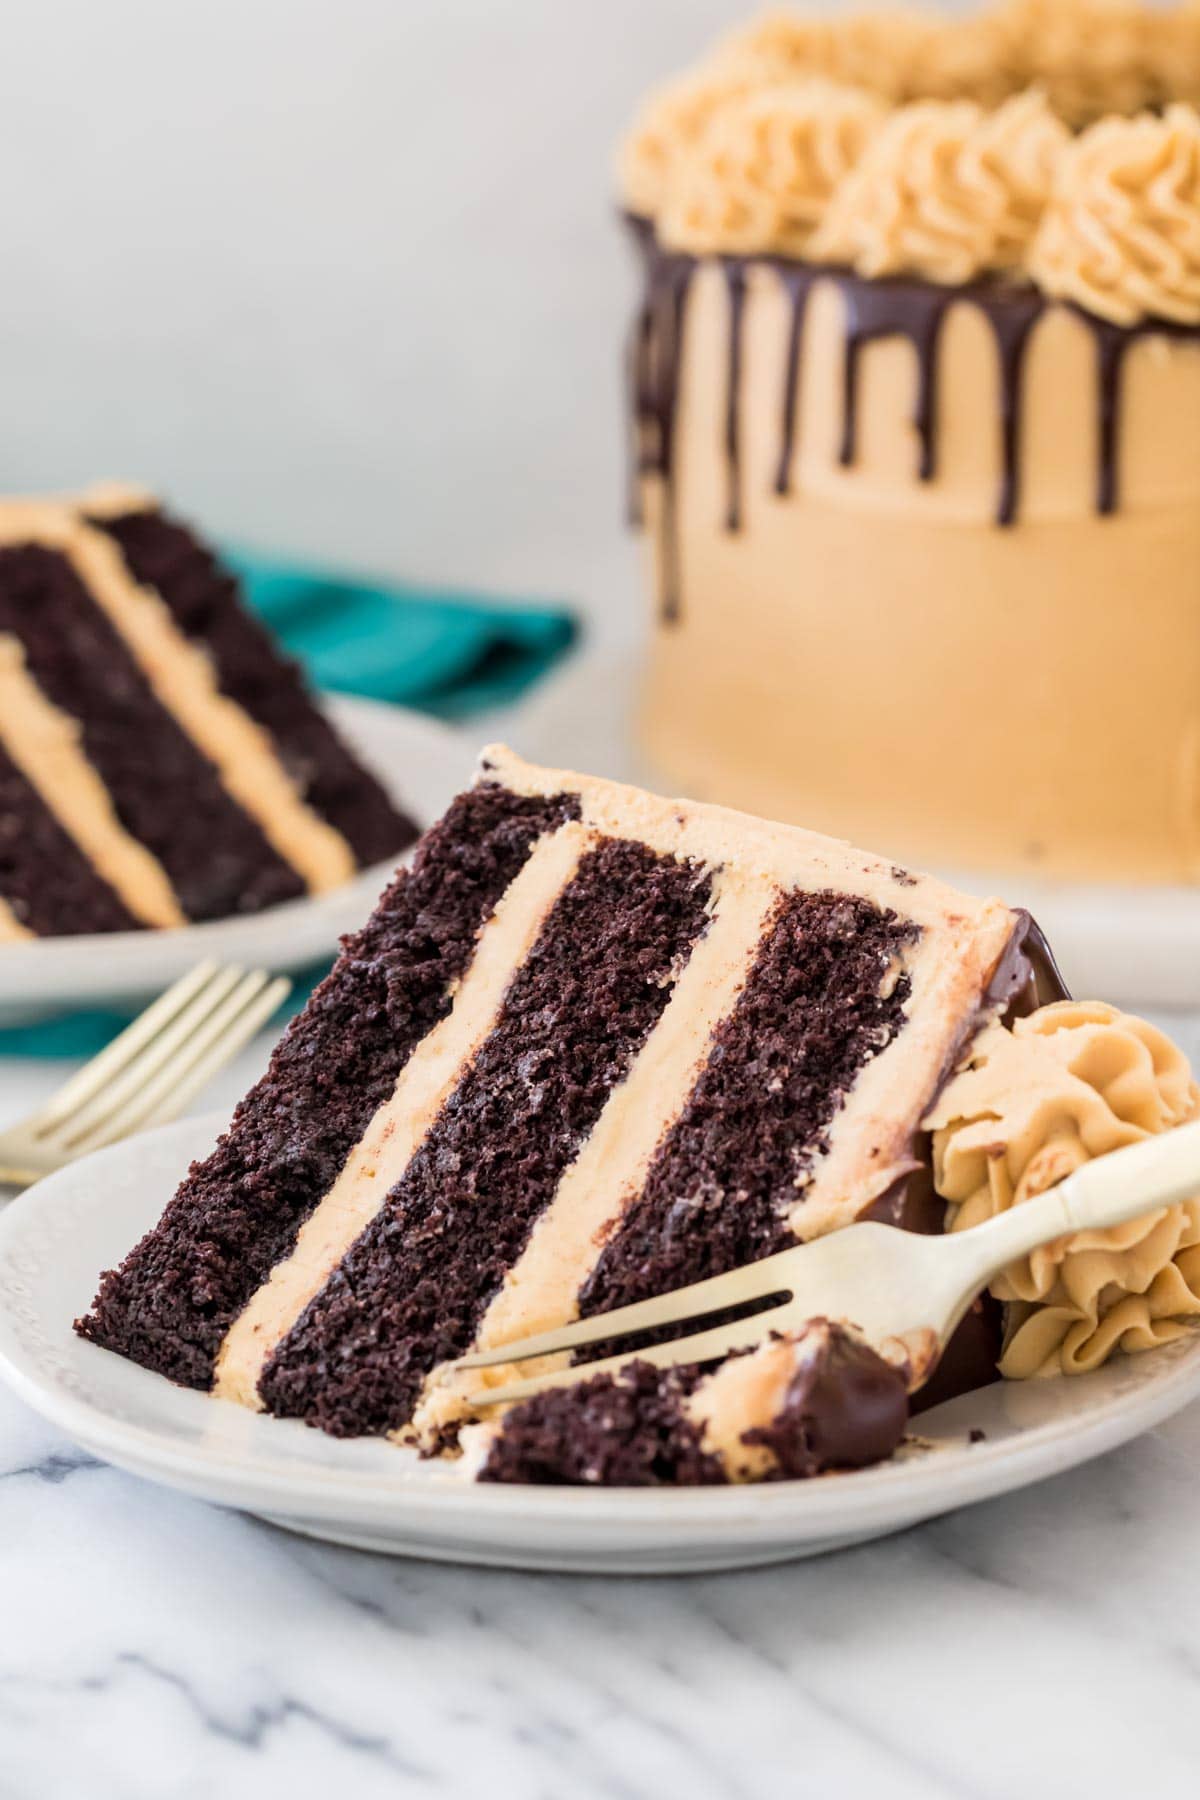
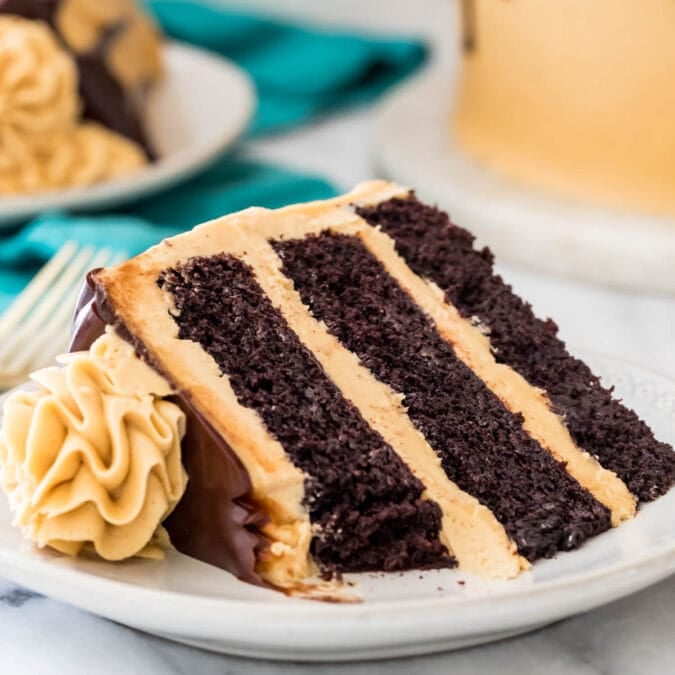
My Peanut Butter Chocolate Cake is made with three layers of incredibly moist and rich dark chocolate cake, covered in peanut butter frosting, and draped with a glossy chocolate ganache drip (and I’ll walk you through the steps on how to do the drip, too!). This is the perfect cake for both celebrations and everyday indulgences. Recipe includes a how-to video!
Perfect Peanut Butter Chocolate Cake
With striking dark chocolate layers, layers of silky smooth peanut butter frosting and a sophisticated chocolate ganache drip, this is not your mother’s peanut butter chocolate cake!
The layers of today’s recipe are closely based off of my dark chocolate cupcakes with all the richness of my devil’s food cake, which means they’re decadent, intensely chocolatey, and moist, moist enough that you can store it in the fridge and still have the crumb melt in your mouth the next day.
While I certainly don’t consider myself a decorator, I wanted today’s cake to be extra stunning and I want you to be able to pull off a cake just like the one in the photos. To help with this, I include detailed decorating instructions in the post, in the recipe, and in the how-to vide below.
Let’s dive in!
What You Need
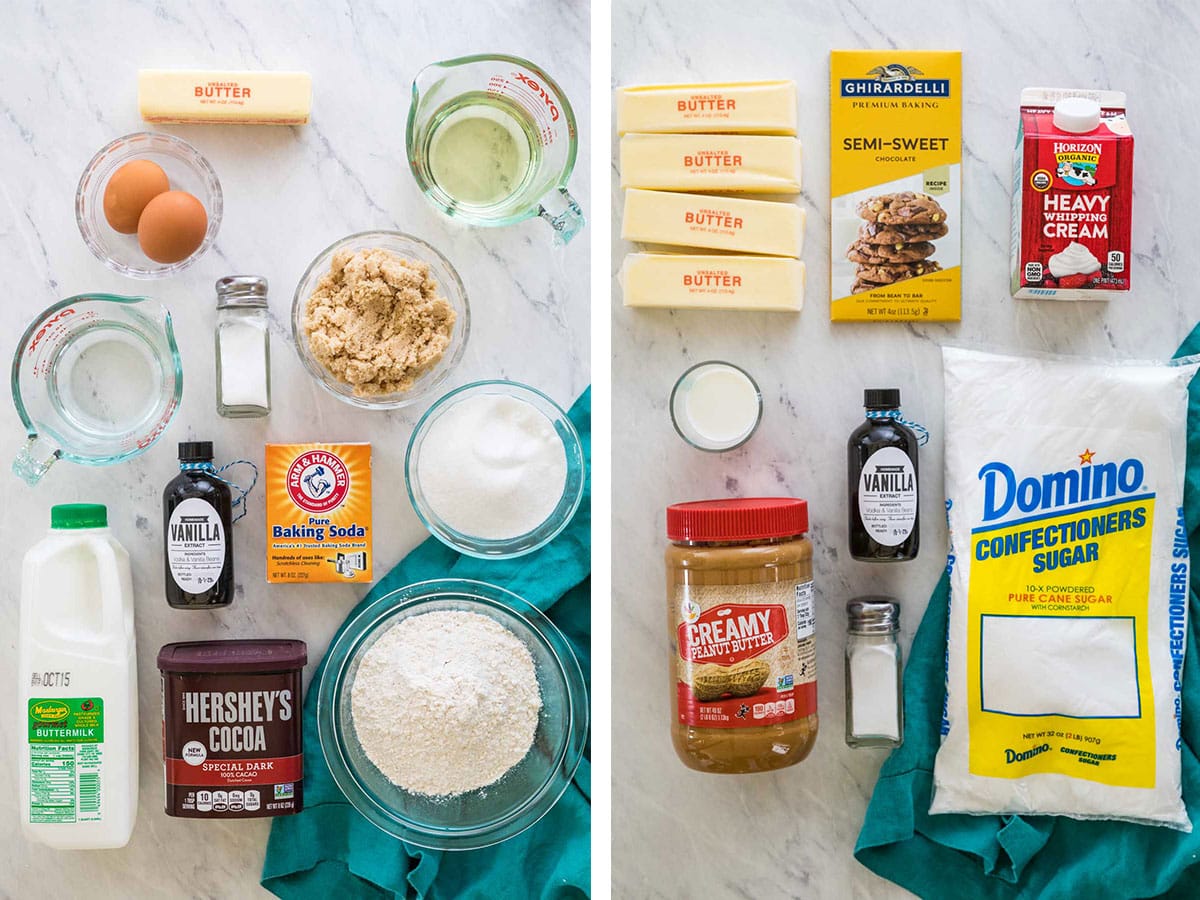
Each ingredient in my peanut butter chocolate cake recipe has been carefully selected to yield a perfectly rich and deeply flavorful, but not too sweet cake.
- Flour. For a sturdier, easily stackable cake, I like using all-purpose flour here. You can substitute cake flour if you’d like, but I don’t personally feel the need.
- Sugar. You’ll need brown sugar and granulated sugar for the cake, and powdered sugar for the frosting. Using a combination of sugars in the cake adds some serious flavor and moisture to make for a rich cake.
- Cocoa powder. Use dark cocoa powder for a strong chocolate flavor that stands up against the creamy peanut butter icing. This is typically sold in the baking aisle beside other cocoa powders, but you have trouble finding it Dutch-process cocoa will also work. If you can’t find either and can only find regular, natural cocoa powder, hop over to my chocolate cake recipe recipe and make that one instead!
- Butter and oil. Yes, we’re using both butter and oil in this cake! The combination of the two makes for an incredibly moist cake with an amazing flavor (which you already know if you’ve made my vanilla cake recipe). I recommend vegetable or canola oil, but you can really use any neutral cooking oil.
- Buttermilk. Besides providing flavor, buttermilk also adds moisture to this cake. If you don’t have any on hand, use my buttermilk substitute.
- Water. You can use water or coffee (for a more intense chocolate flavor), but the liquid you use must be hot to properly react with the cocoa powder.
- Peanut butter. Use a smooth, creamy peanut butter for best results (and save any extra to make a batch of my best peanut butter cookies or my no-bake cookies 😉).
- Semisweet chocolate. Any kind of semisweet chocolate will work, whether that’s chocolate chips or a chopped up baking bar.
- Cream. Warm heavy cream will turn our chocolate into a rich chocolate ganache for decorating our peanut butter chocolate cake. Make sure you heat it to just simmering, then immediately take it off the heat.
Remember, this is just an overview of the ingredients I used and why. For the full recipe please scroll down to the bottom of the post!
How to Assemble and Decorate Peanut Butter Chocolate Cake
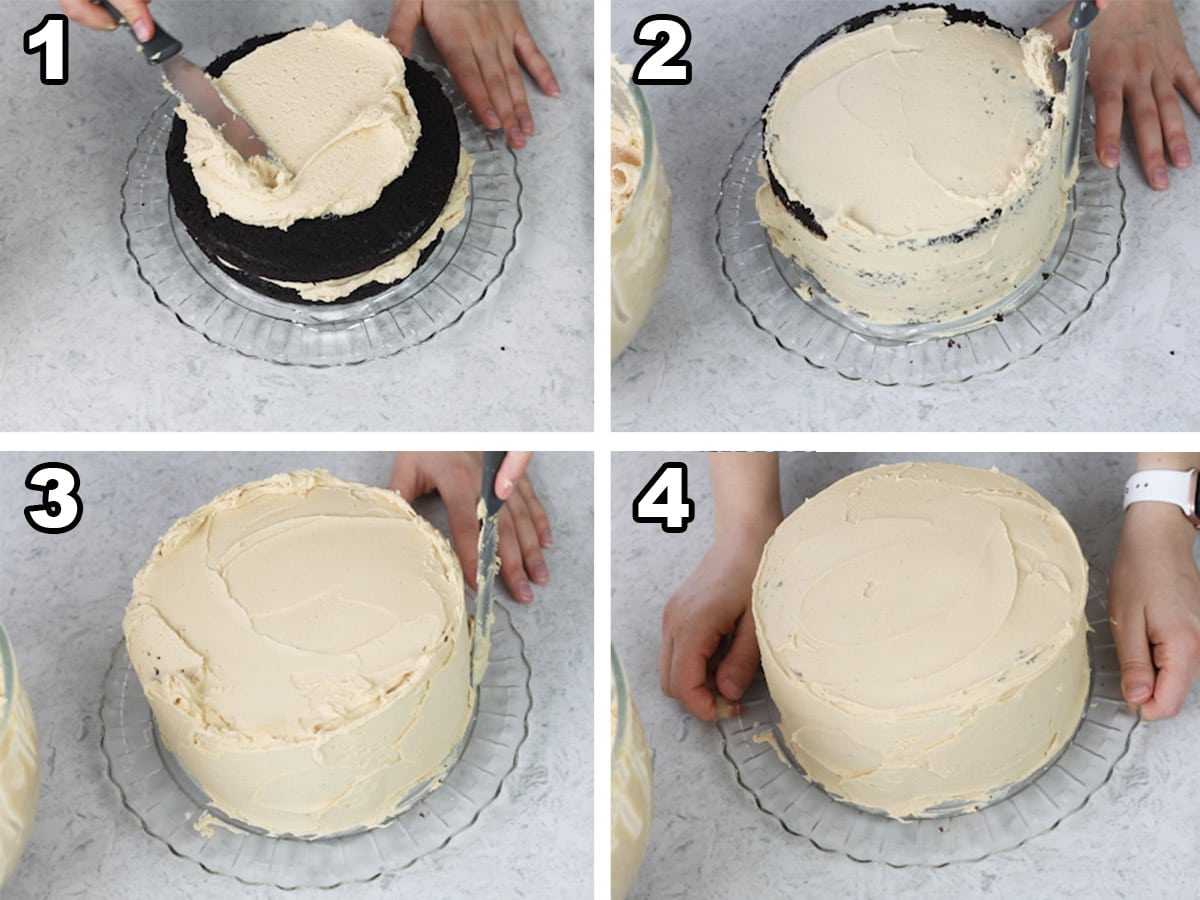
SAM’S TIP BEFORE YOU BEGIN ASSEMBLY: For a professional-looking, totally level cake you will want to level your cake layers before assembling (but after they’ve completely cooled). You can do this using a cake leveler or just using a sharp knife to level the top of the cake.
Bake your cakes as instructed and let them cool completely before frosting. When your cakes are almost done cooling, make the peanut butter frosting. Once your cakes are cool and your frosting is prepared, you’re ready to assemble!
- Place one cooled cake layer on serving platter and cover with a thick, even layer of icing (this recipe makes a lot of frosting, so you should have plenty for a nice thick peanut butter layer!). Repeat with the next two layers.
- For a clean looking cake, do a crumb coat! Spread a thin layer of frosting over the entire cake. It’ll look messy and you’ll see crumbs poking through, this is fine (just make sure you don’t get any crumbs back in your icing bowl as you move your spatula back and forth). Move your cake to the freezer for 10-15 minutes. This “crumb coating” holds all the crumbs in place, so when you do your next frosting application it will be clean, smooth, and crumb-free.
- Remove cake from freezer and cover immediately with a thick, even layer of frosting. You should still have a fair bit of frosting left over, hang on to this, we need it for our decorative topping!
- Smooth frosting until you’ve reached your desired look. If you aren’t adding ganache, pipe a decorative border on top of the cake; otherwise, place your cake back in the fridge or freezer and move on to the next steps.
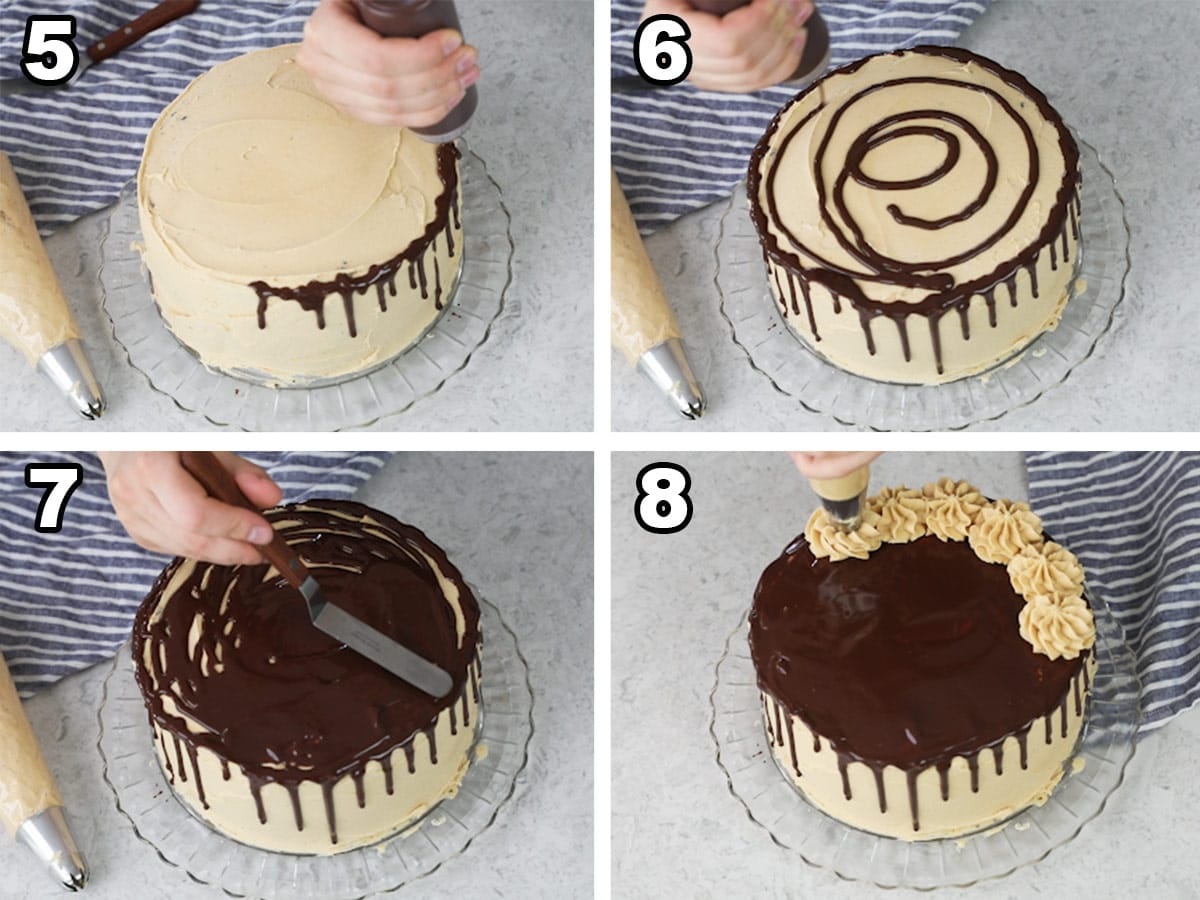
- Prepare ganache and let it cool. Pour cooled (but still liquid) ganache into a squeeze bottle (you could alternatively use a piping bag or even a spoon, but I’m not skilled enough to make these work very well personally). Holding the bottle vertically, drip ganache around the entire cake, allowing the chocolate to slowly run down the edges.
- Drizzle ganache over the top of the cake (you may not need all of it!). Don’t go overboard, I do a few drizzles and then spread the ganache, adding as little as I need, otherwise it drips over the side of the cake and ruins all of our work from the earlier steps.
- Use an offset spatula to smooth the ganache into one even layer. Return the cake to the fridge and chill until ganache set.
- Use remaining peanut butter icing to pipe a decorative border or dollops around the cake. I used my favorite Ateco 848 tip here.
SAM’S TIP: If you’re adding a ganache drip to your cake, be sure your cake is chilled beforehand. Just a few minutes in the fridge or freezer can make a huge difference!
Frequently Asked Questions
Very hot water is critical for this recipe. When you (very carefully!) add hot water to cocoa powder, you are “blooming it. Blooming cocoa powder intensifies its flavor, and we want our cake to be as flavorful and chocolatey as possible! For an even more intense chocolate flavor, you can use hot coffee instead of hot water; your cake won’t taste like coffee, but it will have a very intense chocolate flavor!
Either it’s your cake that isn’t cool enough, or it’s your ganache. For good measure, pop your cake back in the fridge (or the freezer) for a few more minutes and let your ganache cool down some more before trying to add the drip. You can also try making your drips smaller.
This recipe yields a bit extra ganache, so experiment with your drips on something besides your cake before beginning (sometimes I test my drips on an upside-down bowl before moving over to my cake).
Yes! You can make 24-30 cupcakes. They’ll need to bake for approximately 17 minutes.
Enjoy!
More Recipes for Peanut Butter & Chocolate Lovers
Let’s bake together! I’ll be walking you through all the steps in my written recipe and video below! If you try this recipe, be sure to tag me on Instagram, and you can also find me on YouTube and Facebook
Peanut Butter Chocolate Cake
Equipment
- 3 9” baking pans
- Ganache drip bottle
Ingredients
For the cake layers
- 1 ¾ cup (220 g) all-purpose flour
- 1 cup (200 g) light brown sugar, firmly packed
- 1 cup (200 g) granulated sugar
- ¾ cup (75 g) dark cocoa powder
- 1 ½ teaspoons baking soda
- 3/4 teaspoon table salt
- ½ cup (113 g) unsalted butter, melted
- ⅔ cup (155 ml) Avocado, vegetable or canola oil, you may substitute any neutral cooking oil
- 2 large eggs, room temperature preferred
- 2 teaspoons vanilla extract
- 1 cup (236 ml) buttermilk
- ½ cup (118 ml) very hot or boiling water
For the peanut butter frosting
- 2 cups (452 g) unsalted butter, softened
- 2 cups (490 g) creamy peanut butter, (I do not recommend using a “natural” peanut butter/the kind where the oil separates)
- 6 cups (750 g) powdered sugar
- 2 teaspoons vanilla extract
- ½ teaspoon table salt
- 2-4 Tablespoons milk, I use whole milk, but you may substitute any milk you have on hand or even half and half or heavy cream
For the ganache (optional)
- 4 oz (113 g) semisweet chocolate, chocolate chips or a chopped baking bar will work
- ½ cup (118 ml) heavy cream
Instructions
- Preheat oven to 350F (175C) and line the bottoms of three 9” (23cm) round cake pans with parchment paper and grease and flour the sides or spray with baking spray. Set aside.
- In a large bowl, combine flour, sugars, cocoa powder, baking soda and salt and stir well (break up any clumps from the brown sugar).1 ¾ cup (220 g) all-purpose flour, 1 cup (200 g) light brown sugar, 1 cup (200 g) granulated sugar, ¾ cup (75 g) dark cocoa powder, 1 ½ teaspoons baking soda, 3/4 teaspoon table salt
- Add butter, oil, eggs, and vanilla extract and stir until completely combined (batter may be thick).½ cup (113 g) unsalted butter, ⅔ cup (155 ml) Avocado, vegetable or canola oil, 2 large eggs, 2 teaspoons vanilla extract
- Slowly stir in buttermilk until completely combined.1 cup (236 ml) buttermilk
- Finally, slowly (and carefully!) add hot water until batter is uniform and thoroughly combined.½ cup (118 ml) very hot or boiling water
- Evenly divide batter into prepared cake pans and transfer to 350F (175C) oven. Bake 20-24 minutes or until a toothpick inserted in the center of each cake comes out clean or with a few moist crumbs (note: if your oven bakes unevenly you may need to rotate the cakes during baking. It is also fine to bake two cakes at one time and leave the third on the counter until the first two have finished baking, if your oven is too small to hold all 3 at once).
- Allow cakes to cool for 15 minutes then run a knife around the edge and carefully invert onto cooling racks to cool completely before frosting.
Peanut Butter Frosting
- Combine butter and peanut butter and use an electric mixer or stand mixer to beat until smooth and creamy.2 cups (452 g) unsalted butter, 2 cups (490 g) creamy peanut butter
- Gradually add powdered sugar, using a spatula to scrape the bottom of the bowl as needed to ensure sugar is completely combined.6 cups (750 g) powdered sugar
- Add vanilla extract and salt and stir well. Taste-test and add additional salt if needed.2 teaspoons vanilla extract, ½ teaspoon table salt
- Gradually add milk, starting with 2 Tablespoons and only adding additional until the frosting is smooth and creamy.2-4 Tablespoons milk
Assembling Cake
- If your cakes are uneven, you may wish to level them once they are cooled so the final cake is flat/even.
- Place first layer of cooled cake on a serving platter and cover the top with a thick layer of peanut butter frosting. Place the second cake layer evenly on top, then top this with a thick layer of frosting, and repeat with the third layer. Cover entire cake with a thin layer of frosting to make a “crumb coating” that will catch all of the crumbs.
- Transfer to freezer for 10-15 minutes, then remove and apply a clean, thick coating of frosting around the entire cake. If using ganache, go on to the next step, if not, use remaining frosting to pipe a decorative border around the top of the cake as desired (I used an Ateco 848 tip for the cake in the photos) and serve.
Ganache
- If using ganache, place cake in refrigerator and place chocolate in a heatproof bowl.4 oz (113 g) semisweet chocolate
- Place cream in a small saucepan and heat until simmering. Pour evenly over the chocolate and cover. Allow to sit for 5 minutes.½ cup (118 ml) heavy cream
- After 5 minutes, gently whisk together cream and chocolate until smooth. Allow to cool about 15 minutes or until it is still liquid enough to pour but firm enough that it is no longer runny (see video for a visual if needed for any of these steps).
- Remove cake from refrigerator and transfer ganache to either a squeeze bottle or a piping bag with a small round tip or a small corner snipped off. Hold bottle or bag vertically and drip ganache around the edge of the cake (if ganache is dripping all the way to the bottom of the cake, return the cake to the fridge and let the ganache cool longer).
- Once you have done your drip as desired all the way around the cake, cover the top of the cake with a thin layer of chocolate (you may not use all of the ganache).
- Return cake to refrigerator for ganache to set, then once set use remaining peanut butter frosting to pipe a border around the top of the ganache as desired (I used my favorite Ateco 848 tip here).
- Serve and enjoy!
Notes
Baking in different sized pans
This cake may be baked in three 8” (20cm) round pans, but will need several minutes longer in the oven. You may also make just a two-layer cake using 8” (20cm) or 9” (23cm) round pans. The cakes will need to bake for longer, about 30-35 minutes in 8” (20cm) pans or slightly less time in 9” (23cm) pans. For cupcakes, this recipe yields approximately 24-30 cupcakes. Bake for approximately 17 minutes or until a toothpick inserted in the center comes out clean or with moist crumbs. I have not tested this cake recipe in different sized pans beyond these.Can I use cake flour?
While you can, I preferred all-purpose flour for a sturdier cake.Cocoa powder
If you can’t find dark cocoa powder, Dutch-process will work instead. If you can only find natural cocoa powder, I would recommend using my chocolate cake instead and baking in 3 pans for the amount of time listed here.Making in Advance
The cake layers can be made up to a day in advance, wrapped tightly, and stored at room temperature. If you need to store them longer you may freeze them. The peanut butter frosting may be made up to two days in advance. Cover tightly and store in the refrigerator. You will need to return to room temperature and stir well before using. Do not make the ganache in advance.Storing
This cake may be stored at room temperature in an airtight container for up to two days or in the refrigerator in an airtight container for up to 5 days. While I generally prefer to keep most of my cake recipes out of the refrigerator (as it has a tendency to dry out most cakes), this makes a moist cake that holds up well in the fridge! You may also freeze any leftovers: wrap tightly and freeze for up to several months.Nutrition
Nutrition information is automatically calculated, so should only be used as an approximation.
Like this? Leave a comment below!


This cake was amazing! I made this for my daughter’s 20th birthday using two 8-inch pans and hot coffee in place of the water, it turned out fantastic!!! The whole family loved it!! Made a half recipe of the frosting and it was plenty to cover the cake and use it as a filling as well. Definitely Pinning this recipe for future celebrations! Thank you for such a yummy recipe.❤️
This cake turned out soo good! I wish I could share a picture of it here. It’s so good that this is the first time I ever comment under a good blog. I mafe it this weekend for my father in laws birthday. He loves PB cookies the most and loves chocolate. Everyone said this was the best cake I’ve made yet!
I definitely went for the boiling tea (I used breakfast blend/medium roast). I used Hershey’s cocoa and the Publix brand semi sweet chips. I followed the recipe exactly. Including the timing for letting the cake and Ganache cool down. It came out perfectly. I let the cake cool overnight and stored the frosting in the fridge until the next day morning.
I was so worried about the assembly because I’ve never layered or covered a cake elegantly. But now thanks to your advice, I have the trick! I put it in the freezer after the first crumb layer and the second. It made a big difference to getting that lovely drip effect on the cake (I practiced on a bowl like you said).
My own little twist: decorated the bottom with mini reeses cups and the top with fudge covered nutter butter cookies and reeses cups.
Thank you so much!
I’m so glad you enjoyed the cake so much! Unfortunately there isn’t an easy way to post pictures here, but if you have a Facebook I do have a Facebook Group you can join or you can tag me on Instagram @Sugarspun_Sam 🙂
Can you tell me how many does this serve using standard size portions? Thank you!
Hi Jessica! I typically list the servings just above the embedded video. This makes 12 servings. 🙂
Fantastic recipe, but mine collapsed in the oven! I tried putting them in 2 8″ pans and followed your directions precisely, but they look pretty unseemly (they do, however, taste awesome–I think cake pops are in order).
I live at 4500′–is it possible it’s an altitude issue? Any suggested mods?
Hi Rachel! I’m not familiar with high altitude baking. Typically a cake will collapse if it isn’t baked completely.
I just made this today for my husband’s 40th, and omg it turned out SO WELL! Simple instructions, easy to follow, and tasted amazing. The cake is so moist and rich, and my husband and daughter honestly would have just shoveled the frosting into their faces if I’d let them. Thanks!
That’s wonderful, Amber! We’re so happy it was such a hit for everyone. 😊
I made this for my husband’s birthday because he is a Reese cup fan and this cake tastes exactly like a giant Reese cup in cake form! It is so rich and decadent. Will definitely be making again!
We’re so happy he enjoyed it, Leslie! Thanks so much for using our recipe and coming back to leave a review 😊
Hi, I plan on making this for my son’s birthday and am so excited but have a question about the frosting. In the ingredients it lists 2 cups of peanut butter but the video mentioned 1 cup. Thanks in advance.
Hi Mandy! Thanks so much for pointing this out. The written recipe is correct here 😊 We hope your son loves his cake!
Hi there! This cake turned out 🔥🔥🔥 absolutely love it! I have a bunch of frosting leftover—Any idea how long this would last in an airtight container in the fridge?
Thanks again 🙂
Hi Jess! I’m glad you enjoyed it. I think it will be ok up to a week. You may want to press some plastic wrap down onto the surface so it doesn’t crust over. 🙂
I made this cake for my dad’s 90th birthday. It was AMAZING. I personally do not care for chocolate cake, of course I can eat, I ate my whole piece. The cake was moist and dense but to dense. The frosting was to die for. I will definitely be making this cake again.
I loooveee your “Best Chocolate Cake” recipe, it truly is the best. But dutch process cocoa is much more common in my country so I thought I’d give this a go. I notice it has very similar ingredients. How would you say the texture & flavor compares to this one? Either way, I’m excited to find out when I try this tomorrow!
Hi Allie! The chocolate flavor is a bit darker so slightly less sweet in the peanut butter chocolate cake. It may be slightly more moist as well. The textures are very similar with potentially this peanut butter chocolate cake being a little more dense. Either one is a great option if you ask me. 🙂
I made this last night in a 9×13, came out beautifully! Took mine about 35 mins. Half the frosting recipe was the perfect amount. Decadent and delicious!
We’re so happy it turned out for you, Elizabeth! Enjoy 😊
Hi Sam! Thank you for working so hard to give us these amazing recipes. I appreciate all the time and effort you spend getting them just right for us. I made cupcakes and they are divine! I did only get 19, but I plan on freezing them and popping them out when I need a quick dessert. They are great without the frosting too. I’m sure my guests will be impressed! 10 stars!!
Hi Sam, I made this for my daughter-in-laws birthday with the cream cheese frosting. This has an outstanding deep chocolate flavor (replaced hot water with espresso as suggested) and a super moist BUT delicate crumb. I let the cake cool in the pans (2 x 9″) for 10 minutes before turning out and they both broke. Not to let that put me off as I had no time to make another cake, I saved it by piecing it back together in a springform pan frosting the middle and then pieced the next layer on top. I cover the top with pink tinted large rosettes and no one even knew. When I cut the cake it held together and was a HUGE hit. I still gave 5 stars as I will make again and again. Any suggestions? ps. I always weigh my ingredients.
I’m glad everyone still enjoyed the cake so much, Nancy! I’m sorry it cracked though. 🙁 I wonder if maybe it stuck a little bit when being flipped. The inverting process can be very tricky. I show you how I do it in the video to help trying to keep it from cracking. I hope they hold together better next time. 🙂
I used the oil/flour prep on the pans…next time definitely the parchment paper.
On a side note, my son called last night and said to me “I will pay you for the recipe”!!! True story 🙂
I am your newest fan….this week carrot cake cupcakes.
Hi Sam! Having made a lot of your recipes, I think there’s a typo in 1 cup buttermilk to ml? You usually use 236ml, so I just thought I’d point that out! Can’t wait to make this x You don’t have to reply 🙂
Hi Anita! You’re totally right–thanks so much for catching that. We’ve updated this, so everything should be good to go now. Thanks again 😊
Hi Sam: loved the cake
Only problem I have was with the frosting
I used heavy creme. Consistency was to heavy.
Used 5 Tbl heavy creme! Any suggestions 🤔
Hi Rebecca! The heavy cream shouldn’t cause any issues here. The frosting is a thicker frosting but it shouldn’t be really “heavy”. I would try whipping it a little bit longer or maybe use a little less powdered sugar. I hope this helps! 🙂
Awesome!
We’re so happy you loved it, Tom! ❤️
I used Gluten Free flour (Namaste). It worked very well with this recipe.
Hi Sam,
Really want to try this cake because my husband bought the Special Dark Cocoa by mistake and want to use it in something! 😀
But not peanut butter lovers. Do you have a suggestion for another frosting?
Hi Cheryl! Oh yes, basically any of my frosting recipes will work well here, I would particularly recommend my cream cheese frosting (my personal favorite) or classic buttercream frosting. With either of these I would recommend doubling the recipe so you have plenty to work with for all three layers + the decoration on top. I hope that helps, and I hope everyone loves the cake! 🙂