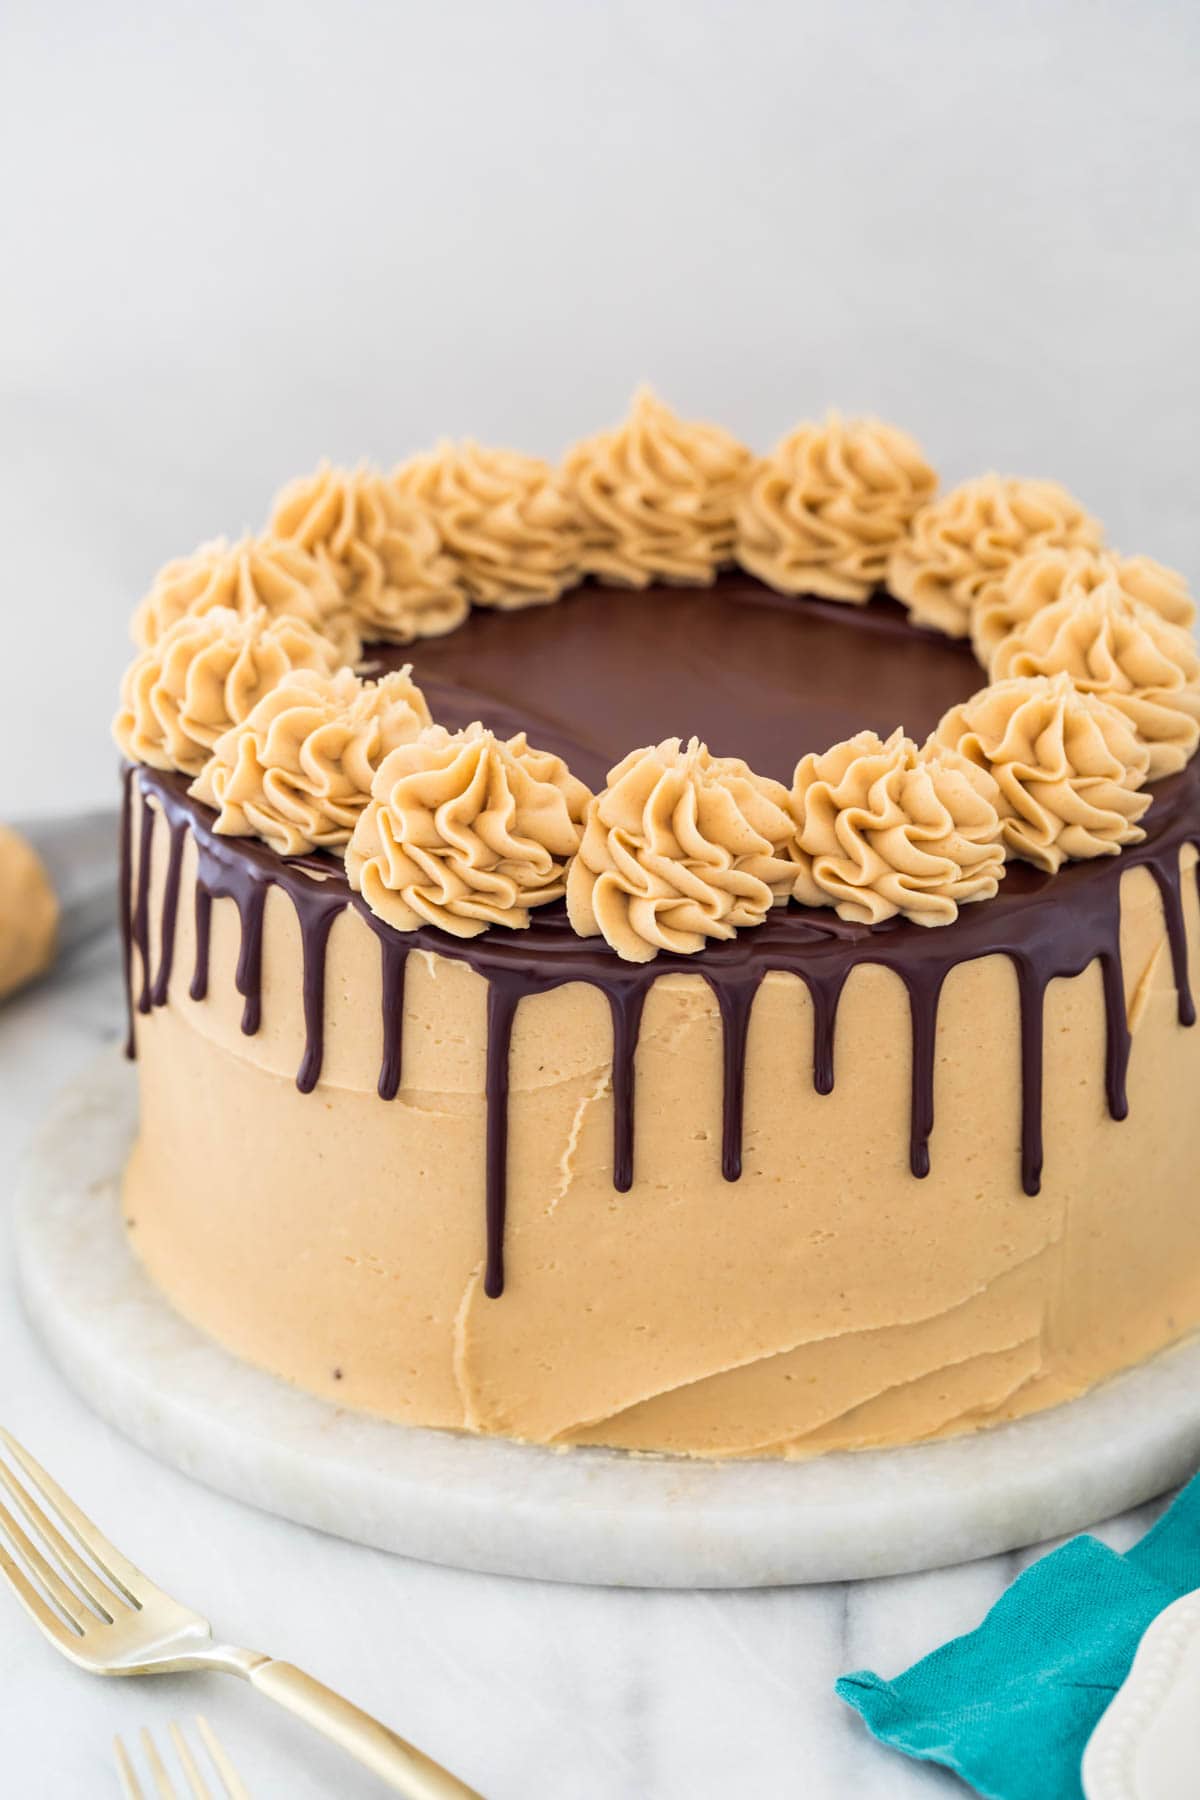
My Peanut Butter Chocolate Cake is made with three layers of incredibly moist and rich dark chocolate cake, covered in peanut butter frosting, and draped with a glossy chocolate ganache drip (and I’ll walk you through the steps on how to do the drip, too!). This is the perfect cake for both celebrations and everyday indulgences. Recipe includes a how-to video!
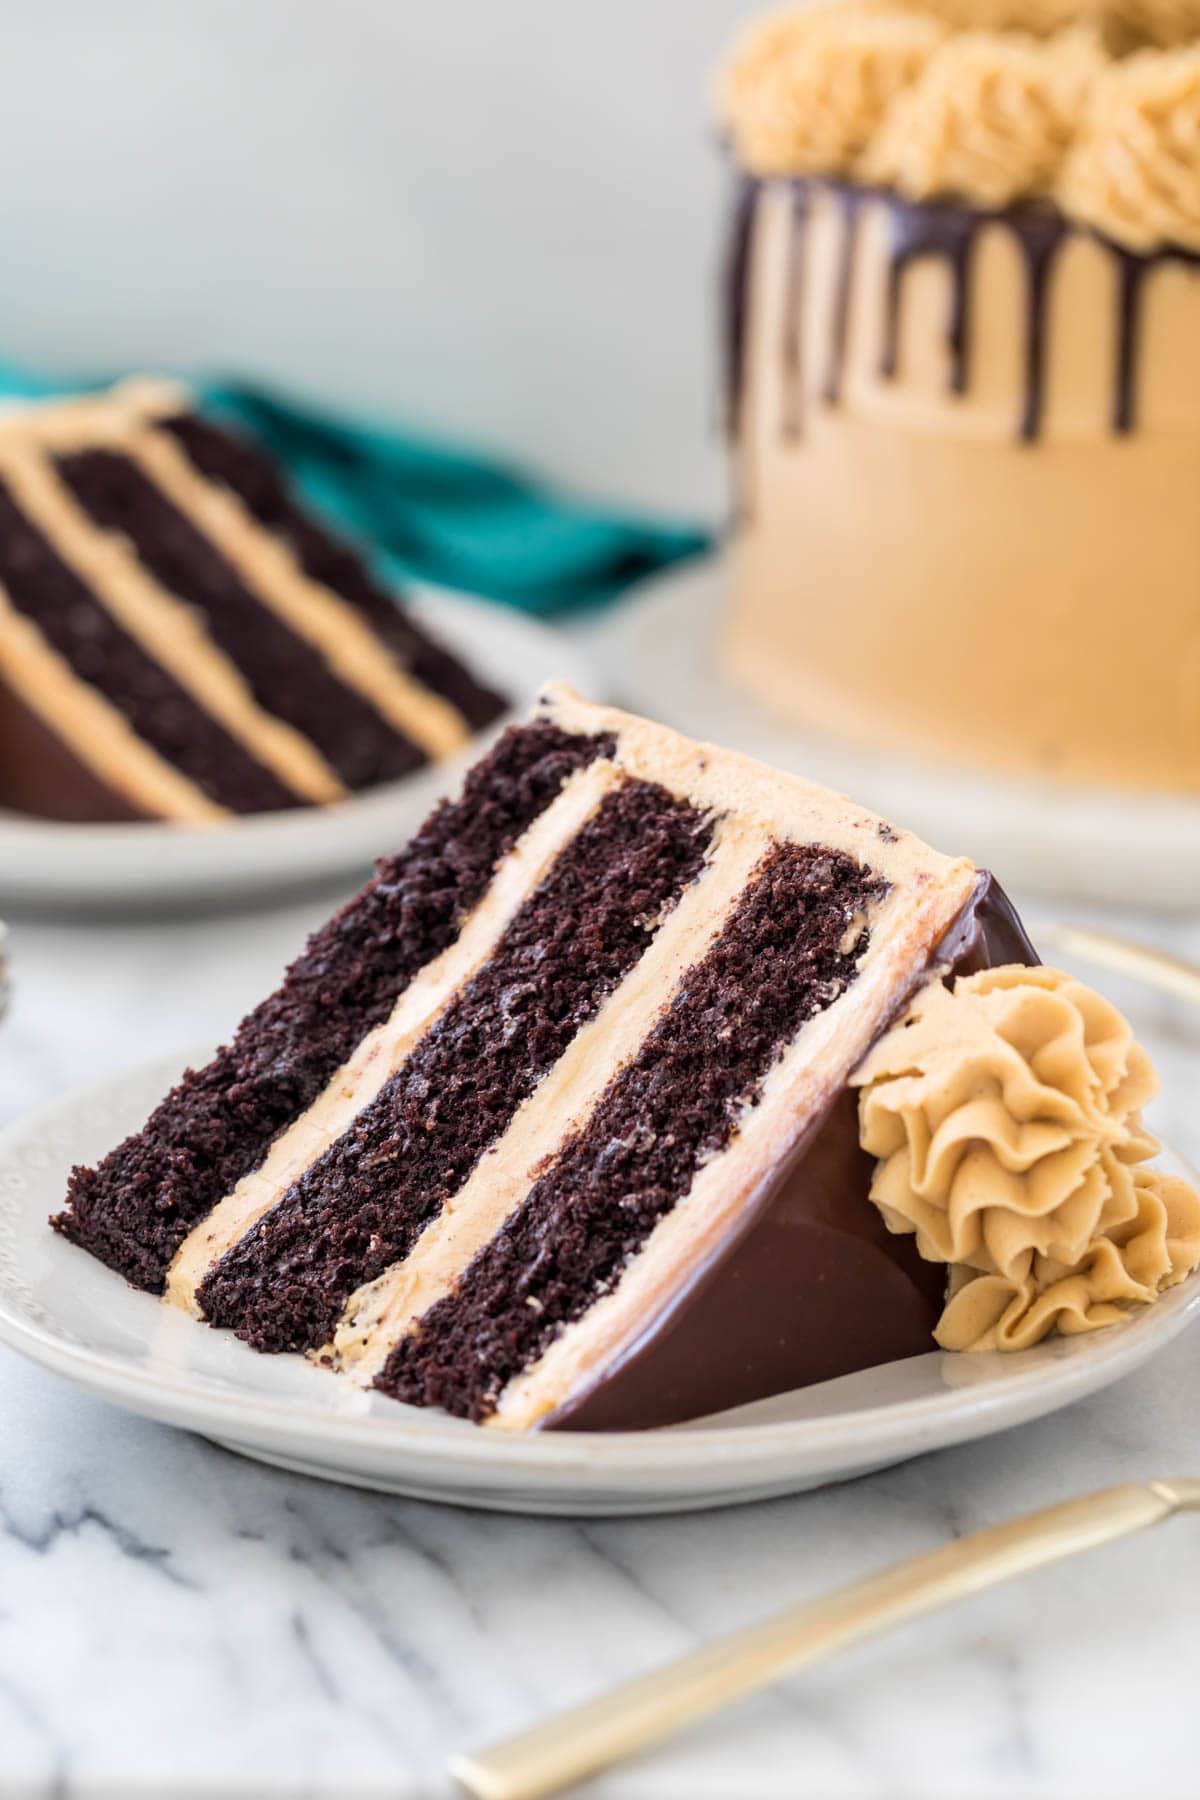
Perfect Peanut Butter Chocolate Cake
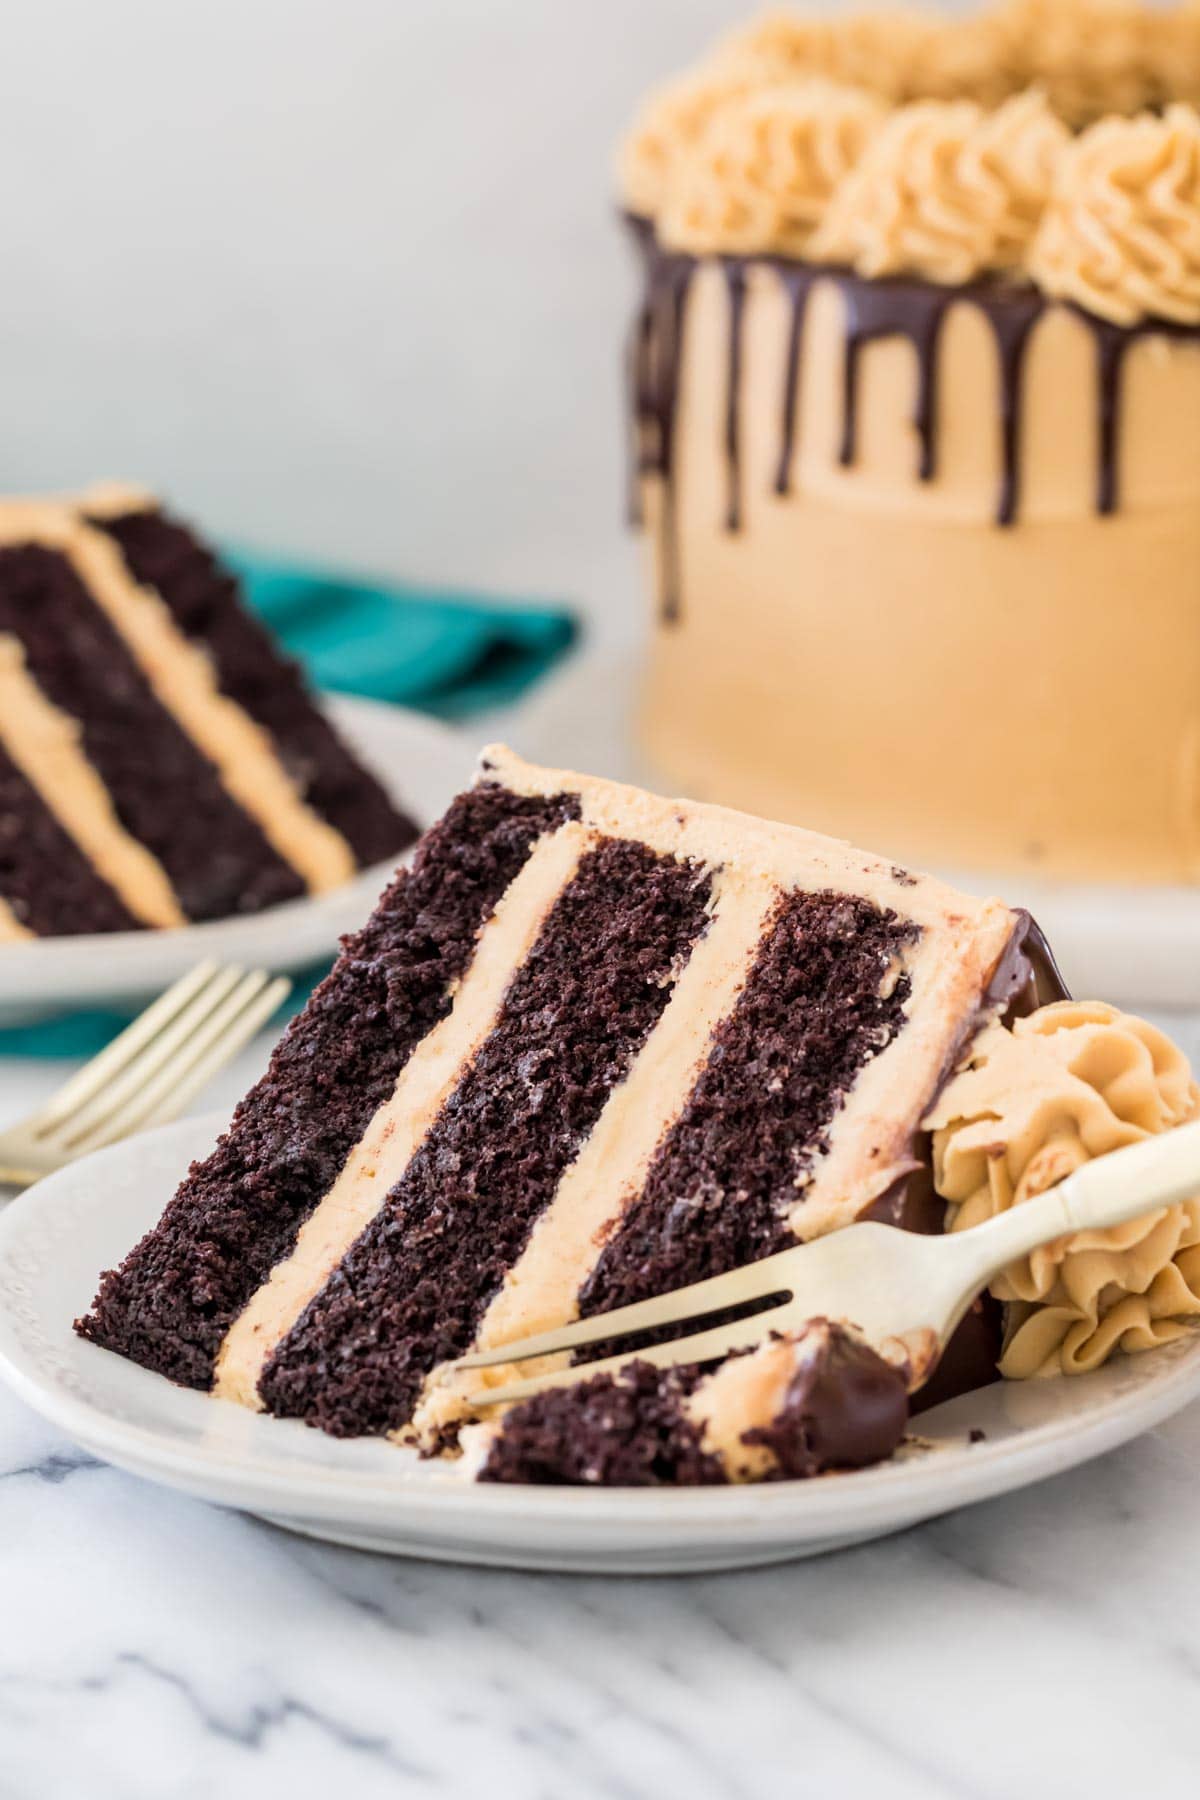
With striking dark chocolate layers, layers of silky smooth peanut butter frosting and a sophisticated chocolate ganache drip, this is not your mother’s peanut butter chocolate cake!
The layers of today’s recipe are closely based off of my dark chocolate cupcakes with all the richness of my devil’s food cake, which means they’re decadent, intensely chocolatey, and moist, moist enough that you can store it in the fridge and still have the crumb melt in your mouth the next day.
While I certainly don’t consider myself a decorator, I wanted today’s cake to be extra stunning and I want you to be able to pull off a cake just like the one in the photos. To help with this, I include detailed decorating instructions in the post, in the recipe, and in the how-to vide below.
Let’s dive in!
What You Need
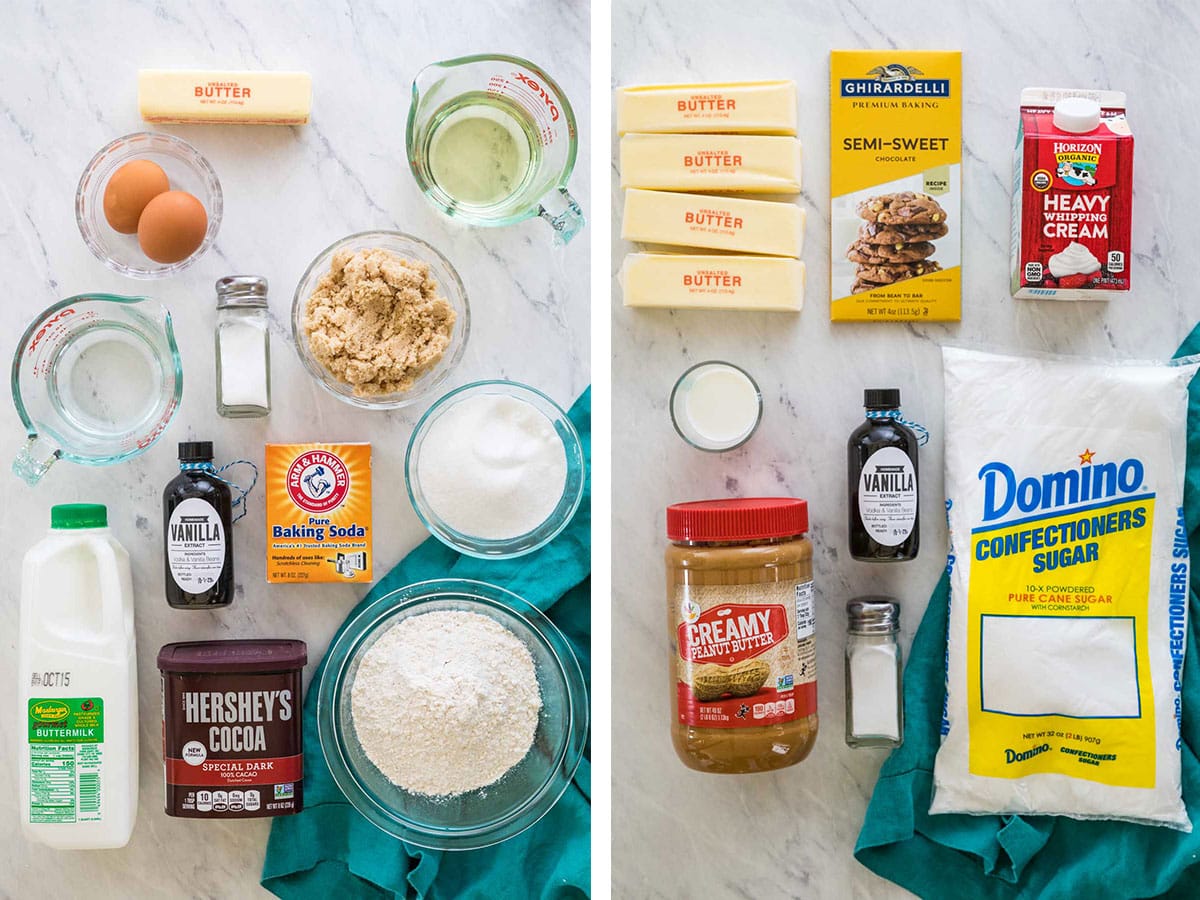
Each ingredient in my peanut butter chocolate cake recipe has been carefully selected to yield a perfectly rich and deeply flavorful, but not too sweet cake.
- Flour. For a sturdier, easily stackable cake, I like using all-purpose flour here. You can substitute cake flour if you’d like, but I don’t personally feel the need.
- Sugar. You’ll need brown sugar and granulated sugar for the cake, and powdered sugar for the frosting. Using a combination of sugars in the cake adds some serious flavor and moisture to make for a rich cake.
- Cocoa powder. Use dark cocoa powder for a strong chocolate flavor that stands up against the creamy peanut butter icing. This is typically sold in the baking aisle beside other cocoa powders, but you have trouble finding it Dutch-process cocoa will also work. If you can’t find either and can only find regular, natural cocoa powder, hop over to my chocolate cake recipe and make that one instead!
- Butter and oil. Yes, we’re using both butter and oil in this cake! The combination of the two makes for an incredibly moist cake with an amazing flavor (which you already know if you’ve made my vanilla cake). I recommend vegetable or canola oil, but you can really use any neutral cooking oil.
- Buttermilk. Besides providing flavor, buttermilk also adds moisture to this cake. If you don’t have any on hand, use my buttermilk substitute.
- Water. You can use water or coffee (for a more intense chocolate flavor), but the liquid you use must be hot to properly react with the cocoa powder.
- Peanut butter. Use a smooth peanut butter and avoid the “natural” kind that separates, people have reported mixed results when using natural peanut butter.
- Semisweet chocolate. Any kind of semisweet chocolate will work, whether that’s chocolate chips or a chopped up baking bar.
- Cream. Warm heavy cream will turn our chocolate into a rich chocolate ganache for decorating our peanut butter chocolate cake. Make sure you heat it to just simmering, then immediately take it off the heat.
Remember, this is just an overview of the ingredients I used and why. For the full recipe please scroll down to the bottom of the post!
How to Assemble and Decorate Peanut Butter Chocolate Cake
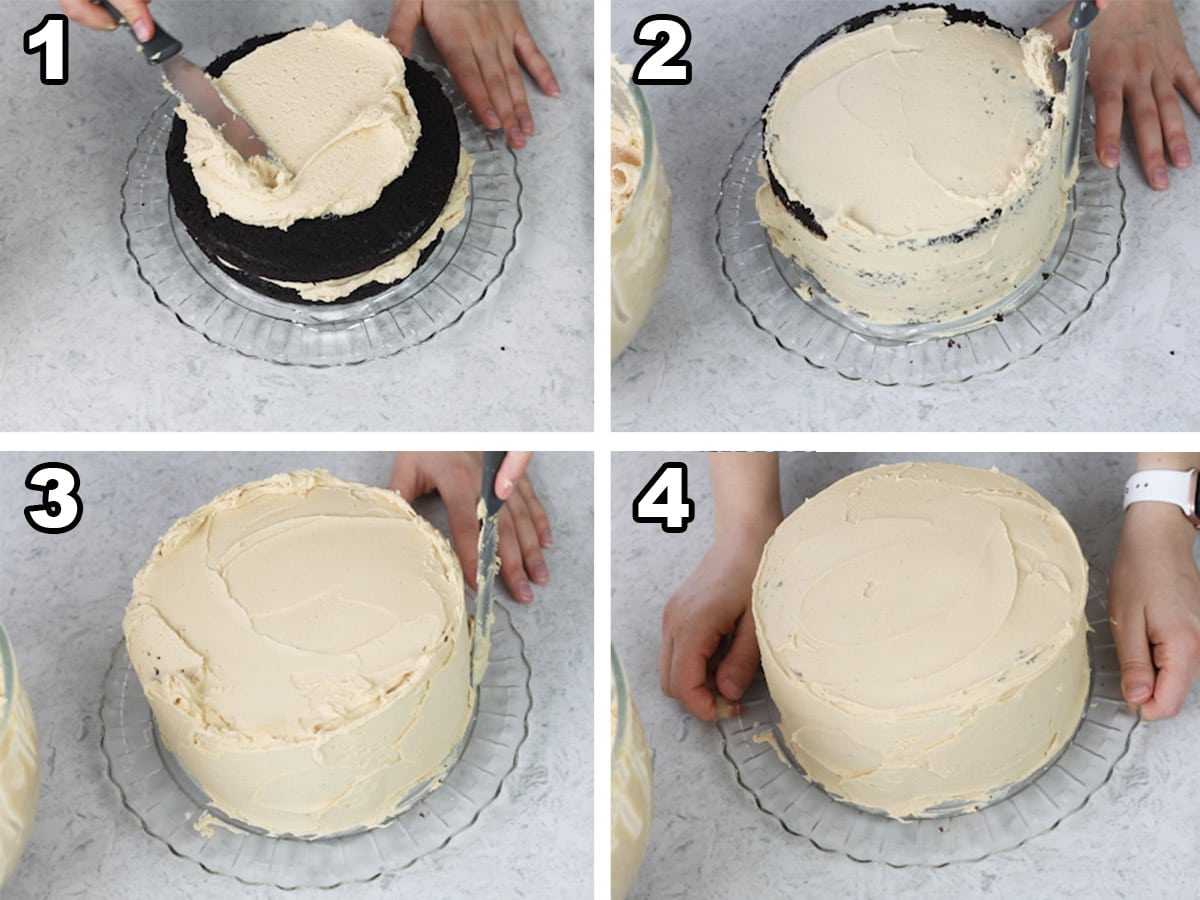
SAM’S TIP BEFORE YOU BEGIN ASSEMBLY: For a professional-looking, totally level cake you will want to level your cake layers before assembling (but after they’ve completely cooled). You can do this using a cake leveler or just using a sharp knife to level the top of the cake.
Bake your cakes as instructed and let them cool completely before frosting. When your cakes are almost done cooling, make the peanut butter frosting. Once your cakes are cool and your frosting is prepared, you’re ready to assemble!
- Place one cooled cake layer on serving platter and cover with a thick, even layer of icing (this recipe makes a lot of frosting, so you should have plenty for a nice thick peanut butter layer!). Repeat with the next two layers.
- For a clean looking cake, do a crumb coat! Spread a thin layer of frosting over the entire cake. It’ll look messy and you’ll see crumbs poking through, this is fine (just make sure you don’t get any crumbs back in your icing bowl as you move your spatula back and forth). Move your cake to the freezer for 10-15 minutes. This “crumb coating” holds all the crumbs in place, so when you do your next frosting application it will be clean, smooth, and crumb-free.
- Remove cake from freezer and cover immediately with a thick, even layer of frosting. You should still have a fair bit of frosting left over, hang on to this, we need it for our decorative topping!
- Smooth frosting until you’ve reached your desired look. If you aren’t adding ganache, pipe a decorative border on top of the cake; otherwise, place your cake back in the fridge or freezer and move on to the next steps.
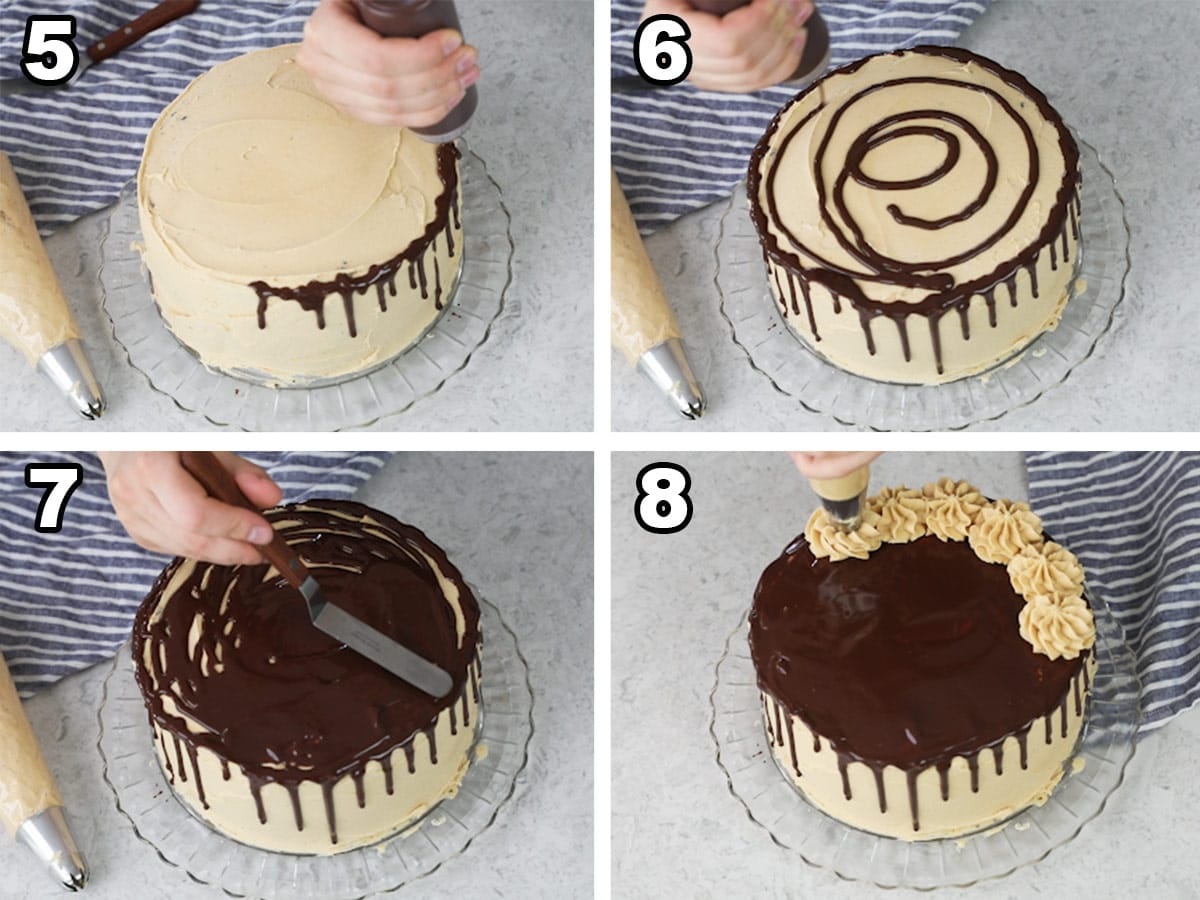
- Prepare ganache and let it cool. Pour cooled (but still liquid) ganache into a squeeze bottle (you could alternatively use a piping bag or even a spoon, but I’m not skilled enough to make these work very well personally). Holding the bottle vertically, drip ganache around the entire cake, allowing the chocolate to slowly run down the edges.
- Drizzle ganache over the top of the cake (you may not need all of it!). Don’t go overboard, I do a few drizzles and then spread the ganache, adding as little as I need, otherwise it drips over the side of the cake and ruins all of our work from the earlier steps.
- Use an offset spatula to smooth the ganache into one even layer. Return the cake to the fridge and chill until ganache set.
- Use remaining peanut butter icing to pipe a decorative border or dollops around the cake. I used my favorite Ateco 848 tip here.
SAM’S TIP: If you’re adding a ganache drip to your cake, be sure your cake is chilled beforehand. Just a few minutes in the fridge or freezer can make a huge difference!
Frequently Asked Questions
Very hot water is critical for this recipe. When you (very carefully!) add hot water to cocoa powder, you are “blooming it. Blooming cocoa powder intensifies its flavor, and we want our cake to be as flavorful and chocolatey as possible! For an even more intense chocolate flavor, you can use hot coffee instead of hot water; your cake won’t taste like coffee, but it will have a very intense chocolate flavor!
Either it’s your cake that isn’t cool enough, or it’s your ganache. For good measure, pop your cake back in the fridge (or the freezer) for a few more minutes and let your ganache cool down some more before trying to add the drip. You can also try making your drips smaller.
This recipe yields a bit extra ganache, so experiment with your drips on something besides your cake before beginning (sometimes I test my drips on an upside-down bowl before moving over to my cake).
Yes! You can make 24-30 cupcakes. They’ll need to bake for approximately 17 minutes.
Enjoy!
More Recipes for Peanut Butter & Chocolate Lovers
Let’s bake together! I’ll be walking you through all the steps in my written recipe and video below! If you try this recipe, be sure to tag me on Instagram, and you can also find me on YouTube and Facebook
Peanut Butter Chocolate Cake
Ingredients
For the cake layers
- 1 ¾ cup (220 g) all-purpose flour
- 1 cup (200 g) light brown sugar firmly packed
- 1 cup (200 g) granulated sugar
- ¾ cup (75 g) dark cocoa powder
- 1 ½ teaspoons baking soda
- ¾ teaspoon table salt
- ½ cup (113 g) unsalted butter melted
- ⅔ cup (155 ml) vegetable or canola oil you may substitute any neutral cooking oil
- 2 large eggs room temperature preferred
- 2 teaspoons vanilla extract
- 1 cup (236 ml) buttermilk
- ½ cup (118 ml) very hot or boiling water
For the peanut butter frosting
- 2 cups (452 g) unsalted butter softened
- 2 cups (490 g) creamy peanut butter (I do not recommend using a “natural” peanut butter/the kind where the oil separates)
- 6 cups (750 g) powdered sugar
- 2 teaspoons vanilla extract
- ½ teaspoon table salt
- 2-4 Tablespoons milk I use whole milk, but you may substitute any milk you have on hand or even half and half or heavy cream
For the ganache (optional)
- 4 oz (113 g) semisweet chocolate chocolate chips or a chopped baking bar will work
- ½ cup (118 ml) heavy cream
Recommended Equipment
- 3 9” baking pans
- Ganache drip bottle
Instructions
- Preheat oven to 350F (175C) and line the bottoms of three 9” (23cm) round cake pans with parchment paper and grease and flour the sides or spray with baking spray. Set aside.
- In a large bowl, combine flour, sugars, cocoa powder, baking soda and salt and stir well (break up any clumps from the brown sugar).1 ¾ cup (220 g) all-purpose flour, 1 cup (200 g) light brown sugar, 1 cup (200 g) granulated sugar, ¾ cup (75 g) dark cocoa powder, 1 ½ teaspoons baking soda, ¾ teaspoon table salt
- Add butter, oil, eggs, and vanilla extract and stir until completely combined (batter may be thick).½ cup (113 g) unsalted butter, ⅔ cup (155 ml) vegetable or canola oil, 2 large eggs, 2 teaspoons vanilla extract
- Slowly stir in buttermilk until completely combined.1 cup (236 ml) buttermilk
- Finally, slowly (and carefully!) add hot water until batter is uniform and thoroughly combined.½ cup (118 ml) very hot or boiling water
- Evenly divide batter into prepared cake pans and transfer to 350F (175C) oven. Bake 20-24 minutes or until a toothpick inserted in the center of each cake comes out clean or with a few moist crumbs (note: if your oven bakes unevenly you may need to rotate the cakes during baking. It is also fine to bake two cakes at one time and leave the third on the counter until the first two have finished baking, if your oven is too small to hold all 3 at once).
- Allow cakes to cool for 15 minutes then run a knife around the edge and carefully invert onto cooling racks to cool completely before frosting.
Peanut Butter Frosting
- Combine butter and peanut butter and use an electric mixer or stand mixer to beat until smooth and creamy.2 cups (452 g) unsalted butter, 2 cups (490 g) creamy peanut butter
- Gradually add powdered sugar, using a spatula to scrape the bottom of the bowl as needed to ensure sugar is completely combined.6 cups (750 g) powdered sugar
- Add vanilla extract and salt and stir well. Taste-test and add additional salt if needed.2 teaspoons vanilla extract, ½ teaspoon table salt
- Gradually add milk, starting with 2 Tablespoons and only adding additional until the frosting is smooth and creamy.2-4 Tablespoons milk
Assembling Cake
- If your cakes are uneven, you may wish to level them once they are cooled so the final cake is flat/even.
- Place first layer of cooled cake on a serving platter and cover the top with a thick layer of peanut butter frosting. Place the second cake layer evenly on top, then top this with a thick layer of frosting, and repeat with the third layer. Cover entire cake with a thin layer of frosting to make a “crumb coating” that will catch all of the crumbs.
- Transfer to freezer for 10-15 minutes, then remove and apply a clean, thick coating of frosting around the entire cake. If using ganache, go on to the next step, if not, use remaining frosting to pipe a decorative border around the top of the cake as desired (I used an Ateco 848 tip for the cake in the photos) and serve.
Ganache
- If using ganache, place cake in refrigerator and place chocolate in a heatproof bowl.4 oz (113 g) semisweet chocolate
- Place cream in a small saucepan and heat until simmering. Pour evenly over the chocolate and cover. Allow to sit for 5 minutes.½ cup (118 ml) heavy cream
- After 5 minutes, gently whisk together cream and chocolate until smooth. Allow to cool about 15 minutes or until it is still liquid enough to pour but firm enough that it is no longer runny (see video for a visual if needed for any of these steps).
- Remove cake from refrigerator and transfer ganache to either a squeeze bottle or a piping bag with a small round tip or a small corner snipped off. Hold bottle or bag vertically and drip ganache around the edge of the cake (if ganache is dripping all the way to the bottom of the cake, return the cake to the fridge and let the ganache cool longer).
- Once you have done your drip as desired all the way around the cake, cover the top of the cake with a thin layer of chocolate (you may not use all of the ganache).
- Return cake to refrigerator for ganache to set, then once set use remaining peanut butter frosting to pipe a border around the top of the ganache as desired (I used my favorite Ateco 848 tip here).
- Serve and enjoy!
Notes
Baking in different sized pans
This cake may be baked in three 8” (20cm) round pans, but will need several minutes longer in the oven. You may also make just a two-layer cake using 8” (20cm) or 9” (23cm) round pans. The cakes will need to bake for longer, about 30-35 minutes in 8” (20cm) pans or slightly less time in 9” (23cm) pans. For cupcakes, this recipe yields approximately 24-30 cupcakes. Bake for approximately 17 minutes or until a toothpick inserted in the center comes out clean or with moist crumbs. I have not tested this cake recipe in different sized pans beyond these.Can I use cake flour?
While you can, I preferred all-purpose flour for a sturdier cake.Cocoa powder
If you can’t find dark cocoa powder, Dutch-process will work instead. If you can only find natural cocoa powder, I would recommend using my chocolate cake instead and baking in 3 pans for the amount of time listed here.Making in Advance
The cake layers can be made up to a day in advance, wrapped tightly, and stored at room temperature. If you need to store them longer you may freeze them. The peanut butter frosting may be made up to two days in advance. Cover tightly and store in the refrigerator. You will need to return to room temperature and stir well before using. Do not make the ganache in advance.Storing
This cake may be stored at room temperature in an airtight container for up to two days or in the refrigerator in an airtight container for up to 5 days. While I generally prefer to keep most of my cake recipes out of the refrigerator (as it has a tendency to dry out most cakes), this makes a moist cake that holds up well in the fridge! You may also freeze any leftovers: wrap tightly and freeze for up to several months.Nutrition
Nutritional information is based on third-party calculations and should be considered an estimate only. Actual nutritional content will vary based upon brands used, measuring methods, cooking method, portion sizes, and more.


Karen
My two boys and Husband loved this cake, my one son asked me to make this for his next Birthday. Thank you
Sam
I’m so glad everyone enjoyed it so much, Karen! 🙂
Robyn
I would like to know if I can use the cake recipe in a Twinkie size pan there are 8 little cake in the pan. What time frame would you recommend to bake them
I’m thinking of making them like funny bones
Sam
Hi Robyn! Unfortunately I haven’t ever tried it so I can’t say for sure. Make sure to keep an eye on them so you don’t overbake them. 🙂
Blake Snyder
Perfect with a cup of kool-aid! 😉
Lauren
Came out perfectly!
Emily @ Sugar Spun Run
We’re so glad to hear it, Lauren! Thanks for trying our recipe and leaving a review 💜
Casey
Hi! How would I downsize the recipe (and cooking time) if I wanted to make a three-layer six-inch cake? Thanks!
Emily @ Sugar Spun Run
Hi Casey! You can halve the recipe to fit your pans. We’re not sure on the bake time though 😊
Elizabeth C.
Sam defies the laws of nature! My Mom has NEVER and I mean NEVER liked dark chocolate, but this is now her FAVORITE chocolate cake! I’m not going to lie, when I read the recipe, I was like “okay, but where is the blooming step?!” I was so conflicted! But Sam never. Disappoints. Ever. So decadent. So indulgent. And I HIGHLY recommend the peanut butter buttercream because I couldn’t stop sneaking tastes while frosting the cake!
I was able to fit this recipe in 4 6 inch rounds and my cook time was ~25-28 min. I would start watching it around 23 min though. The layers baked up to just over an inch.
Emily @ Sugar Spun Run
We’re so happy the cake was such a hit, Elizabeth!! Thanks for trusting our recipes ❤️
John
So is the picture of the recipe 3 8 inch pans? because I just poured it in 3 9 inch and it looks super thin.
Sam
No the picture is done in 9 inch pans. They are thinner layers, not your standard 2 inch tall layer. It will rise a bit as it bakes. 🙂
John
The video says 3 8″ round pans. But the recipe says 3 9″ pans then there is a note saying you can also make it 2 8″ pans. Just wandering which one is the best because it’s confusing. It seems quit a bit of the video is different then the written recipe.
Sam
I’m sorry for the confusion, John! Any of those options will work, 3 9 inch, 3 8 inch, or 2 8 inch. They don’t completely fill the pan when using 3 pans, which is why it will work in 2. 🙂
D
I am 74 years old and have baked most of my life. This recipe did not work for me and I did follow the recipe to the letter. The cake fell apart when removing from the pans although I had greases them and used parchment paper. The icing worked but it was impossible to spread on the cake without tearing it further. Very disappointed because it was a welcome home surprise for my family!
Sam
This is so sad, Deedee, I’m so sorry to hear it. Neither of these things should’ve happened. I’m not sure if the recipe video will be helpful but I do provide one as a step-by-step tutorial in the recipe card, just so you can see exactly how I make it at home.
Mical
Amazing cake! Made this for my mom’s birthday and it was a hit. The peanut butter frosting is amazinggggg.
Emily @ Sugar Spun Run
We’re so happy it was a hit for you, Mical! Thanks for using our recipe ❤️
Sarah
Hello, I love all of your cake recipes! The video on this says 1 c peanut butter and 2 c butter but the recipe says 2 c peanut butter. Can you clarify? Thanks!
Emily @ Sugar Spun Run
Hi Sarah! The written recipe is correct here 😊
Chelsea
Hi there! I love your blog and want to try this recipe. Do you know what will happen if I use natural peanut butter (well mixed)? Will the frosting separate or something? Thanks!
Sam
Hi Chelsea! I would be worried about it separating out over time. 🙁
Sybol
You know it is beyond worth making when your 96 yr. old Grandmother takes a bite , closes her eyes and moans ” Oh sweet Baby Jesus ” ! I will never forget that moment . Thank you for the cake and the memory .
Sam
🤣 I’m so glad everyone enjoyed it so much, Sybol! 🙂
Katie
I made this cake for my sister in law’s birthday and it was TO. DIE. FOR! So good. I used coffee to bloom the cocoa powder. For the buttercream I used salted butter and Reese’s peanut butter – drool worthy. Everyone was impressed! So rich, moist, tasty, amazing. Thank you for sharing it with us!
Sam
I’m so glad you enjoyed it so much, Katie! 🙂
Larissa
You may want to fix a typo in assembly step 2. A “thin layer of cake” on top to catch crumbs.
Loved the video, and I’m making this right now!
Sam
Hi Larissa! Thank you for catching that. I have updated it. 🙂
BritHart
This icing is the most amazing thing you will ever eat. It’s like the epitome of PB icing mixture. It is what you dream of. I lost the recipe and then scrolled back through 20+ websites and ingredients just to find it again. Thank god I did. It does take a lot of ingredients but it’s worth it when you know that it is good. Def make sure your butter is room temp !!
Sam
I’m so glad you enjoyed it so much! You’ll have to bookmark it or print it so you don’t lose it again. 🙂
Mary
Can you make cupcakes with this recipe?
Emily @ Sugar Spun Run
Hi Mary! Give our dark chocolate cupcakes with peanut butter frosting a try instead 😊