
Peanut Butter Brownies
This post may contain affiliate links. As an Amazon Associate I earn from qualifying purchases. Please read my disclosure policy.
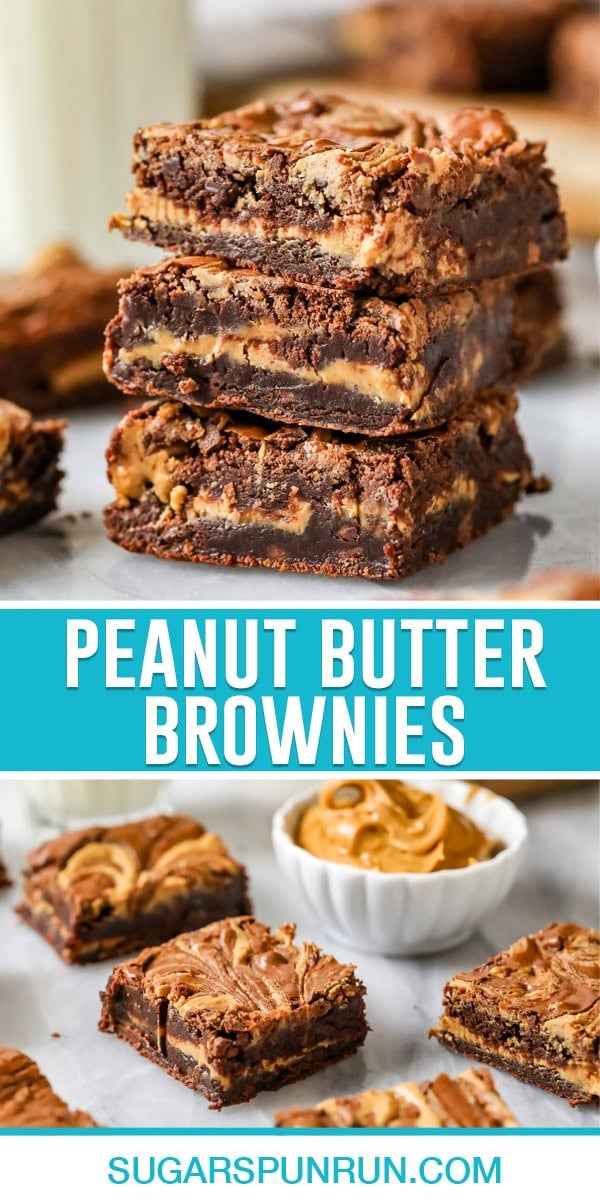
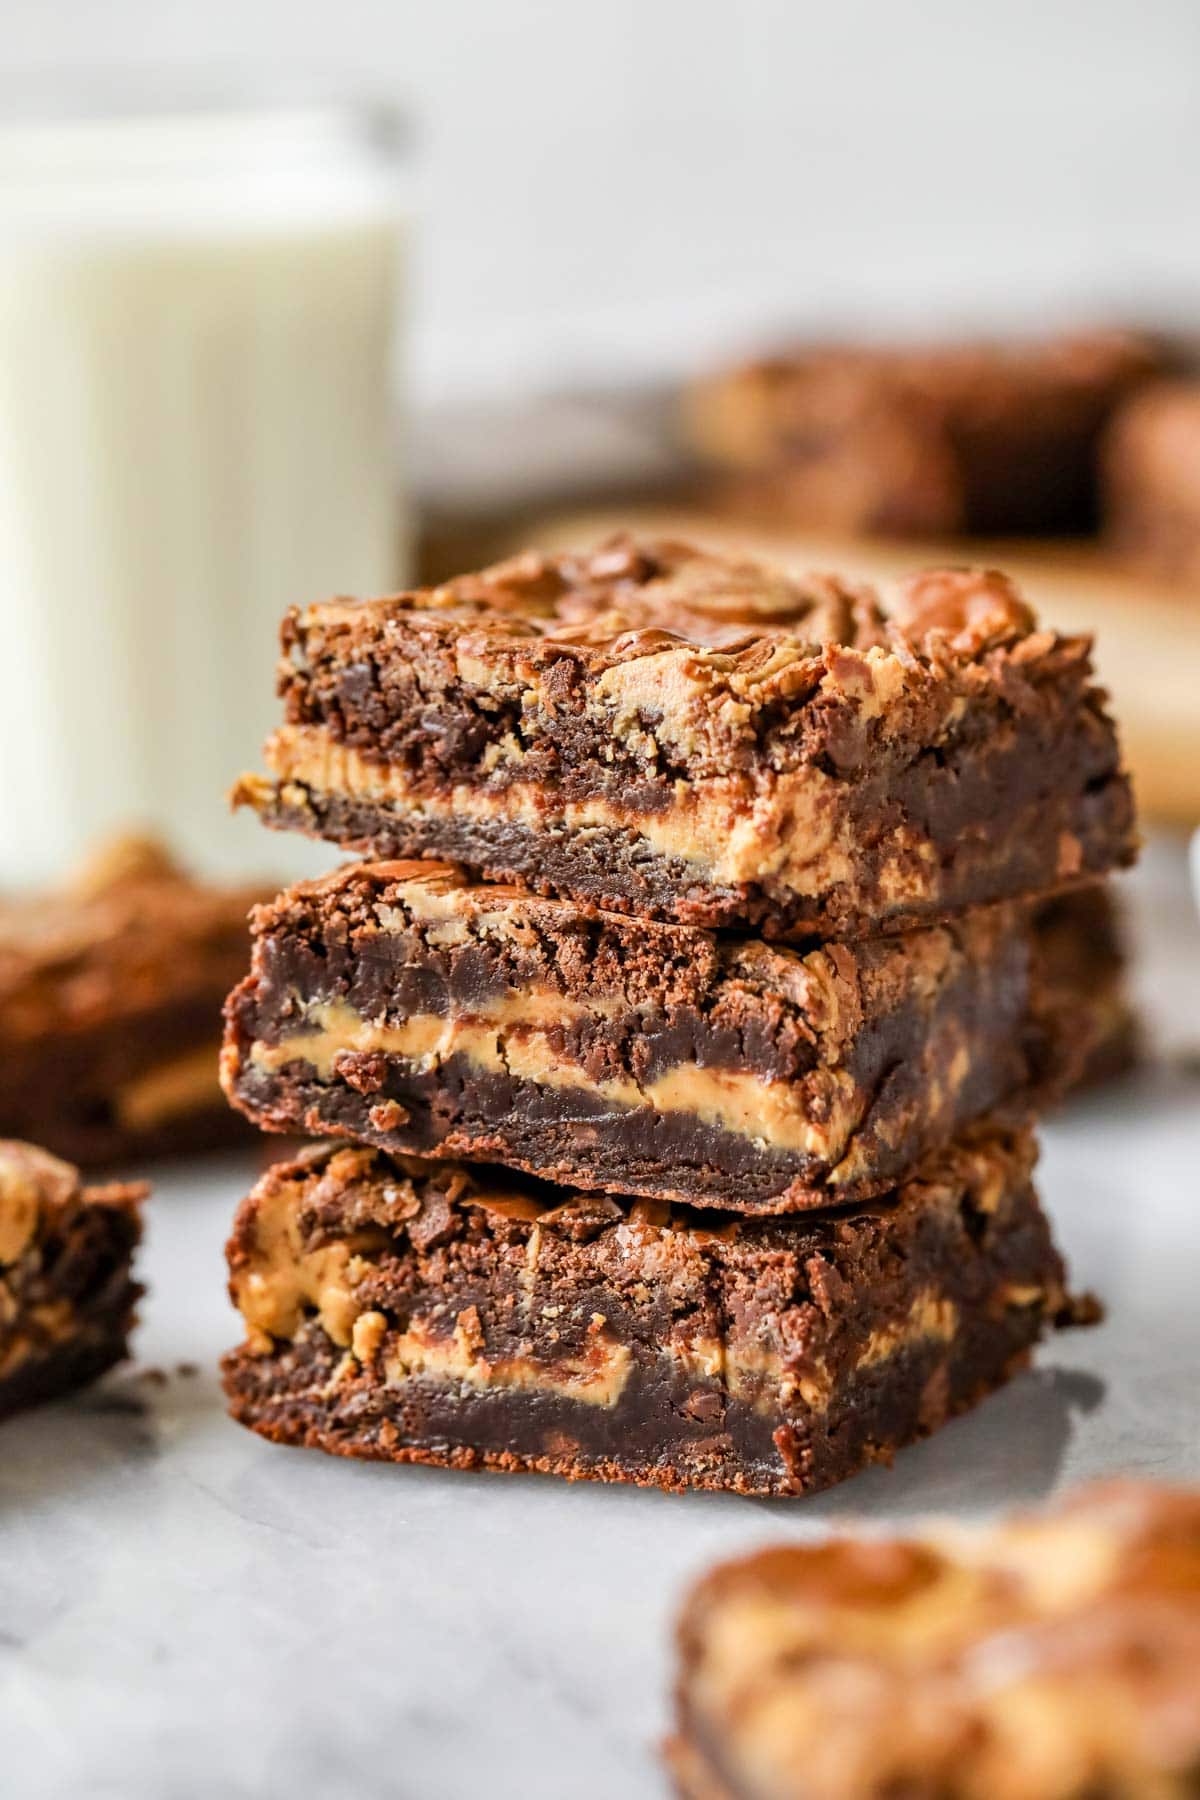
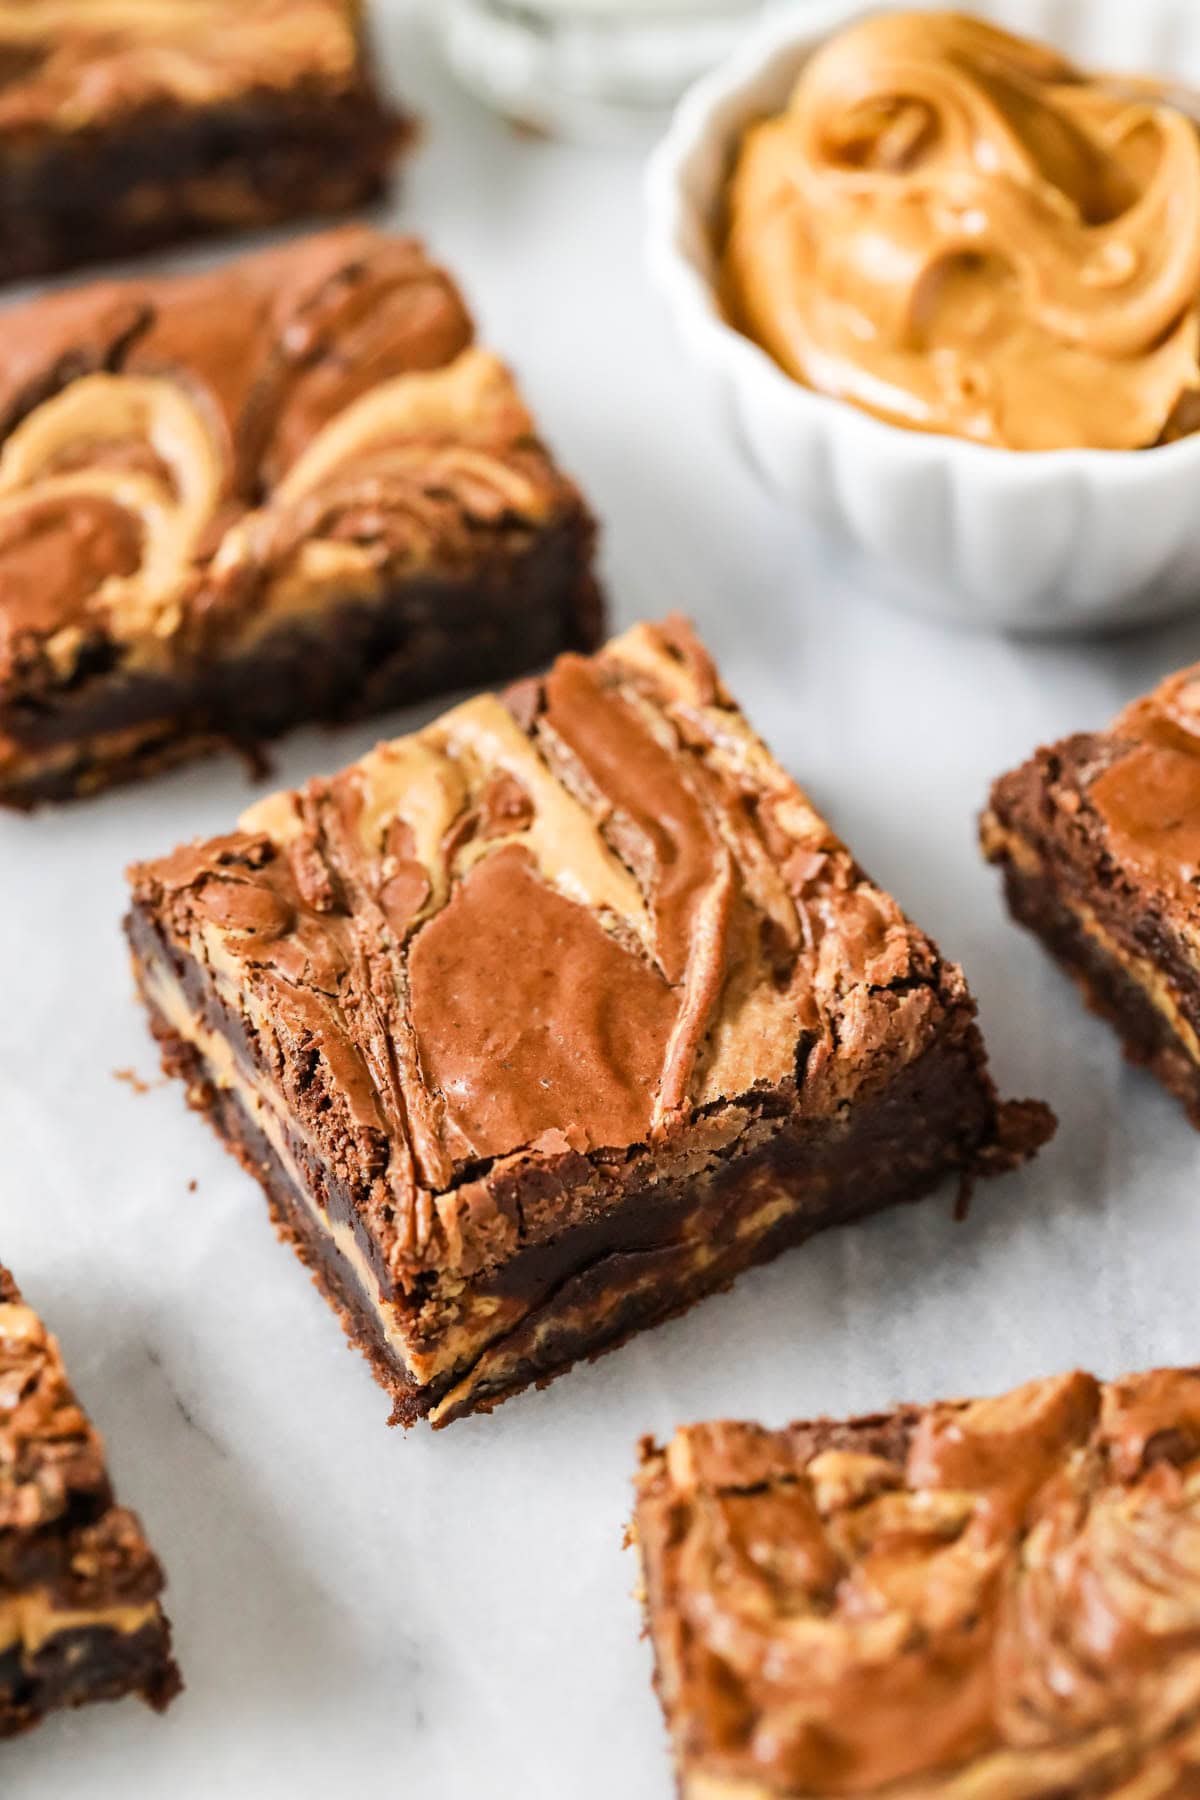
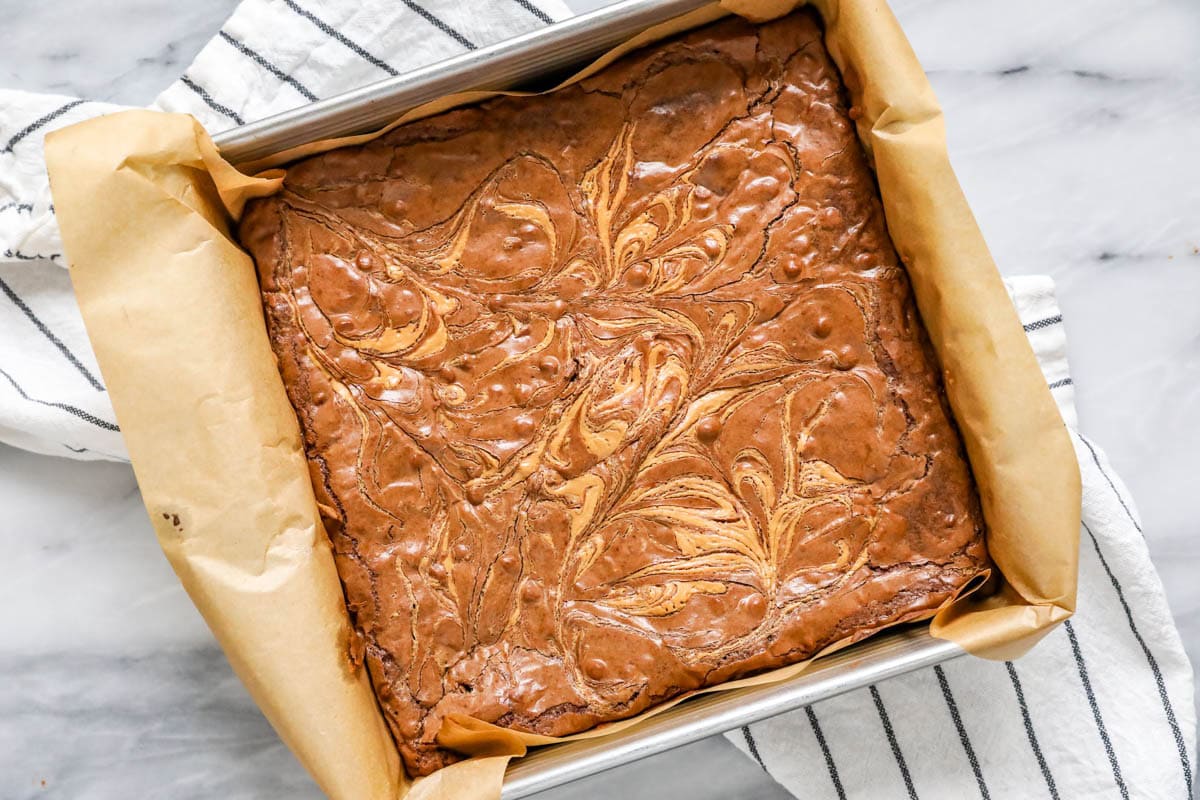
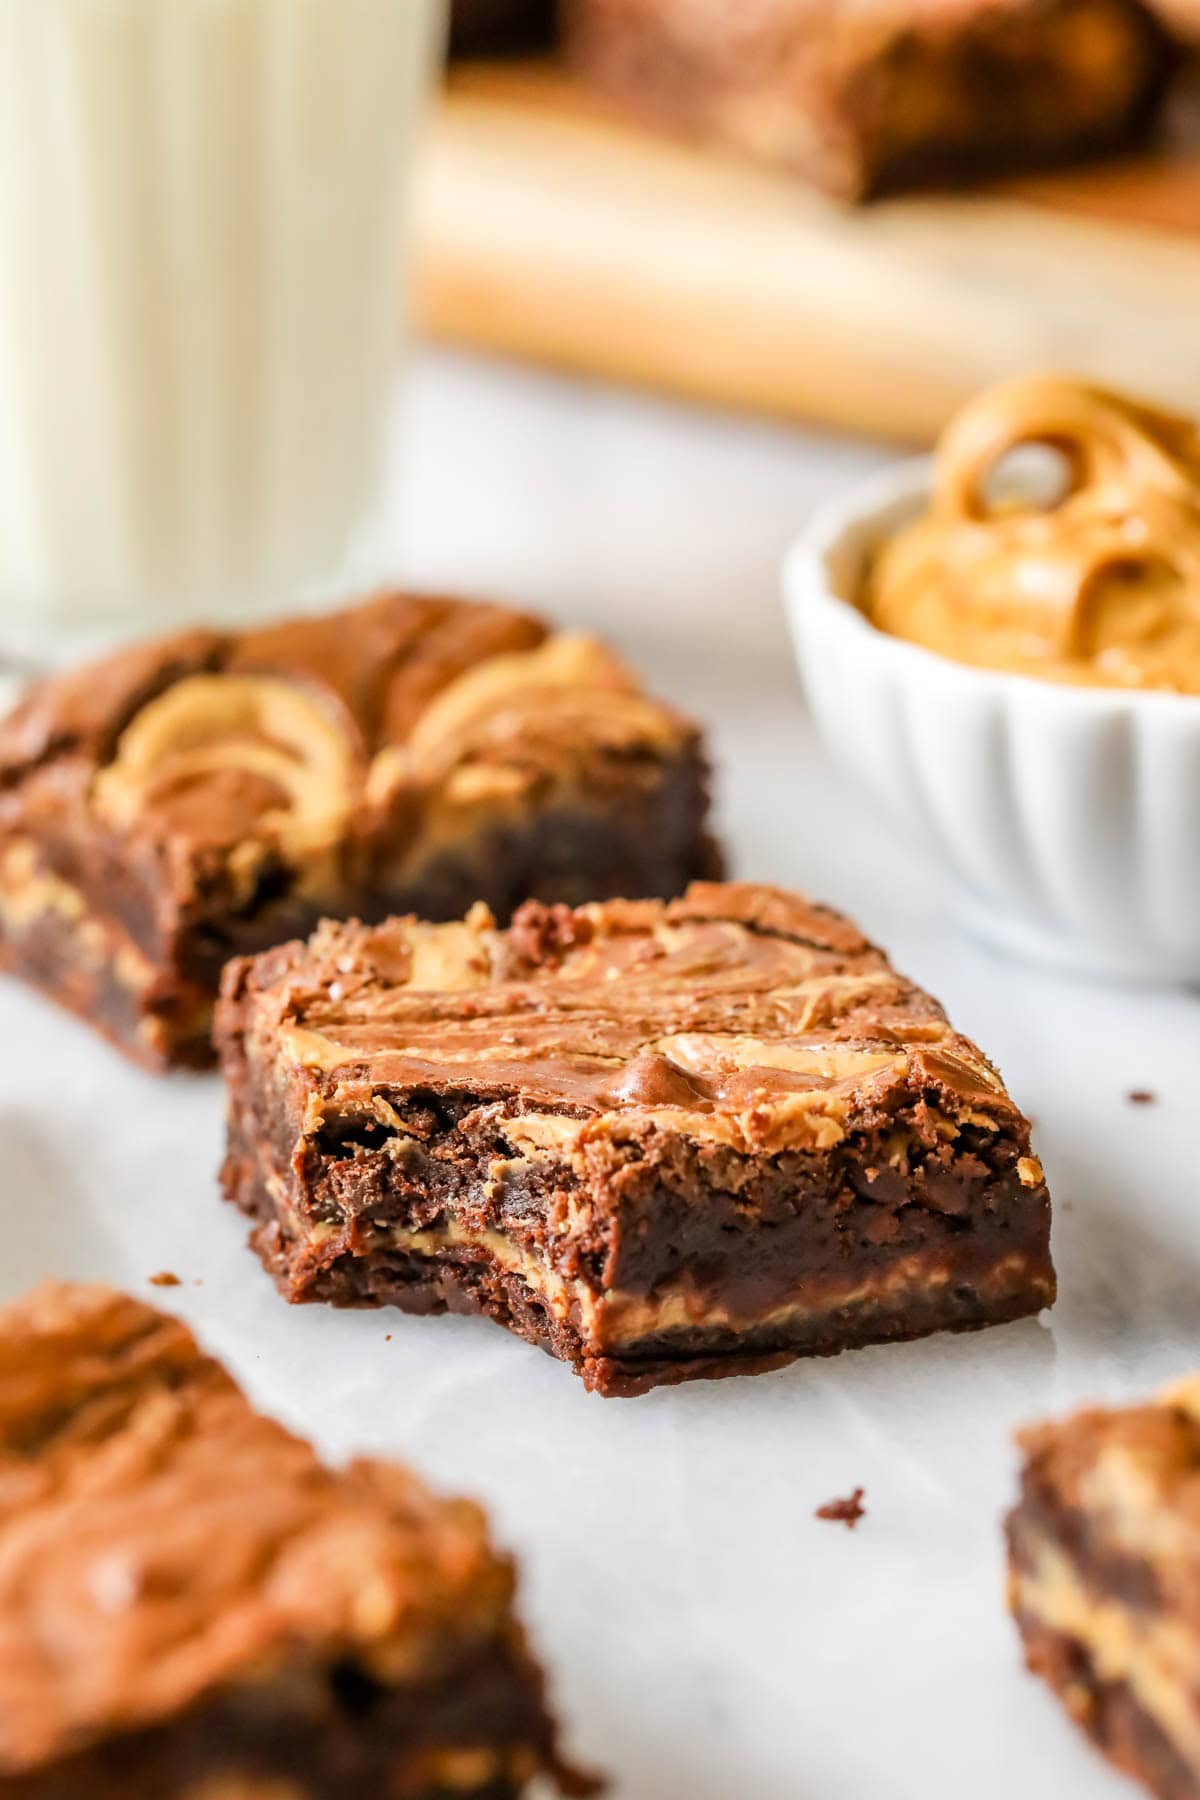
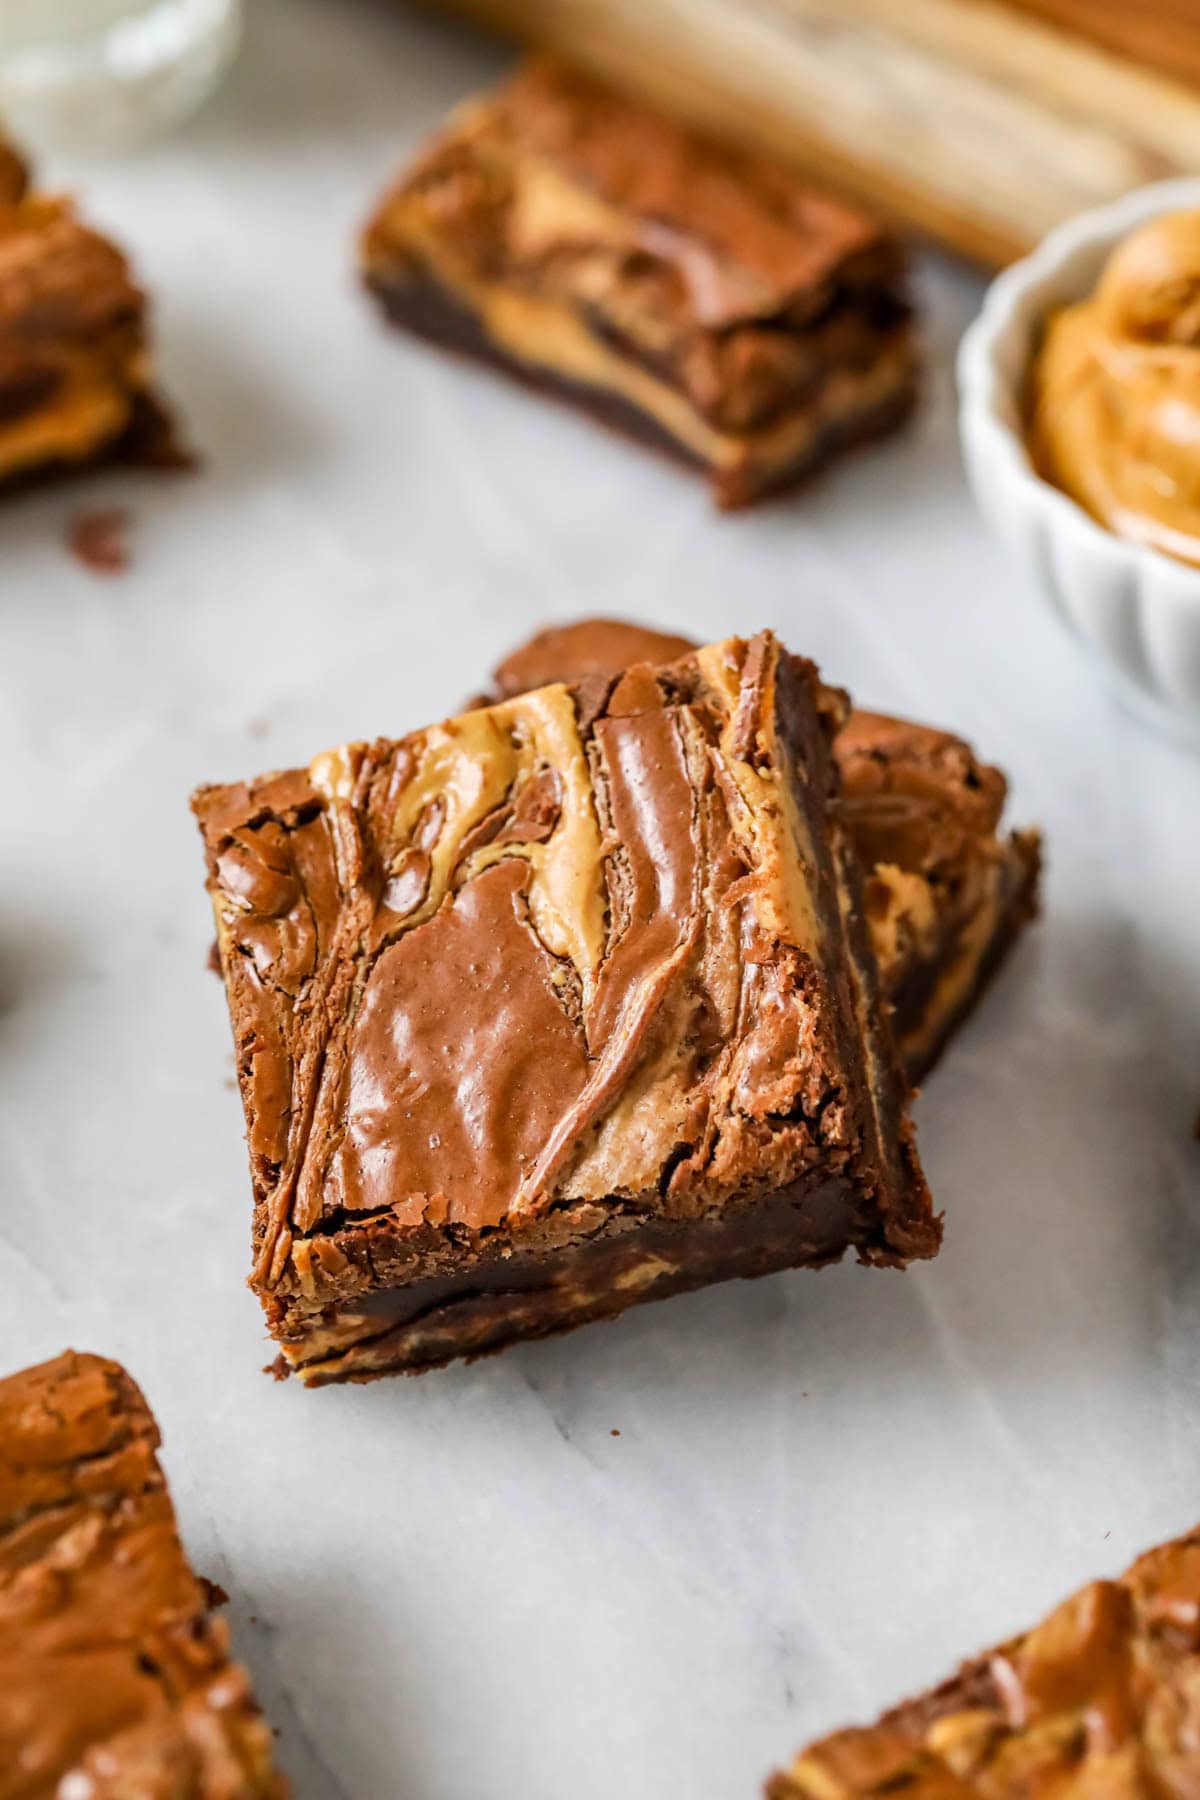
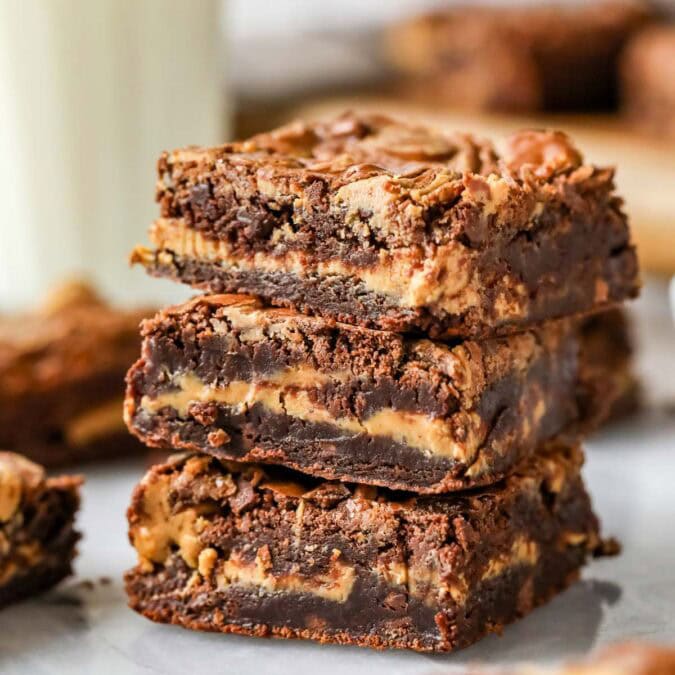
My fudgy, super decadent peanut butter brownies have thick peanut butter centers and pretty swirls on top. The batter takes just 15 minutes to prep! Recipe includes a how-to video!
Why You’ll Love Them
- Simple: only 10 ingredients (most will be in your pantry) and less than an hour from start to finish. These peanut butter brownies will quickly satisfy any chocolate peanut butter craving!
- The most flavorful, fudgy, and chocolatey brownie base. This comes from not one, not two, but THREE types of chocolate! While many recipes rely on just cocoa powder for flavor, we’ll use a base of cocoa powder and real melted chocolate. And of course, we’ll toss some chocolate chips into the batter too 😊
- Pure peanut butter center. We aren’t modifying it in any way (like adding sugar or butter) so it can shine in all of its tasty, peanut buttery glory. We’ll also swirl a bit on top too just for a pretty touch and sneak peak of what’s inside.
- Crackly, shiny, gorgeous brownie tops! Beating the eggs and sugar VERY well directly contributes to this (and also adds a smidge of lightness to the dense/fudgy brownies).
Long-time followers may remember my previous version of this recipe; it was more like a peanut butter version of my brookies (with Reese’s pieces instead of chocolate chips). Tasty, but not quite the indulgent, fudgy peanut butter brownies I picture when I think of this recipe!
Today, I’m updating my old recipe for a more indulgent, brownie-heavy version with a thick, distinct layer of peanut butter in the center and a pretty peanut butter ripple on top. The brownie is decadent, fudgy dense, and super chocolatey, and it pairs perfectly with the pure, unadulterated peanut butter (of course!). It’s a cookie bar that’s nearly as richly indulgent as my millionaire’s shortbread!
Oh, and if the old version still sounds good to you, don’t worry. You can find that linked at the bottom of the recipe!
Ingredients
The usual suspects, but I’ll briefly go over a few you may have questions about before we dig in.
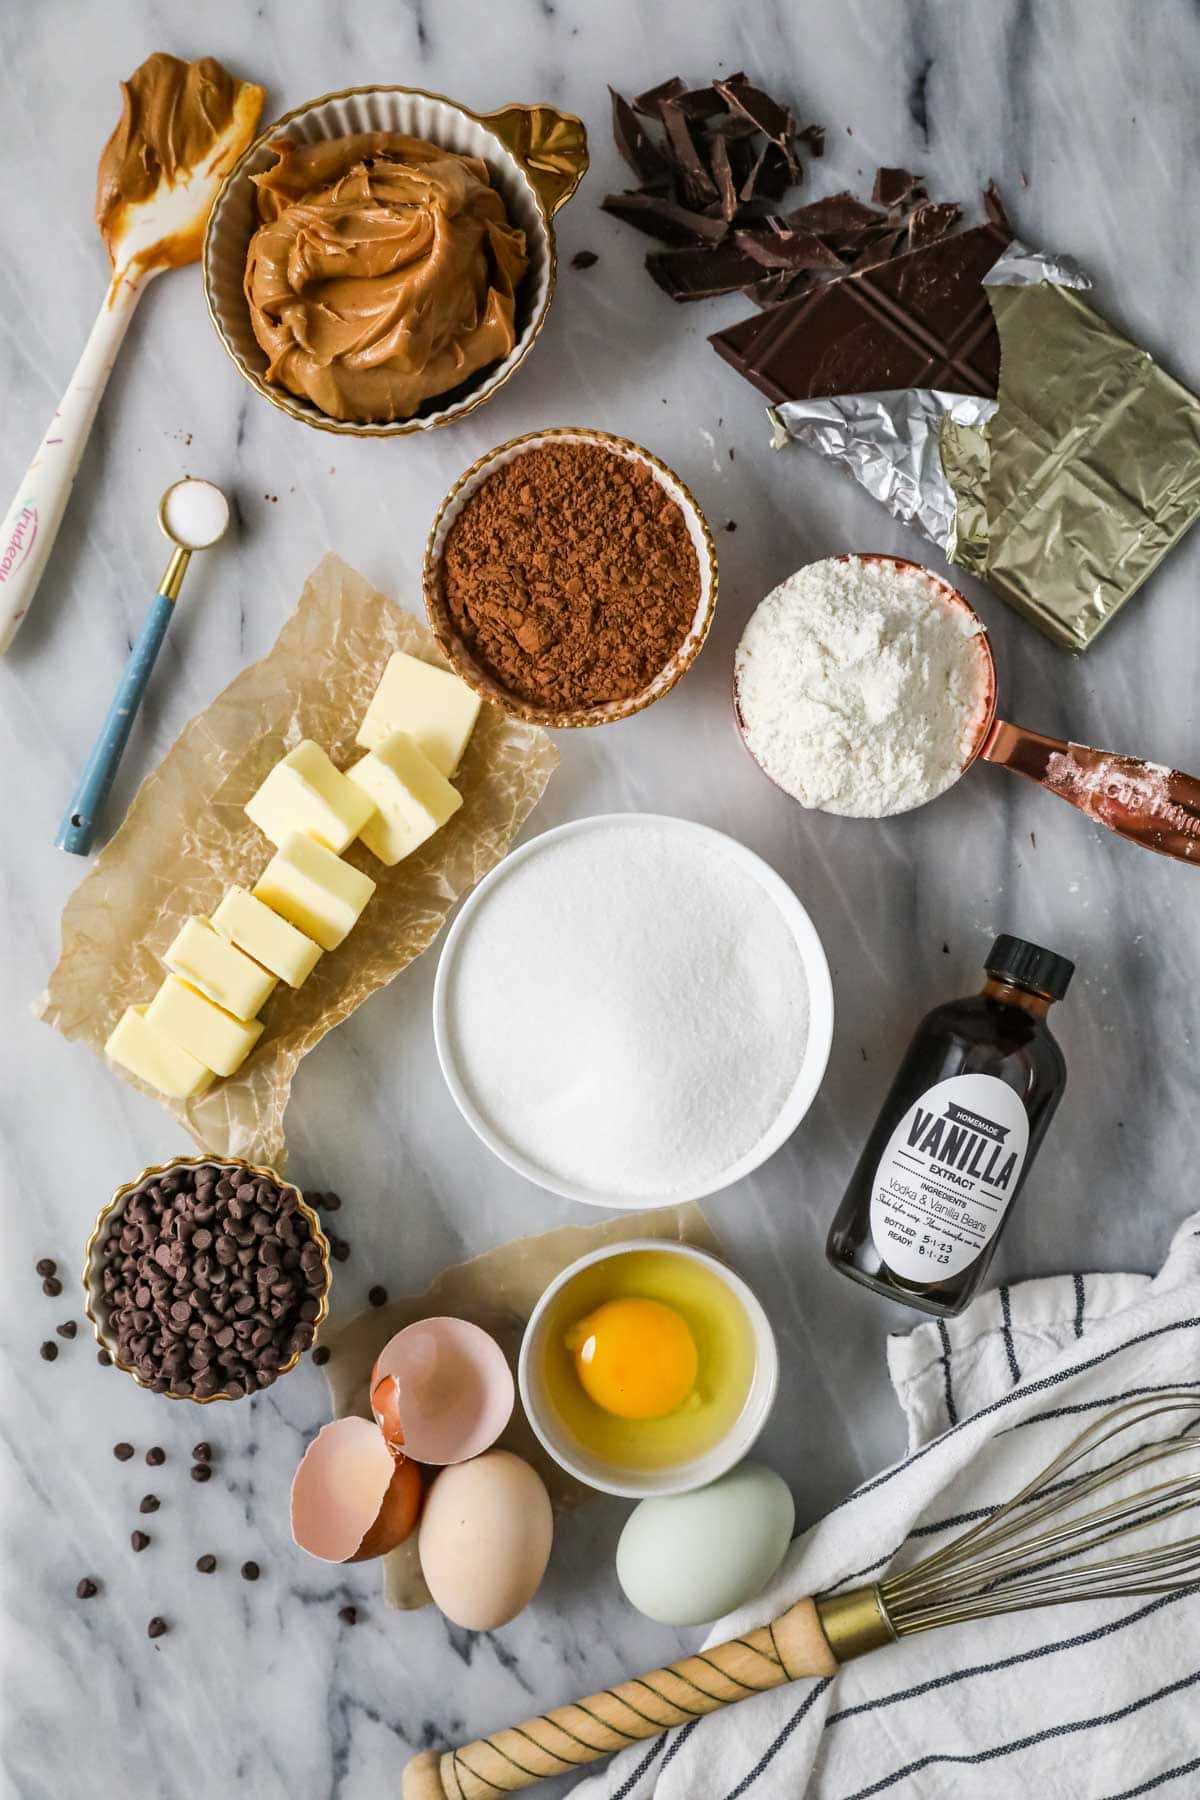
- Peanut butter. Creamy or crunchy, your choice (I prefer creamy!). I’ve been meaning to try this recipe with a natural peanut butter (or my homemade peanut butter) and suspect it would work; once I try it, I’ll update this post!
- Semisweet chocolate. Real melted chocolate gives us the most flavorful brownie base (many recipes just use cocoa powder!). A chopped semisweet chocolate bar is my preference, though chocolate chips (or a bittersweet bar) will work in a pinch.
- Cocoa powder. I recommend you stick with natural cocoa powder for this recipe. While Dutch cocoa will technically work, I don’t prefer the flavor, especially paired with the peanut butter.
- Eggs. Ideally you’ll set your eggs out ahead of time so they can come to room temperature. If you forget (it happens!), use my trick to quickly bring eggs to room temperature.
- Mini chocolate chips. These add some texture and a bit of extra chocolate. Optional, but highly recommended!
I should also mention what you don’t need: baking powder or baking soda! I skip the leavening agents in this recipe for super thick, super fudgy brownies. This also promotes those pretty, shiny brownie tops!
SAM’S TIP: Invest in an electric mixer! The handheld versions are inexpensive and a huge lifesaver for recipes that require vigorous mixing (like meringues, whipped cream macarons, and of course, these peanut butter brownies). If you don’t have an electric mixer just yet, you can just vigorously mix with a whisk–though it will be a bit of an arm workout!
This is just an overview of the ingredients I used and why. For the full recipe please scroll down to the bottom of the post!
How to Make Peanut Butter Brownies
Melt the chocolate & beat the eggs
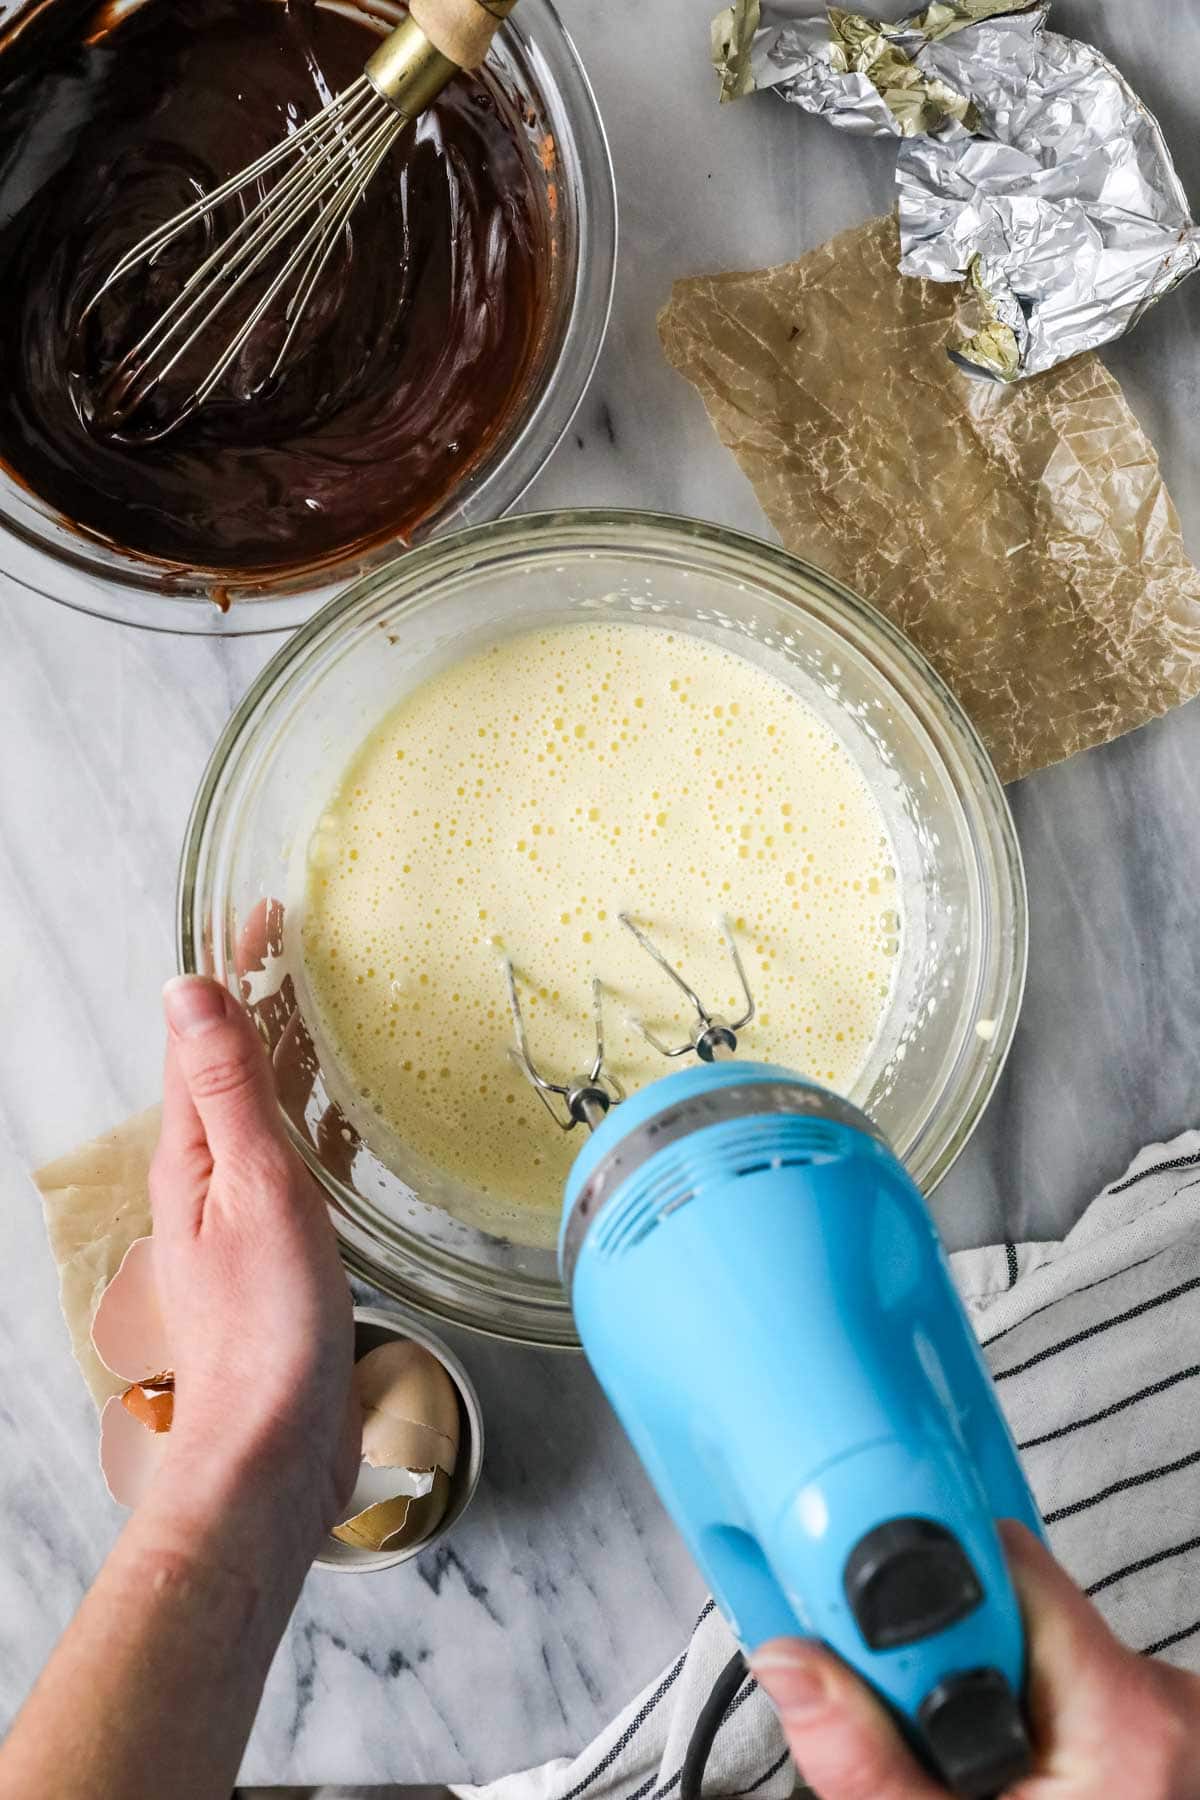
Heat the butter and chocolate until melted, then whisk in the cocoa powder. Adding the cocoa while the butter and chocolate are still warm will allow it to “bloom” and extract the most flavor (a technique I also use in my double chocolate chunk cookies). Set this mixture aside while you prep your eggs.
Next, beat the sugar, eggs, and vanilla with an electric mixer until pale and foamy–this usually takes me about a minute on medium high speed. This step is crucial for those crinkly, shiny brownie tops, so don’t skip it!
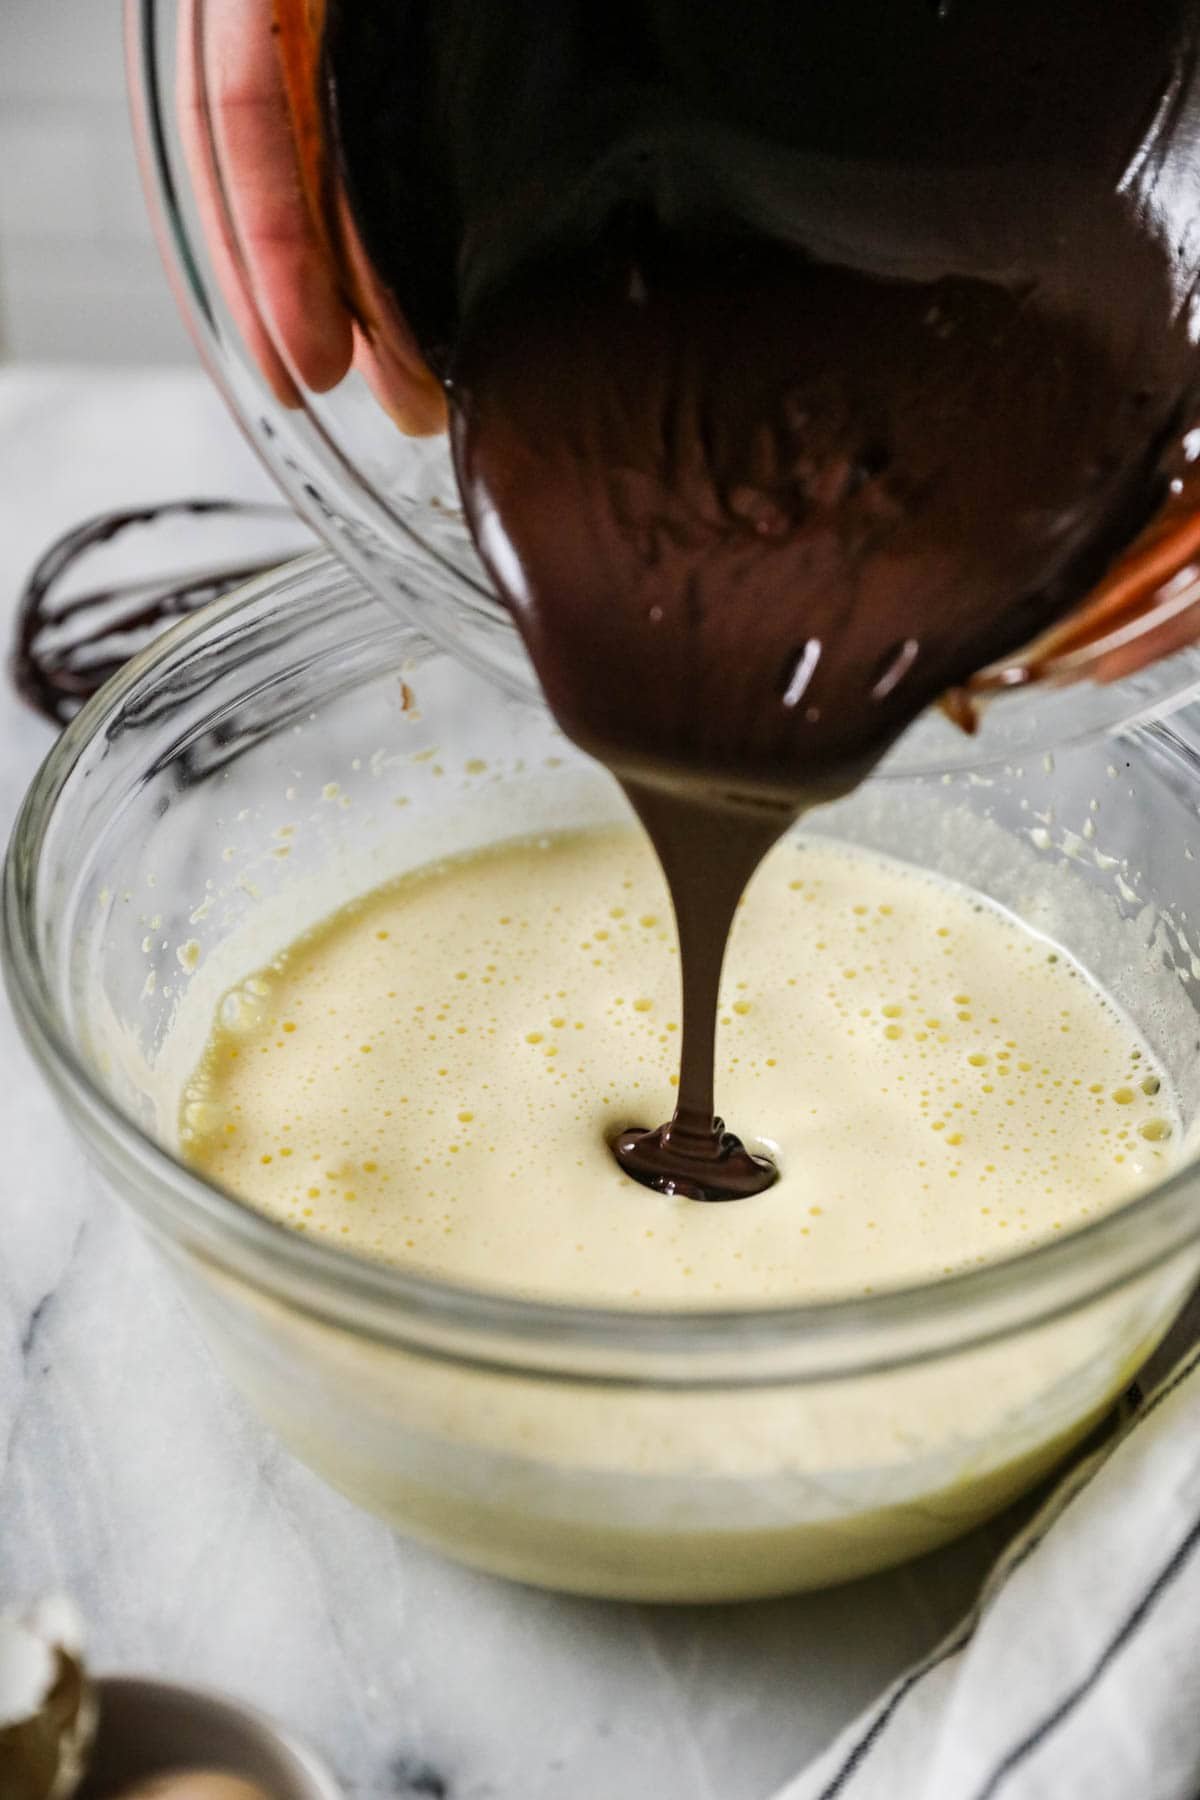
Add the melted chocolate mixture to your eggs and stir until the batter is uniform. You can do this by hand/with a spatula or with your mixer on low-speed.
Sift the dry ingredients
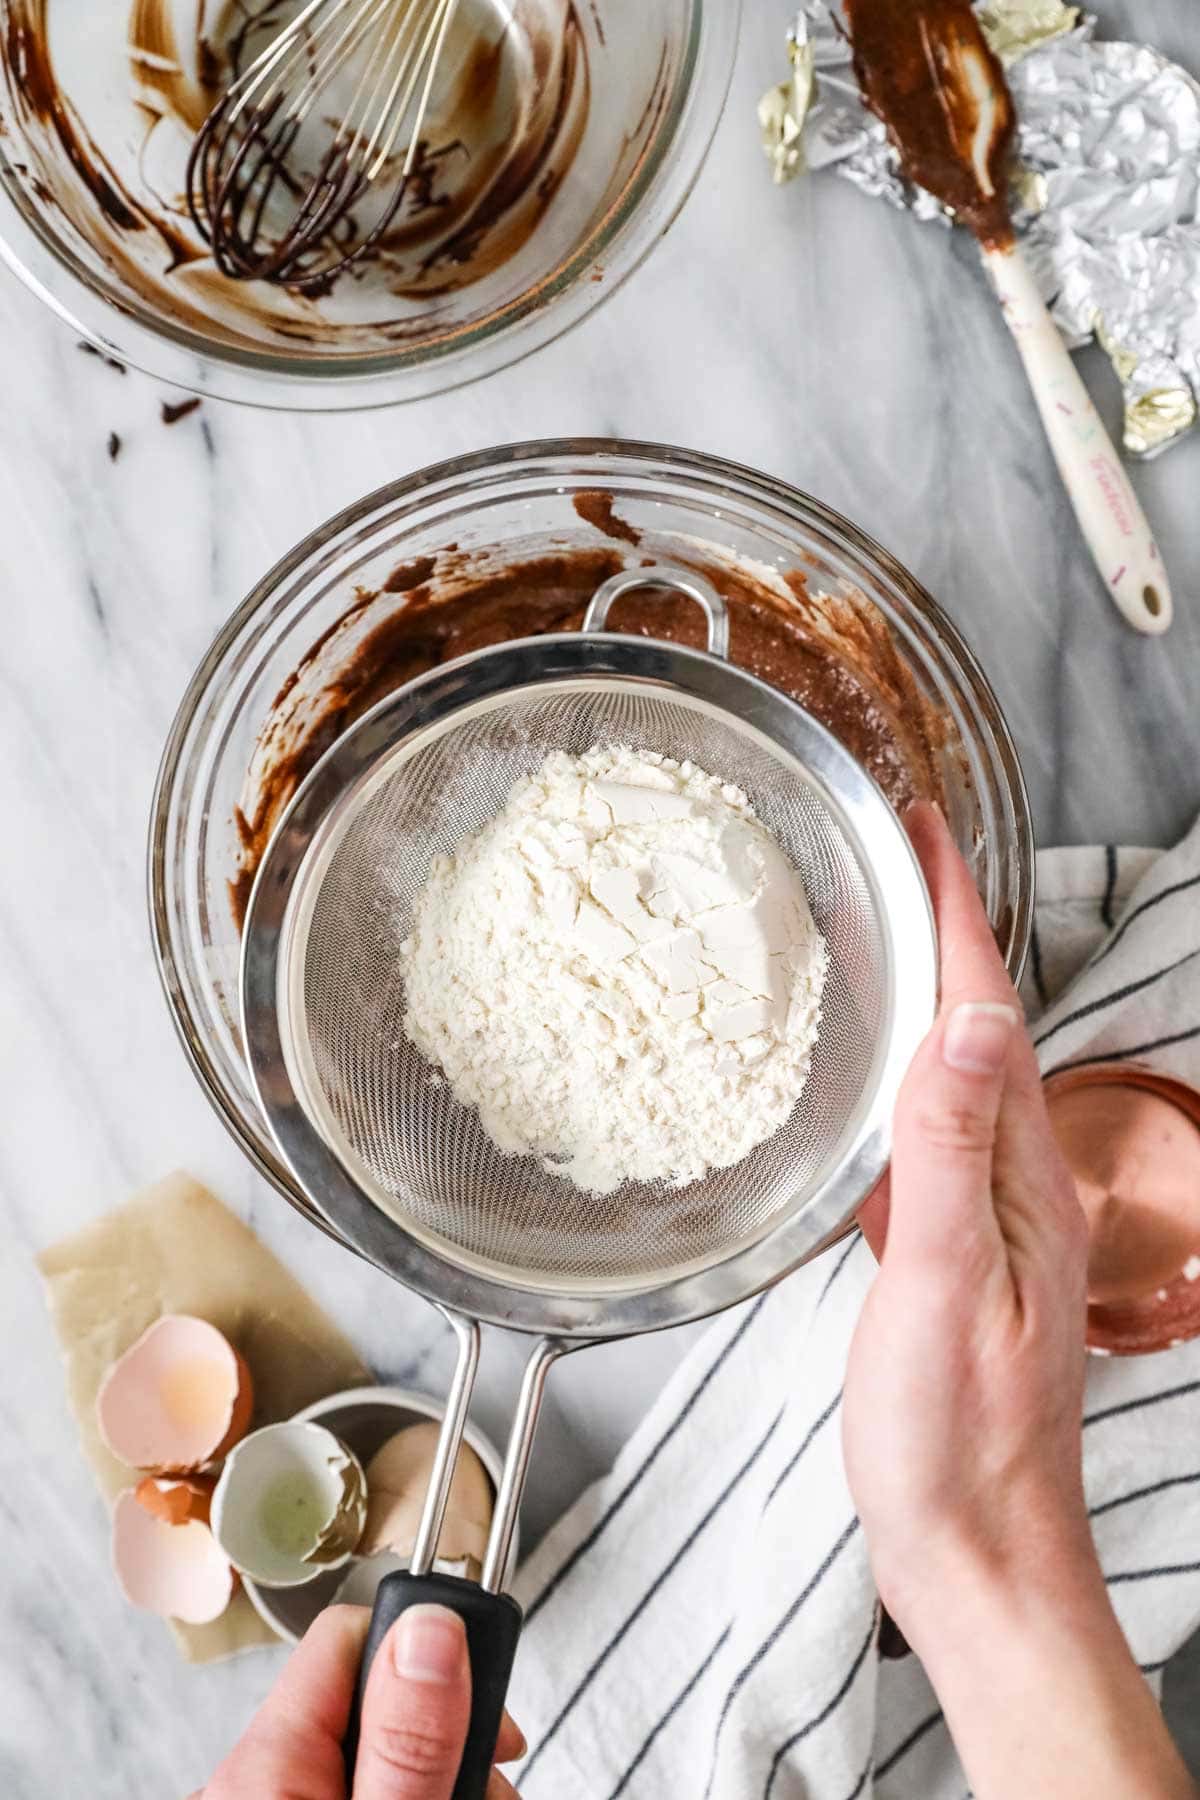
Sift your flour and salt into the bowl and stir to combine. Finally, fold in your chocolate chips. Now it’s time for the peanut butter!
Add the peanut butter
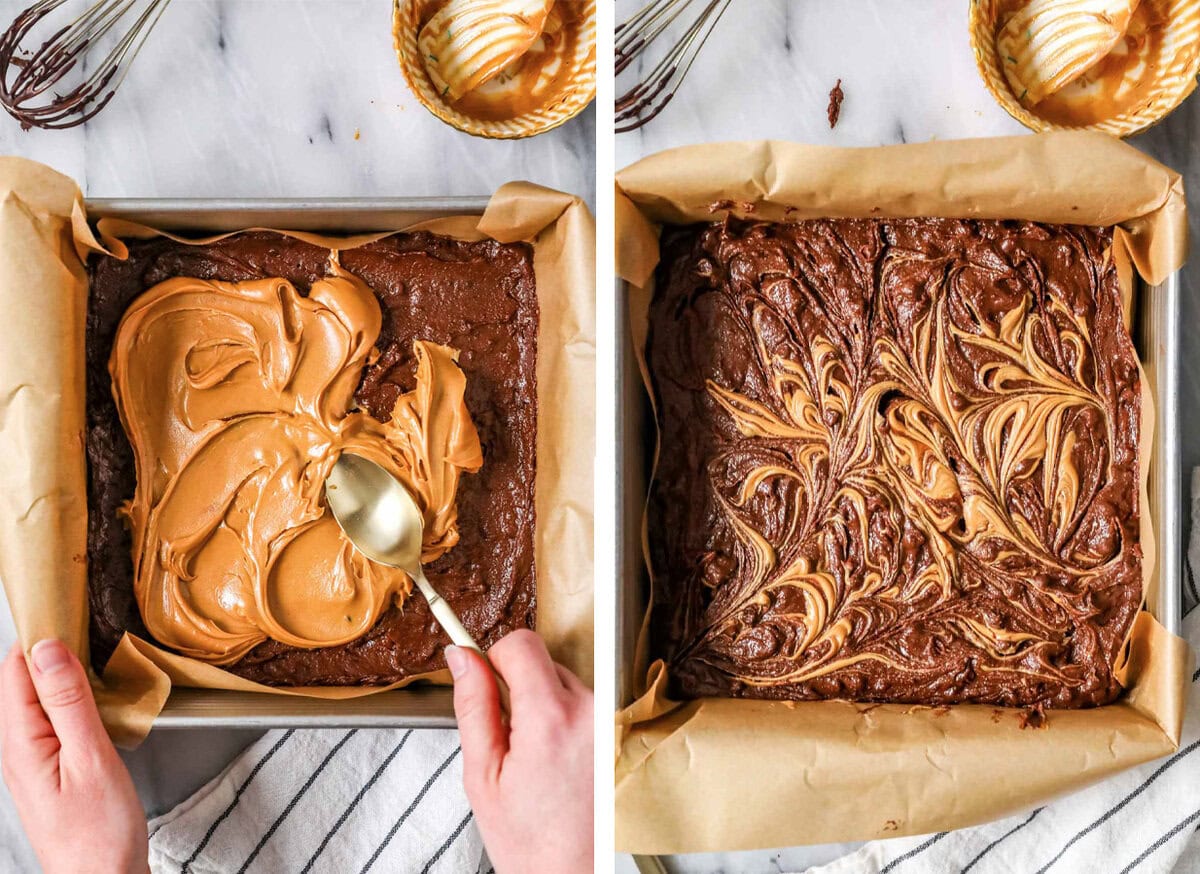
Spread half of your brownie batter into your pan (I like to use a parchment sling for easy removal, but you can just grease the pan instead if you prefer!). Layer all but two tablespoons of your peanut butter overtop–you want this to be a smooth, even layer. I do this in dollops and then smooth with a mini offset spatula or spoon. Don’t take the peanut butter all the way to the edges; leave a brownie border.
Add your remaining brownie batter overtop, making sure to seal the peanut butter layer completely. Dollop the reserved peanut butter overtop, then use a knife or toothpick to swirl it into the brownie batter.
Bake & cool
Bake for 35-40 minutes. I like to check my brownies with a toothpick to make sure they are done; look for a few moist crumbs for that fudgy brownie texture.
Let the brownies cool completely before digging in (they will be messy and just fall apart otherwise), then enjoy!
SAM’S TIP: For the cleanest cuts, let the brownies cool completely. They are so messy if cut when warm (though that doesn’t stop me, I’m known to scoop them out with a spoon and add a scoop of vanilla ice cream on top — yum). Also, the edges generally puff up a bit more and can be a bit crumbly but they’re so good–one of my favorite parts of the brownie!
Frequently Asked Questions
I have a few tips for this! First, line your pan with parchment so you can easily remove the brownies in one solid layer before cutting. Next, let your brownies cool completely before you try to cut them. Some people like to use a plastic/disposable knife, and this does work pretty well. Personally, I use a sharp knife and press straight down into the brownies–no sawing! Clean your knife in between cuts (I like to run it under very hot water and then dry the blade) and repeat. Voila! Perfectly cut brownies ✨
Yes! I recommend wrapping them well in plastic and foil before storing in an airtight container. To thaw, let sit at room temperature (or enjoy while still a bit frozen–yum!).
My favorite method is the toothpick test! To do this, insert your toothpick in the center of your brownies and look for a few moist crumbs–not wet batter. Be careful that you haven’t speared a melty chocolate chip, as that can often look like wet batter.
The toothpick test is your safest bet, but also look for set edges and a shiny, crackly top–both are good indicators that your brownies are done.
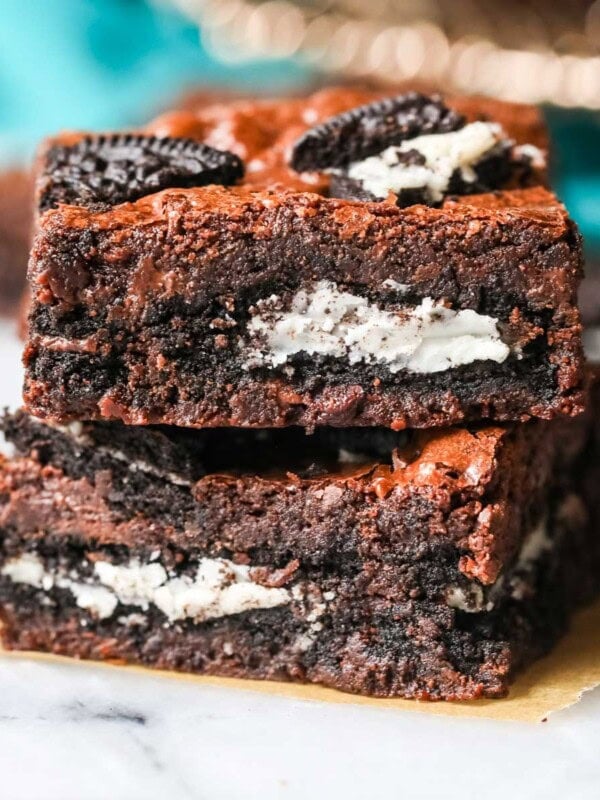
If you want an equally indulgent peanut butter brownie experience, try my buckeye brownies! They have a rich peanut butter fudge topping with a decadent chocolate crown.
Enjoy!
Let’s bake together! Subscribe to my newsletter to be notified of all the newest recipes, and find my free recipe tutorials on YouTube 💜
Peanut Butter Brownies
Equipment
- 9×9” metal baking pan
Ingredients
- 8 Tablespoons (113 g) unsalted butter, cut into 8 pieces
- 4 oz (113 g) semisweet chocolate bar, chopped
- ½ cup (50 g) natural cocoa powder
- 1 ½ cups (300 g) granulated sugar
- 3 large eggs
- 1 teaspoon vanilla extract
- ⅔ cup (85 g) all-purpose flour
- ½ teaspoon table salt
- ½ cup (85 g) mini chocolate chips, (optional)
- 1 cup (280 g) creamy peanut butter
Instructions
- Preheat oven to 350F (175C) and line a 9×9” (22x22cm) baking pan with parchment paper. Set aside.
- In a microwave-safe bowl, combine butter and chocolate and heat in the microwave for 30 seconds. Stir well, and continue heating in 20 second increments until completely melted and smooth.8 Tablespoons (113 g) unsalted butter, 4 oz (113 g) semisweet chocolate bar
- Immediately add cocoa powder, whisk to combine.½ cup (50 g) natural cocoa powder
- In a separate large mixing bowl, use an electric mixer to vigorously beat together sugar, eggs, and vanilla extract until lightened in color/pale yellow (about 1 minute on medium/high speed).1 ½ cups (300 g) granulated sugar, 3 large eggs, 1 teaspoon vanilla extract
- Drizzle the chocolate mixture into the egg mixture and stir until completely combined and batter is uniform.
- Sift flour and salt over the mixture and stir until flour is completely absorbed and batter is well-combined.⅔ cup (85 g) all-purpose flour, ½ teaspoon table salt
- Add chocolate chips (if using) and stir well.½ cup (85 g) mini chocolate chips
Assemble & Bake
- Measure out about 2 Tablespoons of peanut butter and set this aside for your topping.1 cup (280 g) creamy peanut butter
- Spread half of the brownie batter evenly into the bottom of the pan. Dollop the remaining (larger amount of) peanut butter over the brownies and use the back of a spoon to gently smooth it almost all the way to the edges of the brownie batter (I like to leave about ¼-½” of space around the perimeter .
- Gently dollop the remaining brownie batter over the peanut butter and use the back of a spoon to gently nudge all the way to the edges of the pan so the peanut butter layer is completely covered. Dollop reserved peanut butter over top of brownies and use a knife to gently swirl into the brownies.
- Transfer to center rack of 350F (175C) preheated oven and bake for 35-40 minutes, or until a toothpick inserted into the center comes out clean or with a few moist crumbs.
- Allow to cool completely before serving (they’re so messy to cut into when warm!).
Notes
Storing
Store in an airtight container at room temperature for up to 4 days. These brownies freeze well, too! Wrap tightly in plastic and then foil before freezing.Original Recipe
I’ve updated this recipe as of March 2025 to improve it and it’s changed quite drastically! If you are here looking for the original recipe, you can print it here.Nutrition
Nutrition information is automatically calculated, so should only be used as an approximation.
Like this? Leave a comment below!
This recipe was originally published on the blog 07/29/2016. Photos and recipe updated March 2025. A link to print the original recipe can be found in the recipe card above.


Me and my entire extended family absolutely LOVE watching your videos!! You make cooking and baking feel so warm, joyful, and full of love. It’s more than just recipes you bring such a beautiful energy and grace to everything you share. Thank you for inspiring all of us to get in the kitchen and create special moments together!
Thank you so much for your support, Michelle! I truly appreciate that everyone enjoys the recipes so much! 🙂
I am gluten free and have never been able to make brownies that have the correct texture, until now! These are the best GF brownies I have ever had!
I’m so glad you enjoyed them so much, Ray! 🙂
I am shocked that I do not like these Peanut Butter Brownies! I liked the look of the swirled top. I did not like having the middle layer of peanut butter. I want to taste more chocolate brownie taste. (I even used my coveted Ghirardelli Semi sweet bar.)
I think I’ll try another brownie recipe (Sourdough Brownies?) and try a little peanut butter swirl on top. Will it work?
Hi Leslie! I haven’t personally tried adding a peanut butter swirl to the sourdough brownies, but it sounds delicious. Let me know how it goes if you do try it. 🙂
This recipe was delicious! We really enjoyed them. I used Skippy Natural Peanut Butter and was impressed with how much the peanut butter was showcased.
I’m so glad you enjoyed them, Kelly! Thank you for the feedback using the natural peanut butter. 🙂
Can this be doubled for a 9×13 pan?
Hi Barb! You would only need to increase it by 50% to fill the 9 x 13. 🙂
These look delicious, but very dense. I don’t see any leavening in it. Could baking powder / baking soda be added to lighten the brownie?
These brownies are fudgy and delicious and appropriately dense for a brownie.🙂 However, if you don’t like that texture, you could add 1/4 teaspoon baking soda or 1/2 teaspoon of baking powder if you desire, but your tops won’t be as crackly and the brownies themselves would be more crumbly. Hope that helps!
So delicious!! I made these for my adult son’s birthday and the whole family loved them. For me personally they were a perfect combination of chocolate and peanut butter. I used some peanut butter baking chips in the peanut butter batter in place of Reese’s pieces. Definitely a keeper recipe!! 5 stars
I’m so glad you enjoyed them so much, Lori! 🙂
Can i use brownie mix for the brownie part to cut corners?
We suppose you could, but we can’t guarantee how it will turn out or if any changes would need to be made.
My family & I couldn’t stop eating these peanut butter brownies! While it takes slightly more time to make the two different batters, all the steps are easy to follow and it’s worth the delicious & fancier looking dessert.
If you want these brownies to look amazing in addition to tasting amazing, I’ve found that holding the knife at a more horizontal angle when swirling to kind of pull the batters to be on top of each other in addition to next to each other makes the top of them look neater while still mixing the elements together enough. The first time I made these, I swirled them a bit too much & they looked mostly brown on top, but when I used this method the second time it helped make the two batters stand out on top while being mixed together enough underneath.
We’re so happy they were a hit for your crew, Lynne! Thanks for the review! 🙂
Another great and easy explained recipe!
literally obsessed with sugarspunrun love that she lists the ingredients with the directions and with the grams! game changer. currently making the peanut butter brownies to give to my friends for mothers day!
Thank you so much, Nicole! I’m so glad you have enjoyed everything so much! 🙂