
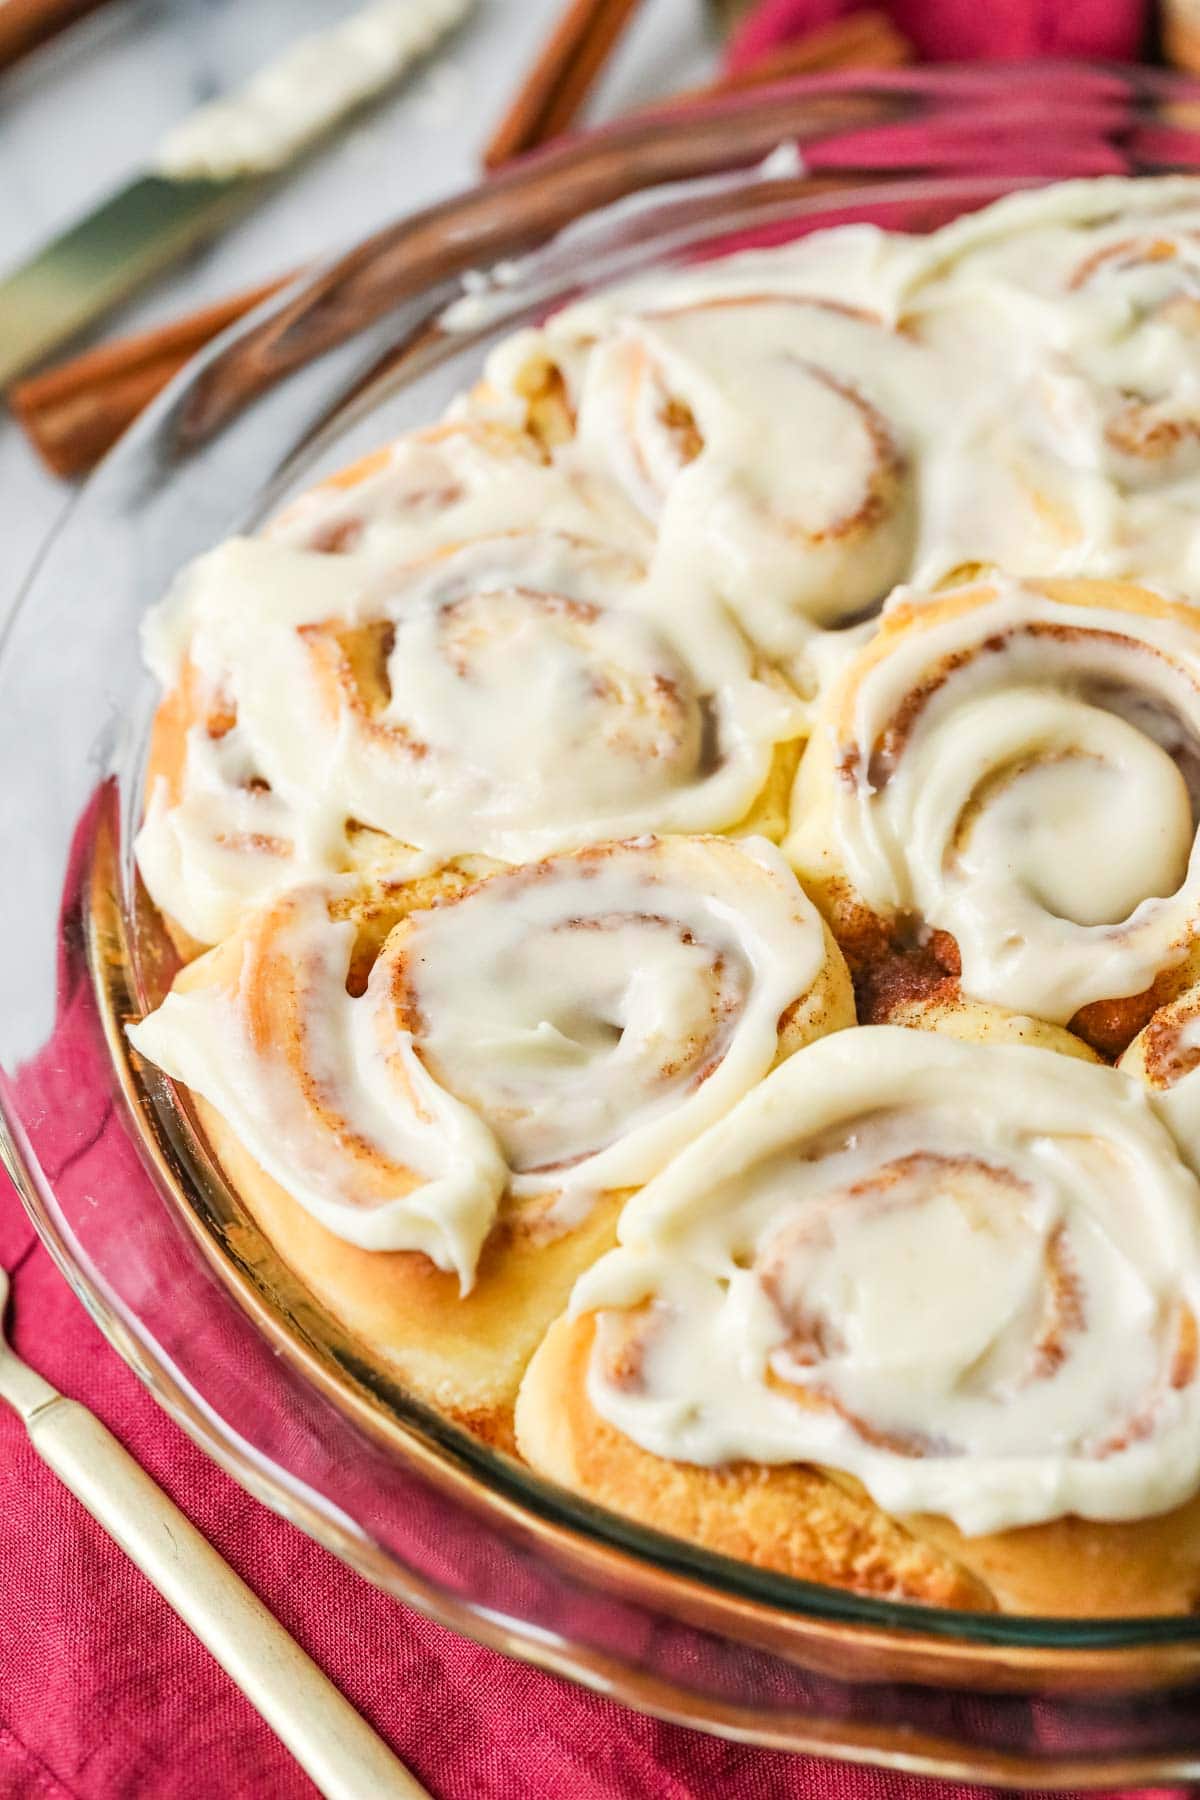
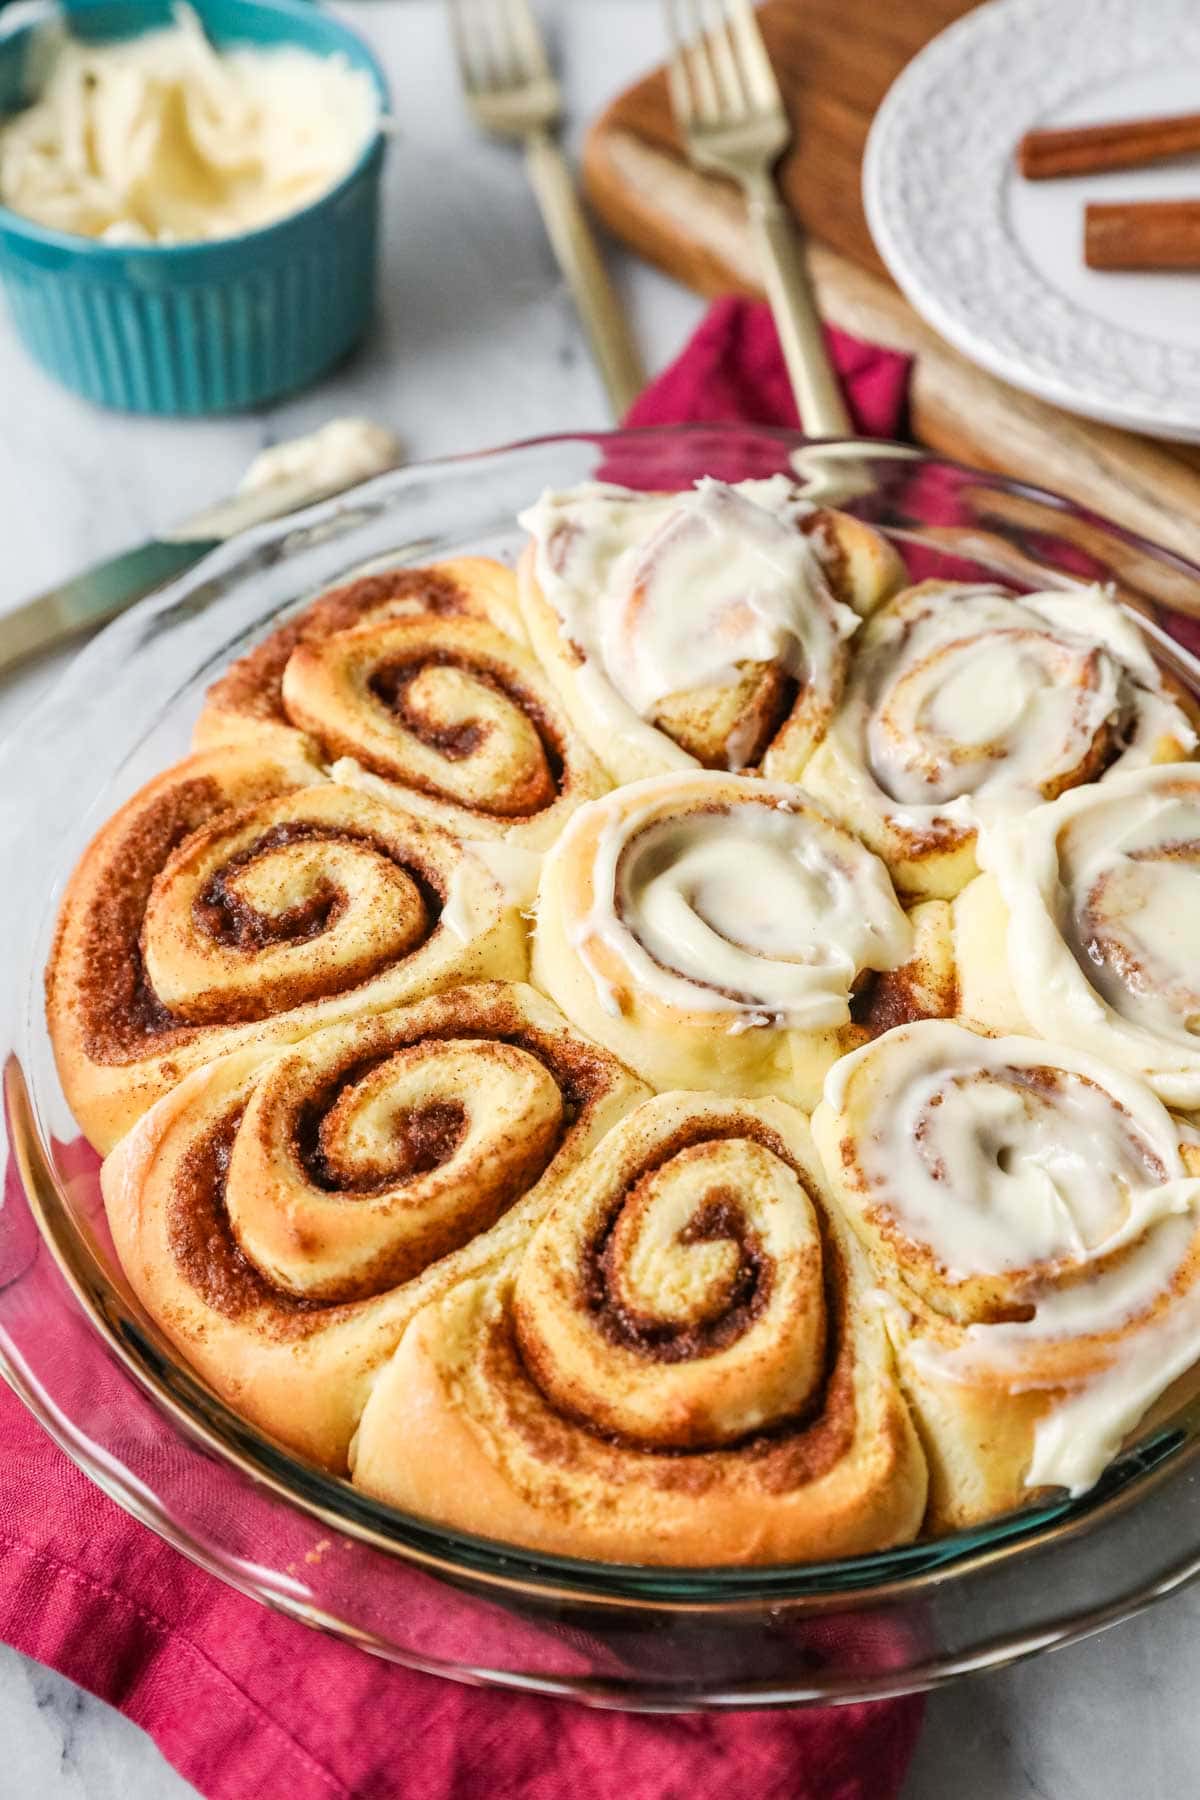
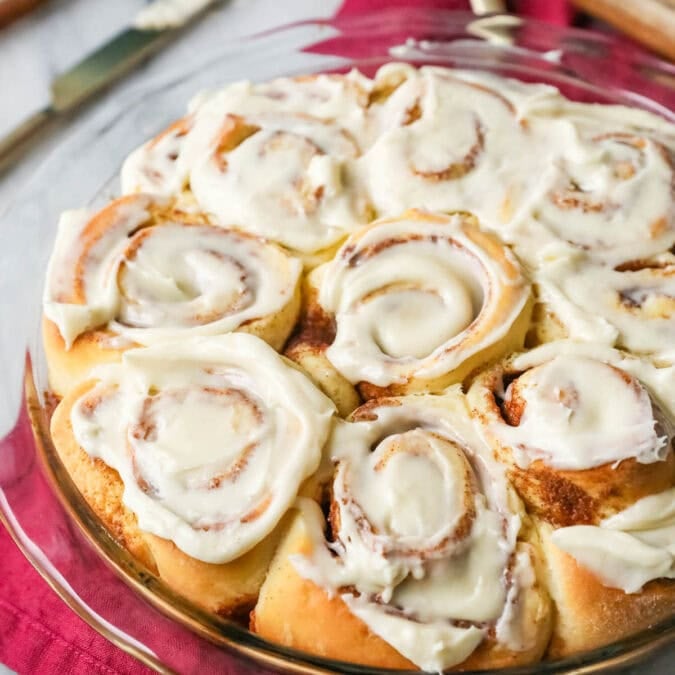
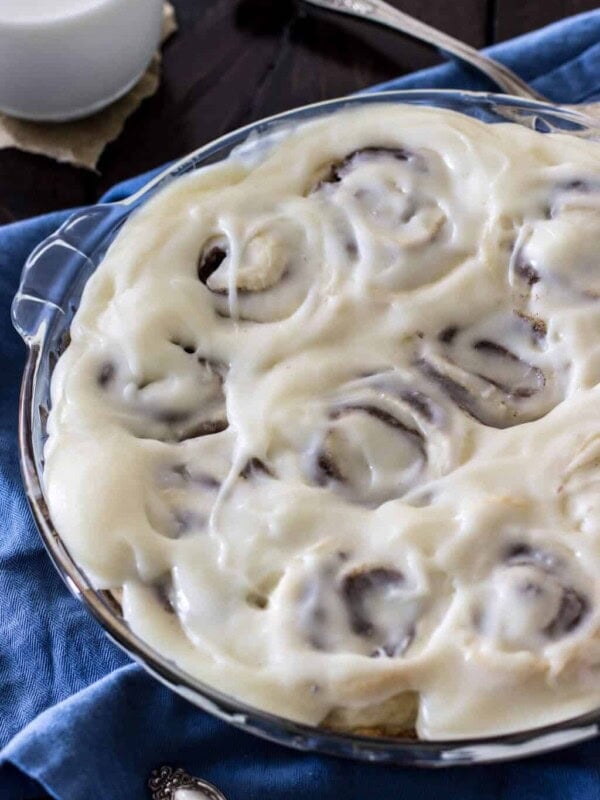
Homemade Cinnamon Rolls
This post may contain affiliate links. As an Amazon Associate I earn from qualifying purchases. Please read my disclosure policy.
Learn how to make the softest, fluffiest homemade cinnamon rolls from scratch with my classic recipe. My version uses secret ingredients you already have in your pantry for flawless results and unparalleled texture (they melt in your mouth with gooey centers). Less than an hour prep (counting the rising time!) and perfect for beginners and advanced bakers alike! Recipe includes a how-to video!
The *Actual* Best Homemade Cinnamon Roll Recipe
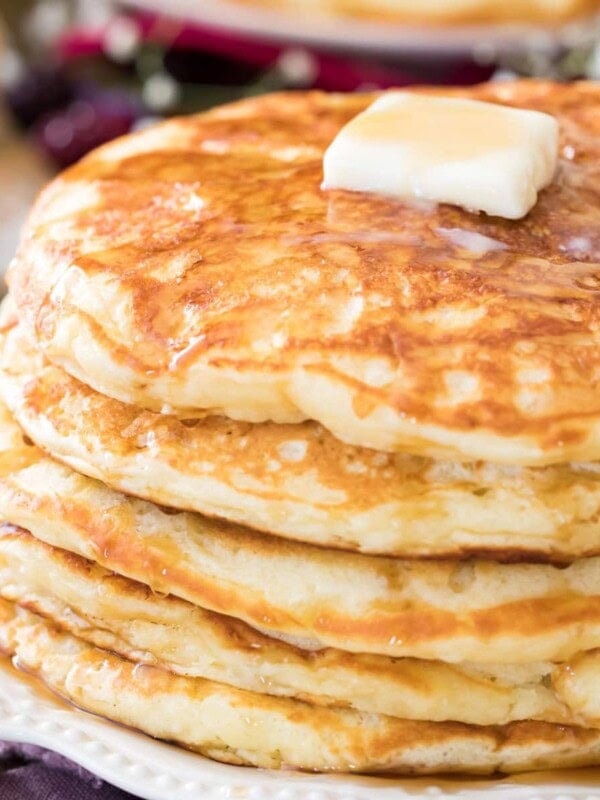
Just like buttermilk pancakes, and sausage gravy, homemade cinnamon rolls are a non-negotiable for me for holiday breakfasts. However, today’s recipe isn’t just for special occasions–it’s a breeze to whip together and can easily serve as your weekend breakfast staple!
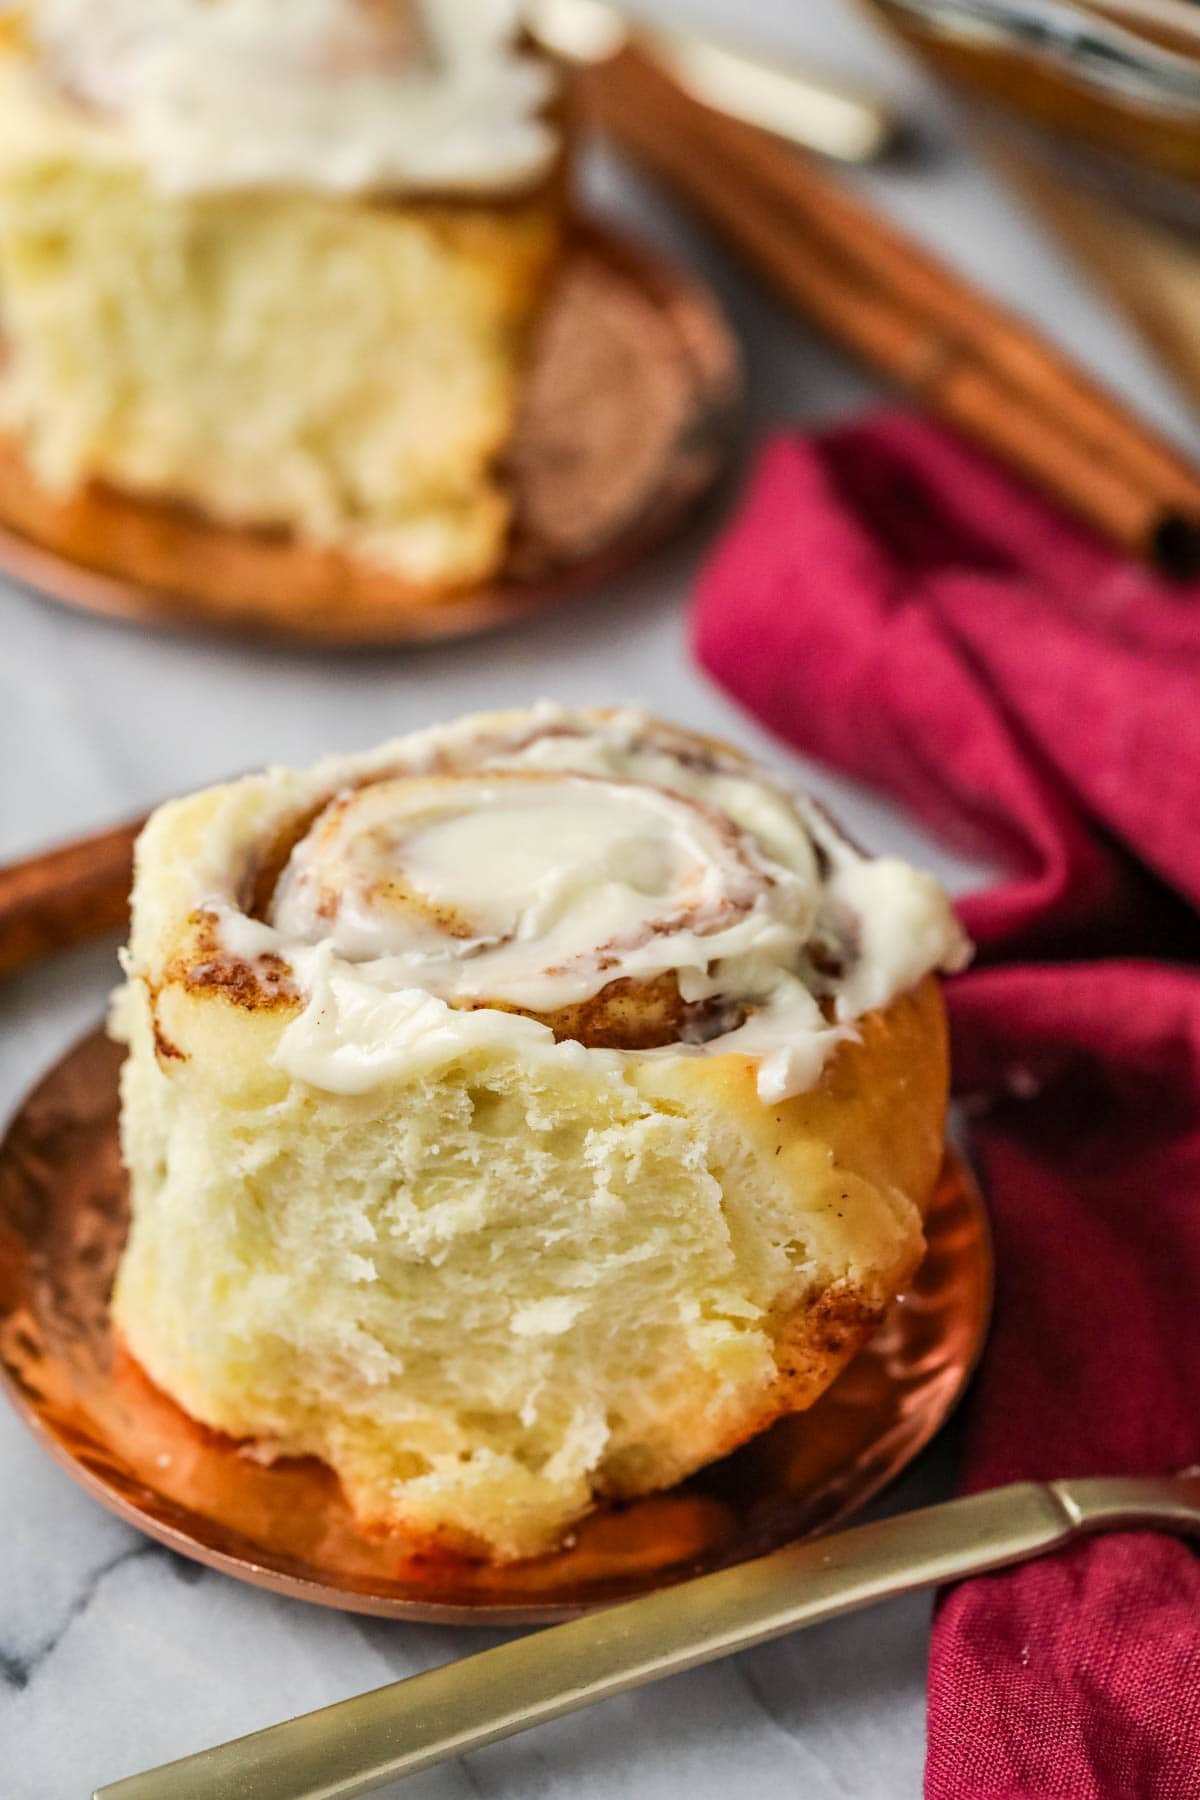
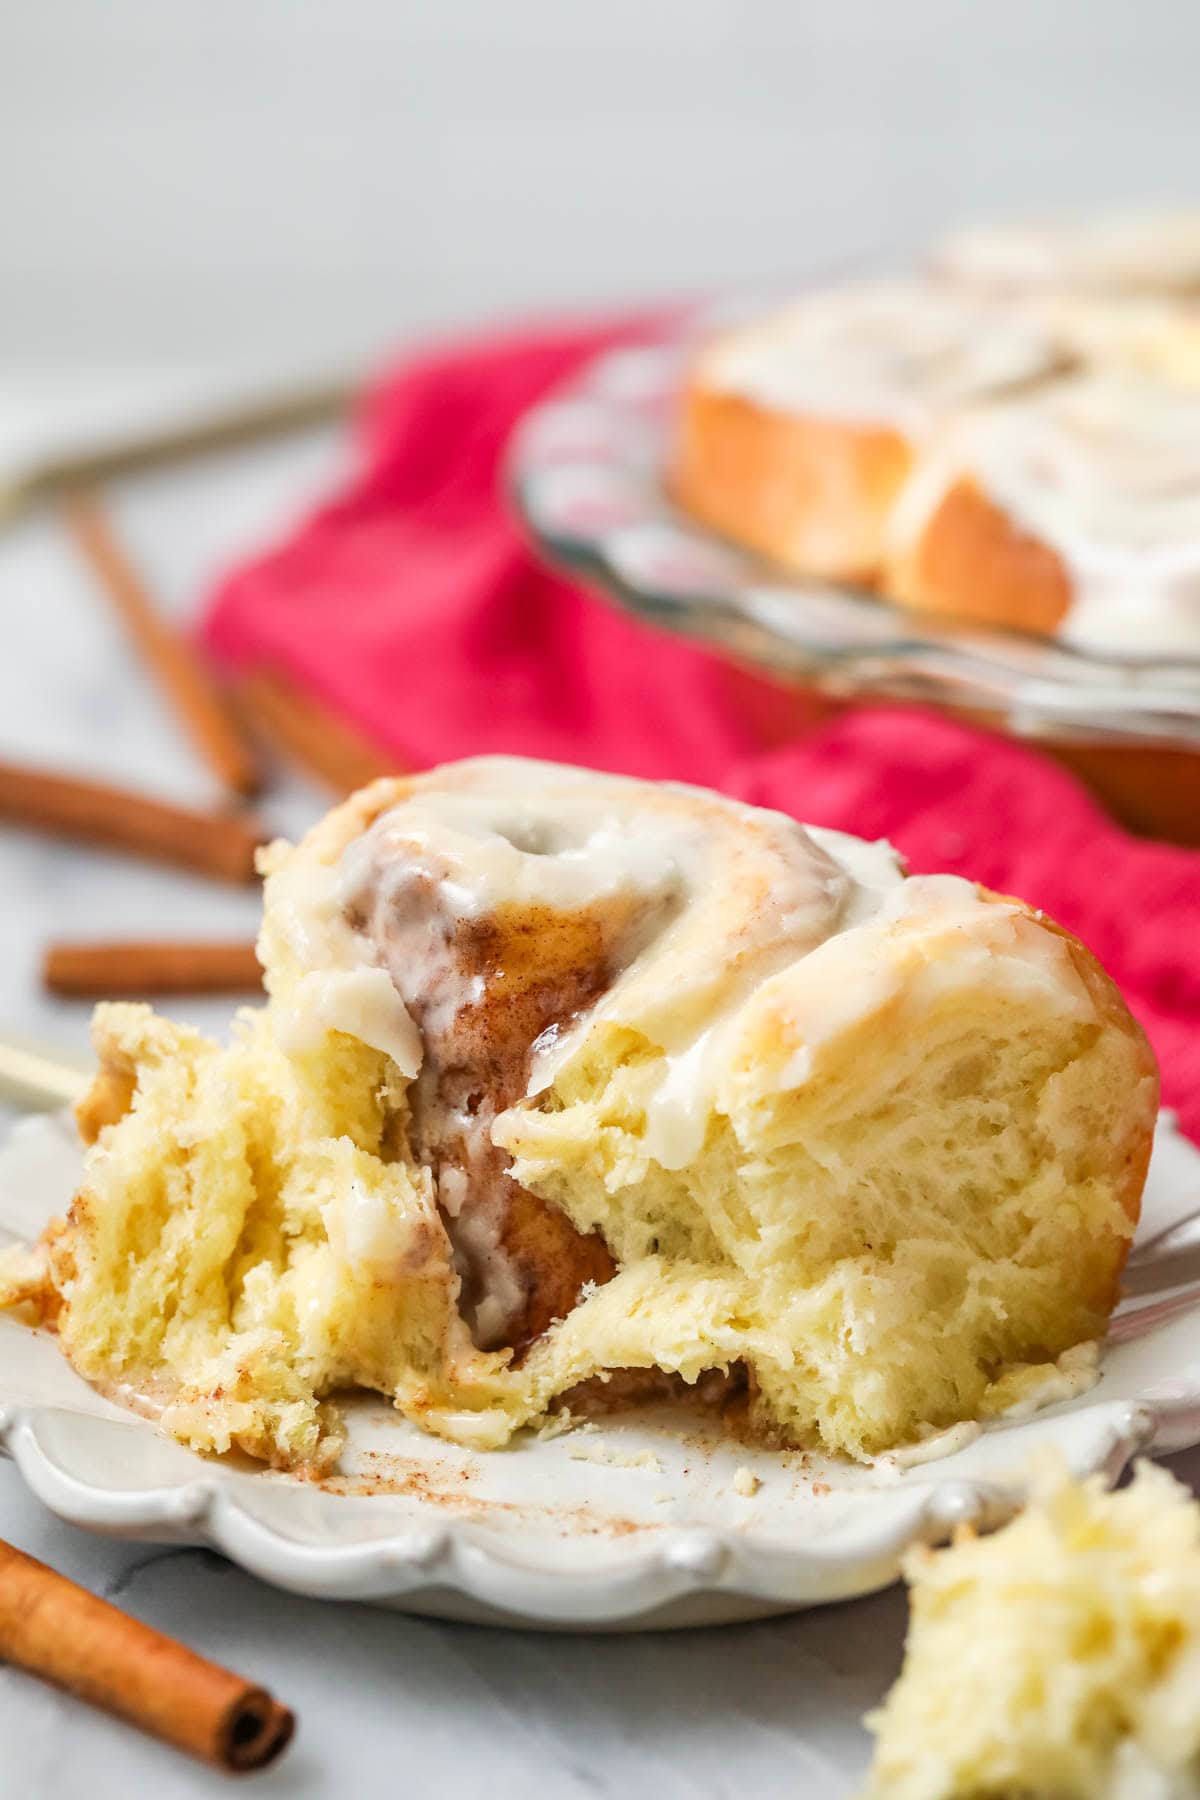
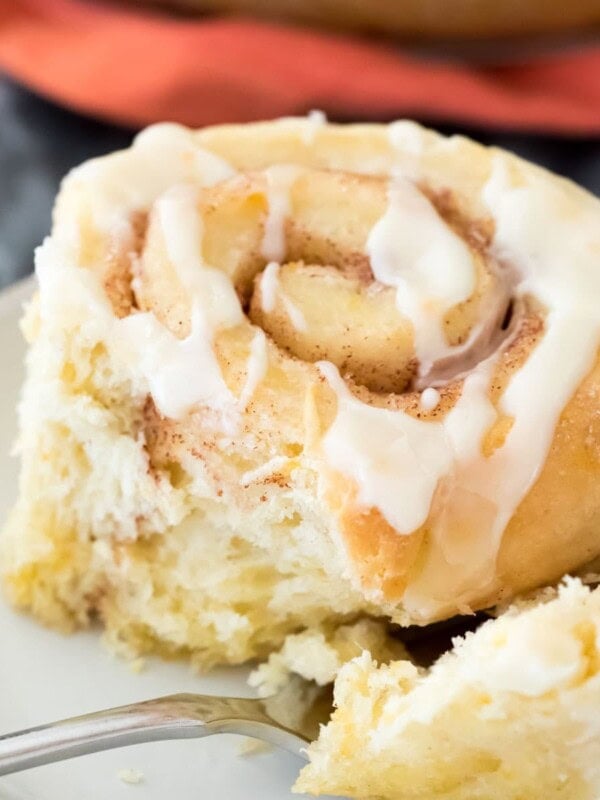
When I finally developed the winning version of this recipe, I was almost shocked by how incredibly perfect it was. The first bite was light and fluffy, the centers were just perfectly gooey, they’re draped with a perfect, simple cream cheese frosting that balances the sweetness of the rolls… the taste was everything you could ever want in a cinnamon roll.
And yet, there’s no long rise time, just a few minutes of kneading, and the whole recipe is completely from-scratch (right down to the icing!). Pretty amazing, right?
Why You’ll Love This Recipe
- Beginner friendly: I included a step-by-step how-to section, video tutorial, and plenty of detailed notes so anyone can make these homemade cinnamon rolls.
- Fast! Relatively speaking, anyway. Many cinnamon roll recipes are a full day project, but this recipe takes just over an hour to make (counting the rising time). You can start them in the morning and eat them for breakfast the same day–no need to prep anything the night before.
- Incredible texture: plush, soft, and melt-in-your-mouth with fluffy exteriors and gooey centers. I use a few optional ingredients that really take these rolls over the top, like cornstarch and heavy cream (but also, you can still make this recipe if you don’t have these things on hand).
This recipe will have you swearing off those cans of pre-made rolls for good. Trust me, you’re going to LOVE this homemade version!
Ingredients
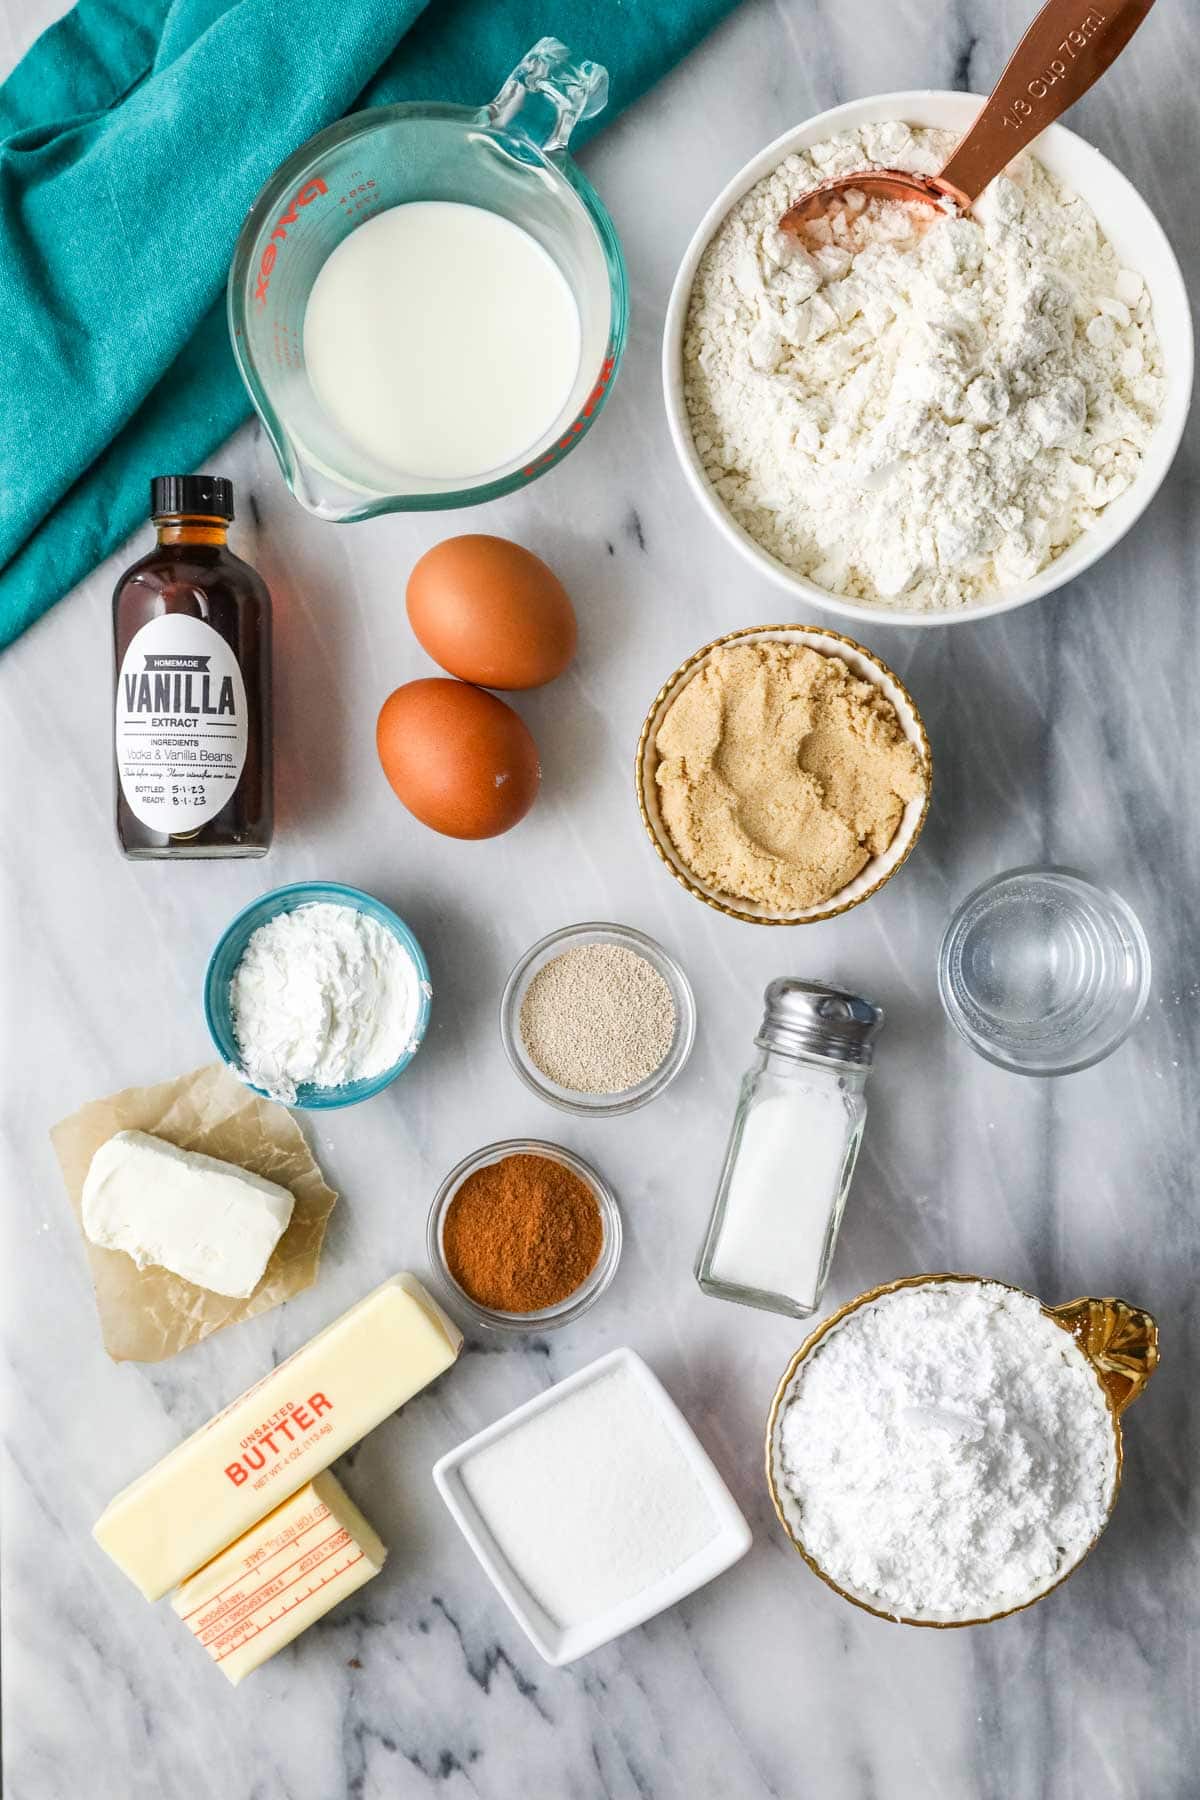
- Flour. You’ll notice I call for a range of flour in the recipe; this is because the specific amount needed will vary in every kitchen. You don’t want to add too much, or you will end up with dense and dry rolls. Add too little though, and your dough will be way too sticky to work with. I talk more about finding the sweet spot for flour below!
- Instant yeast. Also called rapid rise yeast, this works just as well here as it does in my famous pizza dough. If you want to use active dry yeast, try my overnight cinnamon rolls (don’t let the name fool you–they can be baked the same day!). Or if you want to make cinnamon rolls without yeast, try my no-yeast cinnamon rolls.
- Cornstarch. Cornstarch has been my “secret ingredient” in so many of my recipes (most popularly my chocolate chip cookies) that I can hardly call it a secret anymore. In this recipe, it creates a softer texture and encourages tender, light and fluffy rolls. If you don’t have cornstarch, you can replace it with flour (and your cinnamon rolls will still be delicious!) –but your rolls won’t be quite as fluffy!
- Egg + egg yolk. Adding an extra yolk enriches the dough and also encourages a tender texture. If you don’t want to waste the extra egg white, use it to make candied pecans!
- Cream cheese. This is strictly for our frosting and doesn’t go into the dough. If you want a cream cheese-free frosting, try my new cinnamon roll icing instead (you can’t go wrong either way).
SAM’S TIP: Use bread flour for even chewier results! I use this in my king cake and star bread, both of which are pretty much giant cinnamon rolls. It’s not mandatory, but does make for a lovely texture!
As always, this is just an overview of the ingredients I used and why. For the full recipe please scroll down to the bottom of the post!
How to Make Homemade Cinnamon Rolls
Make the dough
A stand mixer is best because you can get away with adding less flour, which makes for softer rolls, but this recipe is absolutely doable and delicious by hand, too (and that’s how I made it in the video). You’ll find instructions to do this either way in the recipe, because I know not everyone has a stand mixer.
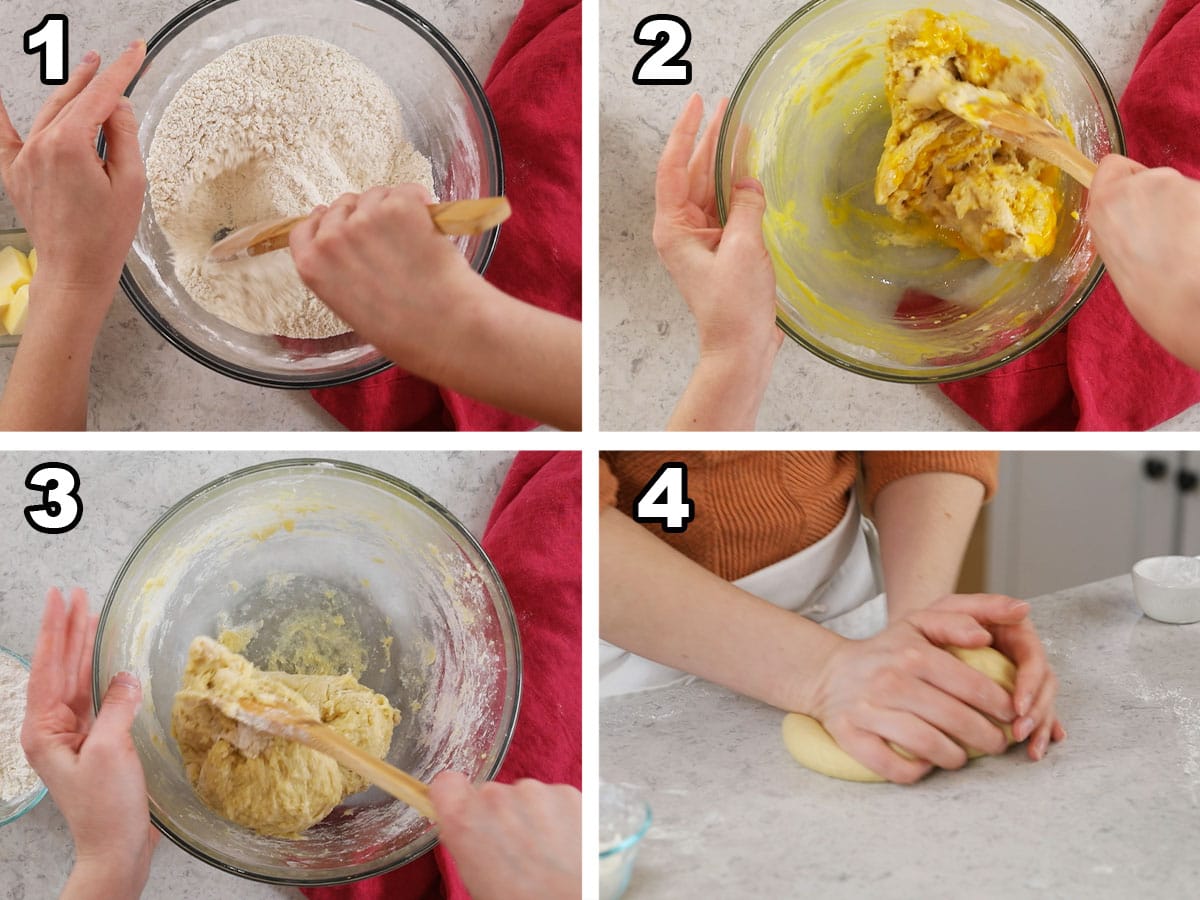
- Combine the dry ingredients – You can use a large mixing bowl and do this by hand or use the bowl of a stand mixer. Since we are using instant yeast, there is no need to proof the yeast separately. And no, you will not harm your yeast by adding the salt (common question I get, we’d have to use way more salt for this to be a risk).
- Add the wet ingredients – I stir in the warm water/milk first so they cool a bit before we add the eggs. Whisk the eggs before adding them so they combine easily, and stir until you have a cohesive dough.
- Stir in more flour as needed – and keep stirring until the dough forms a ball that clings to itself. There is no magic number for how much flour you will need to add (it will vary from kitchen to kitchen!); the best way to know your dough is right is by watching and feeling it.
- Knead the dough – Again, you can use your hands or a stand mixer (with the dough hook attachment). If needed, add additional flour (especially if working by hand and it gets too sticky) and keep mixing until the dough is smooth and elastic.
Assemble
It might seem like a lot of cinnamon/sugar in the center, but this helps create those rich and gooey centers.
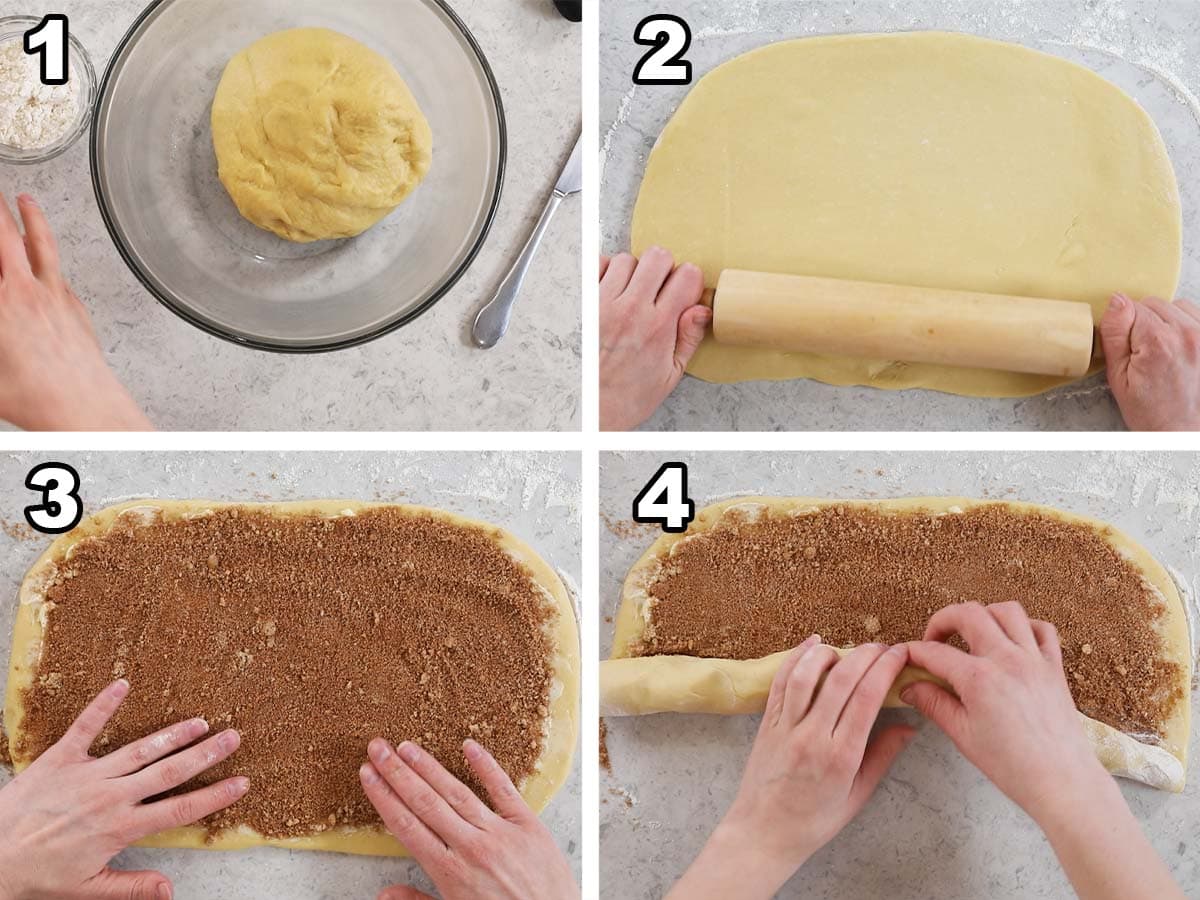
- Rest the dough – Place it in a covered, lightly oiled bowl in a warm place for 10 minutes. The dough won’t change much during this time–that is totally normal but it’s still a necessary resting period.
- Roll out – Turn the dough out onto a lightly floured surface and roll into a 15×9″ rectangle. Make sure the dough is even in thickness so the rolls bake evenly.
- Butter & sprinkle – Spread the butter over the dough leaving a border around the perimeter. Sprinkle the cinnamon sugar in an even layer over the butter.
- Roll the dough into a log – Roll tightly (if you’re too lax the filling could all fall out!), starting with a longer side, then pinch the seams to seal everything together.
SAM’S TIP: If your cinnamon rolls are a bit misshapen after cutting them, don’t stress, just gently re-form them into circle/roll shapes with your hands before placing them in the pie plate.
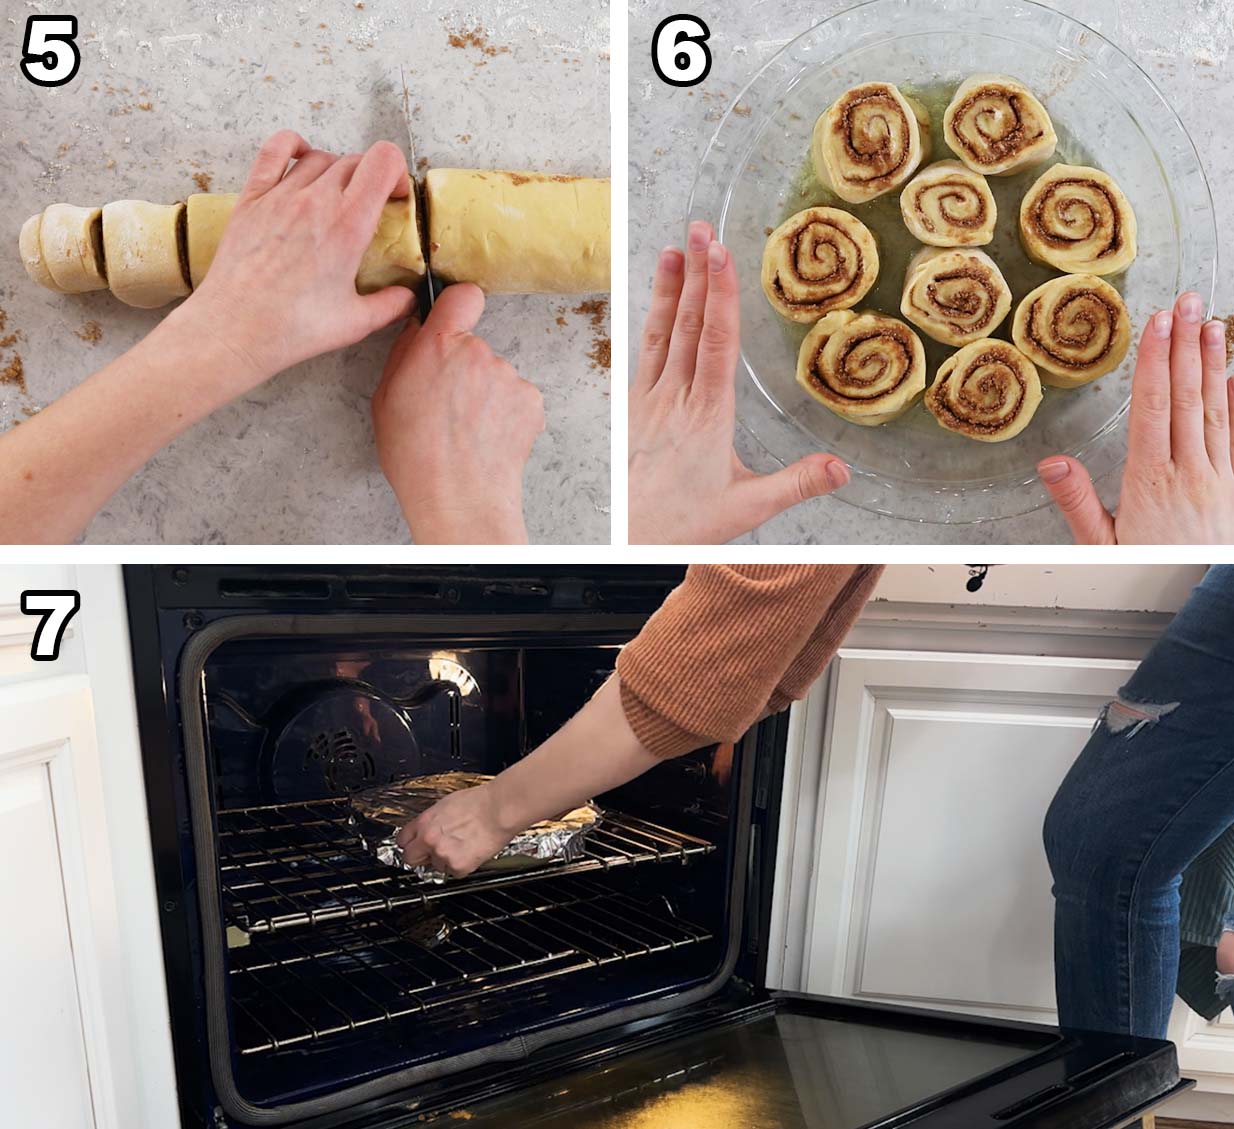
- Slice the cinnamon rolls – Cut the log into nine equal sized rolls. Use a sharp knife and gently saw through or use unflavored dental floss for this step (place a long thread under the log and wrap it around/pinch through the dough — I can’t find this in stores near me and don’t want to use the mint variety but if you can find it, feel free to use it)!
- Arrange the rolls – Place the rolls spacing them evenly in your buttered pan. If your rolls are slightly misshapen from cutting, don’t stress! Just gently reshape them with your hands before putting them in the pan.
- Cover the pan with foil and place in a warm/200F oven. Turn off the oven and let the dough rise inside for 15 minutes. Remove the rolls after 15 minutes and preheat your oven to 350F. Let the rolls sit in a warm spot (keep the foil on!) for 10-15 minutes while your oven preheats.
Bake
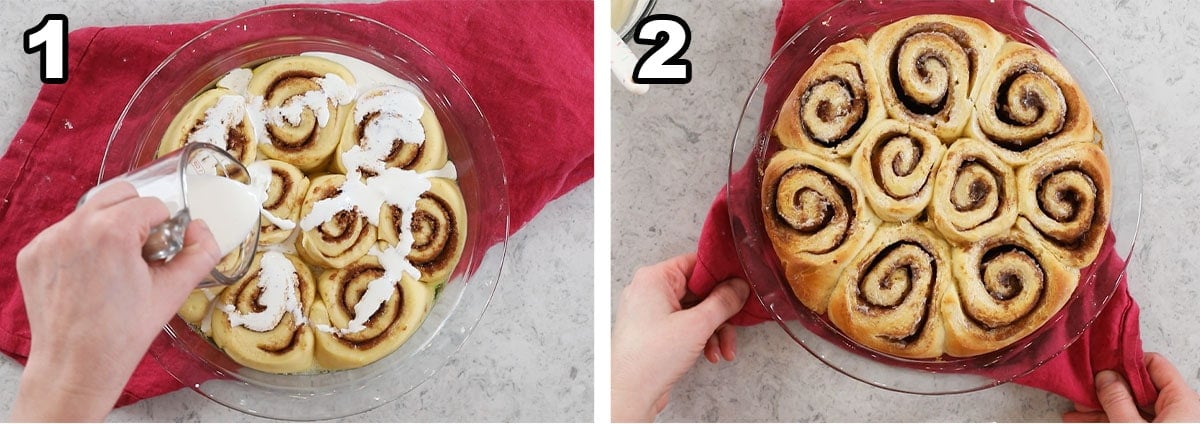
- Optional step! Drizzle with cream! Uncover the rolls once your oven is preheated and evenly drizzle with cream, if desired. This optional step makes the rolls even more moist and gooey (though it does necessitate a longer bake time and the rolls are a bit messier!). If you don’t have cream, skip this step, but it is a fun way to change things up.
- Bake. The cinnamon rolls need to bake until lightly golden brown and cooked through. If you don’t have a thermometer to test that they’re done, use a sharp knife to gently pry between two of the innermost cinnamon rolls – they should appear soft and bready, not gooey and raw!
Frost
Cream cheese frosting is my favorite and adds a subtle tanginess and beautiful depth to the sweet rolls and keeps them from being overbearing. If you’re looking for some different options or just don’t like cream cheese, scroll down to the FAQ section below.
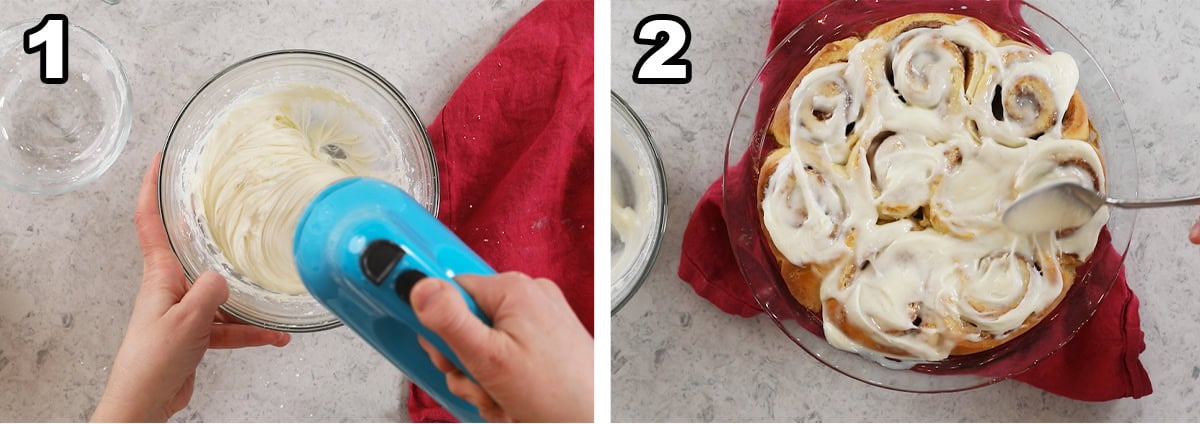
- Make the frosting – While the rolls are cooking, beat together the softened cream cheese, butter, and vanilla, then gradually add the powdered sugar. Add a splash of cream (or milk) until you have a smooth, spreadable consistency
- Frost the cinnamon rolls – (let them cool for a few minutes first!), then enjoy warm.
SAM’S TIP: Add the frosting while the cinnamon rolls are still warm but not hot, about 10-15 minutes after they come out of the oven. This will encourage the frosting to slightly melt into the rolls and coat them perfectly (and adding to the gooey-ness factor of the centers).
Tips for Making Homemade Cinnamon Rolls
- Invest in an instant read thermometer. (This is the instant read thermometer I use, affiliate). Use this to easily check that your water/milk mixture reaches the proper temperature (115F, it can kill your yeast if it is too hot). You can also use the thermometer to test that your cinnamon rolls are finished baking. The thickest part of the roll should reach approximately 190F.
- Do NOT use an electric hand mixer to make the dough! Odds are you’ll burn out the motor if you do. Use a stand mixer or your hands (the recipe includes instructions to do it either way).
- Trust your instincts: You don’t need to knead (haha) the dough for a certain amount of time or add a certain amount of additional flour. Instead, go by how the dough feels; you want a smooth, cohesive dough that is tacky, but not sticky.
- Do the Windowpane test. If you’re not sure that you’ve kneaded the dough well enough, try the windowpane test. Take a gumball to a golf ball-sized piece of dough and gently stretch it with your fingers as thinly as you can in front of you. If it’s thin enough that the light can pass through like a windowpane, the gluten is developed properly. If it tears, knead it longer.
- For the most gooey, indulgent results: add a drizzle of heavy cream before baking. This is a trick that was very popular on social media for a while (and I’m always late to trends), and it adds a nice touch. Necessary? No, these homemade cinnamon rolls are still delicious without; however, it will make them even more moist and tender.
Frequently Asked Questioins
This is typically a result of using too much flour or accidentally overbaking. Since not all ovens run true to temperature, I recommend keeping an oven thermometer (that is the one I use in my own oven, affiliate link) in your oven (hang it in the center where you’ll do most of your baking) and watch the temperature. Keep in mind if you use a different kind of pan (like a metal one) or cut more rolls than indicated, they’ll bake in less time, too.
If you didn’t roll your cinnamon rolls tightly enough the filling could all leak out the bottom during baking.
Of course! Use a classic vanilla glaze (quite sweet!) or if you don’t like cream cheese, use my cinnamon roll icing. My coffee frosting, lemon cream cheese frosting (coming soon!), or brown butter frosting would also be tasty on these homemade cinnamon rolls (though you’d need only a half-batch or even less) 😋
Enjoy!
Let’s bake together! Subscribe to my newsletter to be notified of all the newest recipes, and find my free recipe tutorials on YouTube 💜
Homemade Cinnamon Rolls
Equipment
- Stand Mixer (recommended, but this recipe can be made by hand)
Ingredients
CINNAMON ROLLS
- 1 ½ Tablespoons salted or unsalted butter, melted (for greasing pie plate)
- 2 ¾ cups (345 g (+ additional as needed)) all-purpose flour or bread flour, plus additional flour as needed
- ¼ cup (50 g) granulated sugar
- 2 Tablespoons cornstarch, (cornflour in UK) see note
- 2 ½ teaspoons rapid rise/instant yeast, I use Hodgson mill fast rise yeast
- 1 ¼ teaspoons salt
- ½ cup (120 ml) whole milk
- ¼ cup (60 ml) water
- 4 Tablespoons (57 g) unsalted butter, melted
- 1 large egg + 1 large egg yolk, lightly beaten, room temperature preferred
FILLING
- ½ cup (100 g) light brown sugar, firmly packed
- 1 Tablespoon ground cinnamon
- ⅛ teaspoon salt
- ¼ cup unsalted butter, softened (it needs to be soft enough to easily spread, so pop it in the microwave for a few seconds if it’s still firm at room temperature)
- ¼ cup heavy cream, OPTIONAL INGREDIENT (see note)
ICING (see note)
- 2 oz (57 g) cream cheese, softened
- 2 Tablespoons (28 g) unsalted or salted butter, softened
- 1 teaspoon vanilla extract
- 1 cup (125 g) powdered sugar
- 1 Tablespoon milk or heavy cream
Instructions
- Preheat your oven to 200°F (95C) and prepare a 9 ½” (24cm) pie plate by pouring 1 ½ Tablespoons of butter in your pie plate. Set aside.1 ½ Tablespoons salted or unsalted butter
- Combine flour, sugar, cornstarch, yeast, and salt in the bowl of a stand mixer fitted with a paddle attachment (or stir by hand with a wooden spoon in a large bowl) and stir until well combined.2 ¾ cups (345 g (+ additional as needed)) all-purpose flour or bread flour, ¼ cup (50 g) granulated sugar, 2 Tablespoons cornstarch, 2 ½ teaspoons rapid rise/instant yeast, 1 ¼ teaspoons salt
- Combine milk and water and heat (in a saucepan over low heat or in a microwave-safe dish) until mixture reaches 115F (45C).½ cup (120 ml) whole milk, ¼ cup (60 ml) water
- Turn your stand mixer to low speed and slowly pour heated milk mixture into the bowl followed by the melted butter, stirring until barely combined (or stir in by hand, dough will be stiff).4 Tablespoons (57 g) unsalted butter
- Add lightly beaten eggs and increase speed to medium, continue to stir until completely combined (if needed, pause to scrape down the sides and bottom of the bowl so all flour is absorbed).1 large egg + 1 large egg yolk
- Switch your paddle attachment out for a dough hook and continue to stir on medium low speed (or continue to stir with wooden spoon). Gradually add additional flour as needed until dough clings to itself and pulls away from the sides of the bowl.
- Continue to knead dough with dough hook for about 5 minutes longer on medium speed, until dough develops a soft, elastic texture (it will be slightly sticky/tacky to the touch still). If kneading by hand, transfer to a clean, lightly floured surface and knead until smooth and elastic (about 10 minutes).
- Transfer dough to a lightly oiled, heatproof bowl and cover tightly with plastic wrap. Allow to rest in a warm place (I usually place mine on top of my preheating oven) for 10 minutes. Meanwhile, prepare your filling.
Filling & Assembly
- Whisk together brown sugar, cinnamon, and salt in a small bowl. Set aside.½ cup (100 g) light brown sugar, 1 Tablespoon ground cinnamon, ⅛ teaspoon salt
- Once your dough has finished resting (it may not have risen very much, this is fine) transfer to a clean, lightly floured surface and use a rolling pin to roll out to a 15×9” (38x22cm) rectangle. Spread softened butter evenly over the dough and then sprinkle evenly with brown sugar mixture, leaving about ½” (1.25cm) of dough uncovered around the perimeter.¼ cup unsalted butter
- Starting with the long end, roll your cinnamon rolls into a tight roll. Cut into 9 slices (about 1 ¾” width per slice) and arrange into prepared pie plate.
- Cover with foil and place in your 200°F (95C) oven and turn off the oven. Allow dough to rise for 15 minutes.
- Once 15 minutes has passed, remove covered pie plate and place on top of your oven (or somewhere else warm/draft free). Preheat your oven to 350°F and leave rolls covered, allowing them to continue to rise while your oven preheats (at least 10-15 minutes).
- OPTIONAL STEP: Just before baking, evenly drizzle heavy cream over cinnamon rolls (and the spaces between them).¼ cup heavy cream
- Once oven is preheated, remove foil and bake rolls for 20-25 minutes or until lightly golden brown on top and cooked through (you can use an instant read thermometer, test the thickest part of an outer cinnamon roll and it should reach 185-190F/87C.
- While your cinnamon rolls are baking, prepare the icing.
ICING
- Use an electric mixer to beat together softened cream cheese, butter, and vanilla extract until creamy. Gradually add sugar until completely combined. Add milk or cream, and stir well until creamy and smooth.2 oz (57 g) cream cheese, 2 Tablespoons (28 g) unsalted or salted butter, 1 teaspoon vanilla extract, 1 cup (125 g) powdered sugar, 1 Tablespoon milk or heavy cream
- Once rolls have finished baking, allow them to cool for 10 minutes before covering evenly with frosting. Enjoy!
Notes
Flour
You may substitute bread flour (equal amount) for the all-purpose flour.Corn starch
I love the effect the corn starch has on the cinnamon rolls, making them extra fluffy. However, if you’d like you can omit this ingredient — just replace it with an equal amount of flour.To make in advance
Cover tightly with plastic wrap after step 3 of “Filling & Assembly” and refrigerate for up to 24 hours. When ready to bake, let sit at room temperature for one hour then bake as indicated (may need more time to bake).Heavy cream
This is an optional ingredient. Drizzling this over the cinnamon rolls before baking will make them richer and more gooey (but will also likely require a longer baking time).Icing
I love this cream cheese icing, but for a classic version you can make my (non-cream cheese) cinnamon roll icing instead.Storing
Cover rolls tightly and store at room temperature for up to 2 days, or in the refrigerator for up to a week. I recommend reheating in the microwave before enjoying, they are best warm!Nutrition
Nutrition information is automatically calculated, so should only be used as an approximation.
Like this? Leave a comment below!
I originally published this recipe in 2018. I’ve updated the post to improve the clarity of the recipe (and add the optional heavy cream trick) and have added new photos and a new video.


Amazing. I was so skeptical to try this fast recipe. But this recipe is the truth. Everything that you said it would be, it is. My fear is that since it is so fast and easy to bake that will over do it.
My only question is can the recipe be doubled?
Oh yeah, this is in response to the
1 hour cinnamon bun.
Hi Novellaine! Yes you can double this recipe. I hope you love them! 🙂
These are our favorite cinnamon rolls! Made yesterday and still taste delicious today. Thanks Sam!!
These were delicious! I appreciated the step by step instructions and tips. This helped a novice baker like me make perfect cinnamon buns the first try. Thanks for all your hard work testing and crafting the PERFECT recipe. I made a second batch for a friend’s birthday and will share the recipe with her as well.
I’m so glad you enjoyed them so much, Suz! 🙂
I have made several recipes of cinnamon rolls and I have to say that these are the MOST amazing, melt-in-your-mouth cinnamon rolls I’ve ever made! I was skeptical of the very brief proofing time but they are PERFECT and will surely become a staple in our home!
Thank you so much, Leslie! I am so glad you enjoyed them so much. 🙂
Hey Sam, what are your thoughts on using whipped cream cheese…? I would suppose weight for weight they would be the same.
Hi Jeb! Normally I wouldn’t recommend it but since this is such a small amount it may work. You may need a little extra sugar and I would just stir it together by hand. 🙂
Good to know. We are more apt to have whipped in the house because the kids enjoy it. I wanted to know if it was via able in a pinch…
I dont have a mixer that has a paddle attachment or dough hook can I still make it using regular mixer?
Hi Jan! I would make it by hand. For step 5 you will just have to knead the dough on a clean lightly floured surface after you add the additional flour. I wouldn’t recommend a regular mixer as it can burn out the motor. I hope that helps!
I made these this morning for Christmas and they are AMAZING! THE BEST CINNAMON ROLL RECIPE EVER !!!! I will recommend this to everyone I know! Thank you so much Sam and I hope you have a happy holidays with you and your family 🙂
I have a weird question..do you prefer this recipe with yeast or your other one without the yeast? I can’t decide which one to try first! Thank you 🙂
Hmm that’s a really tough question. They are both so good! If I have more time I would probably make the yeast ones. If I’m in a real hurry, no yeast. 🙂
Thanks so much for answering! I think the quicker ones will be the ones. Merry Christmas too!
Hi! These look great! I only have a hand mixer. Would I still be able to make these?
Hi Apryl! Yes, I’d actually recommend making by hand rather than with the hand mixer though as it could burn out the motor. Do step 5 as much as you can by hand in the bowl then transfer to a clean lightly floured surface and knead until you have that smooth elastic texture. I hope that helps! 🙂
I have made these so many times for my husband, and now I’m planning to make them for our extended family for our Christmas Eve breakfast! They’re so easy (even for a novice baker like me!), and they taste great for days! These would make a perfect Christmas morning breakfast, too!
I am so glad you enjoyed them so much! 🙂
These were amazing! I made them on a whim at 11:30 at night (it’s finals week lol) and when I tell you I’ve never had a cinnamon roll so delicious! Absolutely recommend these for anyone and everything to make!
I’m so glad you enjoyed them so much, Kay! 🙂
If I make these with the intent they be eaten the next day, should I ice them as usual, then reheat them, or will microwaving ruin the icing?
Hi John! The icing will be fine reheated. It just gets a little thinner and a little bit stickier, but that’s all part of the experience. 😉
Follow up question: if I am making multiple batches, can I just cook them togehter in a bigger tray instead of the pie pan?
That shouldn’t be a problem. Your baking time will just change a little bit. 🙂
I made 4 dozen in 2 large pans, my coworkers finished them off in no time! I also took the end bits I cut off the raw rolls, tossed them in a bread pan and have a nice cinnamon loaf as well!
That’s a lot of cinnamon rolls!!! I’m so glad everyone enjoyed them so much! 🙂
Sooo east and yummy!! I had to make more frosting since I hate too much of it while the rolls cooled:)
🤣 I can’t say that I haven’t had to do the same! I’m so glad you enjoyed them so much! 🙂
Made these today. They are amazing! And really they are not that hard. I found my artistic side coming out rolling out the dough. Looked SO pretty. Fantastic texture and awesome taste. Thanks for another great recipe!
I am so glad that you enjoyed the taste and the process of making them, Amber! Thanks for commenting. 🙂
I have made your chocolate chip cookies, your pizza dough and now your cinnamon rolls. My family LOVED them all! Thank you!
I am so glad everyone enjoyed everything so much, Erika! 🙂
SORRY! I meant to post the Banana Bread article on that recipe page. Apologies – Toni