
Homemade Banana Pudding (From Scratch!)
This post may contain affiliate links. As an Amazon Associate I earn from qualifying purchases. Please read my disclosure policy.

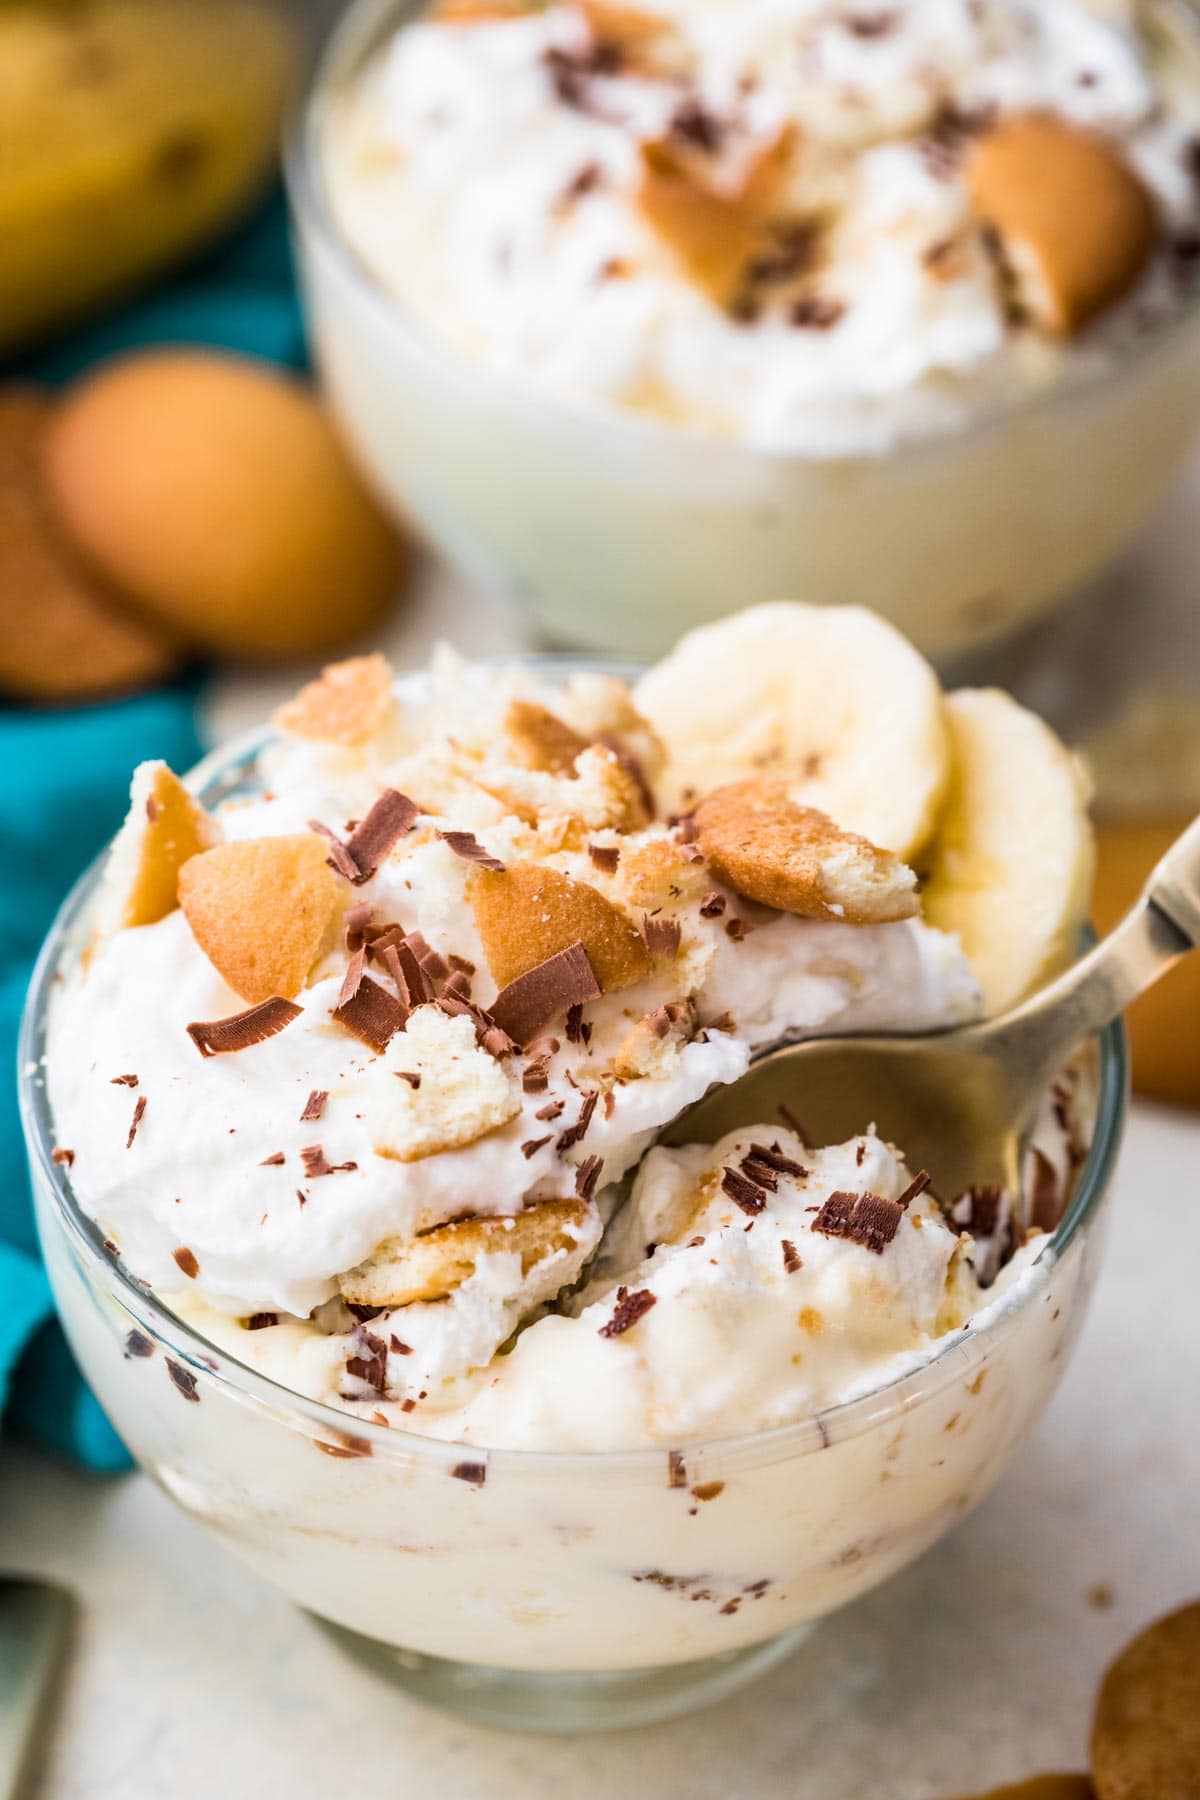
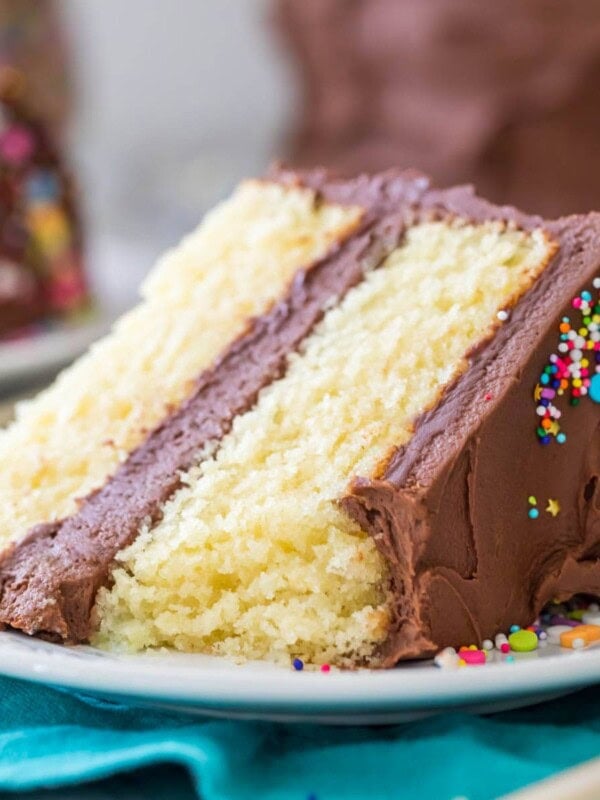
My homemade banana pudding recipe is made completely from scratch and is way better than any boxed pudding! If you’re intimidated by the thought of making this classic show-stopper 100% homemade, don’t be! I’ll walk you through all the steps and I’ve included a step-by-step video!
I hope you bookmarked last week’s homemade vanilla wafers because you’re going to need it for my homemade banana pudding!
While you can substitute store-bought cookies, there is nothing like a truly from-scratch banana pudding.
And this one is the real deal. We’re making our own rich and creamy vanilla pudding base, folding in homemade whipped cream, and layering homemade (preferably) vanilla wafers throughout. No boxed pudding packets, no Cool Whip, just the good stuff.
Let’s get to it.
What You Need
Let’s talk about a few of our ingredients briefly before we begin.
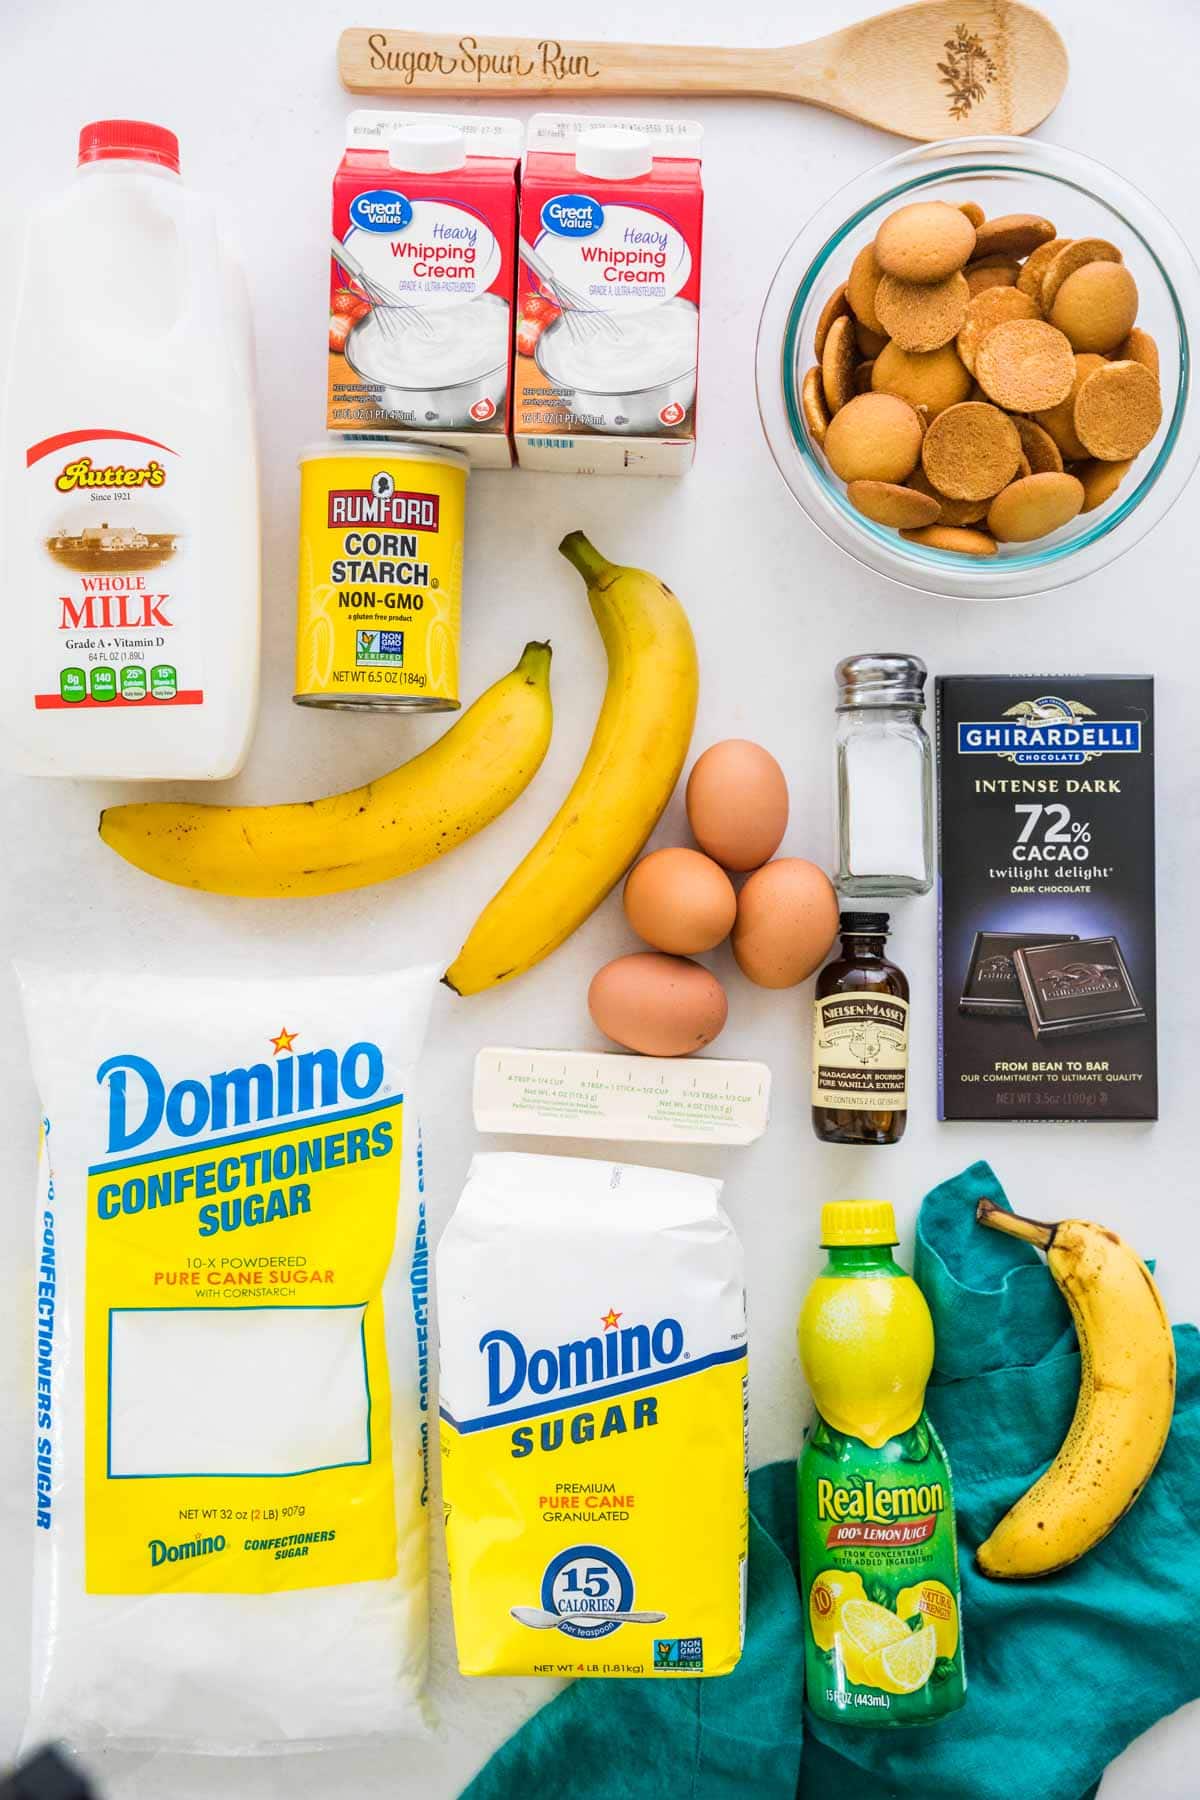
- Cornstarch. This thickens the pudding and helps keep it from becoming runny. An equal amount of arrowroot or potato starch could successfully be substituted. Flour may also be used but you’d have to use a bit more (I’d use 1/3-1/2 cup) and I don’t care for the texture quite as much as I do when using cornstarch.
- Heavy cream. Heavy cream is used in two parts: the pudding and the whipped cream topping. In the pudding it adds a richness, making the end result creamy and lush. Double cream or heavy cream could be used to make the topping, but no other substitute will whip as needed for the whipped cream. See the recipe notes for substitution options in the pudding.
- Egg Yolks. We’re using just the egg yolks for a rich, creamy, and thick pudding. Save the whites to make angel food cake, white cake, my macaron recipe, or meringues!
- Bananas. All of the banana flavor in homemade banana pudding comes from real bananas. Use ripe but not over-ripe or mushy bananas.
- Lemon or lime juice. Brush your bananas slices with lemon juice. The acidity inhibits browning (and adds a lovely, subtle tartness that accents the sweetness of the pudding beautifully). I’ve used this trick before in my banana cream pie recipe.
- Vanilla wafers. Use store-bought or make your own using the link in my recipe!
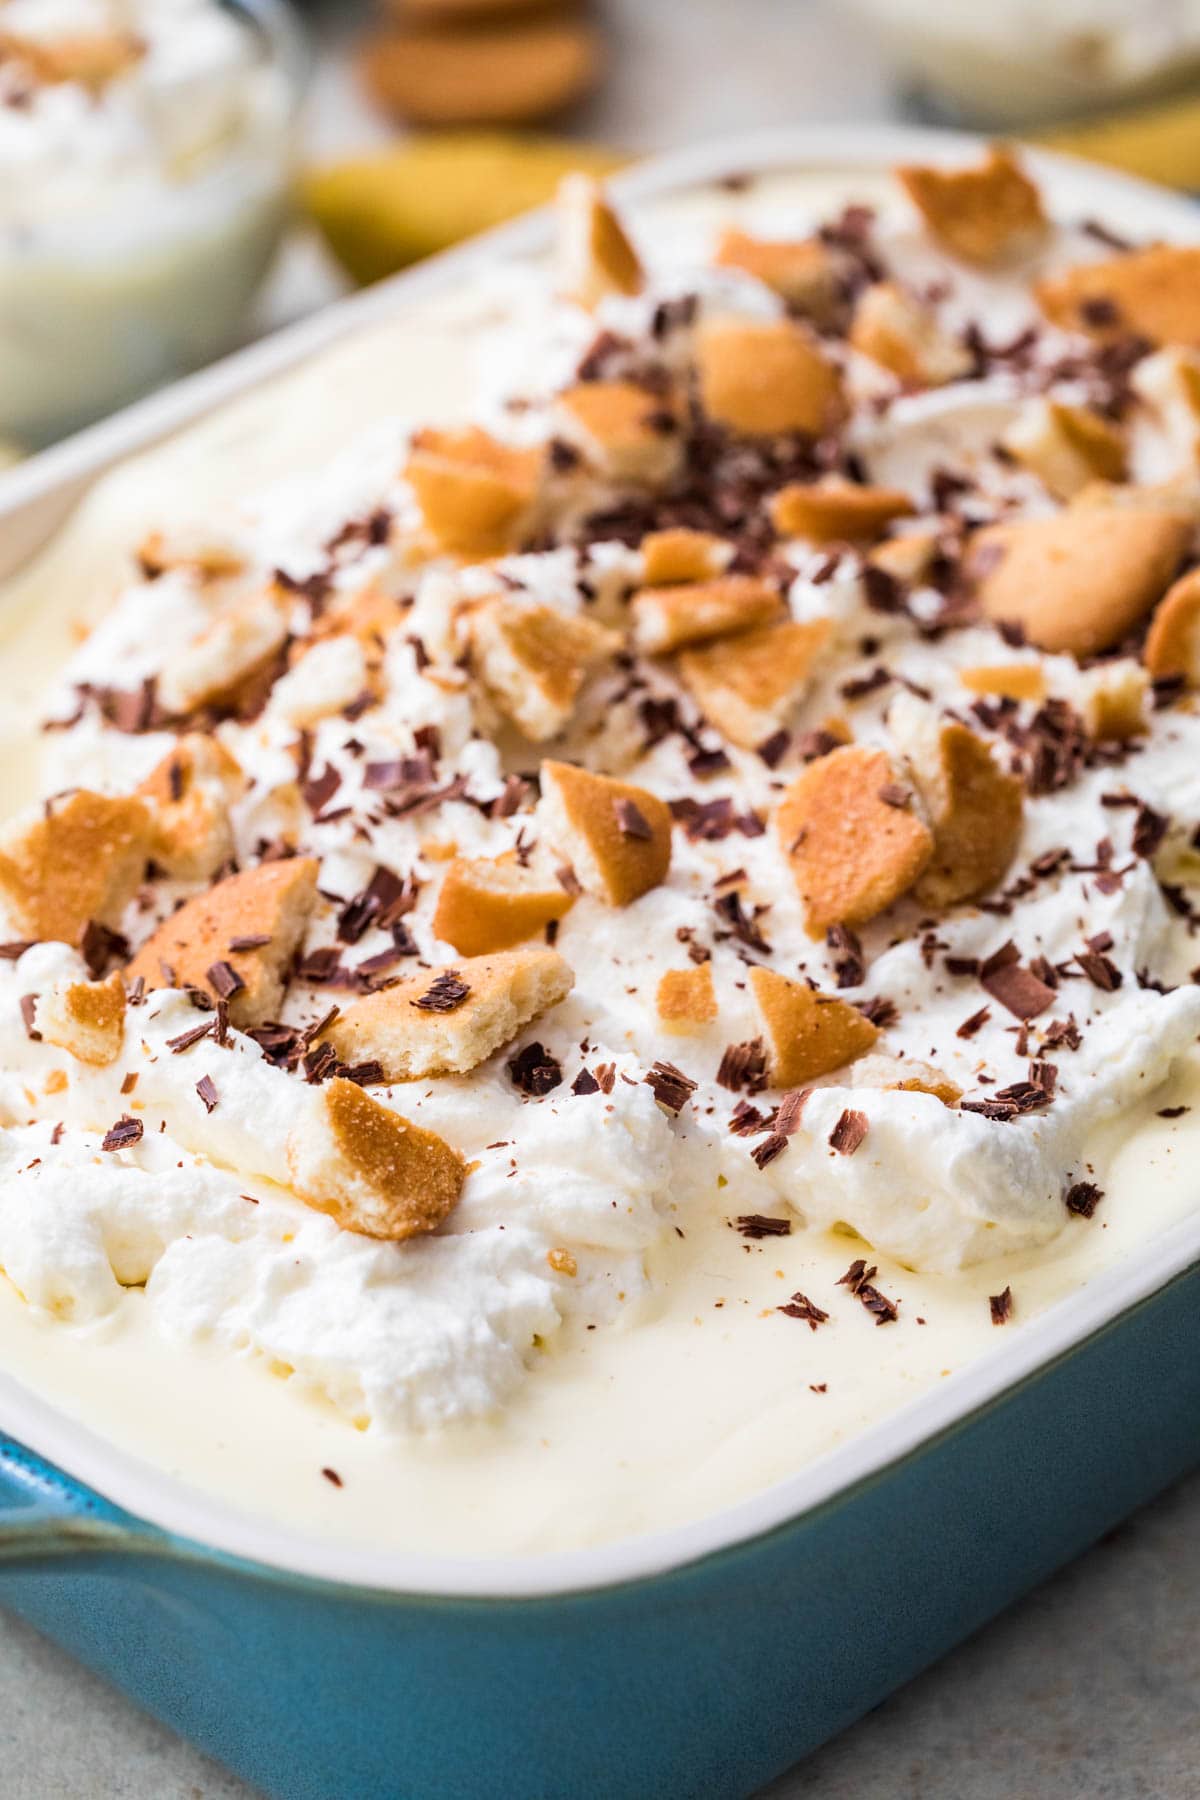
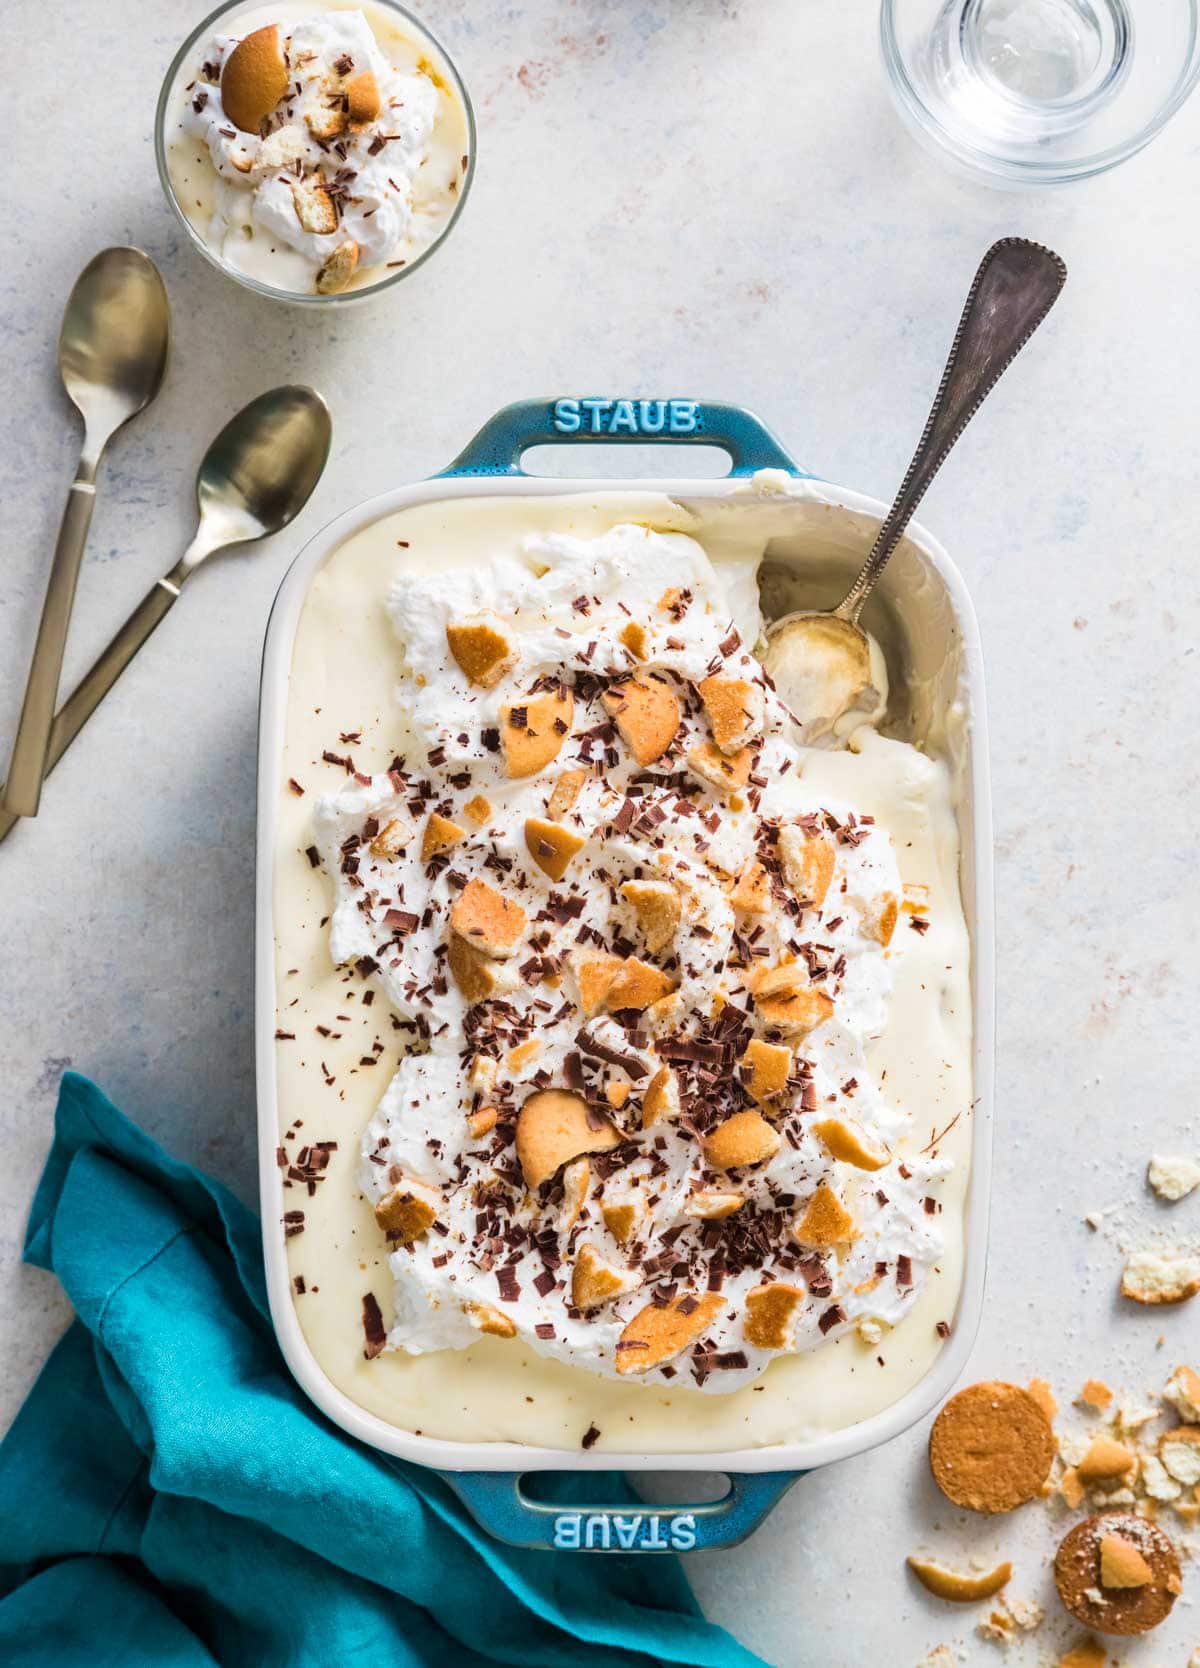
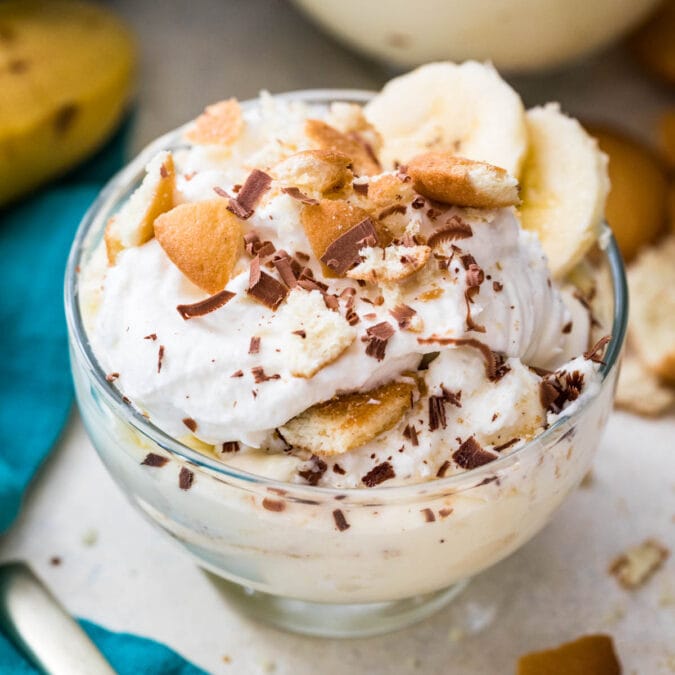
- Dark chocolate. Optional (well, not in my house). A generous sprinkling of dark chocolate shavings over the top takes this dessert to the next level. To make chocolate shavings, just grab a dark chocolate bar and a potato peeler and “peel” the edge of the chocolate over my banana pudding. I demonstrate this in the video in the recipe.
How to Make Homemade Banana Pudding (Step-by-Step)
Make the pudding
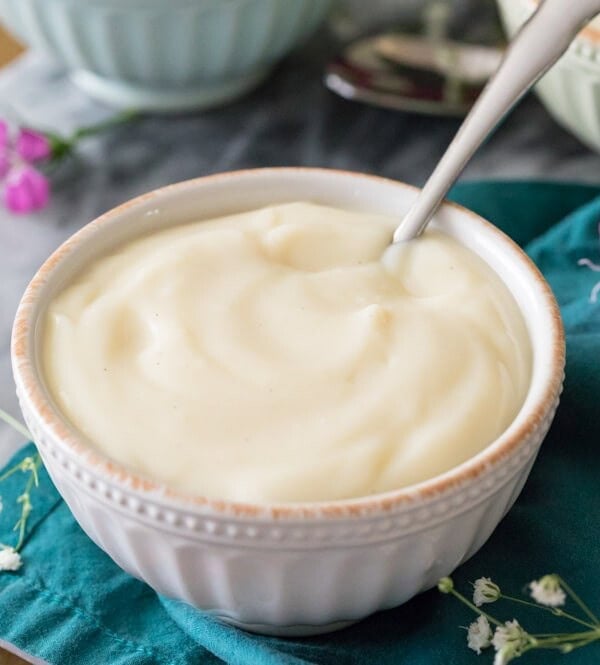
Your first step is to make the pudding. This is very similar to the pastry cream that I use in my eclairs and cream puffs. It will need to be allowed to cool completely before you can serve the banana pudding, so plan ahead!
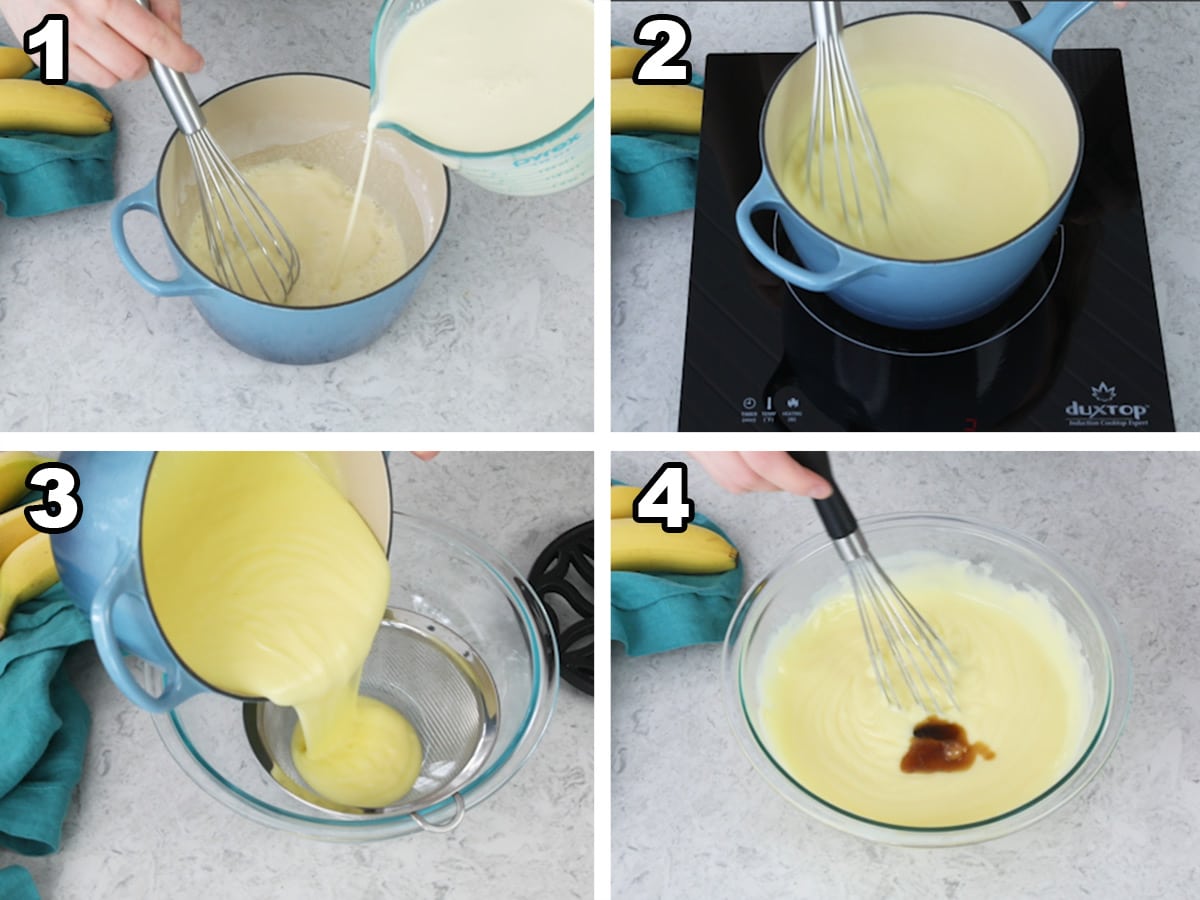
- Whisk sugar, cornstarch, and salt in a medium sized saucepan. Separately, whisk together milk, cream, and egg yolks (get them nicely whisked so the yolks are well beaten). Pour wet ingredients into dry. Whisk constantly as you do this to prevent any lumps.
- Whisk the pudding constantly over medium heat until it thickens. This will take a while so have patience! It’s important that the mixture is heated slowly enough that the sugar has time to melt. If it cooks too fast, you could end up with a runny pudding (this could also leave you with bits of cooked egg in your pudding… I love scrambled eggs, but not in my homemade banana pudding!).
- Pour the pudding through a fine mesh strainer. This is important to catch any lumps or tiny bits of cooked egg that might’ve accidentally happened and guarantees a smooth banana pudding.
- Whisk in butter and vanilla until combined. The butter adds a silky mouthfeel and of course the vanilla adds excellent flavor.
The pudding will need to cool completely before you can use it to make banana pudding. Cover the surface with plastic wrap to keep a skin from forming and pop it in your fridge for a few hours (this can be made 1-2 days in advance of assembly).
Sam’s Tip
The pudding will continue to thicken as it cools, but you still want it to be thick enough that it coats the back of a spoon before you remove it from the heat.
Prepare the Whipped Cream & Bananas
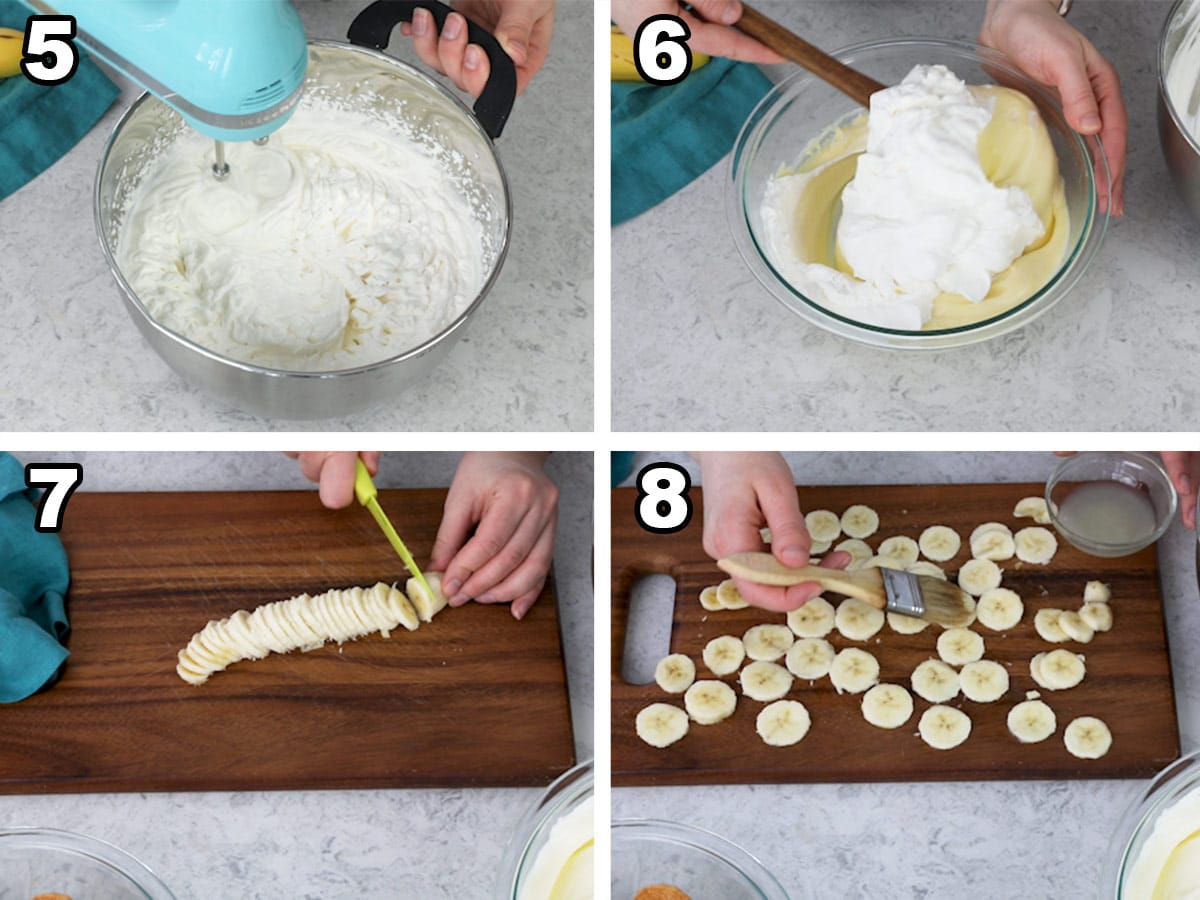
- Use an electric mixer to whip together remaining cream, powdered sugar, and vanilla until you have a thick, billowy cream.
- Fold approximately half of your whipped cream into the pudding mixture (no need to measure, this recipe is forgiving!). This thickens the pudding and adds a lovely, more stable consistency.
- Slice 2-3 ripe but still firm bananas into thin slices.
- Brush each banana slice on both sides with lemon or lime juice to inhibit browning (the browning is harmless, but it’s unappealing and one of my biggest pet peeves and something I wanted to absolutely avoid when I set out to make a homemade banana pudding recipe)!
Sam’s Tip
The riper your bananas are, the more banana flavor will be infused into your pudding. However, don’t choose bananas that are so (over-) ripe that they’re mushy or they’ll be difficult to handle and prone to browning too quickly.
Assemble
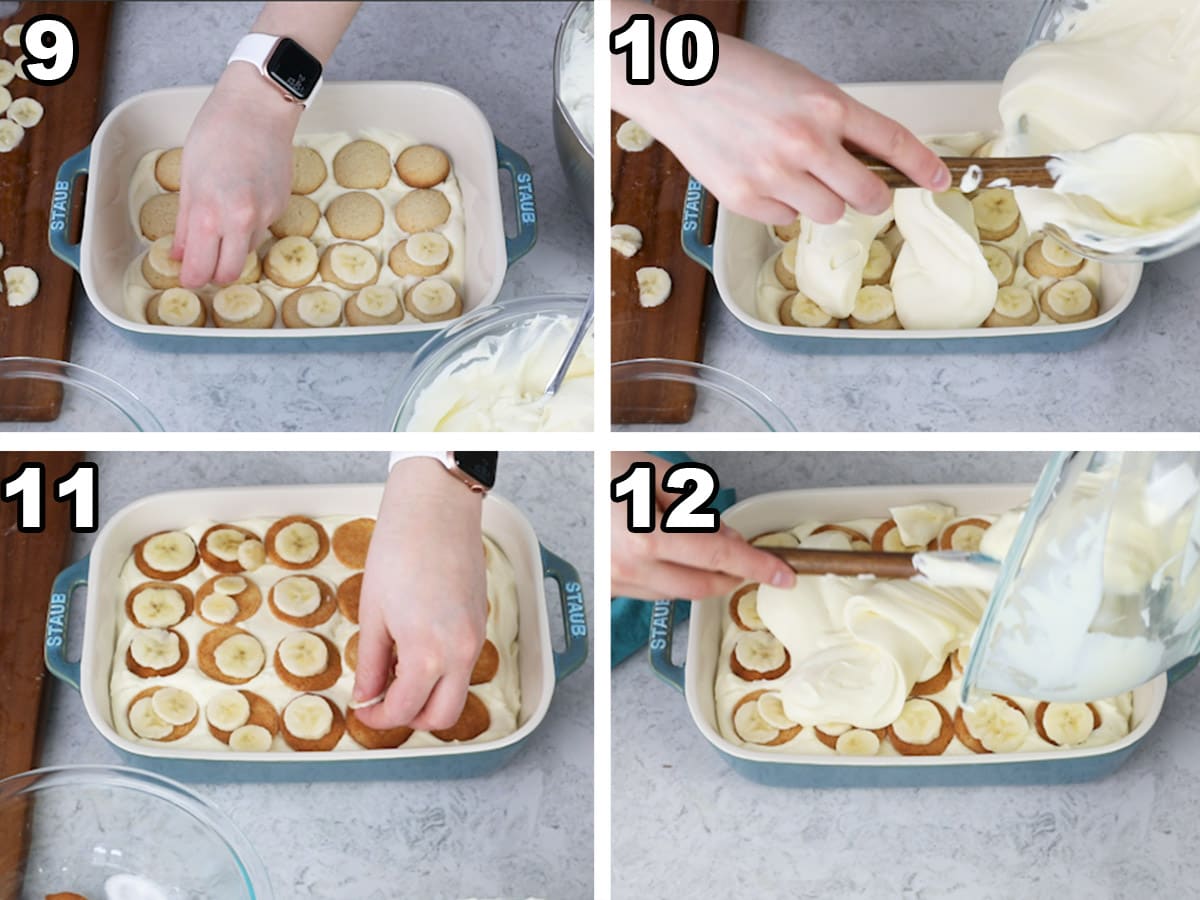
- Spread a bit of pudding in a baking dish then top with vanilla wafers and top each of those with a banana slice (or two, if the slices are small!).
- Layer half the pudding over the banana slices. Gently smooth it over the banana layer.
- Add another layer of vanilla wafers, gently nestling them into the pudding, then top with sliced (lemon-juice-brushed) bananas.
- Spread the remaining pudding evenly over the top. You can top with the remaining whipped cream now, or add it just before serving.
Sam’s Tip
Just before serving, crush additional vanilla wafers over the top (don’t do this in advance or they’ll lose their crispness and you want some crunch) and use a potato peeler to “peel” chocolate curls off of a chocolate bar. For a tropical twist, top with toasted coconut!
Frequently Asked Questions
Usually this is a result of 1) heating the mixture too fast (which doesn’t give the sugar the chance to melt properly) or 2) simply not cooking for long enough. It takes time, but make sure the pudding is thickened before you remove it from the heat. It may be helpful to watch the video before beginning.
Yes. You can make homemade banana pudding in a 9×13 pan, just use a thin layer of pudding on the bottom and you will have just a single layer of vanilla wafers and bananas topped with the remaining pudding and then whipped cream.
You may also make this in a large trifle dish or in individual serving dishes (mason jars work well!).
Bananas will naturally begin to turn brown after they’re sliced simply due to oxidation (being exposed to the air). This won’t cause any problems in taste or texture, but it is much less pretty. To keep your banana slices from turning brown in homemade banana pudding, brush them with a little bit of acidic juice (I use lemon or lime juice) and make sure they’re completely covered by the pudding so they’re not exposed to air. The acidity from the juice slows the browning and the pudding blanket keeps air from reaching the slices so they don’t turn brown too fast.
More Recipes You Might Like:

I would really love to know what you think of my homemade banana pudding, especially if you’ve made the kind with the store-bought cookies and pudding packets in the past!
Enjoy!
Let’s bake together! Subscribe to my newsletter to be notified of all the newest recipes, and find my free recipe tutorials on YouTube
Homemade Banana Pudding (From Scratch!)
Ingredients
Pudding
- ¾ cup (150 g) granulated sugar
- ¼ cup (32 g) cornstarch
- ½ teaspoon salt
- 1 ½ cups (354 ml) whole milk¹
- 1 ½ cup (354 ml) heavy cream¹
- 4 large egg yolks²
- 2 teaspoons vanilla extract
- 3 Tablespoons unsalted butter, cut into 3 pieces
Whipped Cream
- 3 cups (710 ml) heavy cream, cold
- 1 cup (125 g) powdered sugar
- 2 teaspoons vanilla extract
For Assembly
- 2-3 ripe bananas
- 3 Tablespoons lemon juice, lime juice may be substituted
- 45 vanilla wafers, divided (click the link to make your own homemade vanilla wafers)
- 2 oz dark chocolate bar, optional
Instructions
Pudding
- Whisk together sugar, cornstarch, and salt in a medium-sized heavy-bottomed saucepan.¾ cup (150 g) granulated sugar, ¼ cup (32 g) cornstarch, ½ teaspoon salt
- In a large measuring cup or separate bowl, whisk together milk, 1 ½ cups heavy cream, and egg yolks until yolks are beaten and ingredients are well-combined.1 ½ cups (354 ml) whole milk¹, 1 ½ cup (354 ml) heavy cream¹, 4 large egg yolks²
- While whisking the dry ingredients, drizzle milk mixture into saucepan and whisk until completely combined.
- Transfer saucepan to stovetop over medium heat and whisk constantly until mixture thickens to a pudding-like consistency. The whisk should leave trails in the pudding and if you dip the back of a spoon into the pudding it should be entirely coated with pudding. Note that this will take some time, typically around 10-15 minutes or possibly even longer. Do not turn up the heat to high or you’ll burn the mixture, cook the eggs, and ruin the pudding. Just be patient!
- Once pudding has thickened, remove from heat and pour through fine mesh strainer into a heatproof bowl. Whisk in butter, one piece at a time until melted and then whisk in vanilla.2 teaspoons vanilla extract, 3 Tablespoons unsalted butter
- Let pudding sit cool for 15 minutes, stirring occasionally, then cover by pressing a piece of plastic wrap or parchment directly against the surface of the pudding to prevent a skin from forming. Refrigerate until completely cooled before proceeding (pudding may be prepared up to 48 hours in advance). When pudding has cooled, prepare whipped cream.
Whipped Cream
- Combine 3 cups heavy cream, powdered sugar, and 2 teaspoons vanilla extract and use an electric mixer or stand mixer to beat until stiff peaks have formed.3 cups (710 ml) heavy cream, 1 cup (125 g) powdered sugar, 2 teaspoons vanilla extract
- Remove chilled pudding from the fridge and stir. Add half of the whipped cream mixture to the pudding and stir together using a spatula until completely combined.
Assembly
- Slice two bananas into ⅛” thick slices and brush lightly with lemon juice on both sides (this keeps the bananas from browning too quickly).2-3 ripe bananas, 3 Tablespoons lemon juice
- Spread a thin layer of pudding over the bottom of a 2.5qt baking dish (or see note 3) and then top with an even layer of vanilla wafers (about 20 cookies for me).45 vanilla wafers
- Top each vanilla wafer with a brushed banana slice (if slices are small, use two per cookie).
- Top the banana/cookie layer with half of your pudding mixture, gently spreading in an even layer.
- Nestle another layer of vanilla wafers into the pudding and top with banana slices (if needed, slice and brush your last banana).
- Top with remaining pudding. Dollop remaining whipped cream on top. Cover and refrigerate at least 4 hours (pudding should be served with 24-48 hours of being assembled). Before serving, crumble 5-6 vanilla wafer cookies over the whipped cream and use a potato peeler to add chocolate curls/shavings overtop. Serve and enjoy!2 oz dark chocolate bar
Notes
¹Milk and cream substitutes
You may substitute 2% milk for the whole milk. This recipe also works if you substitute the heavy cream for additional milk or if you substitute both the milk and cream for half-and-half. Cream (heavy cream, whipping cream, or double cream) must be used for the whipped cream, however.²Egg whites
Separate the egg whites into a clean dry container and save them to make meringue cookies or angel food cake!³Using different sized dishes
This recipe may be made in a 9×13 pan (do one bottom layer of cookies and bananas topped with the pudding mixture and then whipped cream) or in a trifle dish. It may also be portioned into individual trifle dishes or mason jars.Make ahead instructions
Banana pudding should ideally be assembled several hours before serving to let the flavors develop, but preferably no more than 48 hours before serving, as the bananas will eventually begin to brown and break down. However, the pudding can be prepared 2-3 days in advance of assembling, and the cookies (if making homemade) can be prepared up to 5 days in advance. I recommend making the whipped cream and preparing the bananas immediately before assembly.Freezing
I do not recommend freezing as the pudding does not hold up well to being frozen and then thawed (the texture loses its smoothness).Nutrition
Nutrition information is automatically calculated, so should only be used as an approximation.
Like this? Leave a comment below!


I was a little skeptical of banana pudding because of the way it was prepared when I was younger. I faced what I thought were challenges while making the pudding from scratch, but it all worked out. I made it the night before and put it in the fridge, it was perfect when it got to the table! Important for me was the cookies were not mush, and there was equal distribution of everything. The absolute winner was the pudding made from scratch. I was told this was the best banana pudding they ever tasted. I thought it was great and I am not a big fan of it. Another great recipe!
I’m so glad you enjoyed it so much! 🙂
Can I make this in a square pan?
Sure thing! 🙂
I have a question! Is there any way to make a sugar free version of this recipe? My parents are both diabetic but would love to enjoy my baking but I’m just not sure if not adding sugar would ruin the recipe?
Hi Angel! Unfortunately, I don’t think it’s going to turn out. A sugar substitute could potentially work, but I haven’t tried it to say for sure how it would work.
4 stars instead of 5 because I did make two adjustments: for the vanilla wafers, I used your recipe, but did a double bake on them (second time 10 minutes at 160c\140c convection) to make the brown more and give them that crispy all the way through texture so they would hold up better in the pudding. And for the pudding itself I used 1 full vanilla pod instead of the extract. Best vanilla pudding ever. With those two adjustments this was the BEST banana pudding.
The custard itself was delicious but somehow it curdled when I added the whipped cream to it. What happened? 🙁
Hi Nadya! I’m really confused as to how this could happen? Is it possible that the whipped cream was over-mixed and that’s the curdling you saw?
Im not sure 🙁 Im so sad because the taste was 10/10!
I whipped the cream to stiff peaks then added the pudding. When folding in the whipped cream, the whole mixture started to curdle. Both were cold.
Bummer! 🙁 I think what you are experiencing here is the whipped cream breaking. 🙁
My husband loved this recipe. I burned the wafers i know it’s my fault soni will try again. I follow you and love your recipes
I’m glad you were still able to enjoy it! Thank you for following along. 🙂