
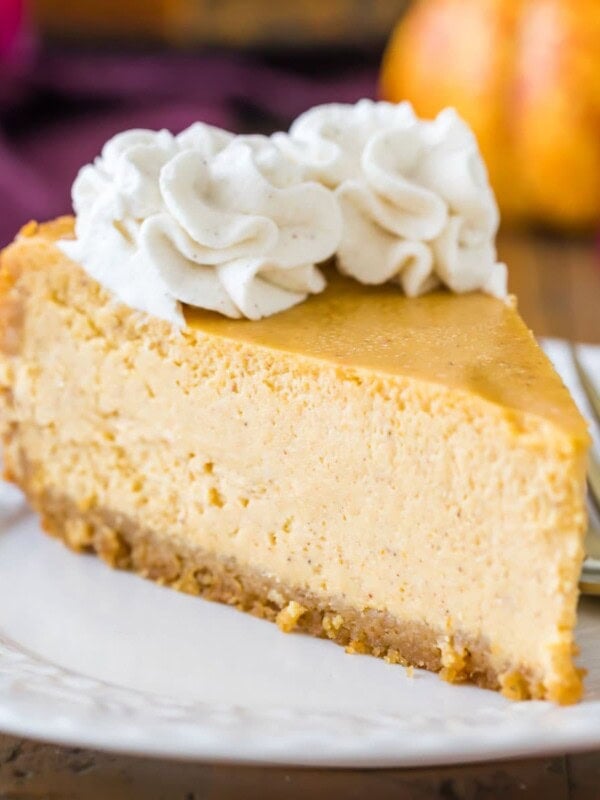
Apple Pie Cheesecake
This post may contain affiliate links. As an Amazon Associate I earn from qualifying purchases. Please read my disclosure policy.
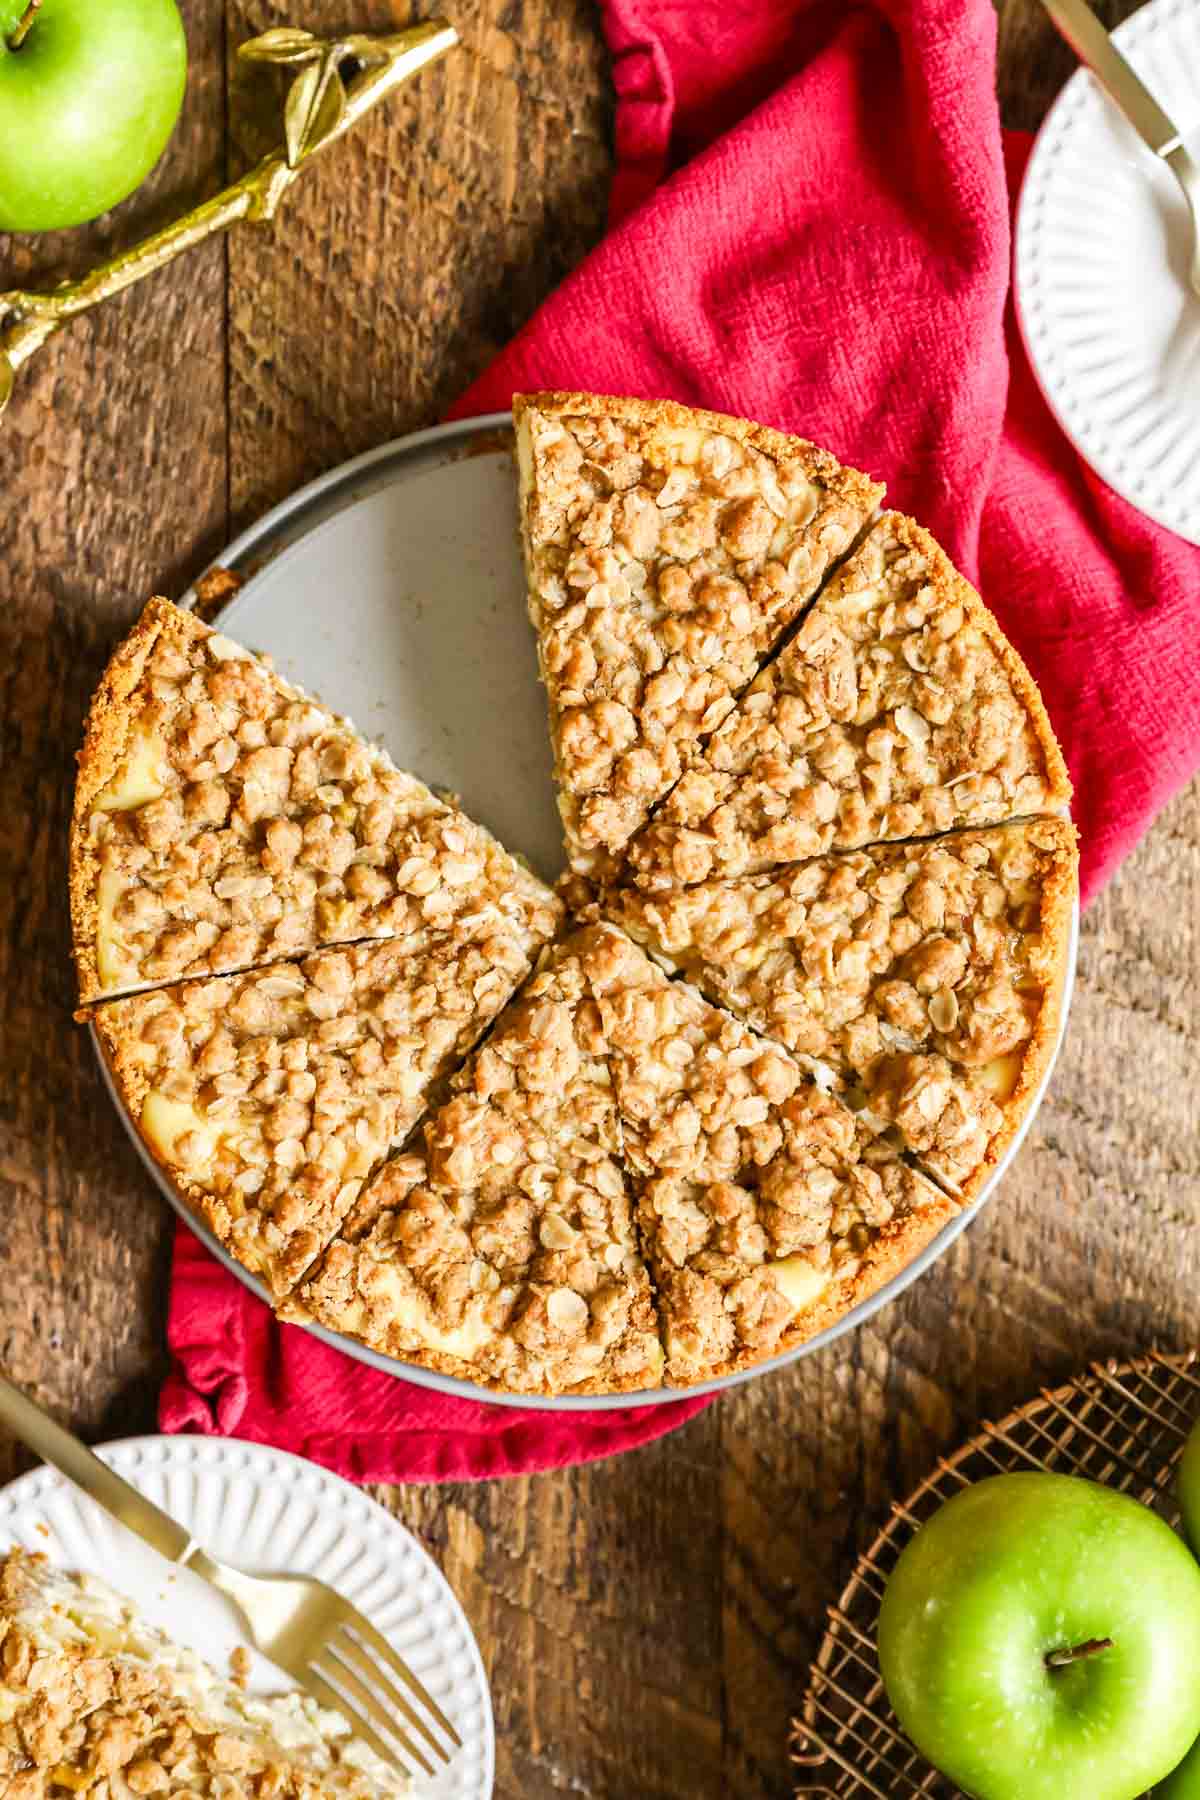
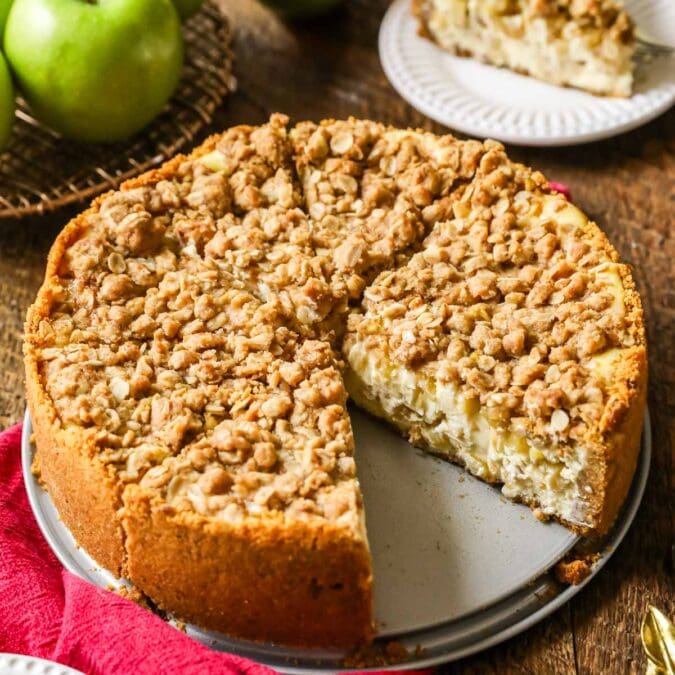
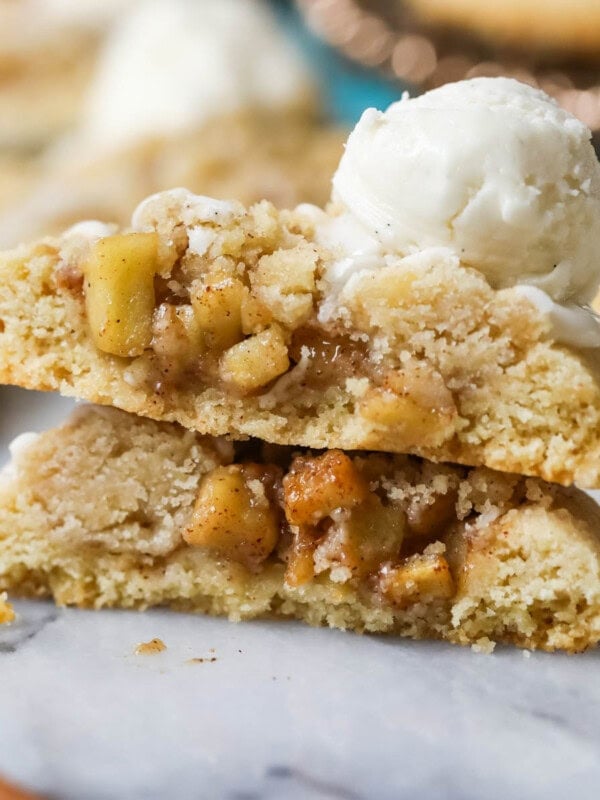
Apple pie cheesecake is a show-stopping, beautifully-balanced blend of classic cheesecake and apple pie. It’s perfect for fall, and guaranteed to impress your guests! Recipe includes a how-to video!
A Must-Bake Fall Dessert
I think you’re about to become obsessed with this apple pie cheesecake, hopefully as much as I am. It’s the perfect marriage of classic cheesecake and show-stopping Dutch apple pie. If you’re looking for a recipe that will knock the socks off your guests and dominate over every other dish on the dessert table (step aside, pumpkin pie), you’ve found it.
What makes this recipe so great:
- No rolling out pie crust. Yes, I’ve got a great one for you right there, but honestly rolling out pie dough, flouring the counters, the whole ordeal is just a hassle I’m happy to skip here.
- No water bath needed. Not a surprise if you’ve been around here a while. Some recipes (creme brulee, anyone?) need a waterbath. Cheesecake, when prepared according to my instructions, does not, and you will still have smooth, creamy results (just follow my tips!)
- A great way to use up extra apples from apple picking. If you’re over-ambitious in the orchard (like me, there are about 8 lbs of excess apples sitting on my counter right now), here’s a great way to use up those apples (psst, try my apple butter and applesauce, too!).
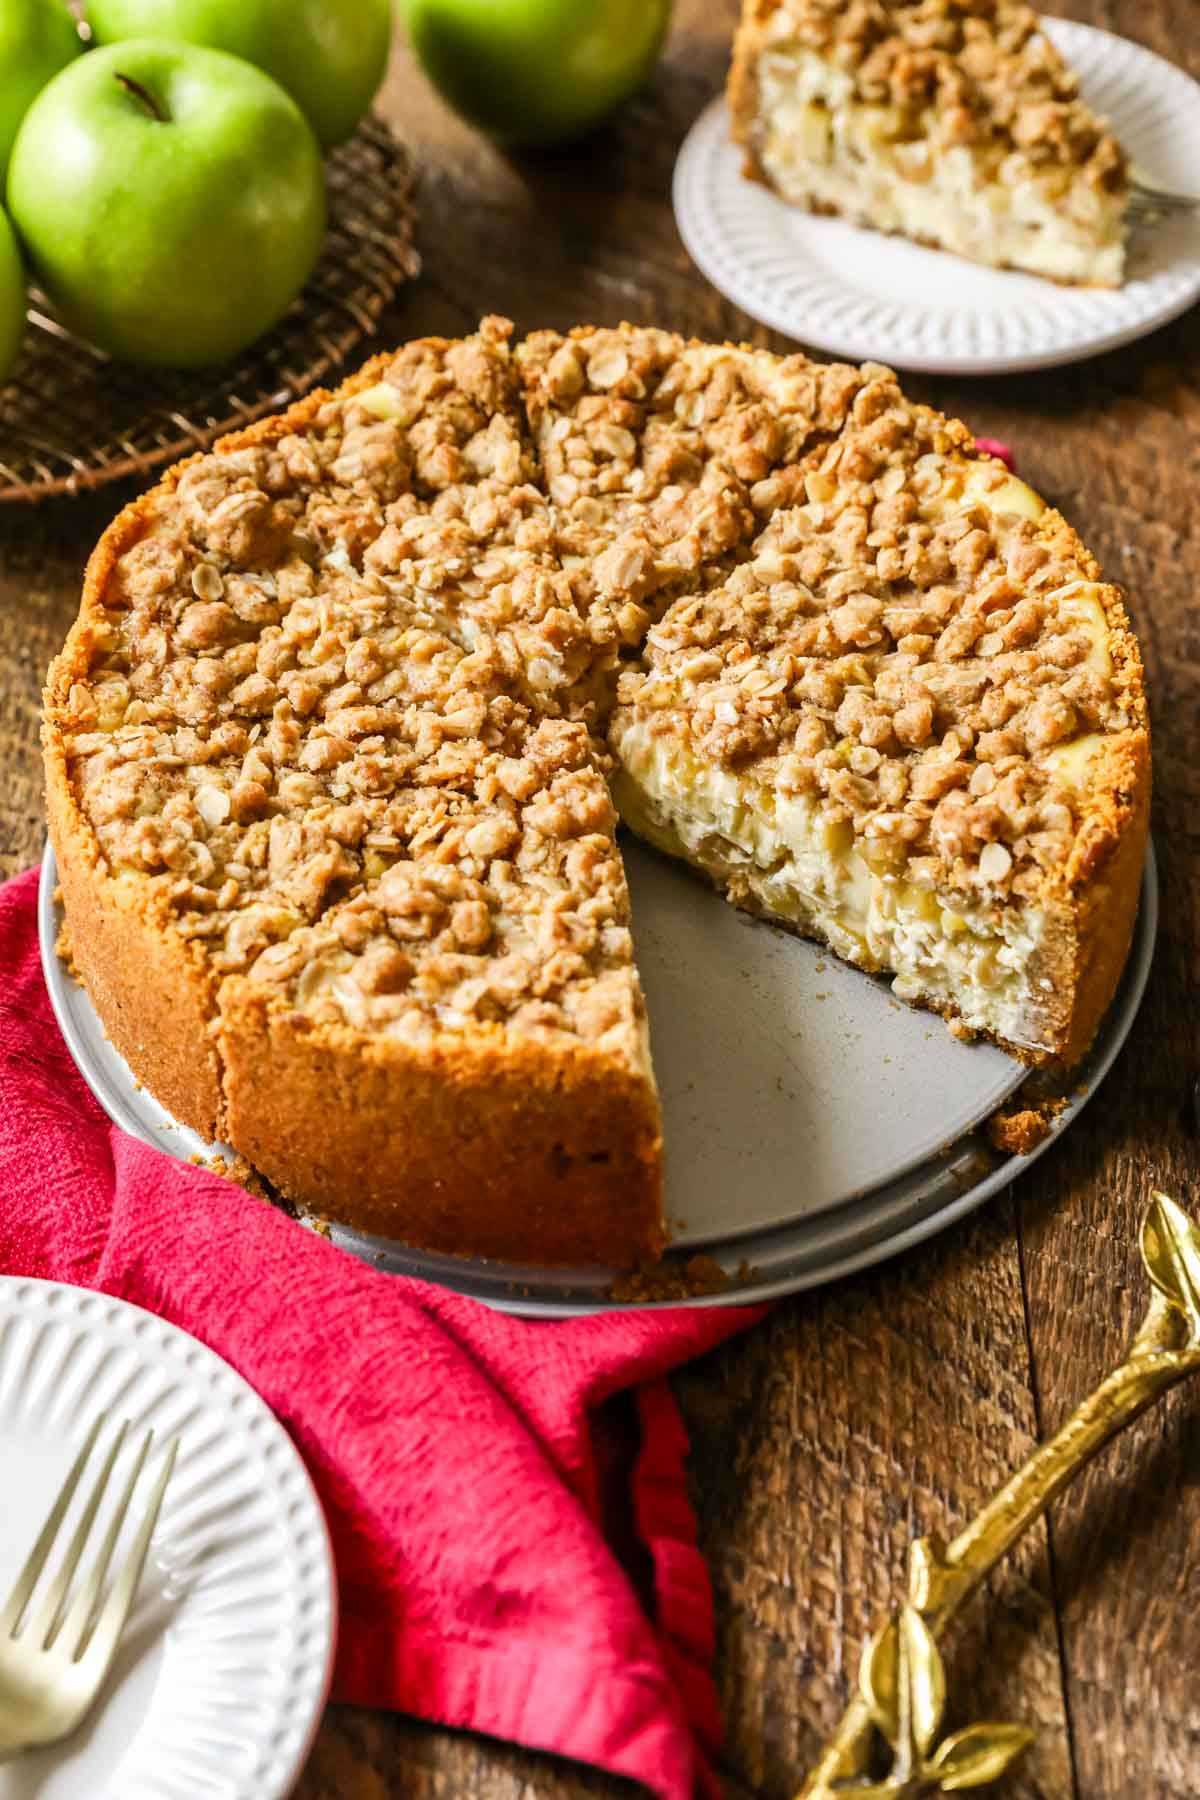
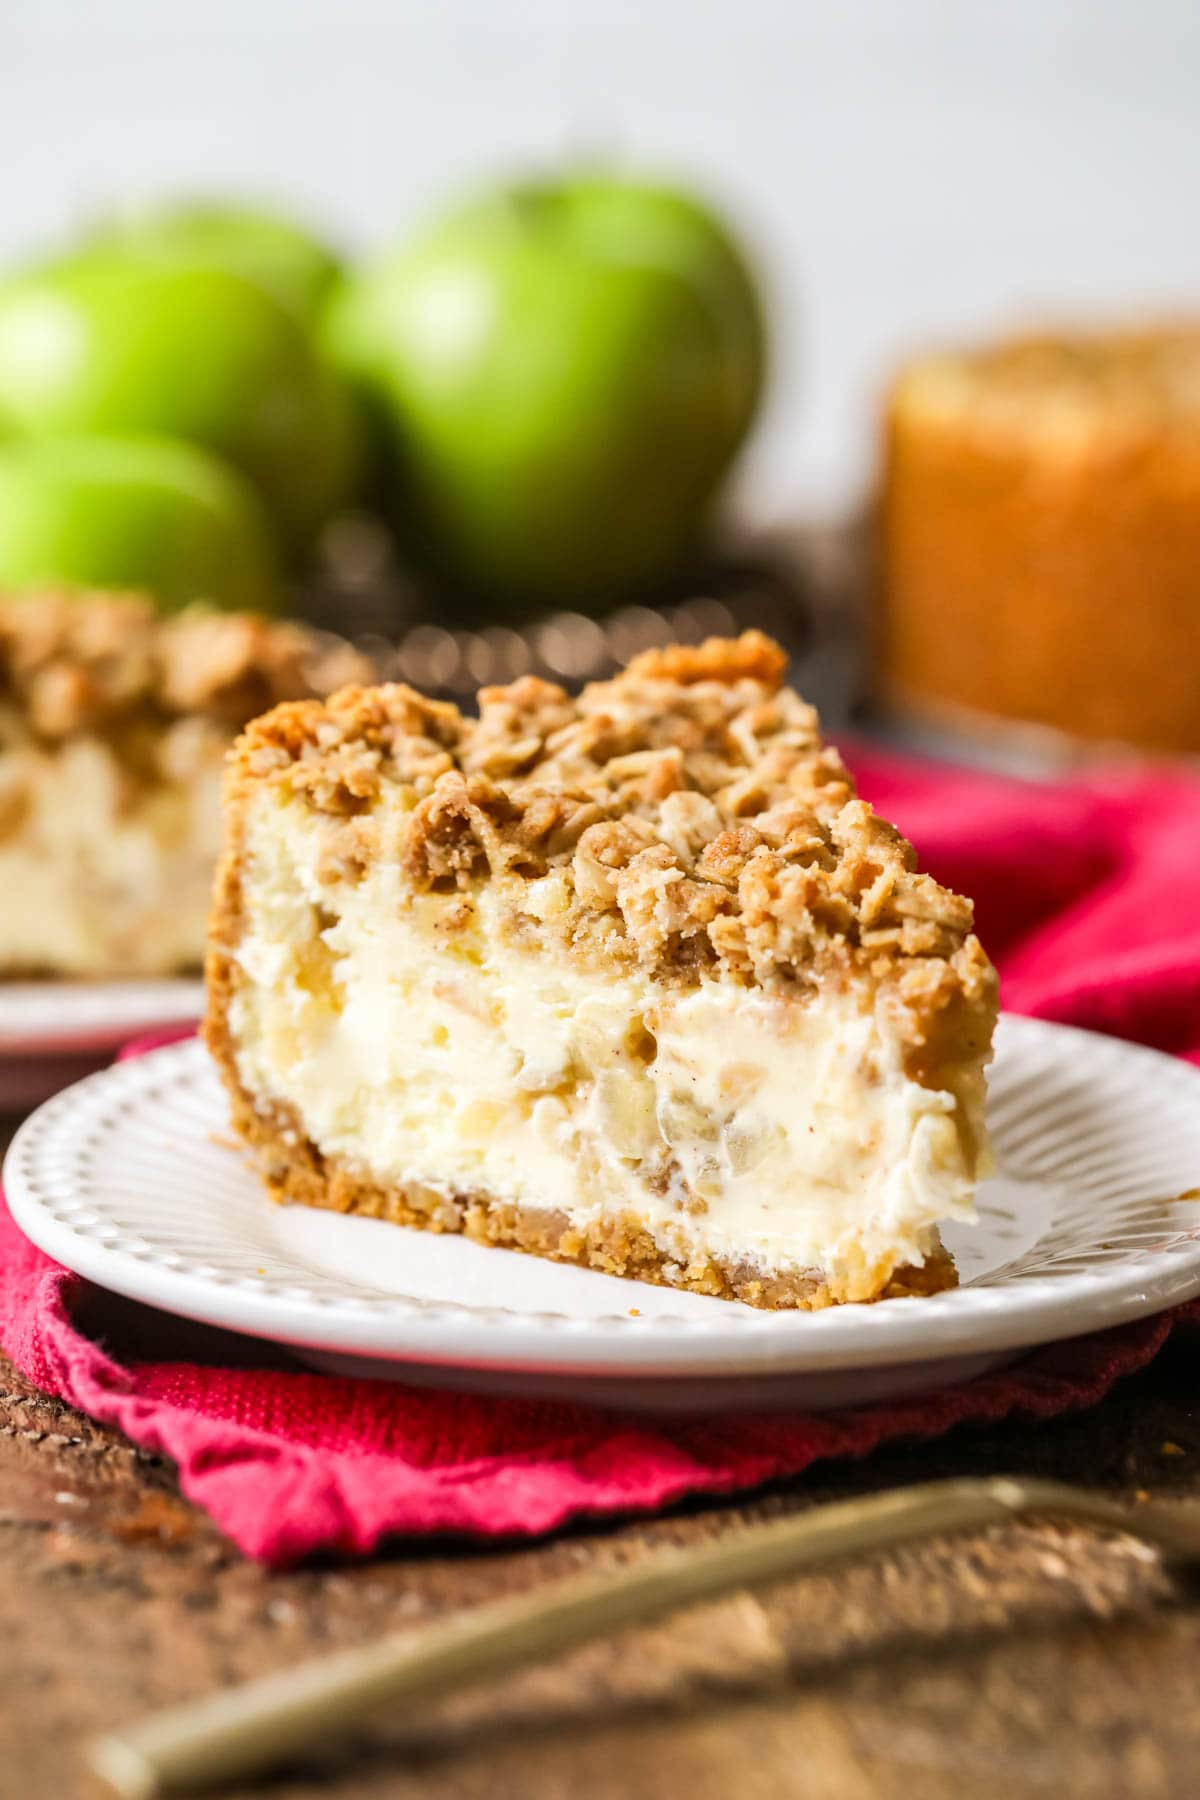
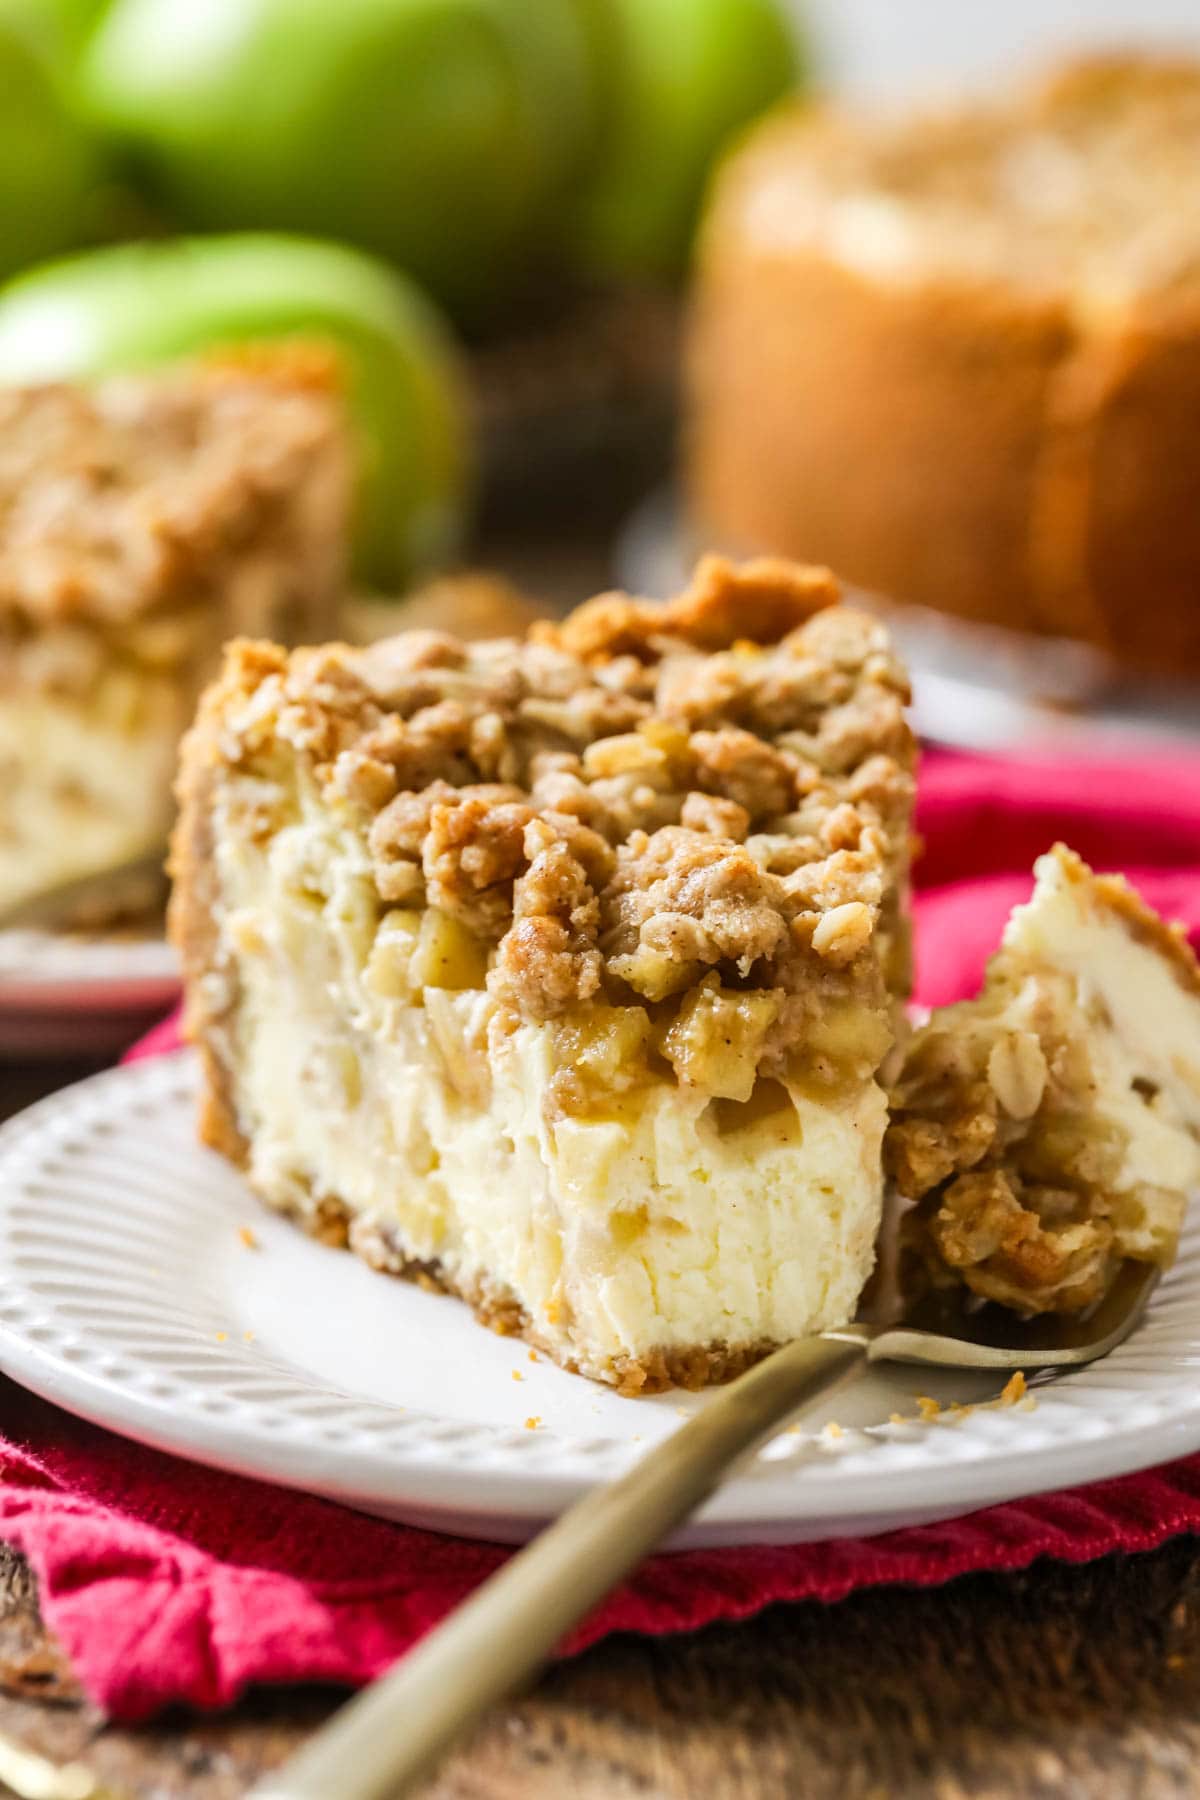
- It’s truly just plain impressive. It’s a stunner even before you cut into it, but just wait til you reveal that gorgeous ripple of apple pie…!
- It’s satisfying. Between the flavor (who knew cheesecake and apple pie paired so beautifully — the tart apples, the subtly tangy sweet cheesecake!) and the texture (creamy cheesecake, crisp apples, crumbly streusel, oh my!) this cheesecake is going to be a showstopper on your dessert table and everyone is going to want the recipe.
- Great dessert option for the indecisive. Should you bring pie? should you bring cheesecake? Why not both! 😏
This recipe is, admittedly a labor of love and a bit of a project, but it’s worth every dish and every minute. Also none of the steps are particularly challenging, so as long as you can follow a recipe, you’ve got this!
What You Need
Yes, there are quite a few ingredients in this recipe, but that’s because apple pie cheesecake is over-the-top in the absolute best way. There are a few worth nothing before we begin though, so let’s briefly go over those.
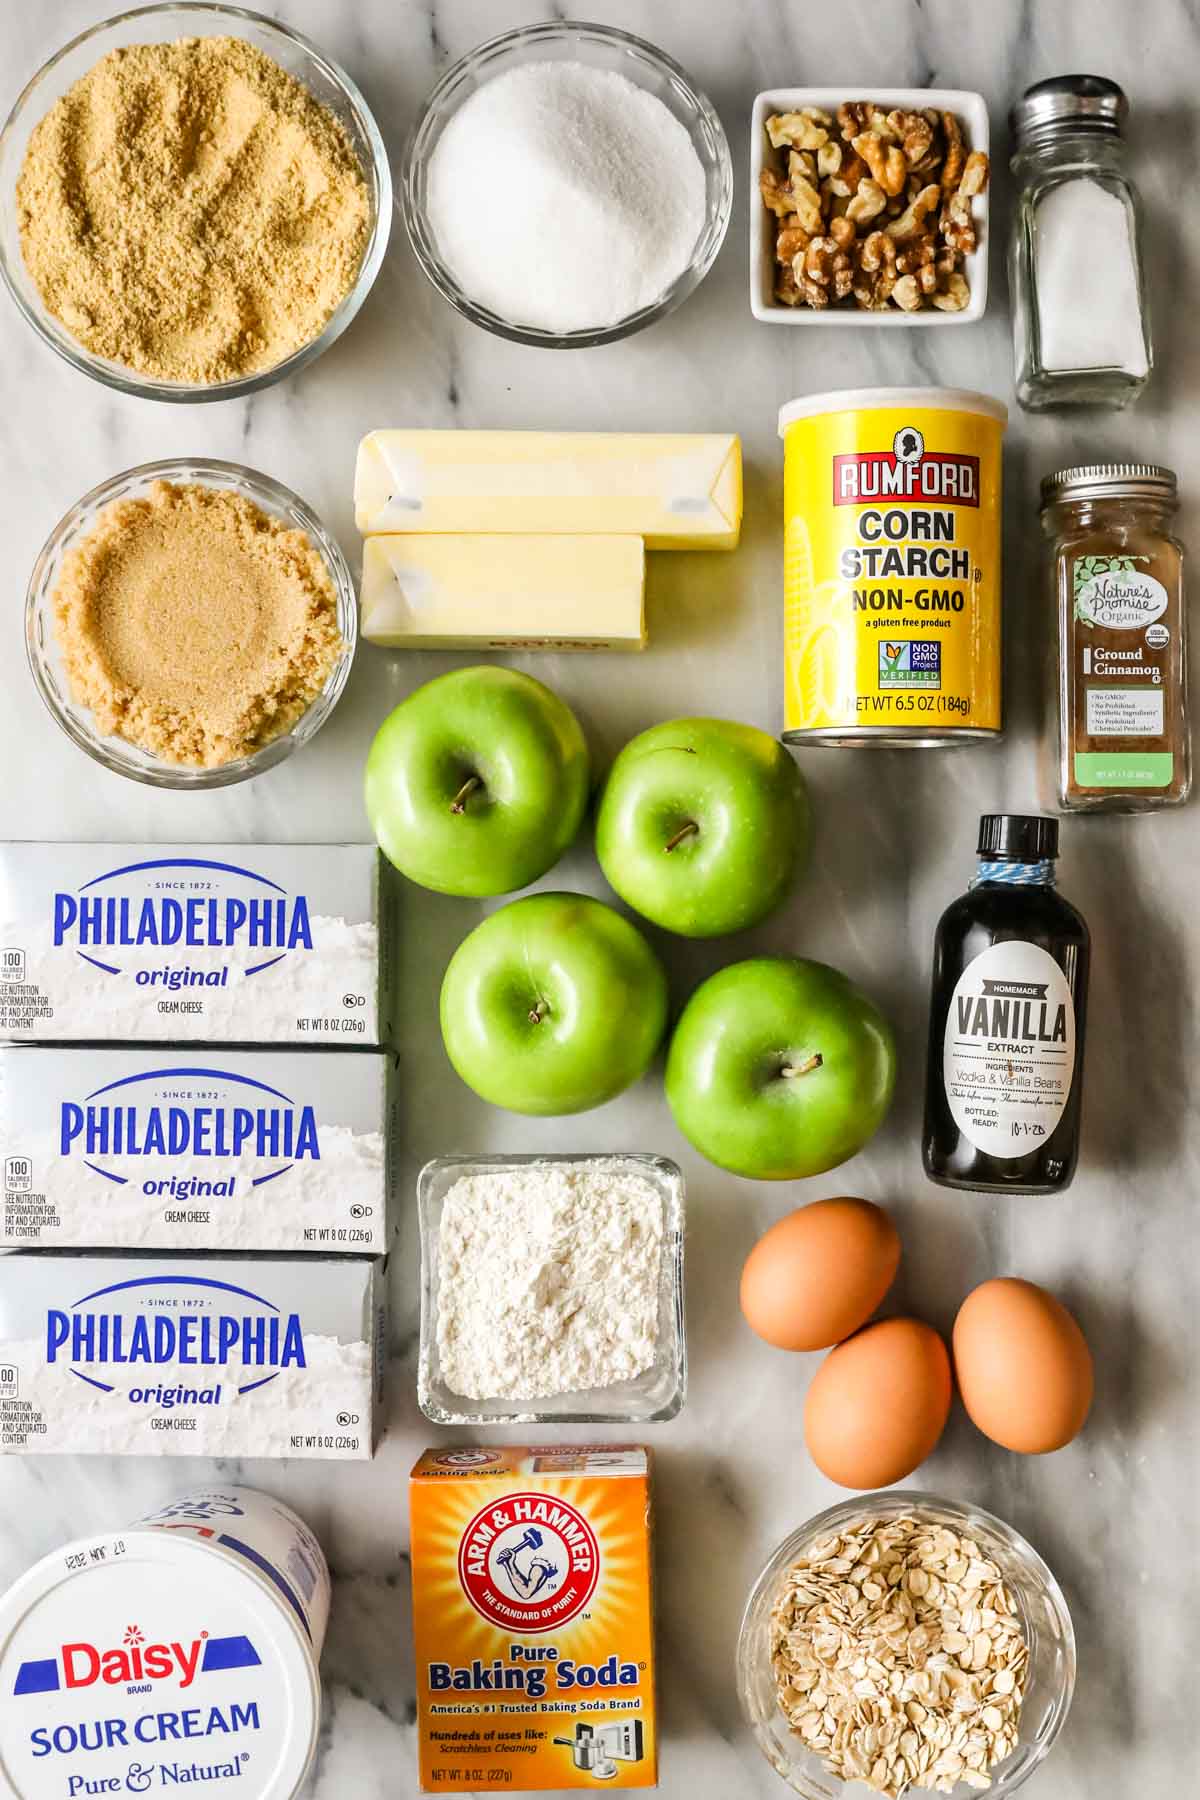
- Apples. Use a tart, firm apple (Granny Smith is my preference), peel them, core them, and dice into small pieces! I found that slicing them, like you would for a pie, makes for a weird texture and causes the apples to sort of slide out of the cheesecake unpleasantly when eating–so definitely stick with dicing!
- Cream cheese. As with my blueberry cheesecake and strawberry cheesecake, you need to use brick-style, full-fat cream cheese in this recipe (not the kind sold in a tub). Let your cream cheese fully soften to room temperature before starting, otherwise you could end up with a lumpy cheesecake.
- Sour cream. Sour cream is a non-negotiable in any good cheesecake–it creates that signature tang! If you don’t have sour cream, you could do full-fat greek yogurt instead.
- Eggs. Make sure to use room temperature eggs, as this will help prevent over-mixing. I also recommend lightly beating each egg before adding it to the batter, once again to prevent over-mixing.
- Walnuts. I love incorporating chopped walnuts into the crust (this is inspired by my favorite apple pie). If you, or anyone you’re planning on serving this to, are nut-averse, you can always leave them out with no other changes needed.
SAM’S TIP: Pre-cooking the filling is necessary to make the apples perfectly textured and flavorful; they stay too crisp if not pre-cooked and don’t have the same deep flavor. I promise I’ll never make you do extra work for no reason! 😊
Remember, this is just an overview of the ingredients I used and why. For the full recipe please scroll down to the bottom of the post!
How to Make Apple Pie Cheesecake
Prepare the Apple Pie Filling
The filling for this was carefully designed to work well in a cheesecake, I had many fails before I decided to try my apple turnover filling. And it worked like a charm ✨
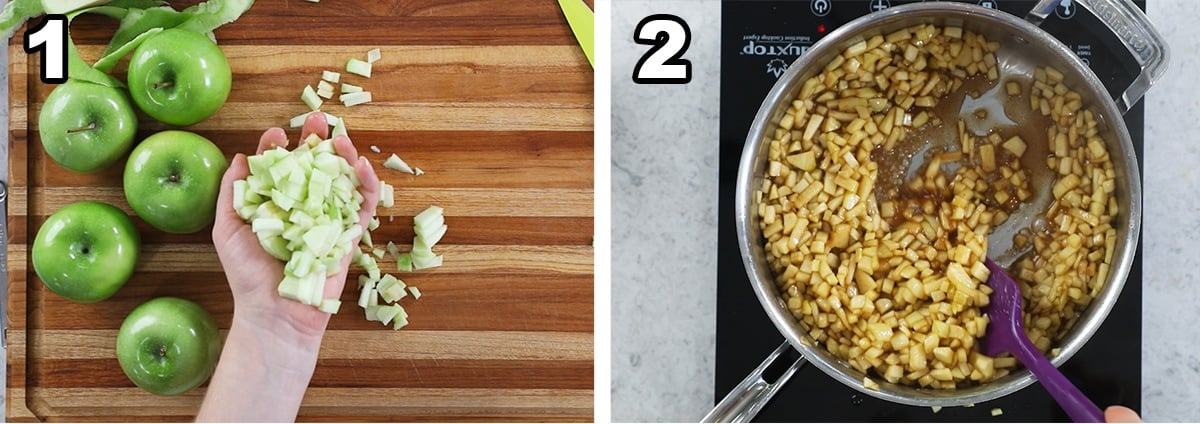
- Dice the apples into small pieces, then add them to a saucepan with brown sugar, butter, cornstarch, cinnamon, and salt. Place over medium low heat and cook until the butter melts.
- Increase the heat to medium and bring the mixture to a simmer. Let simmer five minutes or until the mixture thickens and the apples are tender, stirring frequently. Remove from the heat, stir in the vanilla, then pour into a heatproof bowl to cool.
Make the Crumble Topping
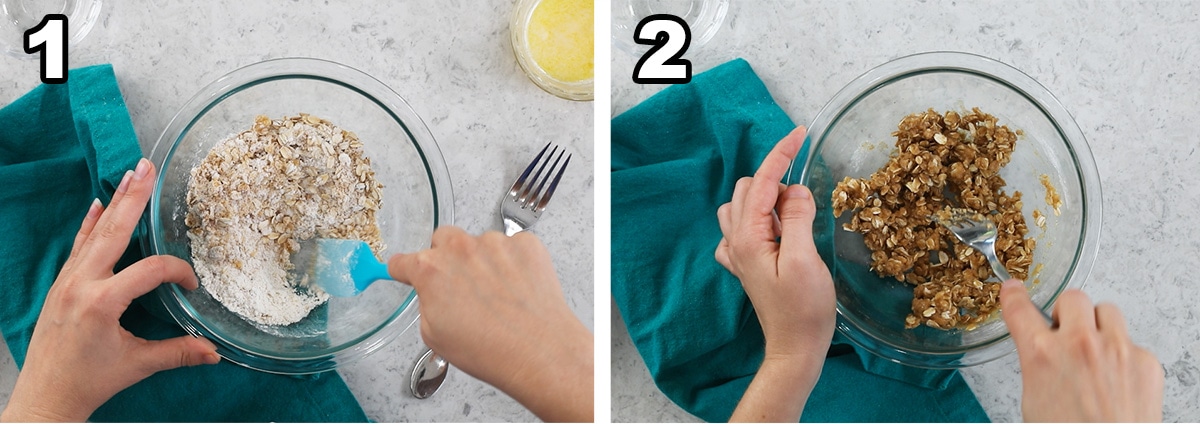
- Stir together the oats, flour, sugar, baking soda, cinnamon, and salt until combined.
- Add melted butter (it shouldn’t be warm to the touch, this is important) and toss with a fork until clumpy and combined. Don’t overdo it, or you could create a paste! Set this mixture aside for later.
Make the Crust
For the crust I stick with my trusty graham cracker crust, only I mix in crushed walnuts for added flavor (feel free to toast the nuts first, for even more flavor). If you’re allergic or simply don’t have any on hand, you can leave them out.
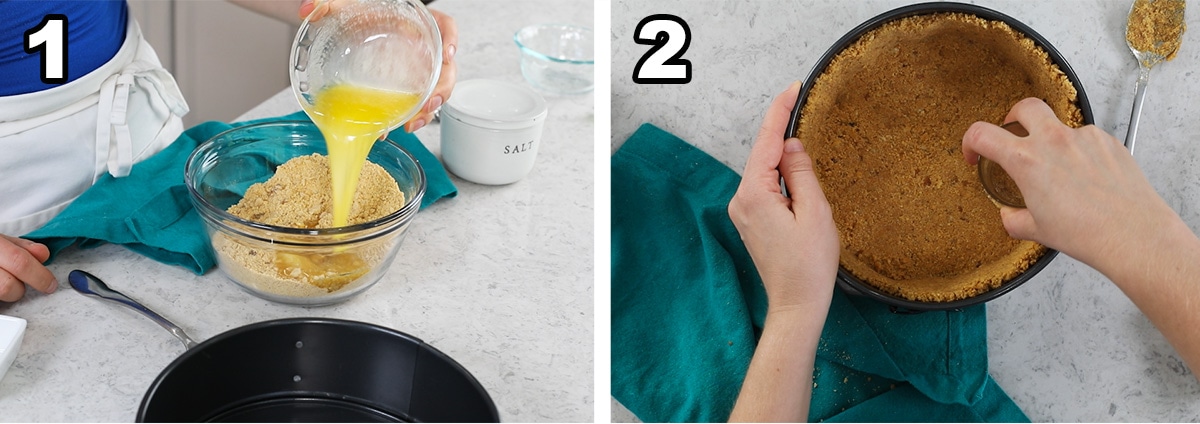
- Stir together the finely chopped walnuts, graham cracker crumbs, and sugars until combined, then add the melted butter and stir until everything is moistened.
- Press into the bottom and high up the sides of a 9-inch springform pan, then set aside. This recipe makes plenty of crust, so press it all the way up the sides!
Make the Filling
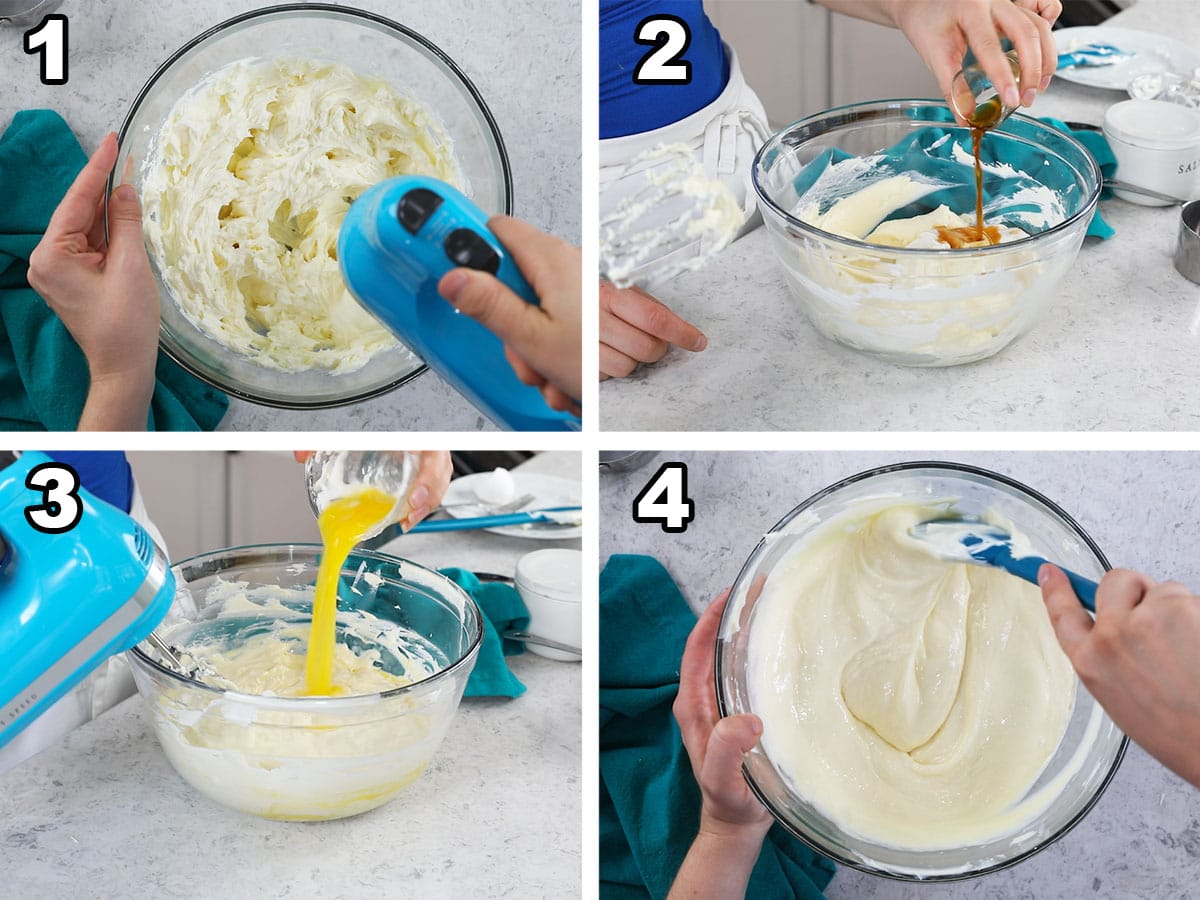
- Beat the cream cheese and sugar on medium low speed until smooth and creamy, scraping the sides and bottom of the bowl periodically as you go.
- Stir in the sour cream and vanilla until incorporated.
- Add the eggs one at a time, lightly beating each one before adding and mixing until just incorporated before adding the next.
- Use a spatula to scrape the sides and bottom of the bowl to make sure everything is combined and smooth. There should be no lumps.
Assemble (& Bake!) the Apple Pie Cheesecake
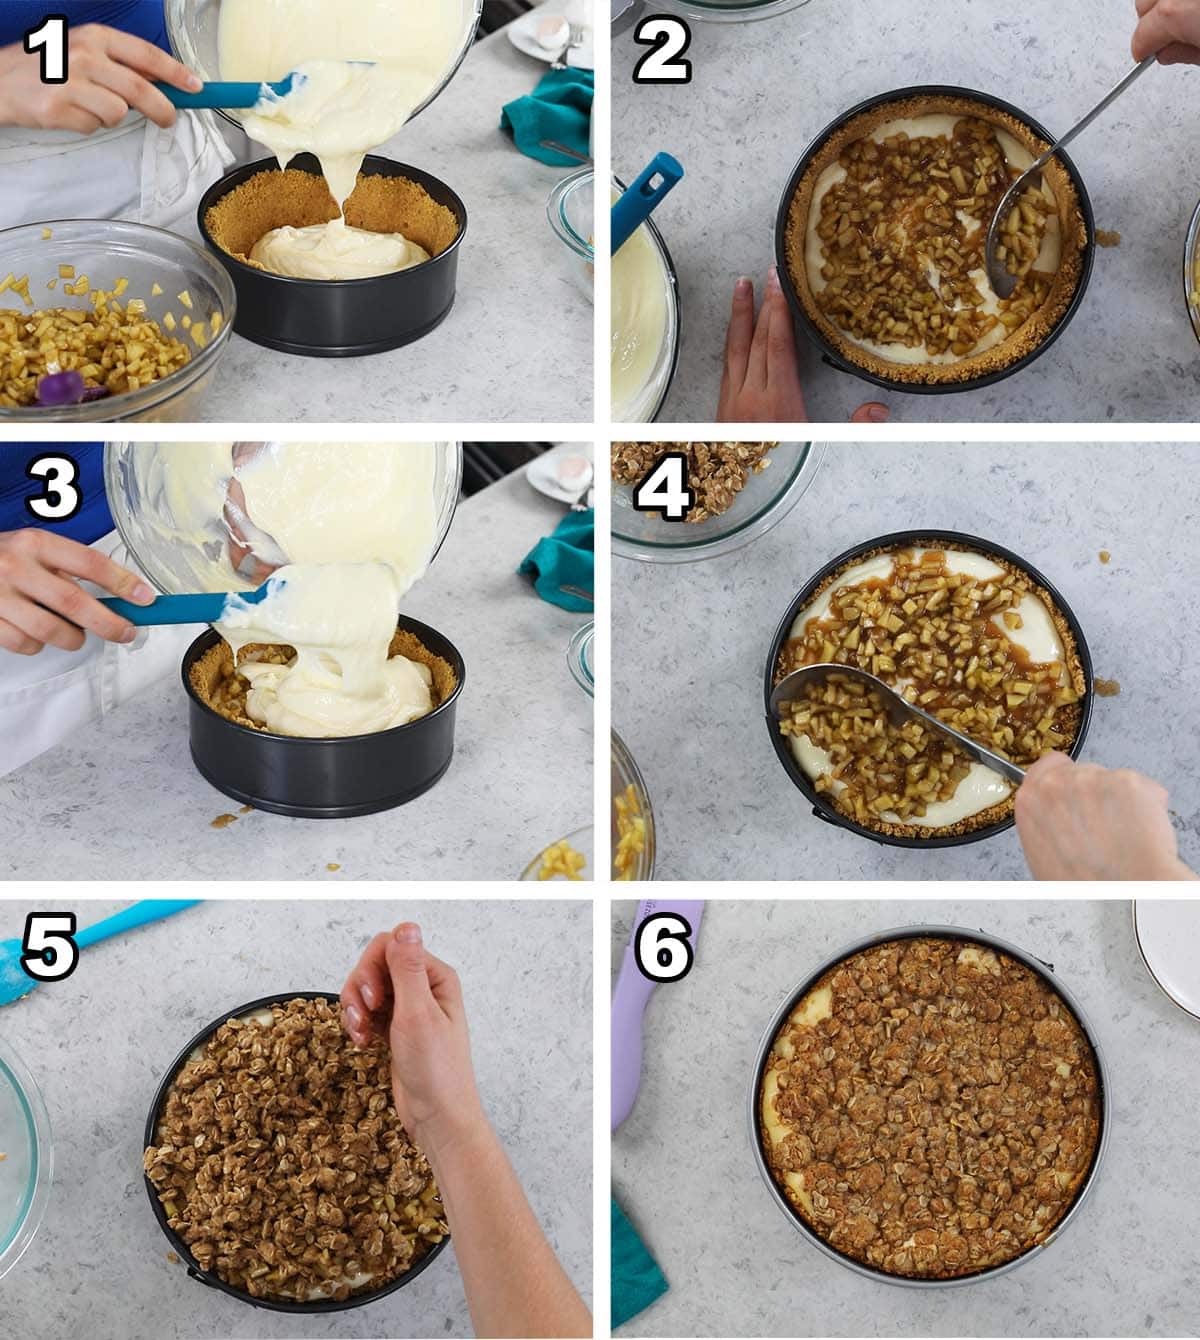
- Pour half of the cheesecake batter into your prepared crust.
- Add half of apple mixture evenly over the cheesecake layer. Use a slotted spoon to strain off any excess juice before adding the apples.
- Pour the remaining cheesecake batter over the apple layer.
- Top with the rest of the apples, once again draining off any juice before layering over the cheesecake.
- Scatter the crumble topping evenly over the apple layer, breaking up any big clumps as you go. Yes, the pan will be quite full, this is why you avoided over-mixing earlier (and why this recipe would never work in a pie plate).
- Bake for 60-70 minutes on low heat (no water bath needed here!). You can tell the cheesecake is finished when, if jostled, the edges are set and the center is mostly set but still has a little bit of jiggle (like Jell-o) to it. Let the cheesecake cool to room temperature before placing it in the fridge to chill overnight before digging in.
SAM’S TIP: There are two easy mistakes that will ruin your cheesecake, and I don’t want you to make either of them! #1: Don’t over-mix your cheesecake batter, especially when adding the eggs. This makes it more likely to crack and to puff up and then fall. #2: Don’t over-bake the cheesecake! Opt for checking earlier rather than later. Over-baked cheesecake has an unpleasant, mealy textured cheesecake instead of a smooth and creamy apple pie cheesecake.
Frequently Asked Questions
While I suppose you could, the homemade apple filling in this recipe is actually very easy to make and tastes much, much better than the store-bought stuff. If you do use store-bought, make sure to strain the extra juices. I haven’t measured my filling after cooking to be able to give you an exact amount, but if you use enough filling to scatter cover about 75% of each cheesecake layer, you should be good to go.
Yes, in fact, this apple pie cheesecake is perfect for making in advance. It needs to chill for a minimum of 6 hours, but it’s even better if it’s chilled overnight. Just make sure to enjoy the cheesecake within 5 days of making for the best flavor and texture.
Once your oven timer goes off, open the oven door and (using oven mitts, of course!) gently jostle the cheesecake. The edges should be set and unmoving. In the bulls-eye center, you should notice a slight bit of jiggle (think like Jell-O), but it should also be mostly set. These are the visual cues I look for when testing that any of my cheesecakes, are finished baking.
Save this one for Thanksgiving–it will be the star of the dessert table! And if you’re enjoying these gourmet cheesecakes as much as I am, check out my salted caramel cheesecake, turtle cheesecake or peanut butter cheesecake next!
Enjoy!
Let’s bake together! I’ll be walking you through all the steps in my written recipe and video below! If you try this recipe, be sure to tag me on Instagram, and you can also find me on YouTube and Facebook
Apple Pie Cheesecake
Equipment
Ingredients
Apple filling
- 2 lbs (907 g) apples, peeled, cored, and finely chopped (see note)
- ⅔ cup (133 g) light brown sugar, firmly packed
- 2 Tablespoons (30 g) unsalted butter
- 2 teaspoons cornstarch
- ½ teaspoon ground cinnamon
- ⅛ teaspoon salt
- ½ teaspoon vanilla extract
Crumble topping
- ½ cup (40 g) old fashioned oats
- ⅓ cup (41 g) all-purpose flour
- ¼ cup (50 g) light brown sugar
- ¼ teaspoon baking soda
- ¼ teaspoon ground cinnamon
- ¼ teaspoon salt
- 4 Tablespoons (57 g) unsalted butter, melted and cooled at least 10 minutes
Crust
- 1 ½ cups (170 g) graham cracker crumbs
- ⅓ cup (40 g) finely chopped walnuts, (for nut-free, omit walnuts, no other changes needed)
- 2 Tablespoons granulated sugar
- 1 Tablespoon firmly packed light brown sugar
- 7 Tablespoons (98 g) salted butter, melted
Cheesecake batter
- 24 oz (680 g) cream cheese, softened, use brick-style full-fat cream cheese
- 1 cup (200 g) granulated sugar
- ½ cup (120 g) sour cream
- 1 teaspoon vanilla extract
- 3 large eggs, room temperature preferred
Instructions
For the apple filling
- In a medium or large sized saucepan, combine apples, brown sugar, butter, cornstarch, cinnamon, and salt.2 lbs (907 g) apples, ⅔ cup (133 g) light brown sugar, 2 Tablespoons (30 g) unsalted butter, 2 teaspoons cornstarch, ½ teaspoon ground cinnamon, ⅛ teaspoon salt
- Heat over medium low heat. Stir frequently until butter is melted. Once butter is melted, increase heat to medium and bring mixture to a simmer. Simmer for 5 minutes, stirring frequently. Mixture should thicken slightly and apples should be tender when pierced with a fork when finished.
- Remove mixture from heat and stir in vanilla extract. Pour into a heatproof bowl and allow mixture to cool while you prepare your crumble (you can place it in the fridge and stir occasionally to speed up the cooling process).½ teaspoon vanilla extract
For the crumble
- In a medium sized mixing bowl, combine oats, flour, sugar, baking soda, cinnamon, and salt.½ cup (40 g) old fashioned oats, ⅓ cup (41 g) all-purpose flour, ¼ cup (50 g) light brown sugar, ¼ teaspoon baking soda, ¼ teaspoon ground cinnamon, ¼ teaspoon salt
- Add butter to the flour mixture and use a fork to combine. Don’t over-mix, mixture should still be clumpy. Set aside while you prepare your batter.4 Tablespoons (57 g) unsalted butter
For the crust
- Preheat oven to 325F (165C).
- In a medium sized bowl, combine graham cracker crumbs, finely chopped walnuts, and sugars.1 ½ cups (170 g) graham cracker crumbs, ⅓ cup (40 g) finely chopped walnuts, 2 Tablespoons granulated sugar, 1 Tablespoon firmly packed light brown sugar
- Add melted butter to the mixture and stir until butter is well incorporated and all crumbs are moistened.7 Tablespoons (98 g) salted butter
- Press crust mixture evenly onto the bottom and up the sides of a 9-inch springform pan. Set aside.
For the cheesecake batter
- In a large mixing bowl, use an electric mixer to combine cream cheese and sugar. Beat on medium-low speed until smooth, creamy, and free of lumps. Don’t over-beat or whip too much air into the batter, but do make sure batter is uniform and smooth. Scrape sides and bottom of the bowl periodically.1 cup (200 g) granulated sugar, 24 oz (680 g) cream cheese
- Add sour cream and vanilla extract and stir on low speed until combined.½ cup (120 g) sour cream, 1 teaspoon vanilla extract
- Lightly beat one egg then add it to the cheesecake batter. Stir on low-speed until just combined. Repeat with remaining eggs. Scrape the sides and bottom of the bowl to ensure all ingredients are evenly combined.3 large eggs
Assembly
- Pour about half of the cheesecake batter over prepared crust in springform pan.
- Using a slotted spoon to drain excess juice, layer about half of the apple mix over the cheesecake batter. Pour the remaining cheesecake batter overtop. Top batter with remaining strained apples, then scatter crumble evenly overtop (if crumble has solidified as it’s been sitting, just break it up with your hands).
- Place pan on a foil lined baking pan and transfer to center rack of 325F (160C) oven. Bake for 60-70 minutes (dark-colored pans tend to take less time, and lighter-colored pans take longer). Cheesecake is finished when, if slightly jostled, the edges are mostly set but the center still gently jiggles like jell-o. Allow to cool to room temperature in a warm, draft-free place (you could use the top of your oven or, turn your oven off, crack the door several inches, and allow it to sit for about an hour before removing to room temperature to cool further).
- Transfer to the refrigerator and chill for at least 6 hours, preferably overnight, before slicing and serving.
Notes
Apples
Weigh apples before coring/peeling. A firm, tart apple that would be good for a pie is best here. I personally prefer and recommend Granny Smith.Storing
Store, covered, in the refrigerator, for up to 5 days.Freezing
Cheesecake may be wrapped tightly and frozen for up to 3 months. Thaw overnight in the refrigerator before enjoying.Nutrition
Nutrition information is automatically calculated, so should only be used as an approximation.
Like this? Leave a comment below!


My family really loved the cheesecake and I want to try making bars like the Oreo Cheesecake bars. Should the bake time be about the same at 40 min in a 9×13 pan? What do you think about folding the apple filling into the batter instead of layering?
Hi Diane! I haven’t tried making it in a 9 x 13 so I can’t say for sure how long it would need to bake. If you fold the apple part in, you will want to do so very gently. Let me know how it goes if you try it. 🙂
Hi Sam, I did make the Apple Pie Cheesecake in a 9×13 pan and folded half the filling into the batter. I baked it at 325 for a total of 45 minutes. It came out great! Sorry I didn’t get a picture of it for you.
That’s quite alright! I’m glad to hear it turned out. Thank you for the feedback. 🙂
has anyone tried using apple pie filling in a can? I may try this today, but will dice up apples. not much time today to peel and core.
Hi Sherry! I actually cover how to use apple pie filling from a can in the FAQ section of the post. 🙂
Two of my dad’s favorite desserts are apple pie and cheesecake so I thought I’d give this a try for his birthday. It was a hit with everyone (my nephew say it may be his request for his birthday). I didn’t realize my pan was 10″ until I put it in the oven but I just kept an eye on it around 50 minutes, probably took 60.
I MAY do a different crumble when I make it again. I like oats and oatmeal cookies, but I thought the texture was weird on some bites with the smooth cheesecake.
I’m so glad everyone enjoyed it so much, Britt! 🙂
Hi Sam,
How would this cheesecake taste if I make it 3 days in advance (make Tues, serve Fri)?
Thanks
Hi Selina! You should have no issues keeping it for 3 days. 🙂
I’m sure it will still taste great but after 70 minutes it was SUPER jiggly and cracks had formed on the edges. The springform pan was dark colored if that matters. Where did I go wrong? Thank you!
Hi Lisa! Dark pan shouldn’t be an issue, if anything it would cook a little faster in a dark pan. You can always use an instant read thermometer to check the internal temperature (should be 165F) to tell if it’s done and I do show in the video how it looks when it’s finished, if that helps (mine isn’t as jiggly as I think you’re describing). Your oven could just be running a bit cooler and it may just need a bit more time in the oven though.
I should leave it in longer even if it starts cracking? Thank you
Little cracks on the edges can signify that it’s about finished. Is your oven running hot?
Yes it was hot. Anyways the crumble topping hides any cracks!
made this 4 a party, very delicious
I’m happy to hear everyone enjoyed it, Will! 🙂
I made it yesterday and put in the fridge overnight for Thanksgiving today. It is AMAZING! These are my favorite things to bake from scratch (ALL from scratch for me)and your recipe made perfection in my opinion, and my husband’s!
I’m so glad it was such a hit, Kirsten! 🙂
Can I use a water bath as a full proof method if i want? I am used to using one and have all of the required materials to make it easier.
Hi Renee! It’s not going to hurt anything to use a water bath. It’s just an extra step that isn’t really needed here. 🙂
Outstanding recipe! It’s a little more work – but worth the effort. It was gobbled up by everyone and we were sad when there were barely any leftovers. Oddly, I unknowingly used the wrong amount of cream cheese (only two blocks instead of three) and didn’t alter the other ingredient amounts – I was left with a very delicious, creamy cheesecake and made it with the wrong quantities when I made it again cause, “why not?”.
It is quickly becoming the most requested dessert in our family.
I’m so glad everyone enjoyed it so much, Kare! 🙂
I made this recipe for company and everyone loved it. The cheesecake was creamy and the crust with walnuts was great. It was an excellent fall treat. Thanks for creating this combination.
I’m so glad everyone enjoyed it so much, Donald! 🙂
Very delicious and impressive. I made it for a cheesecake contest at my church and was judged 1st place of 14 entries. Well worth following the directions precisely, most especially to chill the cheesecake for at least a day before serving.
Thank you, Sam.
Congratulations, Marilou! Thanks for using our recipe 🥰
My family and friends were so excited when I said I would make this recipe but I wonder if I can use a 10 inch springform pan instead of 9 inch without changing the amount of ingredients
Hi Melissa! It could potentially be made in a 10 inch pan, but the cheesecake will be much thinner and your bake time would be reduced. Let me know how it turns out! 🙂
Hello my sweet Sam I used my 9 inch square springform pan and I came out awesome. So delicious that it was well worth the extra work. I have some frozen tropical fruits that I need to use soon so would you recommend using frozen fruit with this recipe
I’m so glad it turned out! 🙂
I’m about to make this incredible cheesecake for the second time this month (I’ll try not to eat it this time) and my fiance is already asking me to make it for Thanksgiving and Christmas. I made it in a square 9 inch pan and it came out perfect. We will be watching, waiting and anticipating your newer recipes but I have so many older ones to choose from as well. Thank you sweet Sam.
I am so happy to hear this has been such a hit, Melissa! It’s a favorite in my household too. I hope you love everything you try and I look forward to hearing from you in the future. 🙂
Hi, I made this for a birthday party and it was absolutely delicious!
I was wondering, what would the time of baking be, if I made mini versions in cupcake cups?
I’m so glad everyone enjoyed it so much, Liana! I haven’t personally tried baking it in cupcake tins so I can’t say for sure what the bake time would be.
Best cheesecake I ever made so delicious
We’re so happy you enjoyed it, Anne! 🩷
I made it last weekend my family and friends loved it. I don’t eat desserts so I can only go by their comments. I used the 1 minute oats for the topping I have gotten several feedbacks about my many different variations of oatmeal cookies. Some have said they don’t like the texture of the larger oats. So every recipe that calls for oats I use the 1 min oats. (Not the instant of course) thank you for this recipe! 💝
I’m so glad everyone enjoyed it so much, Rose! 🙂
Hi Sam, I’ve pleasantly surprised myself with success is making your pumpkin pie cheesecake, now a firm favourite at home, and am now planning to make this delicious looking apple pie cheesecake. Can you please tell me the temperature you bake the cheesecake at with a fan forced oven. Is it still 160 degrees C for 60-70 minutes or does it need to be adjusted for a fan forced oven?
Thank-you, Nicole
Hi Nicole! I would adjust the temperature for a convection oven. I believe the standard is to reduce the temperature 25F. I would check it a few minutes sooner as well just to be safe. 🙂
Sam, can I bake this in a toaster oven?
Hi Don! I don’t have much experience with a toaster oven so I can’t say for sure how it would turn out. It’s likely possible, but I can’t say for sure how to do it.
Should I preheat the oven first before putting in the pie?
Yes
Thank you Sam
I’m excited to try this recipe! my husband loves apple pie and cheesecake and I’m hoping to make this for his upcoming 40th birthday. Would you happen to know if I can make this a week in advance and freeze it?
Hi Holly! I haven’t personally frozen it, but I don’t see any reason why it couldn’t work. 🙂
Can I use splenda instead of granulated sugar?
Hi Don! I haven’t tried it, but it could work. It will change the flavor.
I find myself going to your site for recipies more and more as time goes on and this one has been something I’ve been wanting to try for a while now. As with every other recipie of yours I have made this one was absolutely amazing. I really love how creative you are and how you break down each recipie so it’s easy to follow. Thank you for the time and effort you put into sharing your wonderful recipies with us.
Thank you so much, Crystal! I’m so glad you’ve been enjoying everything so much! 🙂
I don’t know if I measured out the apples wrong but I let the cheesecake cook for an hour and 20 minutes and took it out to let it rest. I finally took off the spring form and it started collapsing on itself cause it didn’t cook through but it was starting to crack in the oven. I’ve cooked cheesecakes before but this is the first a cheesecake didn’t cook right. however it smells, looks, and tastes amazing. (the parts that fell off anyway) I had to put it back in the oven. Any tips, I need it for Thanksgiving tomorrow.
Oh no, Evelyn! It needs to cool to room temperature and then sit in the refrigerator overnight before it’s fully set. 🙁
no. no. no. I did that and it completely changed the taste and texture!
Absolutely perfect for our Friendsgiving. I browned the butter that I used for the crust and it elevated it to the next degree!!!
I’m so glad everyone enjoyed it so much, Amy! 🙂