
Pumpkin Cheesecake
This post may contain affiliate links. As an Amazon Associate I earn from qualifying purchases. Please read my disclosure policy.
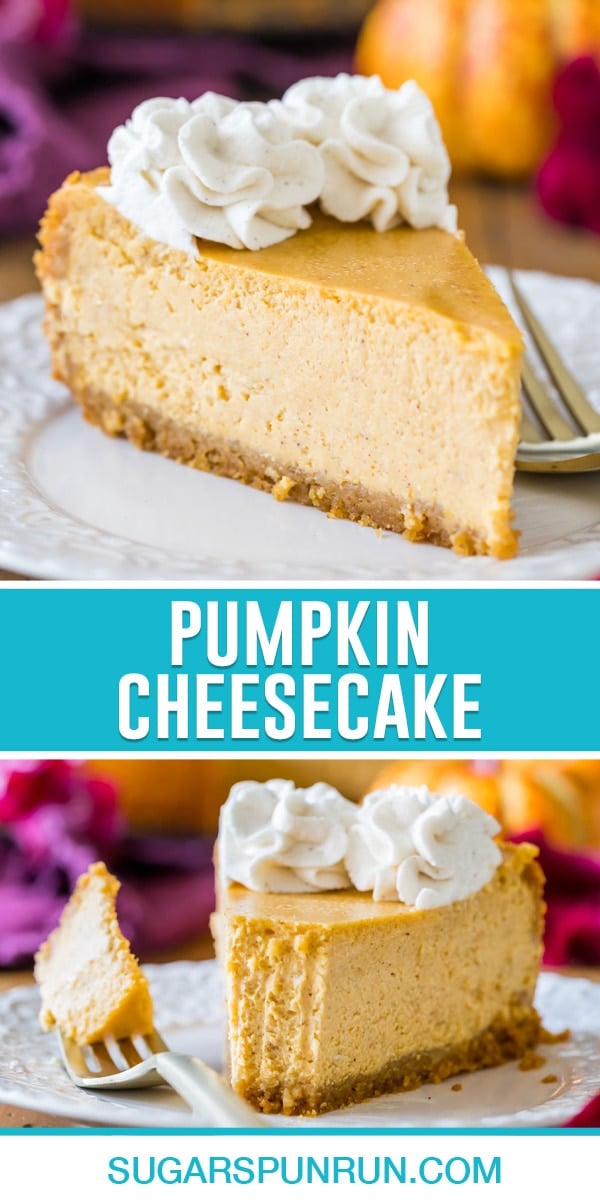
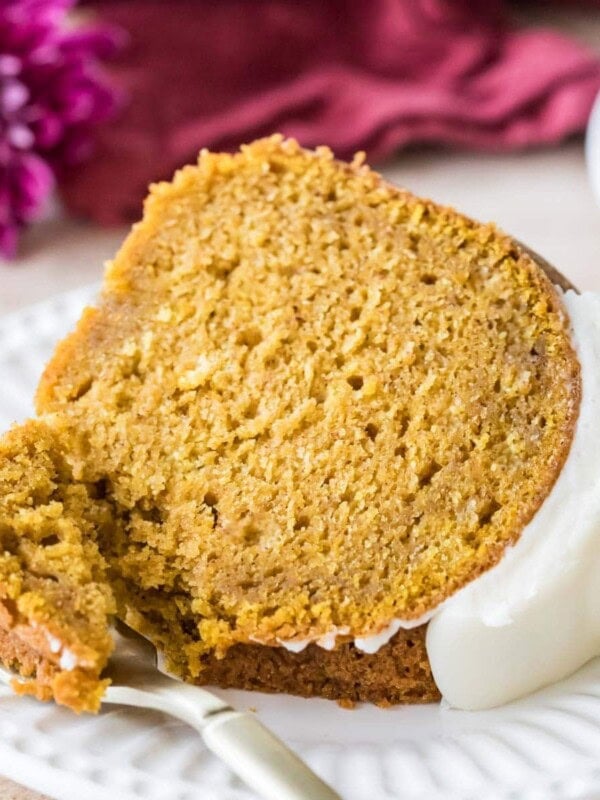
My easy, creamy Pumpkin Cheesecake recipe is made completely from scratch WITHOUT a water bath! I’m including lots of tips and tricks to prevent cracks so yours can turn out just like the pictures. Recipe includes a how-to video!
The Perfect Cheesecake For Fall
You’re not getting tired of cheesecake yet, right? I know I’m not. I’ve received quite a few requests for how to turn my classic cheesecake into a pumpkin cheesecake, so I figured it was about time I re-shared this recipe. This one is just as easy as my classic recipe, and of course, it’s made WITHOUT a water bath…yay!
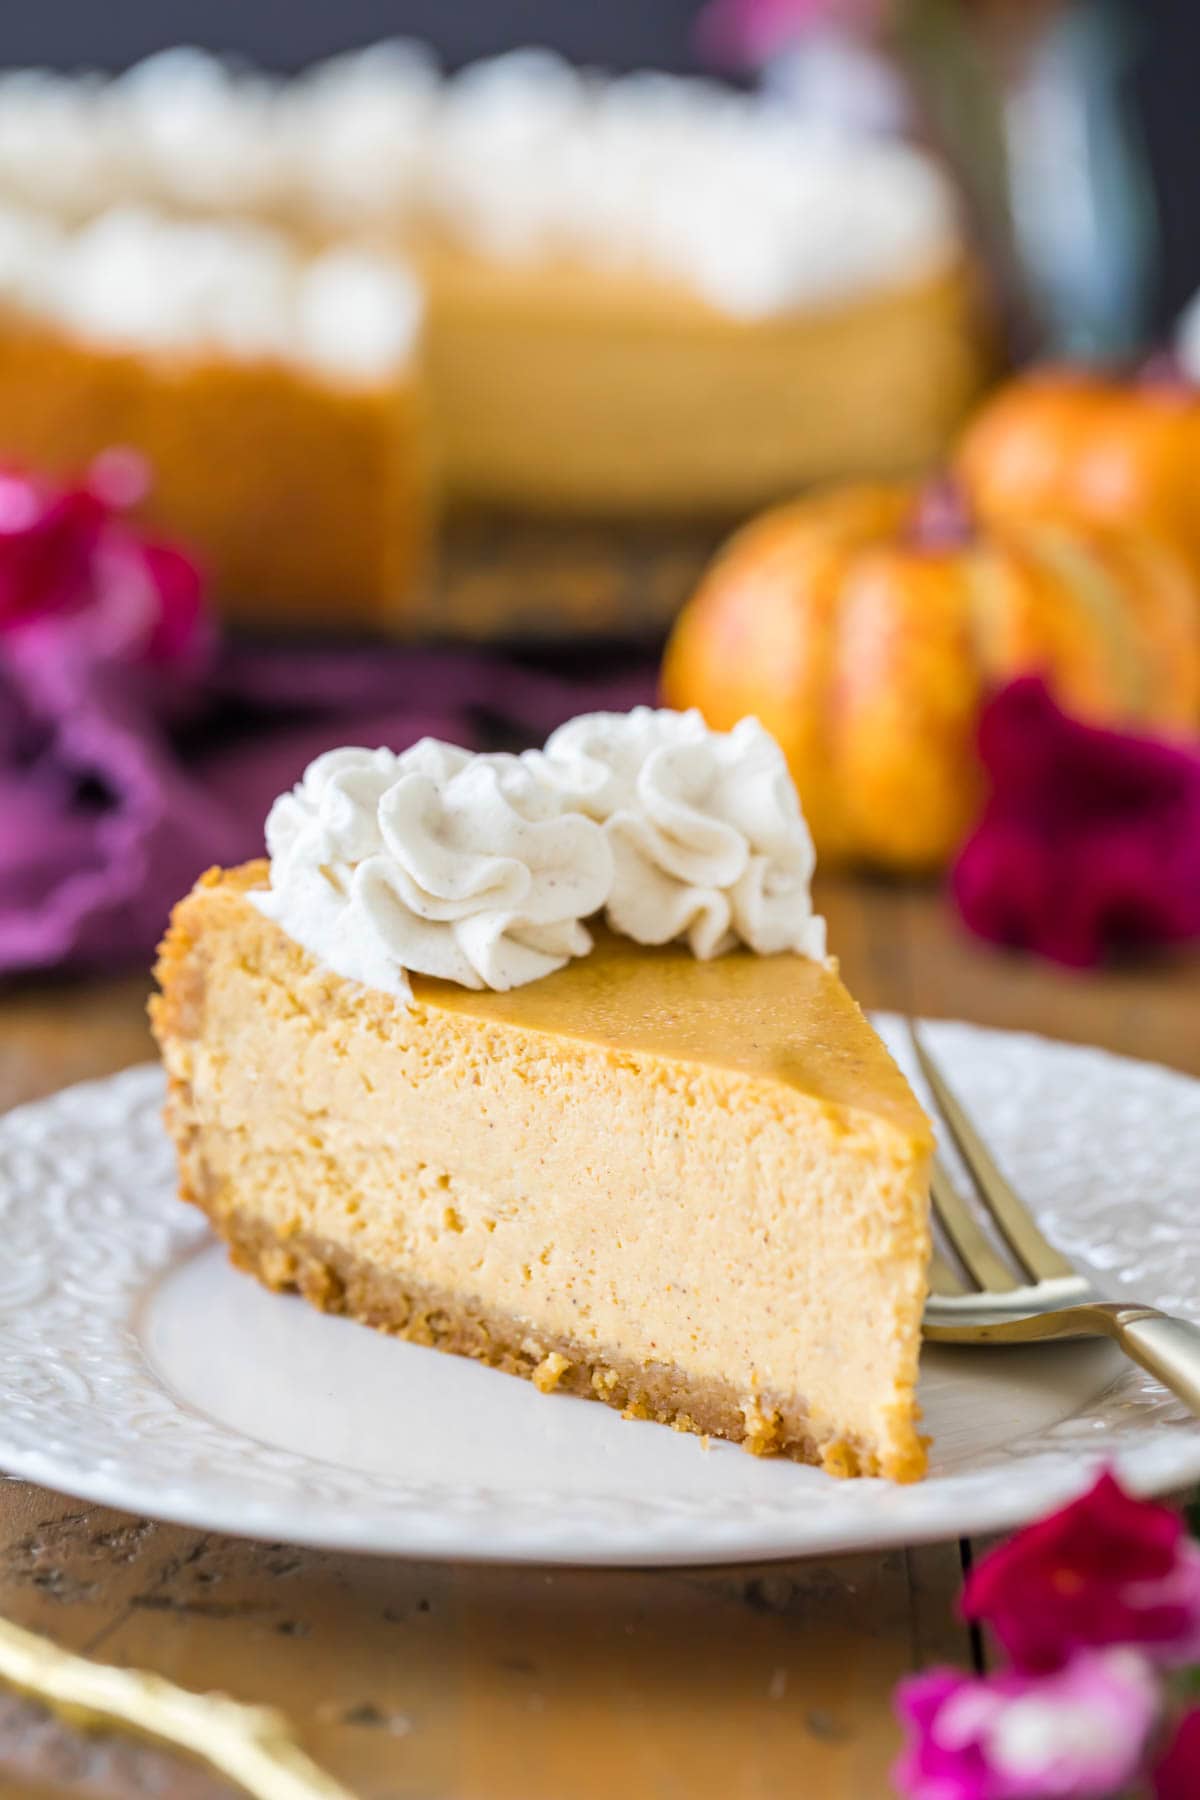
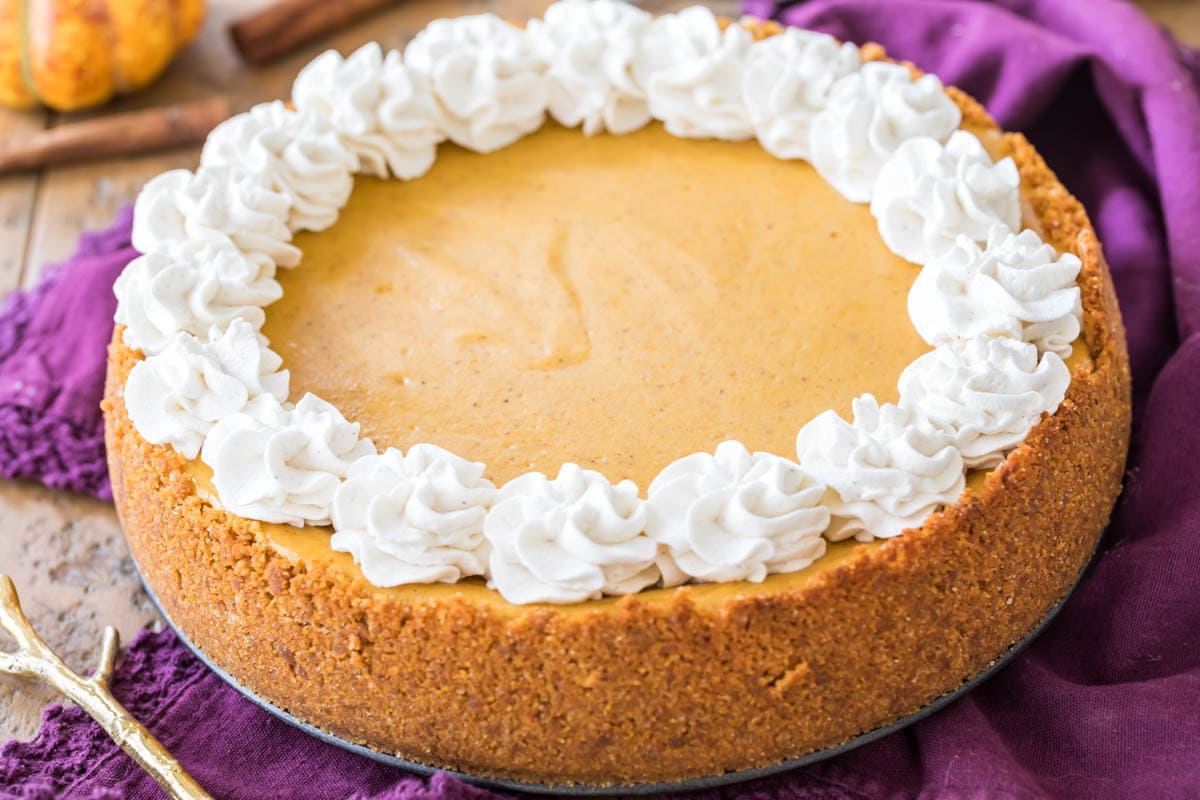
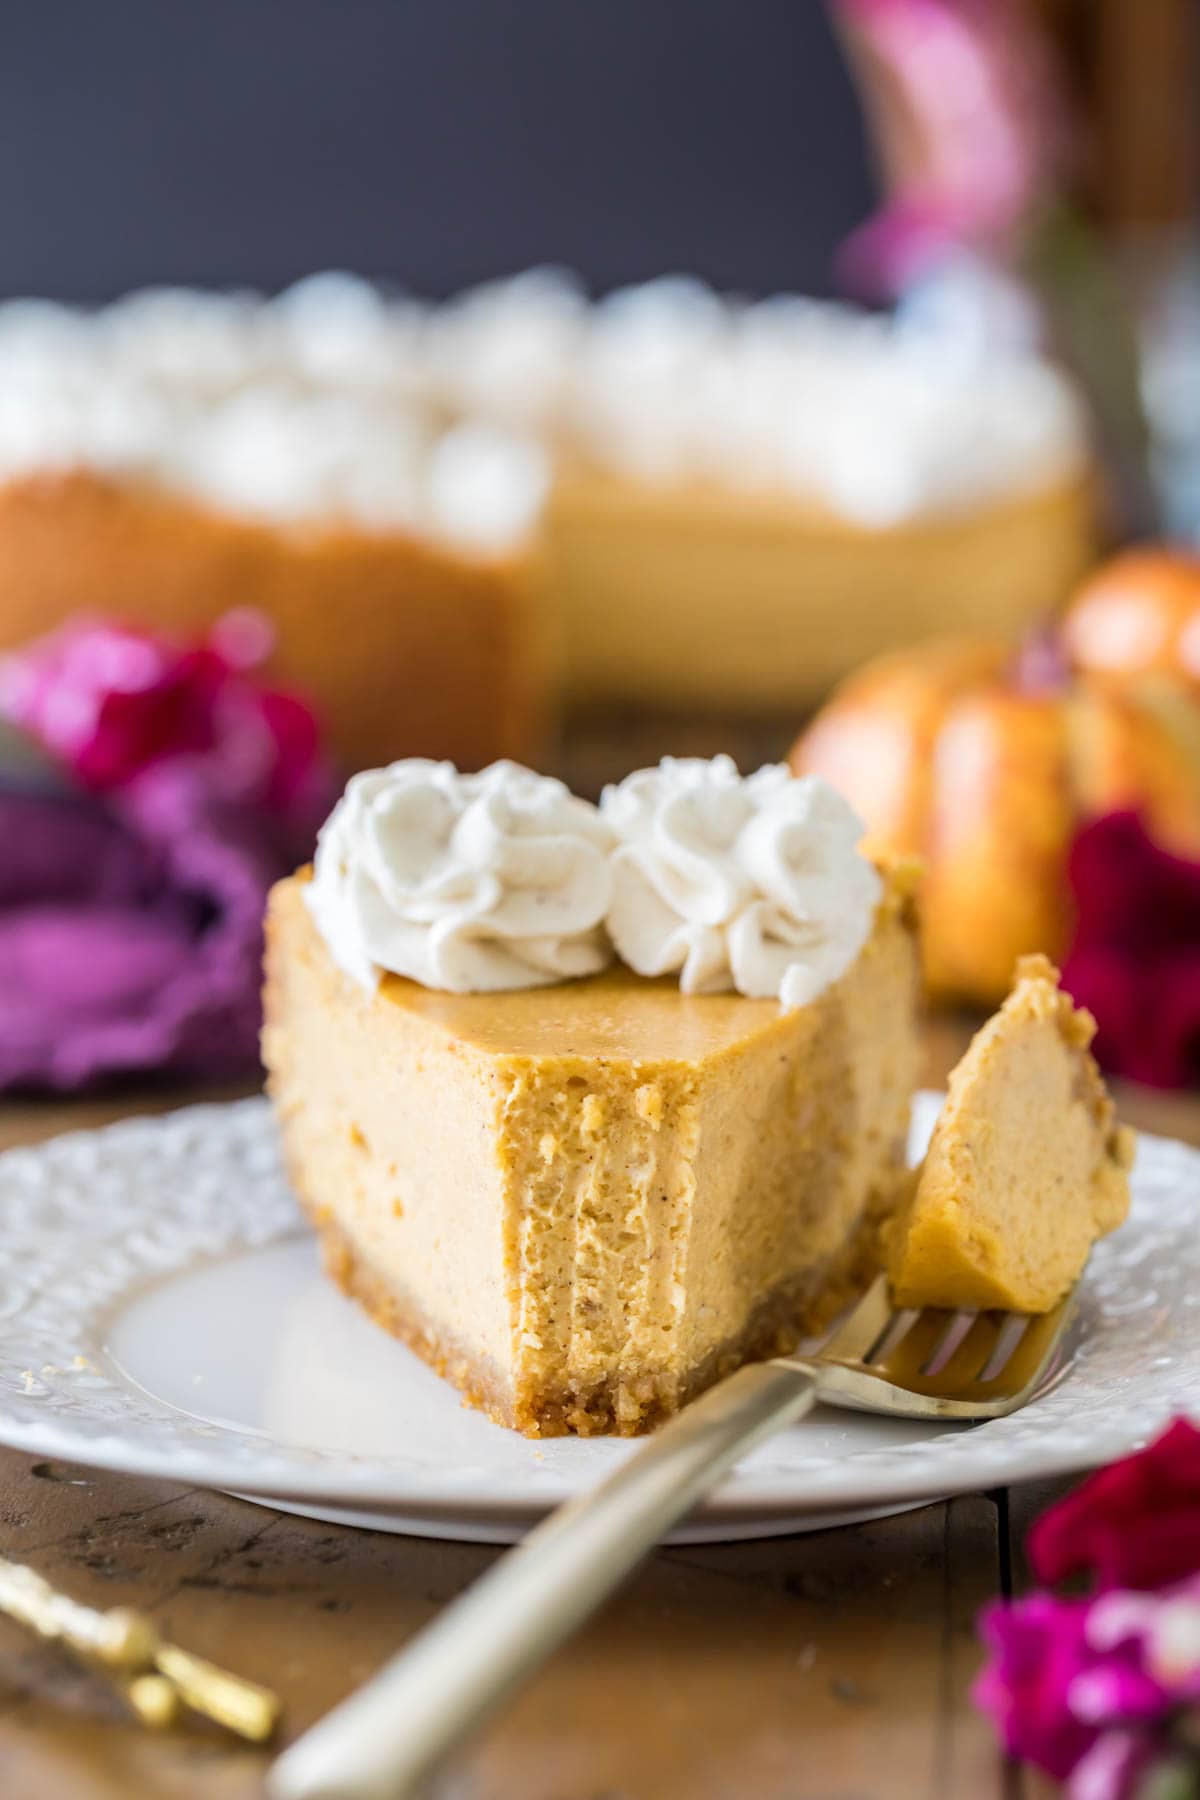
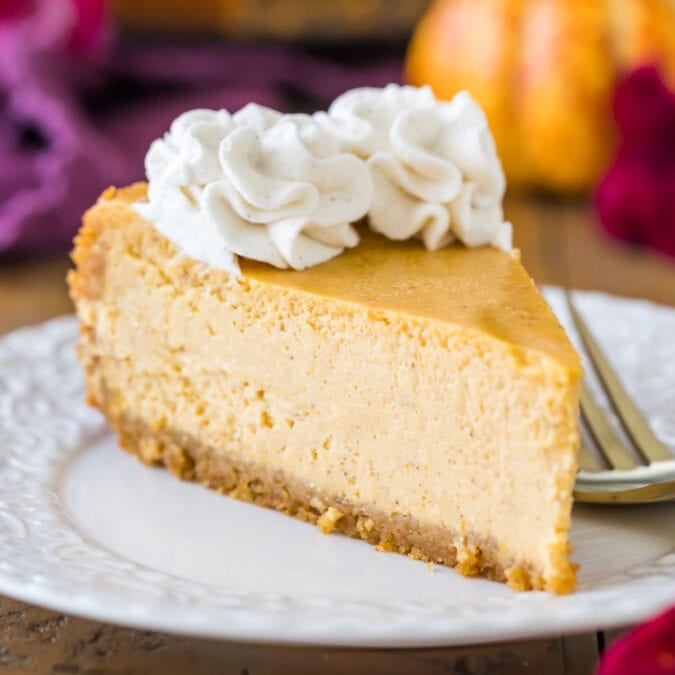
We’ll be serving our pumpkin cheesecake on my homemade graham cracker crust and topping it off with a cinnamon version of my homemade whipped cream. It’s a perfectly spiced fall cheesecake that would make a great Thanksgiving dessert (and, in my opinion, it’s WAY better than pumpkin pie!).
Why you should try my recipe:
- No water bath needed. Let me repeat that: No water bath!
- Classic cheesecake flavor infused with just the right amount of pumpkin.
- 100% from-scratch!
- Includes tips on how to prevent cracks.
What You Need
Take note of these ingredients before starting the recipe–they’re important!
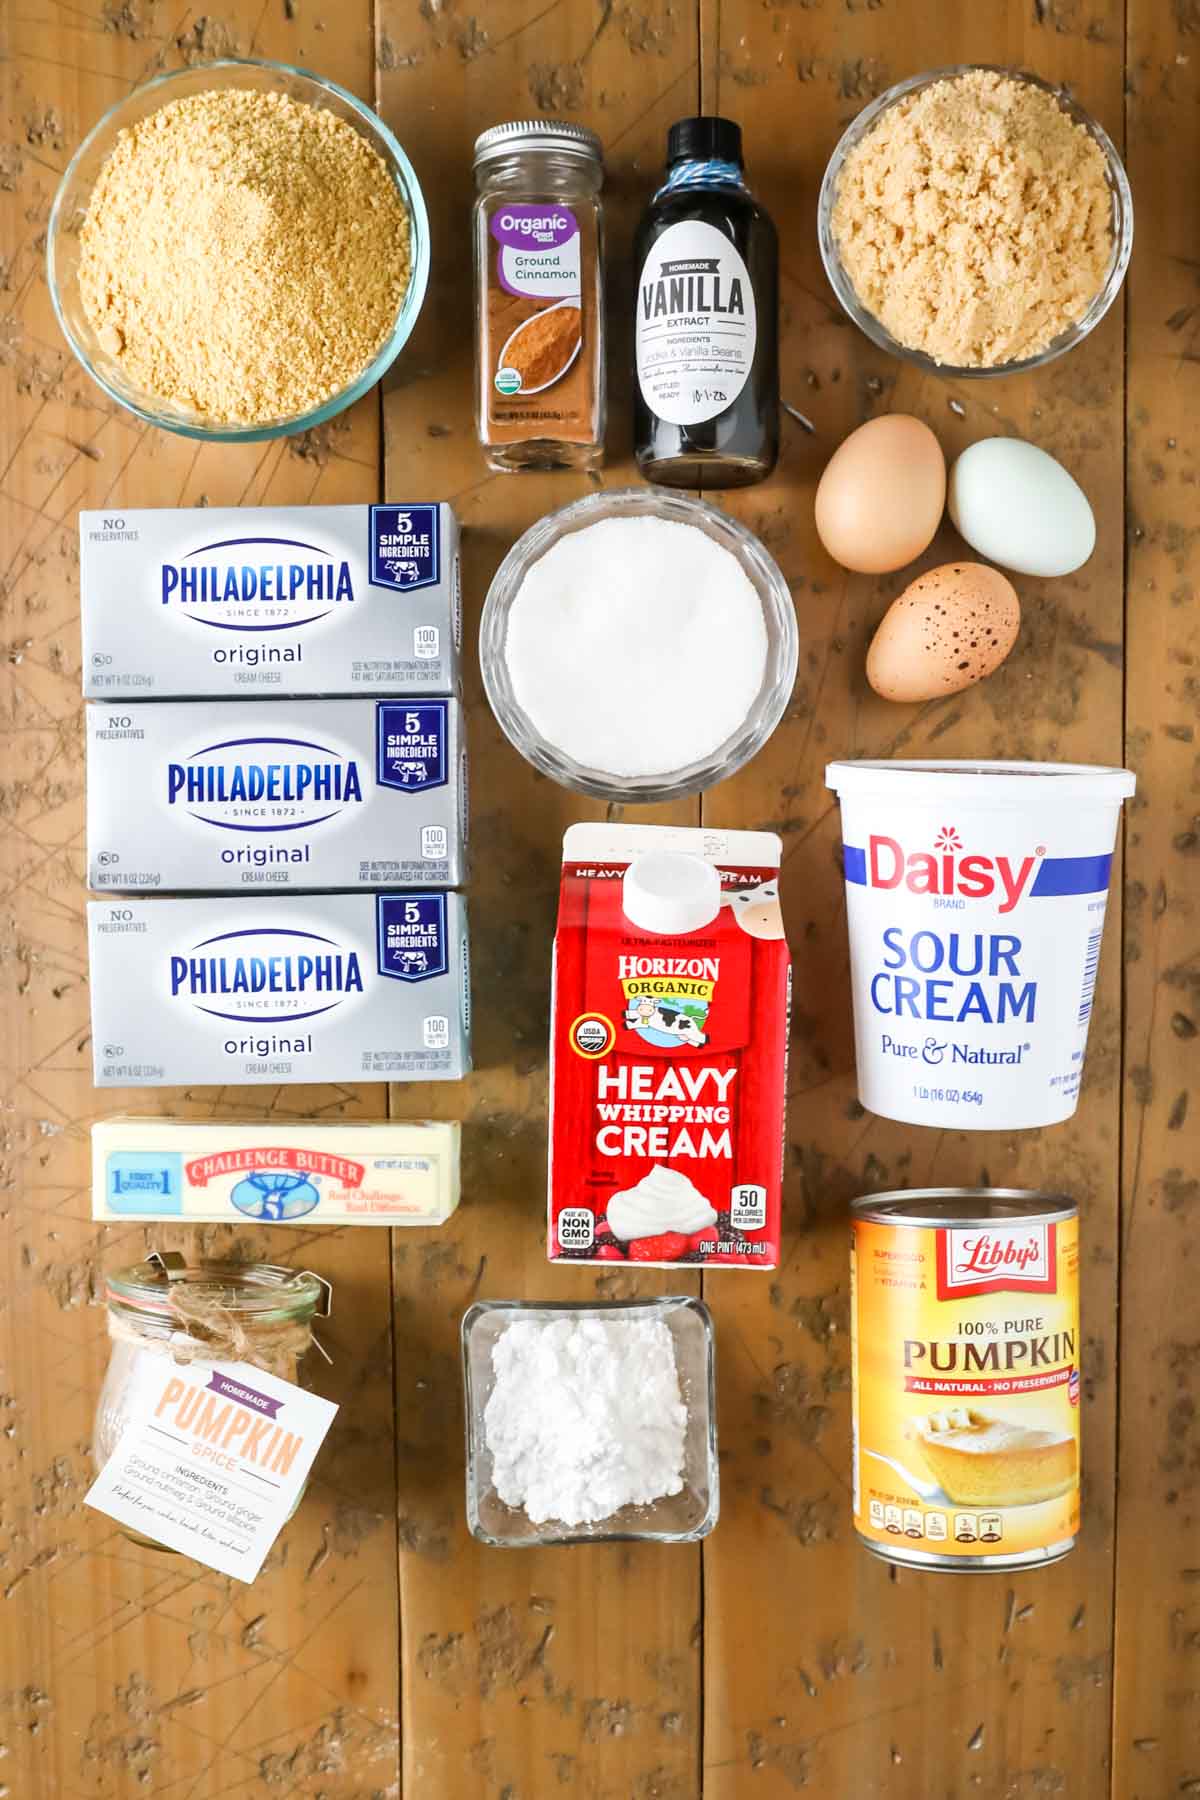
- Cream cheese. As with all of my cheesecake recipes, you want to make sure you use full-fat, brick-style cream cheese and not the kind the comes in a tub, which can cause the cheesecake to not bake properly.
- Pumpkin puree. Do NOT use pumpkin pie filling, which has additives and flavoring that we do not want in our cheesecake! We’re looking for the plain, 100% pumpkin that’s often (confusingly) sold right beside the pie filling.
- Sour cream. I’m a staunch believer that cheesecake without sour cream simply isn’t worth wasting your time on. Sour cream gives you rich depth of flavor that is critical for that classic cheesecake flavor. And critical for guaranteeing that your guests ask for the recipe after they’ve tried a bite.
- Eggs. It’s best if they are are room temperature and give them a light mix with a fork so they incorporate easily.
- Pumpkin pie spice. This gives our pumpkin cheesecake a beautiful spiced flavor that complements the pumpkin SO well. If you don’t have your own, now is the time to whip up a batch of my homemade pumpkin spice.
SAM’S TIP: I like to remove my eggs, cream cheese, and sour cream from the fridge at least an hour before I begin making my cheesecake. They will combine more evenly this way, which makes for a uniform batter and reduces the risk of cracks.
Remember, this is just an overview of the ingredients I used and why. For the full recipe please scroll down to the bottom of the post!
How to Make Pumpkin Cheesecake
- Prepare your graham cracker crust and set it in the fridge to chill.
- Cream together the cream cheese and sugars until well-combined.
- Stir in the sour cream, then add the vanilla, pumpkin, and pumpkin spice.
- Add the eggs on at a time and mix until just combined after each.
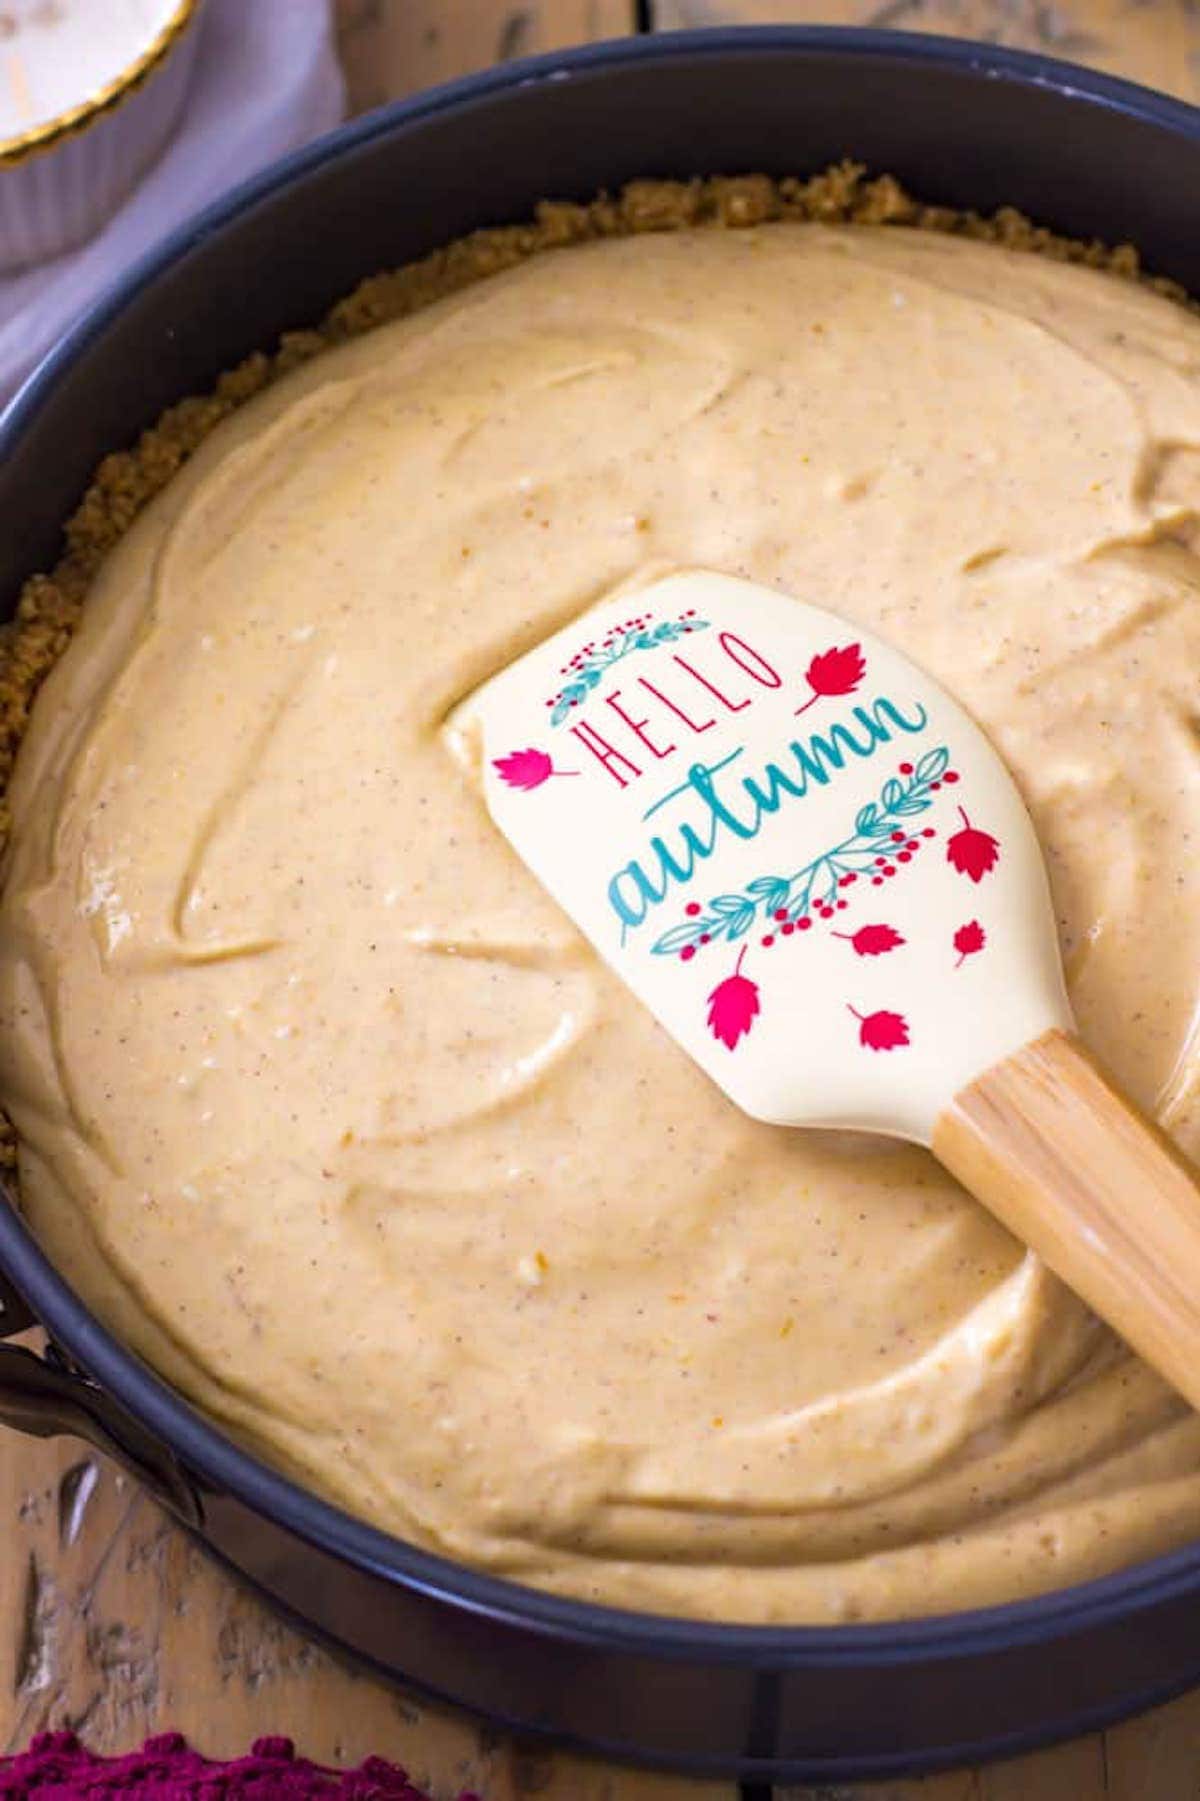
- Spread the batter into your crust and bake for 40 minutes.
- Let the cheesecake cool to room temperature, then chill for at least 6 hours.
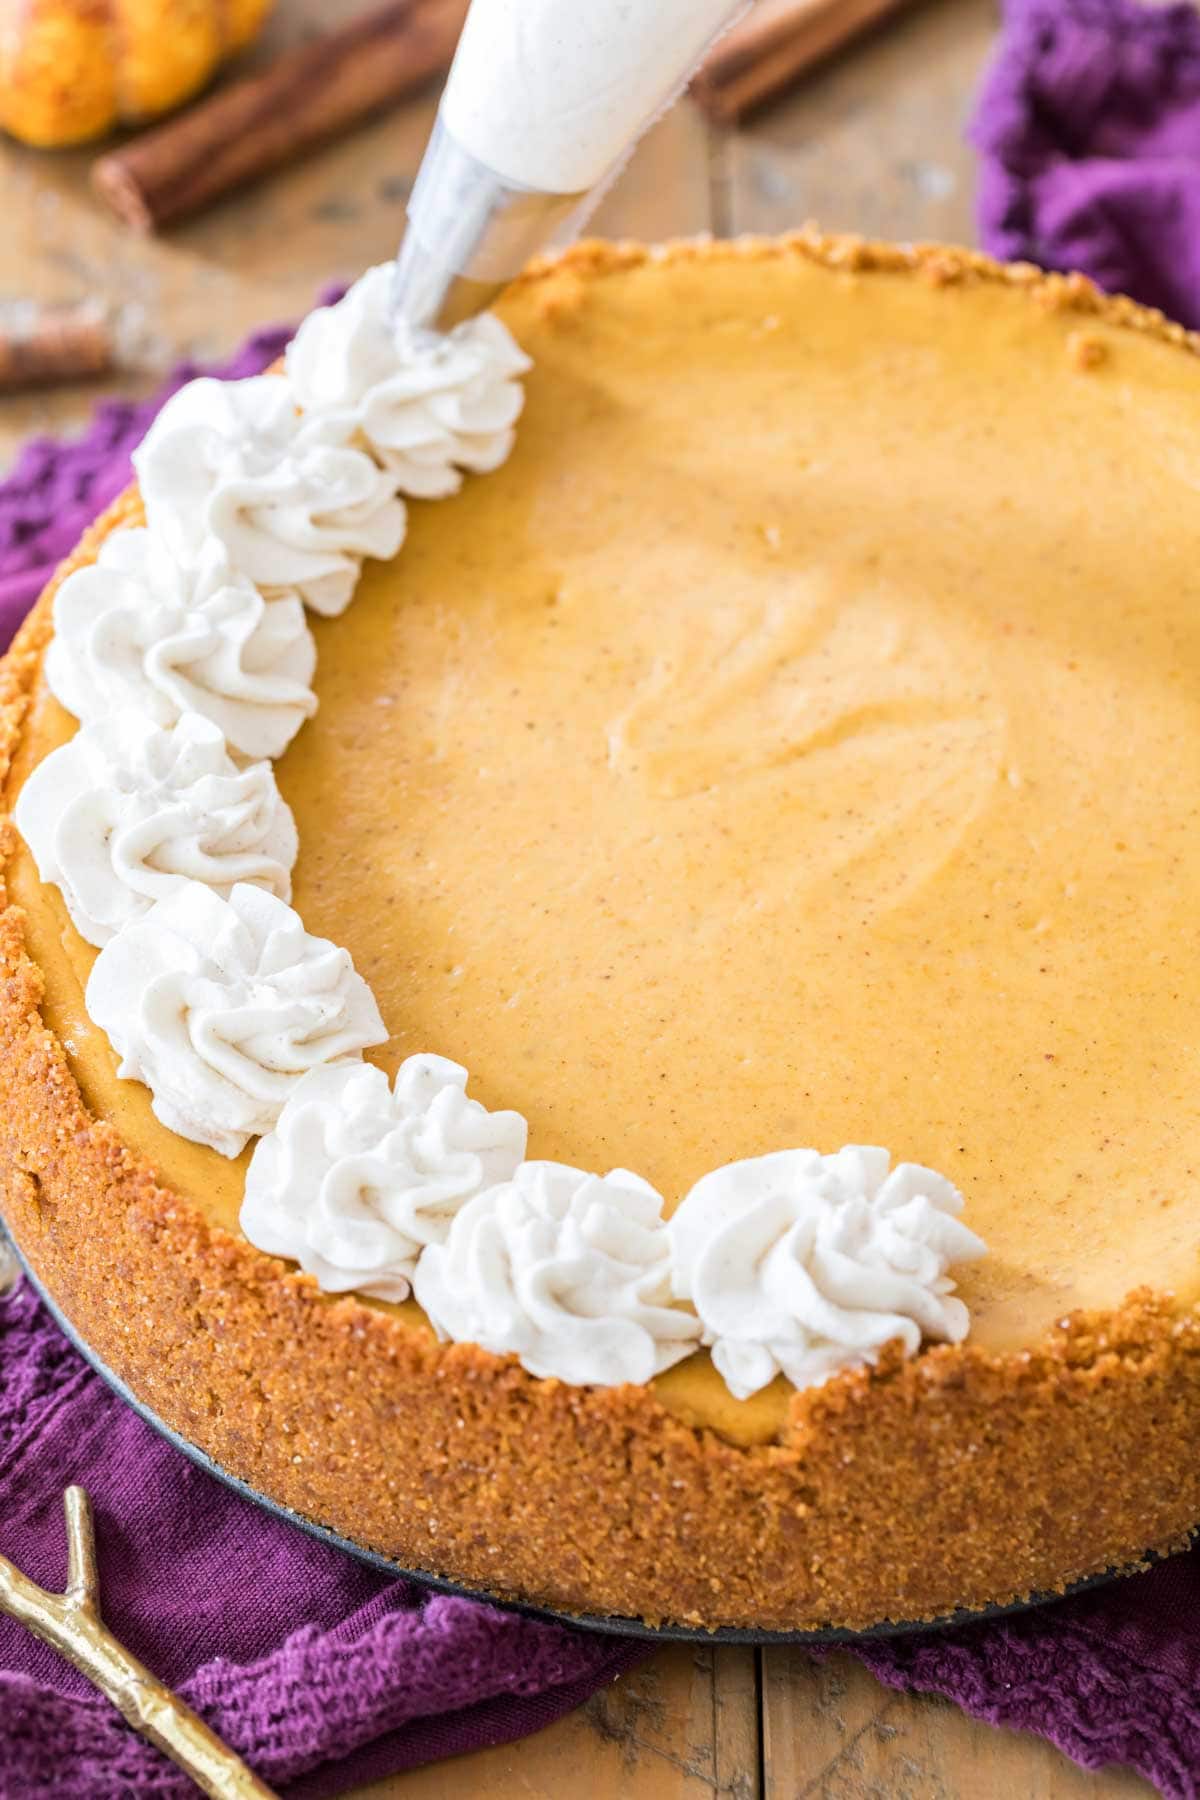
- Top with cinnamon whipped cream and enjoy!
SAM’S TIP: It’s important that the eggs are fully incorporated into the batter, but don’t overdo it. Stir the batter on low-speed just until each egg has been incorporated.
Tips for a Crack-Free Cheesecake
Like my other cheesecake recipes, this cheesecake is made WITHOUT a water bath. If you’ve made any of my other recipes, like my chocolate cheesecake, you’ve already seen these, but they’re worth repeating. To avoid cracks, make sure you follow these tips:
- Use room temperature ingredients. Set your cold ingredients out beforehand and don’t try to soften/warm them up quickly in the microwave (you can end up melting your ingredients this way!).
- Don’t over-beat your eggs! Not only can this make your cheesecake crack, but it can also ruin the texture and make it mealy and dry.
- Don’t open the oven! Opening the oven door drastically reduces the temperature, which can slow the baking process and can cause your cheesecake to crack and sink.
- Cool slowly! Rapid cooling is a surefire way to end up with a big crack in the center of your pumpkin cheesecake (even if it was smooth when it first came out of the oven!). Let your cheesecake cool slowly! I let mine cool on top of the oven where it’s still warm, but you can also leave it in your (turned off) oven with the door open to let it come to room temperature before refrigerating.
- Mind the crust! When you’re pressing your crust into the pan, press it up the sides, too, as high as you can! Cracks are most often caused by tension that happens as the cheesecake tries to contract in the pan. The edges are usually stuck to the side, and the tension of trying to shrink but not being able to can cause cracks. I actually can’t believe it took me so many years to learn this tip, it’s an absolute game changer and I didn’t realize how obvious it was until I developed my lemon cheesecake. If you only try one of these tips to avoid cracks, make it this one. Oh, and if you didn’t get your pumpkin cheesecake crust up quite as high as you needed to, just immediately after baking run a sharp knife around the edge of the cheesecake to loosen it from the pan.
SAM’S TIP: If you follow all my tips and your cheesecake still cracks, don’t panic–it will still taste amazing! You can simply cover it with your cinnamon whipped cream or top it with chocolate ganache, and no one will even know!
Frequently Asked Questions
I don’t recommend it, as most store-bought crusts come in small pie tins that aren’t large enough to hold the amount of batter that this recipe makes. You would need at least two store-bought crusts, and the baking time would be reduced quite a bit.
I suggest you use my homemade crust instead; it takes just a few ingredients and a few minutes of your time to make and will fit the pan perfectly!
You can store your cheesecake in the refrigerator for up to 5 days. Make sure you cover your cheesecake with plastic (or store it in an airtight container) to keep it from absorbing other odors in the fridge. You can also freeze your pumpkin cheesecake (after it’s cooled as indicated in the recipe) for several months. I like to cut mine into slices and wrap and freeze them individually.
I leave mine in the springform pan until I’m ready to serve, then I remove the ring and serve. When I need to store it again, I’ll put the ring back on.
If you’d like to remove your pumpkin cheesecake onto a pretty platter, use a spatula to gently pry the bottom up from the bottom of the pan and very gently slide it onto a serving platter.
I hope you love this fall twist on my classic cheesecake 🍂
Enjoy!
Let’s bake together! I’ll be walking you through all the steps in my written recipe and video below! If you try this recipe, be sure to tag me on Instagram, and you can also find me on YouTube and Facebook
Pumpkin Cheesecake
Equipment
Ingredients
- 1 graham cracker crust, (prepared according to recipe in 9" or 10" springform pan, not pre-baked). Click the link for recipe.
- 24 oz (680 g) cream cheese, softened to room temperature, be sure to use brick-style and not spreadable cream cheese
- ¾ cup (150 g) brown sugar, packed
- ½ cup (100 g) sugar
- ⅓ cup (80 g) sour cream
- 1 ½ teaspoon vanilla extract
- 1 cup (244 g) pumpkin puree¹
- 2 ½ teaspoons pumpkin pie spice
- 3 large eggs, lightly beaten, room temperature preferred
Cinnamon Whipped Cream
- ¾ cup (175 ml) heavy cream
- ¼ cup (30 g) powdered sugar
- ½ teaspoon vanilla extract
- ⅛ teaspoon ground cinnamon
Instructions
- Preheat oven to 350F (175C)² (see note).
- Prepare graham cracker crust in a 9″ springform but do not bake. Place in refrigerator to chill while you prepare your cheesecake filling.1 graham cracker crust
- In a stand mixer (or in a large bowl with a hand-mixer), beat together softened cream cheese and sugars, scraping down the sides with a spatula occasionally to ensure ingredients are mixed well and lump-free.24 oz (680 g) cream cheese, ¾ cup (150 g) brown sugar, ½ cup (100 g) sugar
- Add sour cream and stir well, pausing once to scrape down the sides and bottom of the bowl.⅓ cup (80 g) sour cream
- Add vanilla extract, pumpkin puree, and pumpkin spice and stir until well-combined.1 ½ teaspoon vanilla extract, 1 cup (244 g) pumpkin puree¹, 2 ½ teaspoons pumpkin pie spice
- Add eggs, one at a time, beating until just mixed after each addition (and scraping down the sides after each addition).3 large eggs
- Spread cheesecake batter evenly over prepared crust.
- Transfer pan to a foil lined baking sheet and place in center rack of 350F (175C) oven. Bake for 40 minutes or longer (see note!), until center of cheesecake is almost set (center may jiggle very slightly, edges should be set and may be slightly puffed or very slightly cracked).
- Allow pumpkin cheesecake to cool to room temperature and then transfer to refrigerator and chill for 6 hours or overnight.
- Before serving, prepare your cinnamon whipped cream.
Cinnamon Whipped Cream³
- For the cinnamon whipped cream topping, combine heavy cream, powdered sugar, vanilla extract, and ground cinnamon in a clean medium-sized bowl.¾ cup (175 ml) heavy cream, ¼ cup (30 g) powdered sugar, ½ teaspoon vanilla extract, ⅛ teaspoon ground cinnamon
- Use an electric mixer to stir on low-speed. Gradually increase speed to high and beat until stiff peaks form.
- Pipe or dollop whipped cream over chilled cheesecake. Slice, serve, and enjoy!
Notes
¹Pumpkin note
Be sure to grab pure pumpkin puree (the only ingredient on the can should be “pumpkin”) and not “pumpkin pie filling”, which contains other ingredients and is usually sold right beside the pumpkin puree.²Video note
Whoops! The video says to preheat the oven to 375F but this cheesecake should actually be baked on 350F (as the written recipe indicates) instead.Baking time
Exact bake time can vary depending on your oven, whether you bake your cheesecake on a baking pan or not, the color of your springform pan (light or dark), and even the precise temperature of your ingredients. Because of this I recommend checking your cheesecake at 40 minutes (the amount of time it takes me) and adding time as needed. Some readers have reported needing to bake their cheesecake upwards of an hour! Follow the cues indicated in the recipe to tell that it’s done, you can use an instant read thermometer to check that it’s done if you aren’t sure, the temperature should exceed 160F (70C).³Whipped cream
I used a Wilton 2D tip to pipe the whipped cream onto my cheesecake.Storing
Store in an airtight container in the refrigerator for up to 5 days. Pumpkin cheesecake may also be frozen for several months.Nutrition
Nutrition information is automatically calculated, so should only be used as an approximation.
Like this? Leave a comment below!
This recipe originally published 10/13/2017, while the recipe remains the same, the post has been updated and improved and a video has been added!
Related Recipes
My pumpkin cheesecake recipe was originally published in 2017. The recipe remains unchanged, but I’ve updated the photos, added a video, and updated the blog post to make it more helpful.


Last night I made the pumpkin cheesecake, but I will not make it again. I followed the directions as written. It was too sweet and too creamy for me. There was also too much graham cracker crust. Thank you for the recipe.
I’m wondering what difference using the pumpkin pie can would make. Im about to make this but when I was shopping didnt see the notes. I thought getting that would eliminate the need for pp spice, since I only had cinnamon and nutmeg at home and wasnt wanting to buy even more spices I never use. Praying for the best.
Hi Jamie! I don’t recommend pumpkin pie filling as it has other things added in along with the pumpkin. I’m not sure how your cheesecake will turn out if you used the pie filling. 🙁
So I used the pie filling and just didn’t add anymore spices. I reduced the sugar only by about 1/3 cup. And I didn’t the Japanese style where you separate your eggs and fold in the stiffened whites at the end prior to baking. My cake turned out amazing!
Can you make this recipe as cheesecake cupcakes?
Hi Linda! You shouldn’t have any issues baking this in a cupcake tin. I’m not sure on a bake time though. Enjoy! 🙂
After seeing the pumpkin cheesecakes in Costco, I was craving pumpkin cheesecake for Thanksgiving. I wanted to make my own because 1) I didn’t want a Costco-sized cheesecake since we would also have other desserts and 2) everything is better homemade! This was my first time making pumpkin cheesecake and it was excellent. I did have to cook it longer; your tip to use the instant read thermometer was so helpful. Great recipe!
I’m so glad you enjoyed this so much, Francine! 🙂
That was the best cheesecake I have ever made! Thank you for this amazing recipe. 🧡
I made this using Truvia brown sugar and Truvia white sugar for Thanksgiving. Everyone was going on and on about it. I just made a 2nd one for just me and my husband. Thanks for a great recipe!!
Having made your classic cheesecake before and gotten rave reviews from friends and family (I top it with a blueberry limoncello jam), I decided to make this for the work Thanksgiving potluck. All day people kept coming up to me raving about how amazing it was. Even coworkers who normally don’t like pumpkin desserts couldn’t get enough. I love that it doesn’t require a water bath and still turns out perfectly flat and perfect texture. Can’t thank you enough!
Wow, just wow! I texted my daughter, who asked for a pumpkin cheesecake instead of pumpkin pie for our Thanksgiving dessert table. Told her I’d have to search for a recipe, but since I’m subscribed to your blog and always have had good results, this is where I started. I couldn’t wait to tell her this pumpkin cheesecake is DIVINE!
Yes, I had to cut a slice before hand, because who could blame me, it looked delicious! Thank you, for sharing your great recipe!
this is such a hit!! i baked for a little longer than suggested and it was amazing.