
The Best Vanilla Cake Recipe
This post may contain affiliate links. As an Amazon Associate I earn from qualifying purchases. Please read my disclosure policy.

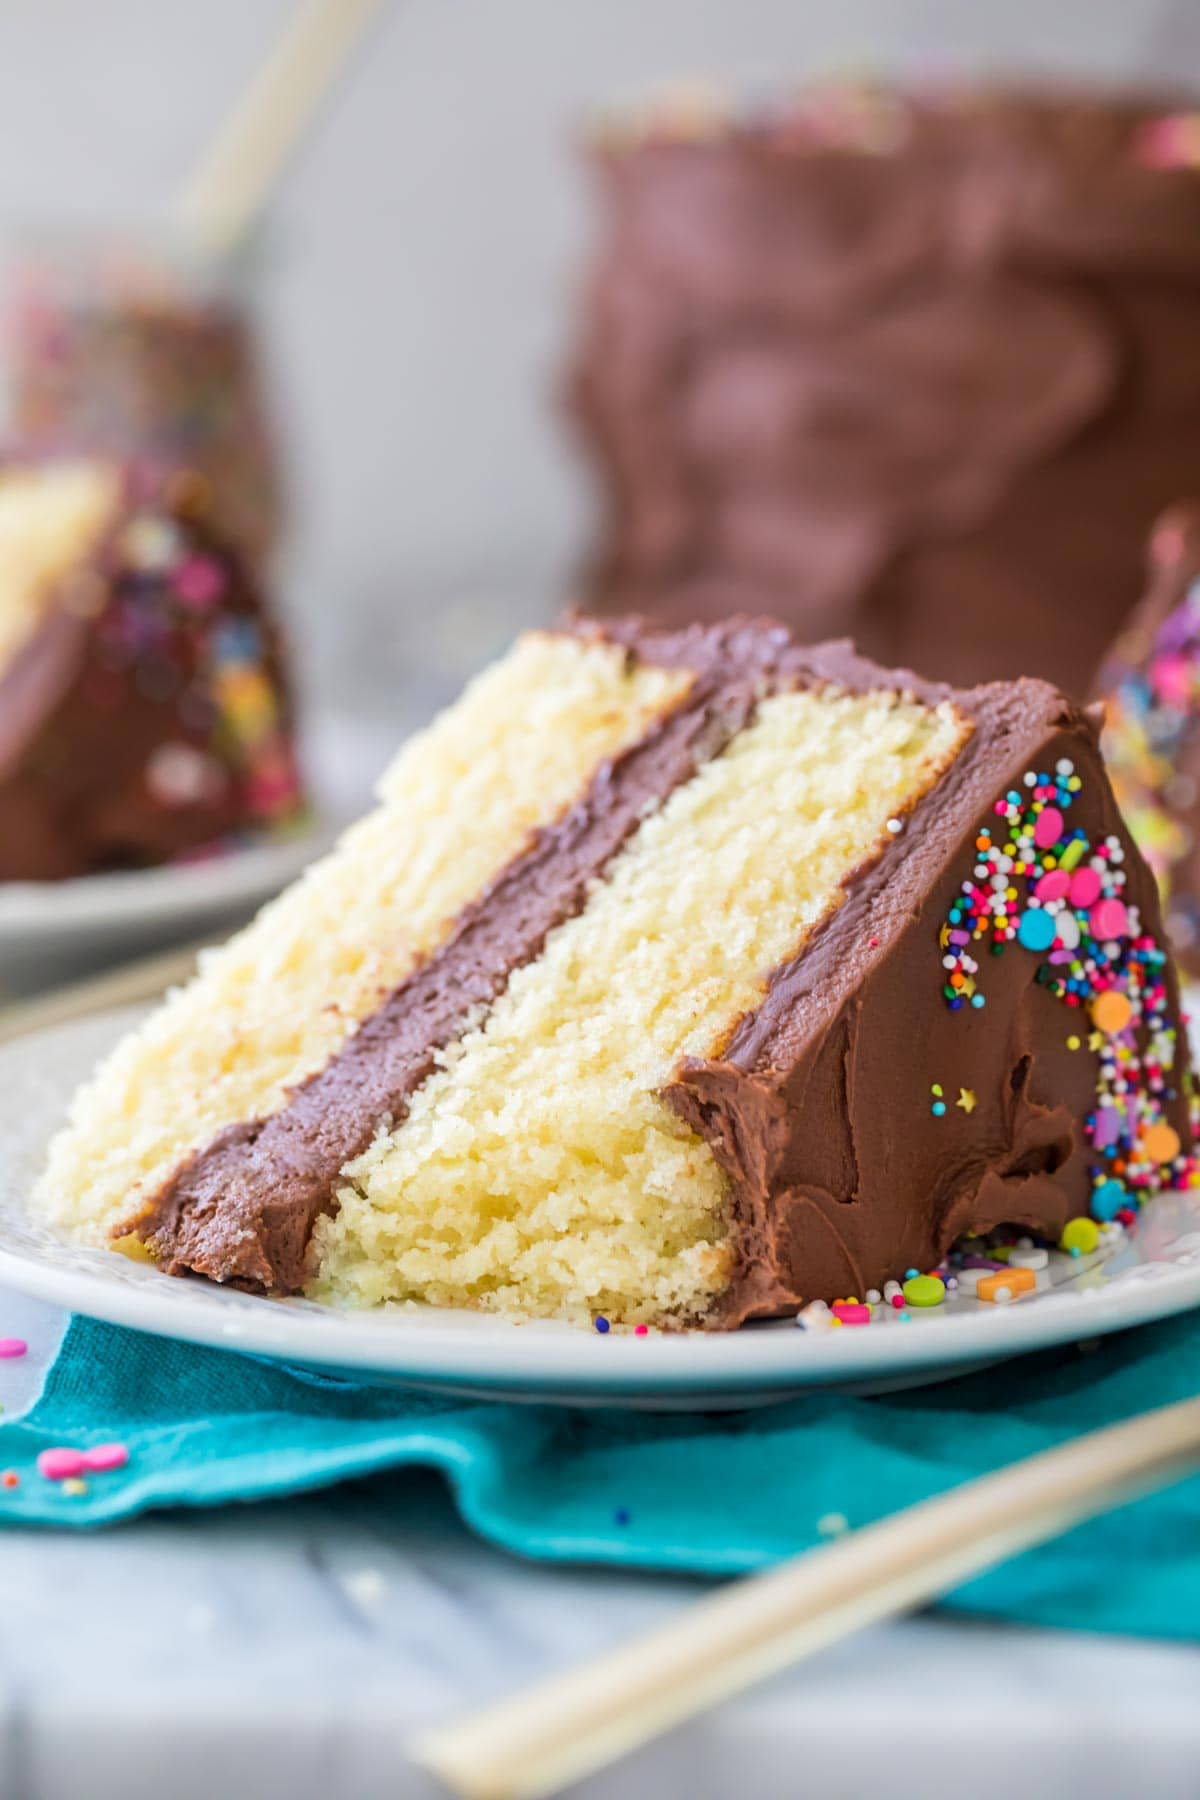
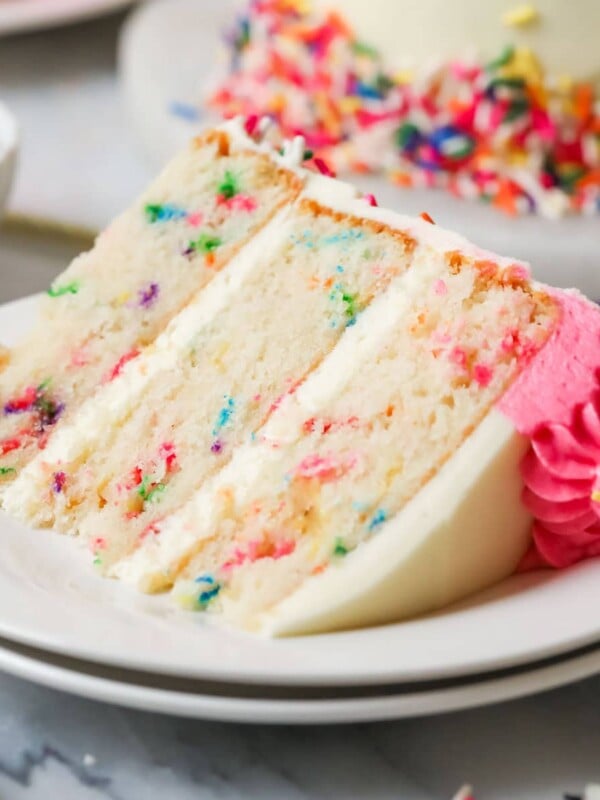
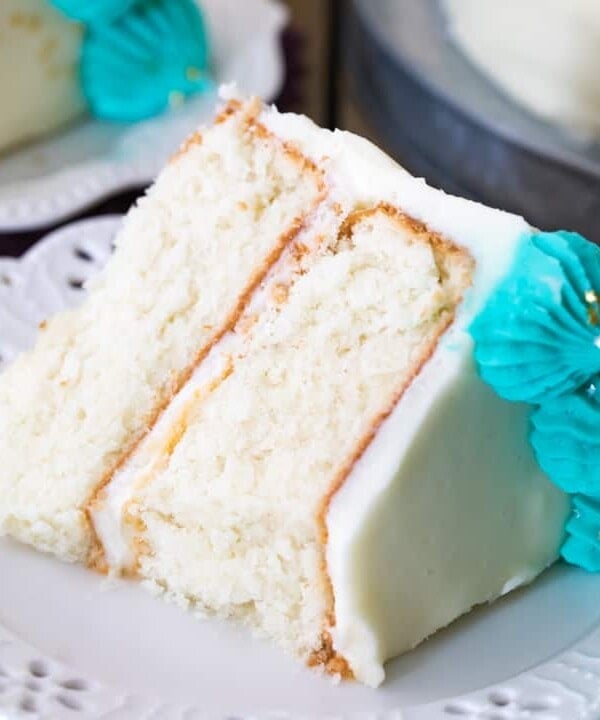
My vanilla cake recipe has a soft, plush, and perfectly moist crumb. It has a rich vanilla flavor, is perfectly beginner friendly, and is made entirely from scratch! If you’re looking for a classic homemade vanilla cake that works every time, this is it! Includes a video tutorial.
The BEST Vanilla Cake Recipe (Soft, Moist, and Made from Scratch)
Every baker needs a solid vanilla cake recipe in their repertoire, and today’s recipe is just that.
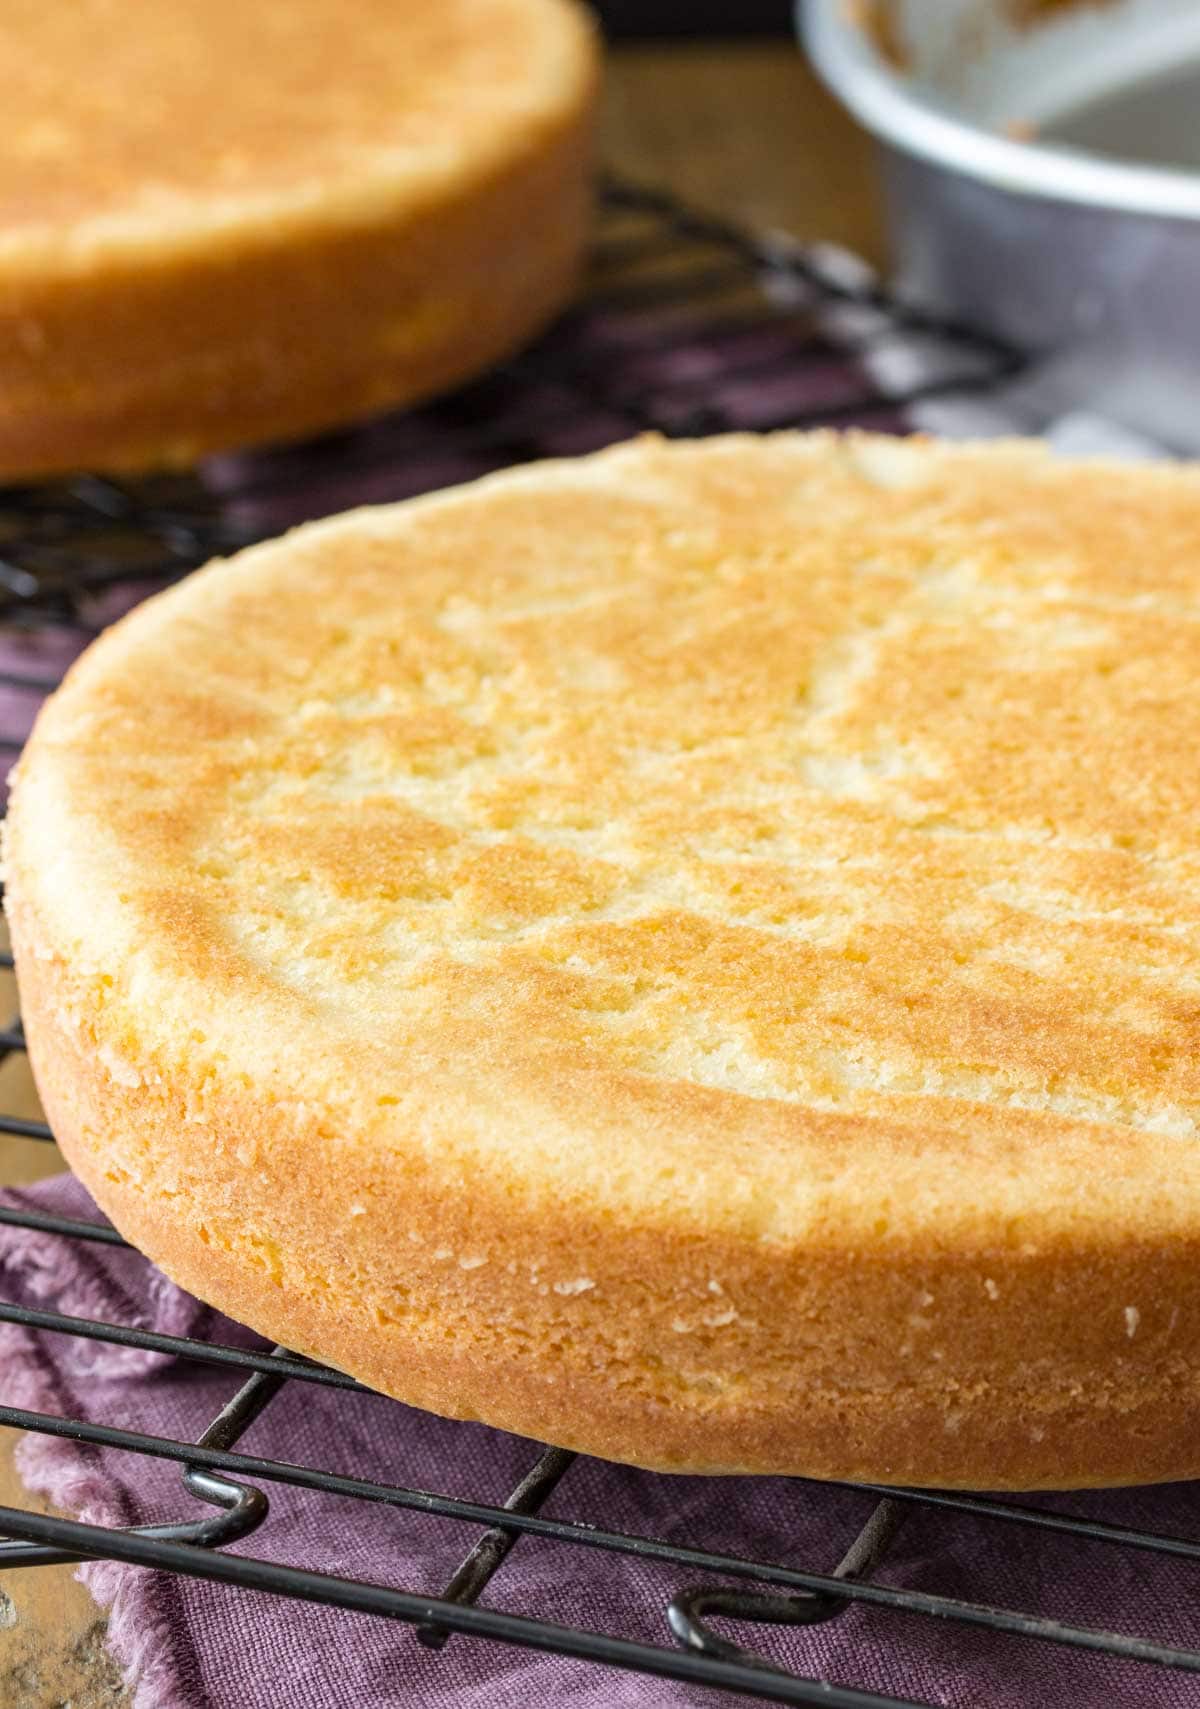
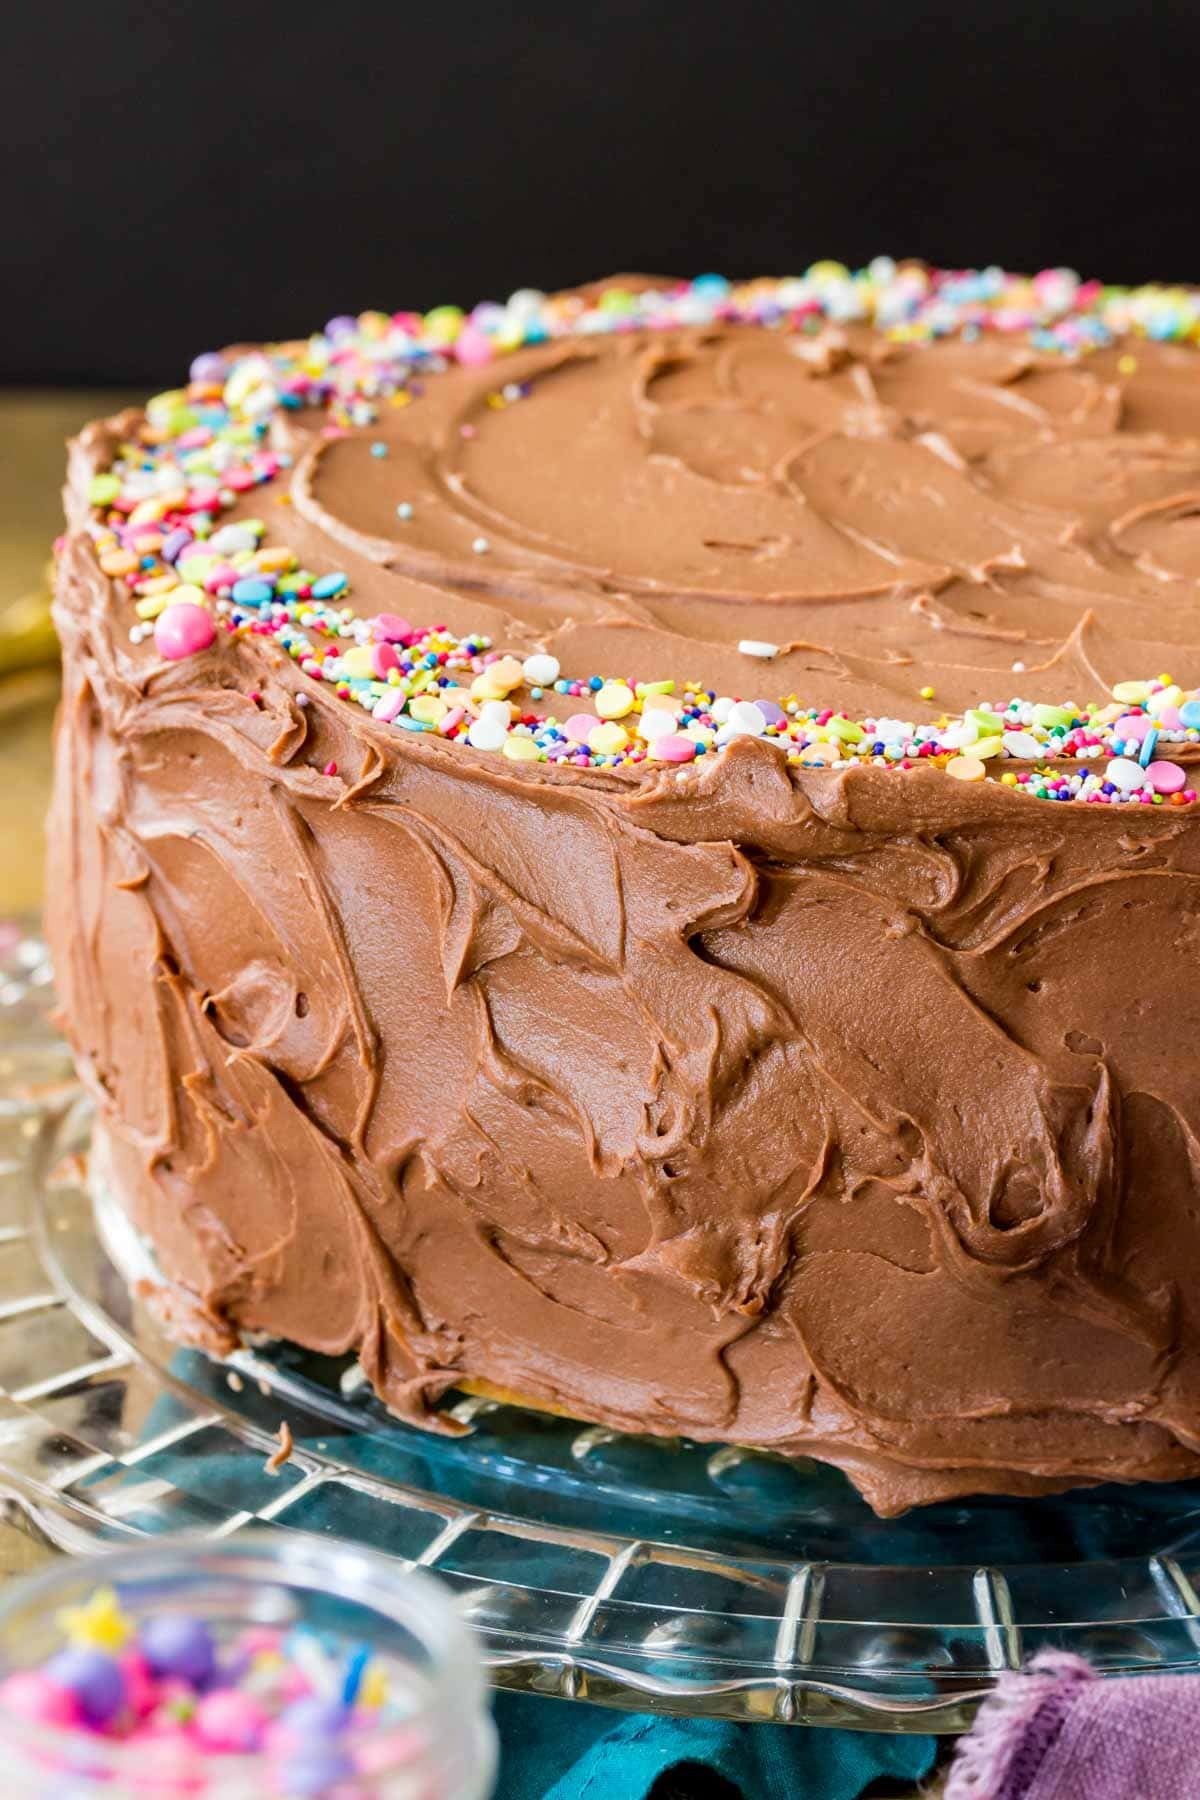
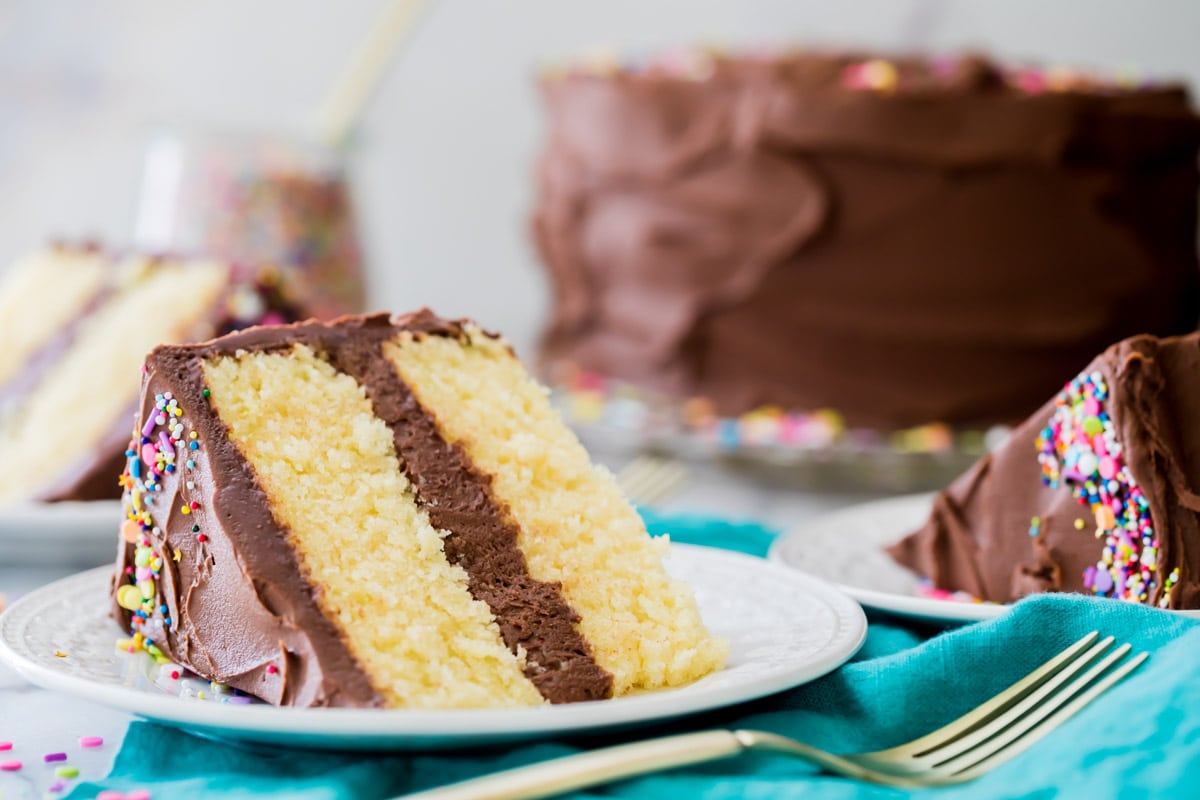
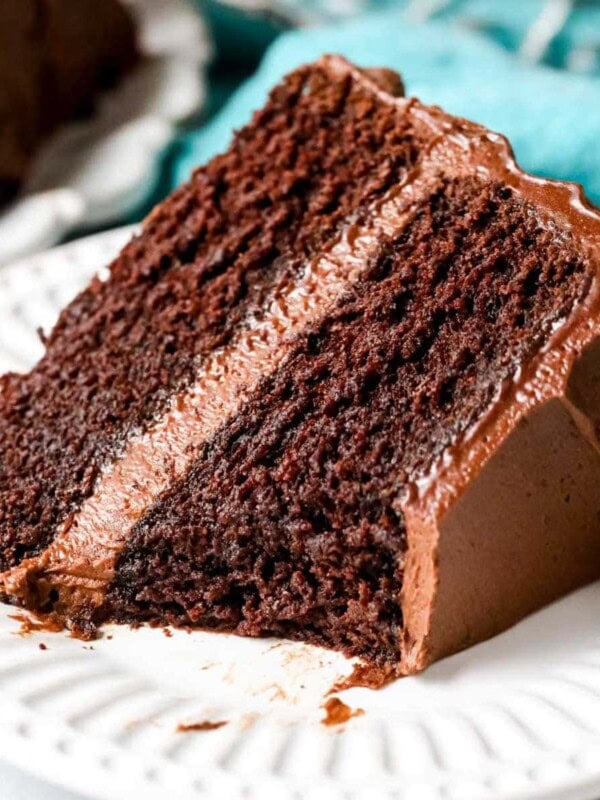
It’s soft, plush, and perfectly moist. Not to be confused with my white cake recipe, this recipe is a beautiful pale golden color and distinctly vanilla flavored. It pairs beautifully with any frosting, although a traditional chocolate frosting is my favorite finish!
Why This Vanilla Cake Recipe Works:
- Butter & oil combo. Using a blend of both butter and oil lets the cake reap the best benefits of both worlds: a rich, buttery flavor from the butter and soft, lasting moisture thanks to the oil. This technique worked so well in this cake recipe, I’ve used it in many recipes since then, including my chocolate cake recipe and marble cake.
- Buttermilk keeps the cake tender and adds subtle depth and richness.
- Light, fluffy texture. A full Tablespoon of baking powder gives the cake crumb lift for a soft, plush crumb that’s never too dense or heavy.
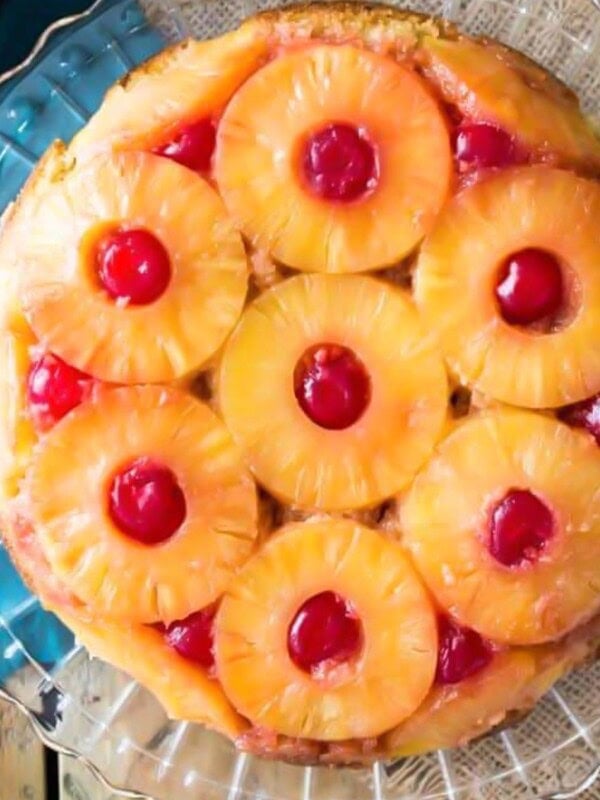
- Time-tested & reader-loved recipe. This vanilla cake recipe has been a long-time favorite on my website. It’s served as the base for many of my other cakes, including my popular pineapple upside-down cake.
Ingredients
After testing many versions and combinations of ingredients, I’ve found that a good vanilla cake recipe needs the following ingredients:
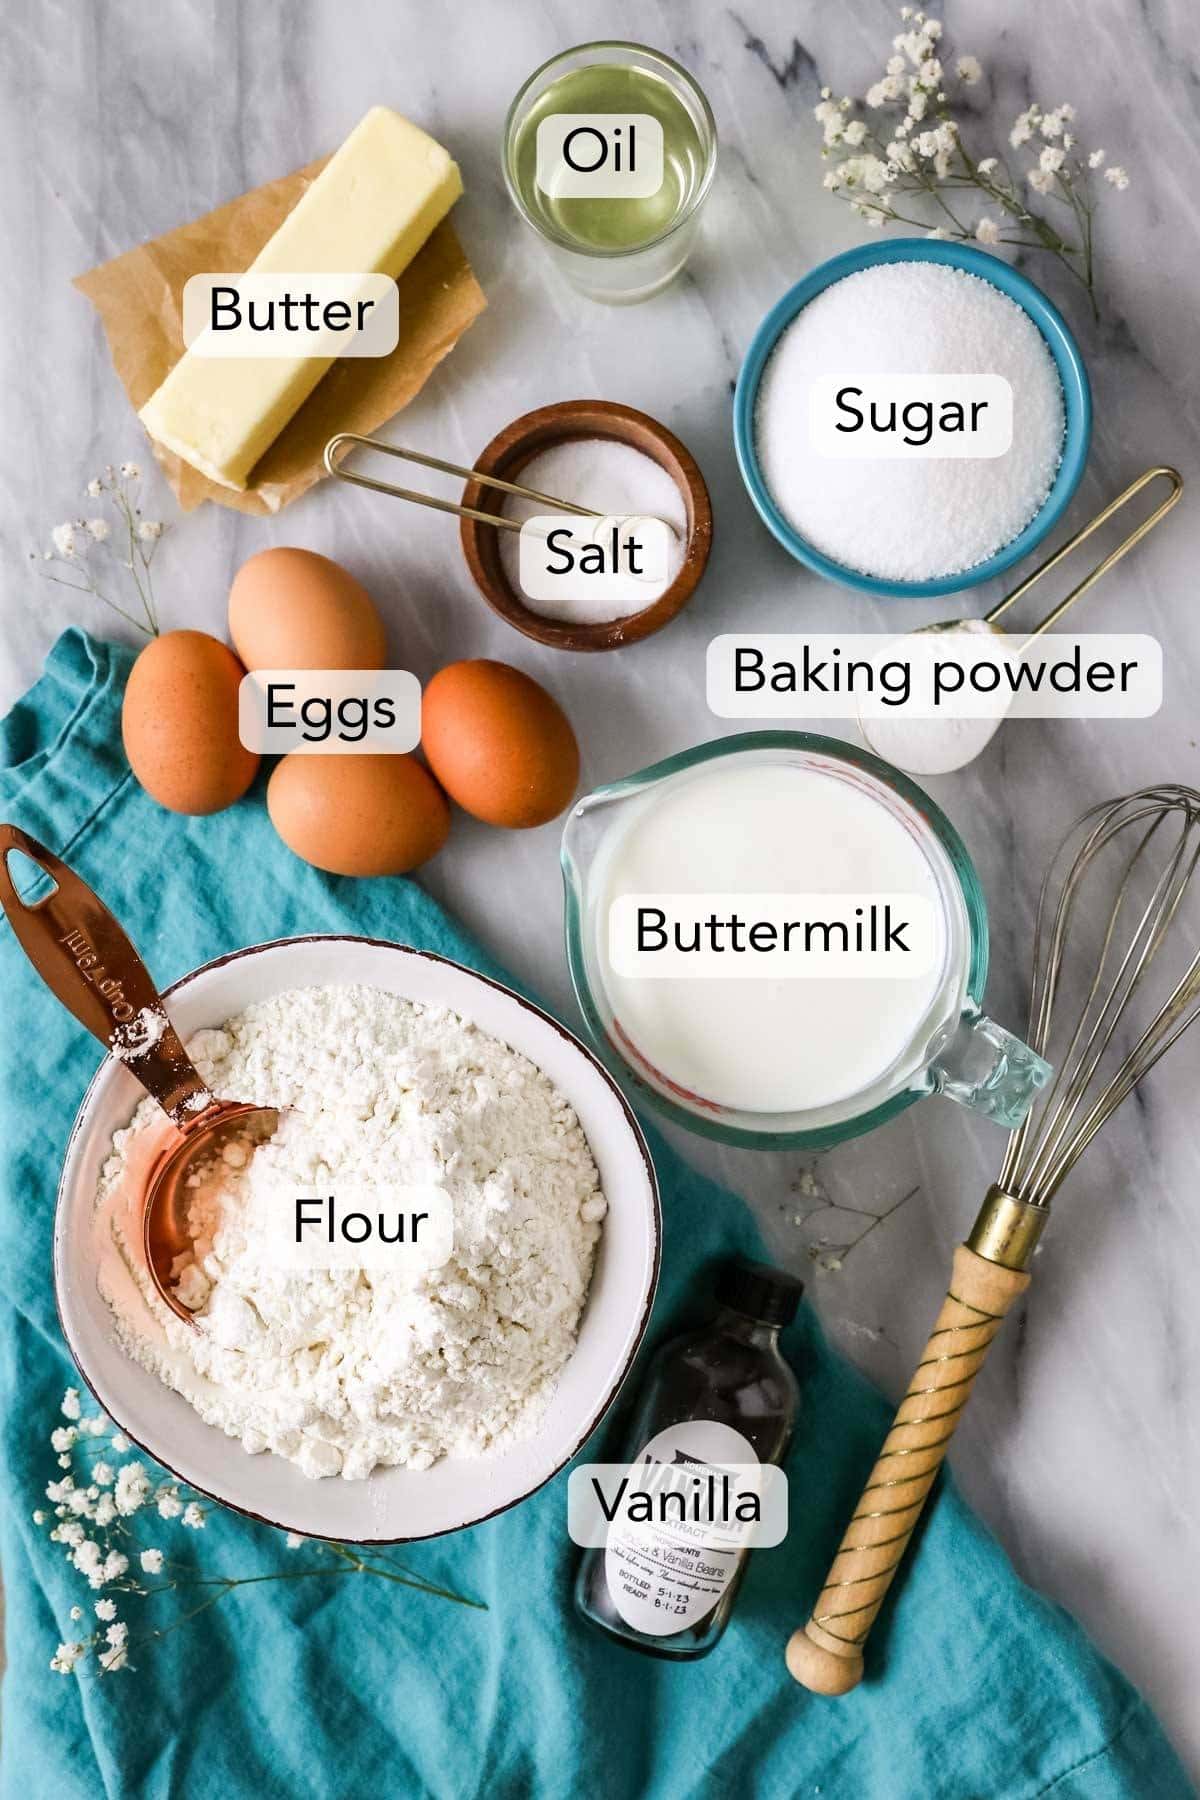
- Oil AND butter. A blend of these two ingredients gives the cake the best possible flavor and texture. Butter provides flavor while oil adds moisture and keeps the crumb soft and moist rather than dry. A cake made with all oil would be moist but lacking in flavor, and an all-butter cake may have a more buttery taste, but would be more dry. Any neutral cooking oil will work here, but I typically recommend using either vegetable or canola oil. For the butter, unsalted is best so we have maximum control over the flavor of the cake.
- Sugar. Plain granulated sugar works best. Brown sugar would add moisture, but would detract from the classic vanilla flavor and even weigh down the cake a bit.
- Eggs. You’ll need four eggs, and it’s best if you bring them to room temperature before adding them (this helps them incorporate into the batter more evenly).
- Vanilla. You can’t have vanilla cake without vanilla! I recommend using a good quality vanilla extract, so if you’ve got a batch of homemade vanilla extract, use it here!
- Flour. I developed this vanilla cake recipe specifically to work with all-purpose flour and that’s what I always use. However, you *could* use cake flour instead. To substitute by weight, you would use the same amount, but if you are using measuring cups you will need to substitute your flour properly.
- Baking powder. I know a tablespoon of baking powder may seem like a lot, but that’s not a typo. It’s key for a soft, lifted cake crumb. Always make sure your baking powder is fresh and avoid using a generic brand, which I’ve had mixed results with in the past.
- Salt. You can just use plain table salt or a very fine sea salt.
- Buttermilk. I strongly recommend using full-fat buttermilk for the best flavor and texture. While I do have a buttermilk substitute, it doesn’t really make this vanilla cake quite as moist and flavorful as I like it to be, so now I strictly recommend using real buttermilk. And no, you do not *need* to have baking soda in a recipe in order to use buttermilk; we’re using it for its moisture and flavor here!
Sam’s Tip
One of the biggest mistakes you can make with this recipe is neglecting to measure your flour properly. If you over or under-measure your flour, your cake will not turn out right! Use the right method, be as precise as possible, and use a kitchen scale if you have one.
As always with my recipes, this is just an overview of the ingredients I used and why. For the full recipe please scroll down to the bottom of the post!
How to Make This Vanilla Cake Recipe (Step-by-Step)
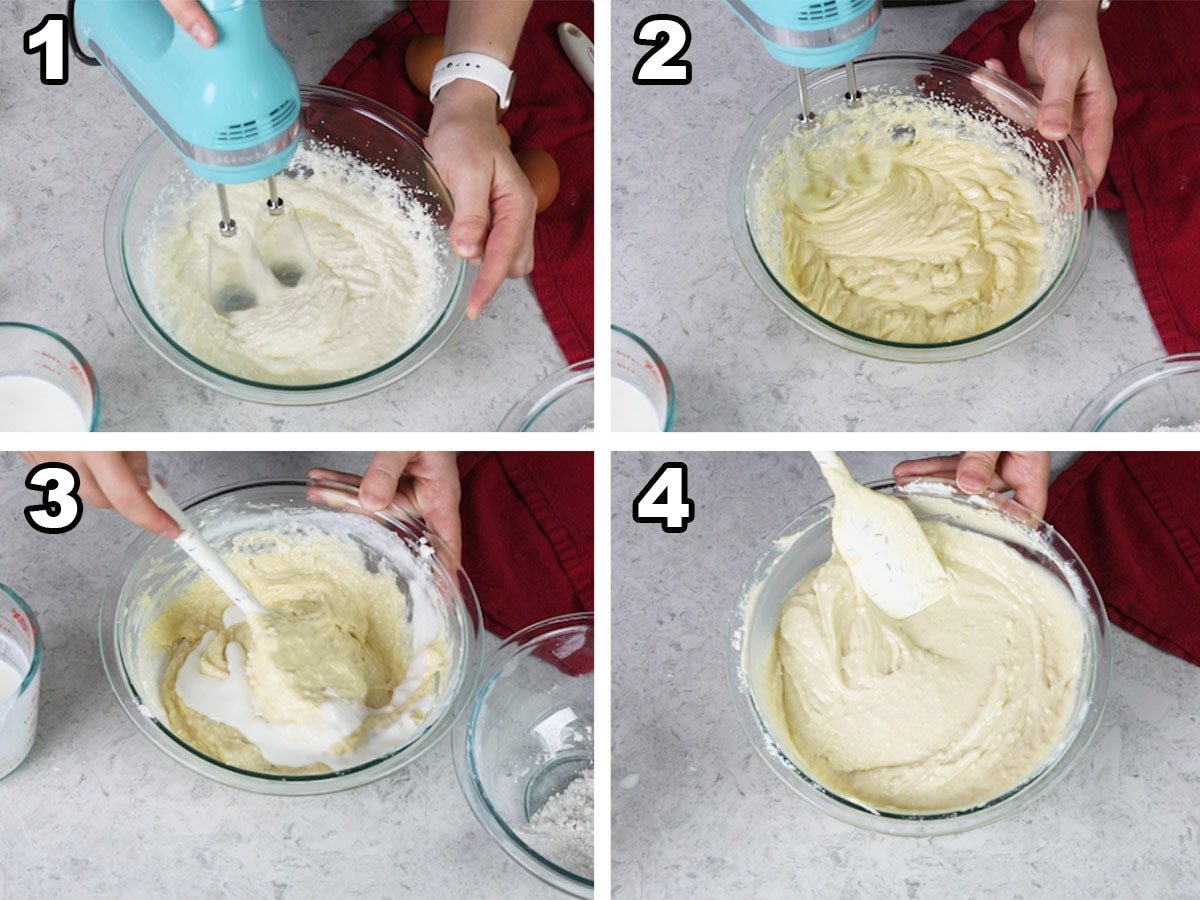
- Cream the butter, oil, and sugar in the bowl of a stand mixer.
- Add the eggs one at a time, beating well after each addition, then stir in your vanilla extract.
- Combine your dry ingredients in a separate bowl, then add about 1/3 of the mixture into your bowl. Use a spatula to gently stir until just combined. Follow this with about 1/2 of your buttermilk, and stir again until just combined.
- Add 1/2 of the remaining dry ingredients stir, and then add the remainder of the buttermilk. Finish with the final portion of dry ingredients and use your spatula to make sure the batter is smooth–do NOT overmix!
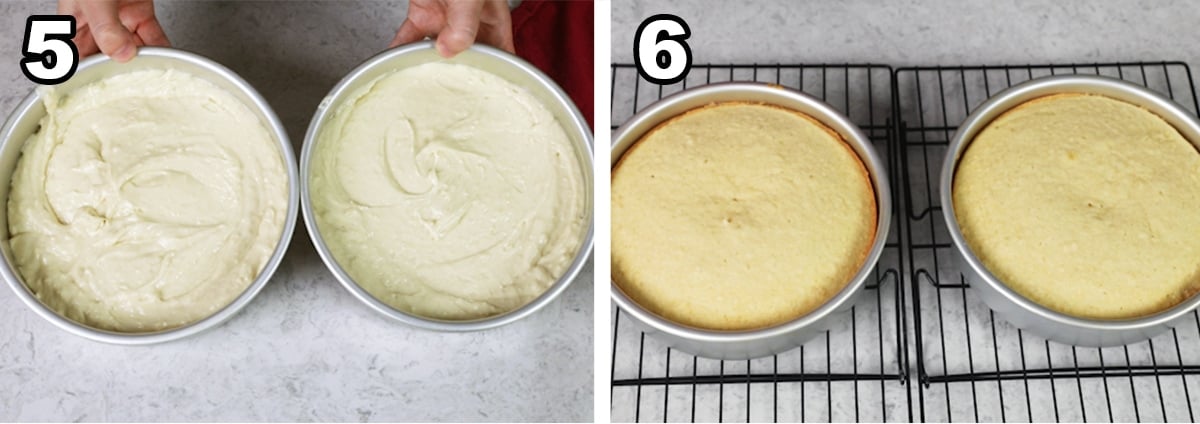
- Divide the batter evenly into two greased baking pans.
- Bake, then use a toothpick to test for doneness. Let the cakes cool in their pans a bit before inverting onto a cooling rack, where they’ll need to cool completely before frosting.
Sam’s Tip
While a toothpick that comes out clean indicates a fully baked cake, an over-baked cake will also yield a clean toothpick. It’s best to pull your vanilla cake out of the oven when a toothpick shows moist crumbs!
Frequently Asked Questions
A cake that has been over-baked or one in which too much flour was used will be crumbly when cut into. If you invert the cake too soon or try to handle it while it’s too warm, this could also make it break.
Cakes made from scratch require a bit more care and technique than those that come from a box-mix. When making any cake from scratch, take care to not over-mix, over-bake, or use too much flour, or the cake can end up tasting like cornbread. This applies to any cake that is made from scratch, not just this vanilla cake recipe!
Yes! This recipe will make approximately 24 vanilla cupcakes. Fill cupcake liners no more than 3/4 full and bake one pan at a time on 350F for about 17 minutes each.
Under-mixing your cake batter, not baking the cake for long enough, or opening the oven door too frequently while the cake bakes can cause the cake to sink as it cools.
A good vanilla cake recipe is a blank canvas for your favorite frosting, it works with just about any icing. Some of my favorites include my chocolate fudge frosting, chocolate Swiss meringue buttercream, or classic chocolate buttercream (vanilla cake with chocolate frosting is a classic combo!), peanut butter frosting, cream cheese frosting, vanilla frosting, coffee frosting, or take a fruity spin with my strawberry frosting, raspberry buttercream, or even blueberry frosting. You can also top any of these frostings with my ganache drip.
Why Is My Vanilla Cake Dry?
Dryness is typically the biggest issue home bakers run into when making cakes from scratch, so I thought this FAQ deserved its own space. There are three main causes for a dry cake: over-measuring the flour (addressed above), over-mixing, and over-baking.
Over-mixing the batter:
Mixing the batter properly can be tricky and this is often where most mistakes are made with homemade cakes. To avoid over-mixing, thoroughly cream together the wet ingredients, particularly the butter, sugar, oil, and eggs. I highly recommend using an electric mixer for this step!
However, once you get to the point of combining your wet and dry ingredients, you need to be gentle and fold by hand using a spatula. Alternate adding the dry ingredients and the buttermilk, folding thoroughly, but not aggressively. The batter will be smooth and mostly cohesive; there may be some small lumps remaining, but so long as there aren’t any dry streaks and the batter is mostly uniform, that’s fine! Also, remember that while over-mixing can make your vanilla cake both dry and dense, under-mixing has its own risks and should be avoided as well!
Over-baking the cake:
Even a minute too long in the oven can cause a cake to be too dry and dense. Bake your cake layers on the center rack and use an oven thermometer to ensure your oven is running at the proper temperature.
Don’t check your vanilla cake too early (that can make it sink!), but do keep an eye on it. When your cake is finished baking, the center should spring back if lightly touched–it should not deflate or appear jiggly. You can also use the toothpick test to check for doneness. To do this, insert a toothpick in the center of your cake; it’s done if the toothpick comes out with a few moist crumbs (not wet batter). Once your vanilla cake is finished baking, let it cool in the pan for only 10-15 minutes before inverting it onto a cooling rack to cool completely.
More Great Cakes to Try:
If you’re new to making homemade cakes (or just want to delve deeper into the process) make sure to check out my posts on how to decorate a cake and 3 ways you’re accidentally ruining your homemade cake.
Enjoy!
Let’s bake together! Subscribe to my newsletter to be notified of all the newest recipes, and find my free recipe tutorials on YouTube

Vanilla Cake Recipe
Equipment
Ingredients
- ½ cup (113 g) unsalted butter, softened to room temperature
- ½ cup (120 ml) avocado, canola or vegetable oil¹
- 1 ½ cup (300 g) granulated sugar
- 4 large eggs, room temperature preferred
- 1 Tablespoon vanilla extract
- 3 cups (375 g) all-purpose flour²
- 1 Tablespoon baking powder
- ½ teaspoon salt
- 1 ¼ cup (300 ml) buttermilk, room temperature preferred
- 1 batch Chocolate Frosting, click link for recipe, or use one of the other frostings recommended in the notes below
Instructions
- Preheat oven to 350F (177C) and prepare two deep 8" round cake pans³ by lining the bottoms with parchment paper and lightly greasing the sides. Set aside.
- In the bowl of a stand mixer (or in a large bowl using an electric mixer) cream together the butter, canola oil and sugar until creamy and well-combined.½ cup (113 g) unsalted butter, ½ cup (120 ml) avocado, canola or vegetable oil¹, 1 ½ cup (300 g) granulated sugar
- Add eggs, one at a time, beating until thoroughly combined after each addition.4 large eggs
- Stir in vanilla extract.1 Tablespoon vanilla extract
- In a separate, medium-sized bowl, whisk together flour, baking powder, and salt.3 cups (375 g) all-purpose flour², 1 Tablespoon baking powder, ½ teaspoon salt
- Using a spatula and gently hand-mixing, alternate adding flour mixture and buttermilk to the butter mixture, starting and ending with flour mixture and mixing until just combined after each addition. The batter should be thoroughly combined, but there may be some small lumps in the batter and avoid over-mixing (and do not use your electric mixer or stand mixer for this step).1 ¼ cup (300 ml) buttermilk
- Evenly divide batter into your prepared cake pans, and bake on 350F (175C) for 30-35 minutes. When the cake is done, the surface should spring back to the touch and a toothpick inserted in the center should come out mostly clean with few moist crumbs (no wet batter).
- Allow cakes to cool in their cake pans for 10-15 minutes before inverting onto cooling rack to cool completely before frosting.
- Frost cake using my chocolate frosting (or see notes for other favorite frosting options) and decorate with sprinkles (if desired).1 batch Chocolate Frosting
Notes
¹Cooking oil
You may use any neutral cooking oil instead of vegetable or canola oil. I generally don’t recommend olive oil, which is heavier and has a distinct flavor that could affect the end taste result of your cake.²Cake Flour
You may substitute cake flour for all-purpose flour. Use 3 1/3 cups or 375g of cake flour.³Different size baking pans
- 13×9″ pan: This recipe makes enough for one 13×9″ baking pan. Readers have reported the approximate bake time is 30 minutes.
- Two 9″ pans: Readers have reported this cake takes approximately 25 minutes to bake in 9″ pans.
- Bundt pan: Readers have reported this cake takes approximately 40-45 minutes to bake in a bundt pan
Vanilla Cupcakes:
This recipe will make approximately 24 vanilla cupcakes. Fill cupcake liners no more than 3/4 of the way full. Bake on 350F for 17-18 minutes or until a toothpick inserted in the center comes out with a few moist crumbs or clean.Frosting Options
The chocolate frosting I linked to in the ingredients is my favorite pairing with this cake, but here are some other great options:Storing
Store covered at room temperature for up to 2 days or in an airtight container in the refrigerator for up to 5 days. If refrigerated, it’s best to allow the cake to come to room temperature before serving for best texture and flavor.Freezing
Unfrosted cake layers can be wrapped tightly in plastic wrap and then foil and then frozen for up to 3 months. Thaw (without unwrapping) overnight and then bring to room temperature (still without unwrapping) to retain the best texture. Frosted cake slices can be wrapped individually and frozen and thawed overnight in the refrigeratorVideo note
In the video I mistakenly say to add more buttermilk than is necessary. The written recipe is correct with 1 1/4 cups of buttermilk.Nutrition
Nutrition information is automatically calculated, so should only be used as an approximation.
Like this? Leave a comment below!
This vanilla cake recipe was originally published in January 2019 but has since been updated to include new photos and helpful tips. The recipe remains the same.


Hi Sam,
I followed your directions to a T and both my husband and I do not like the taste of this cake (we are used to the boxed Dunken Hines) and the icing we didn’t like either. My cake and icing look identical to yours, but I guess it’s a matter of taste. Maybe I should have used milk chocolate instead of semi-sweet since that’s the can of frosting we love. We did LOVE your cheesecake, “worst chocolate chip cookies” and your oatmeal cookies, but sorry Sam, I’m just not a fan of this cake recipe. Nonetheless, you did teach me a few tricks on how to get a perfectly shaped cake 😉
I’m so sad to hear this one wasn’t a hit for you, Sharon! 🙁
Hi! I want to make my son a soccer cake, and I got this 3D ball pan from
Wilton, do you think batter would work well?! Thanks!!
Hi Alexis! I think this cake will work just fine in that mold. 🙂
I make this cake using coconut milk and use a 9×13 pan. I heat the oven to 350 and because my pan is dark reduce to 325 and bake for 30 minutes, delicious
I am so glad you enjoy it so much, Shirley! Thank you for your feedback! 🙂
I used this recipe for my first time ever making cake from scratch and made 24 cupcakes! The flavor is great, but my cupcakes seemed a little dry. I did the fork test at 15 and 16 minutes, and they were still doughy. At 17 minutes the fork came out clean and I took them out. Any tips for next time? Very beginner baker here 🙂
Hi Anna! A fork isn’t always the best option for testing the doneness of a cupcake, I always prefer a toothpick. The cupcakes could also come out dry due to over-mixing the batter. I hope this helps. 🙂
If its only a little doughy, you can take it out. Heat that remains will cook it the rest of the way through! If it is very doughy leave it in. Make sure to level out all dry ingredients as the dry ingredients are what makes it dry. Another tip is to tell between moist and dry, as it can be confusing.
Hi – i’d like to use this recipe to make an 11×15 sheet cake. It seems like a could do 1.5x the recipe ingredients for this. could you suggest an approximate cooking time?
Hi Sabrina! Unfortunately I haven’t tried it so I can’t really give a very good guess. 🙁 If you do try it I would love to know how long it takes so I can pass the information on to anyone else who asks. 🙂
hi, i was wondering if i can half this recipe and bake it into an 8′ pan. also, is this cake good to make cake pops?
Hi Alaina! If you cut this in half, yes, it will fill one 8 inch pan. I haven’t tried it for cake pops but I don’t see any reason it wouldn’t work. 🙂
Hi,
I made this recipe and I loved the taste! It did come out a bit dense and a little dry though. I should have watched your video first, because I think I over mixed the eggs, oil and butter. They were much whiter than I saw in your video. I also used the mixer to incorporate the buttermilk and flour mixture. Should the batter be a little lumpy or smooth?
O no! I’m so sorry this happened, Scarlett! In the future I would definitely recommend mixing the flour and buttermilk together by hand. Some lumps are ok in this step. You can see what the batter looks like in the video. I hope it goes better next time. 🙂
Hi I made a 6 inch cake-3 layers with this recipe. It was absolutely amazing! My only issue is it’s little crumbly as I made a semi naked cake with it. The crumbs kept coming out as I tried to crumb coat it even when it was cold.
I’m so glad you enjoyed it so much! I’m not sure I understand though. To make the crumb layer you add a thin layer to catch the crumbs, then you refrigerate to stiffen up the frosting a little bit, then you can add the outer layer of frosting without getting crumbs in it. I hope this helps. 🙂
Can it be made in a 9 x 13? I always make layer cakes but I want a sheet cake.
Hi Debbie! This works great in a 9 x 13. Others have reported about 30 minutes to bake. 🙂
Dryer than the Sahara! I don’t think anything went sideways- I followed the instructions to the T.
I even made my own buttermilk. All ingredients were at room temp.
When finished, at 30 min, my two 8” rounds were bricks and the crumb was like sandpaper when cut. It was awful. And there was a bite of salt twinge in vey bite. I measure everything, exactly.
This was a terrible outcome. Dry, dry, dry. I threw it out. Looking for another recipe.
Hi Dessy! Did you accidentally use baking soda instead of baking powder, by chance? Something definitely went wrong here 🙁
Wow. I was debating saving myself time and ordering a cake for my son’s birthday but that was honestly the best cake ever. The trick is to absolutely not over stir. I have made it before and got lazy and it came out dense. Not this time. Incredible.
I am so glad you enjoyed it so much, Caitlin! 🙂
I was wondering before making this recipe if it would be better using cake flour instead of all purpose flour. Thanks!
Hi Leo! You can use cake flour if you’d like but this cake was specifically written to use all-purpose flour. It’s a great cake. 🙂
Could this recipe be used for cupcakes? It sounds really good
Hi Brigette! Yes! Fill liners 2/3 full and bake on 350F (175C) for 17-18 minutes. Enjoy 🙂
Thanks so much!
I wanted to make this for my sons 16th birthday. But instead I wanted to make a 3 or 4 layered 6 in round cake. Do you think I should adjust the recipe for this or just shorten bake time and have slightly thinner layers?
This recipe as is will give you enough for 3 6 inch layers with maybe a tiny bit leftover. If you wanted 4 you might want to make the layers just a bit thinner. I’m not sure what the bake time will be, just be sure to keep an eye on them. Good luck! 🙂
Made this last night as Pittsburgh is freezing !!
WE LOVE IT.
Followed recipe exactly as written.
Texture is almost like a pound cake (to me) thick but melts in your mouth.
Didn’t have ingredients for icing but it really didn’t matter.
This is a perfect cake for icing.
Great recipe.
I am so glad everyone enjoyed it so much, Teresa! Stay warm! 🙂
Hi, My batter is lumpy when I mix by hand. I am afraid to over-mix though so I just leave it! Is that normal? All ingredients are room temp and I sift my dry ingredients.
Hi, Iver! You should be fine. Keep me posted on how it turns out. 🙂
Hi, I noticed during the video that you only greased the sides of the 2 pans. And not the bottoms….should the bottoms be greased if I am using parchment paper? Also – should the parchment paper itself be greased?
Also, can I add sprinkles to the cake like your Birthday Cake? If so, what amount of sprinkles?
Hi Susan! If you are using a parchment paper round there really isn’t any need to grease the bottom. The parchment paper won’t stick so you don’t need to grease that either. You could certainly stir in some sprinkles. This is really a matter of preference. I would think about 1/3 cup would be good. I would stay away from nonpareils as they will bleed in your batter. 🙂
hi! I’ve noticed that you used two 8in pans, does that mean that this recipe calls for 2 cakes? If I am interested in baking only one cake, would I need to measure out half of the amount listed above? thank you!
Hi Jessica! This recipe makes 2 8 inch layers. If you would only like 1 8 inch round cake you will want to cut the recipe in half. 🙂
Hello. This recipe looks delicious! I want to try it for my son’s birthday. Can you use cake flour instead of AP flour? Would the amount in the recipe need adjusted?
Hi Meredith! You can use cake flour. If using weights the amounts are the same. If using cups you need 1c + 2 TBSP of cake flour for every cup of flour, so total you would need 3c + 6TBSP of cake flour.
I followed the recipe exactly and Tried the recipe twice cake came out first time it looked perfect the toothpick came out clean to both cakes so I set them to cool the middle of the cake sank and was undercooked but it was perfectly fine whilst in the oven… The second time it was exactly the same, It was also a very dense and dry cake and it wasn’t even overmixed It was a decent cake but it wasn’t moist or fluffy what so ever
Hi Addison! I’m so sorry this happened. I’m not sure what you mean by the cakes being done while in the oven then undercooked when removed from the oven. You want your toothpicks to come out with a few moist crumbs so they finish baking in the pan while cooling, otherwise you run the risk of them over-cooking and that would cause the dense dry cake. 🙁 I hope it goes better next time.
Thank you so much for the advice ill try that next time 🙂
Addison, my cake did the same exact thing. It passed the toothpick test without doubt but after being out of the oven for just a few minutes, the center sank in and was raw cake dough when I took a knife and cut into the center. I’ve been baking for 50+ years and I’ve never had a cake do that.
Hmmm I’m really confused as to what could be happening here. Sinking is typically caused by either over-mixing the cake or over-baking the cake, but if it’s raw then it wasn’t over-baked. Is your oven temperature accurate? Silly question, but are you testing the cake in the center and getting all the way to the bottom of the pan with your toothpick?