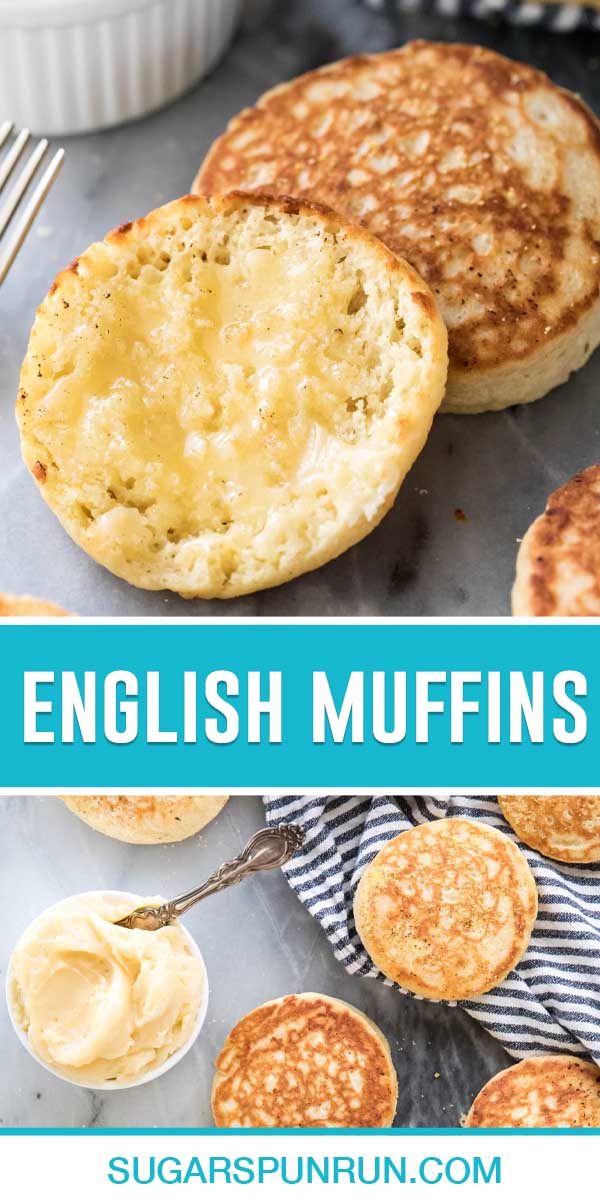
My English muffins recipe totally delivers when it comes to getting those perfect nooks and crannies (no kneading and no special tools required)! This recipe is simple and quick to make (for a yeast dough, anyway!), and is a perfect easy breakfast option! Recipe includes a how-to video!
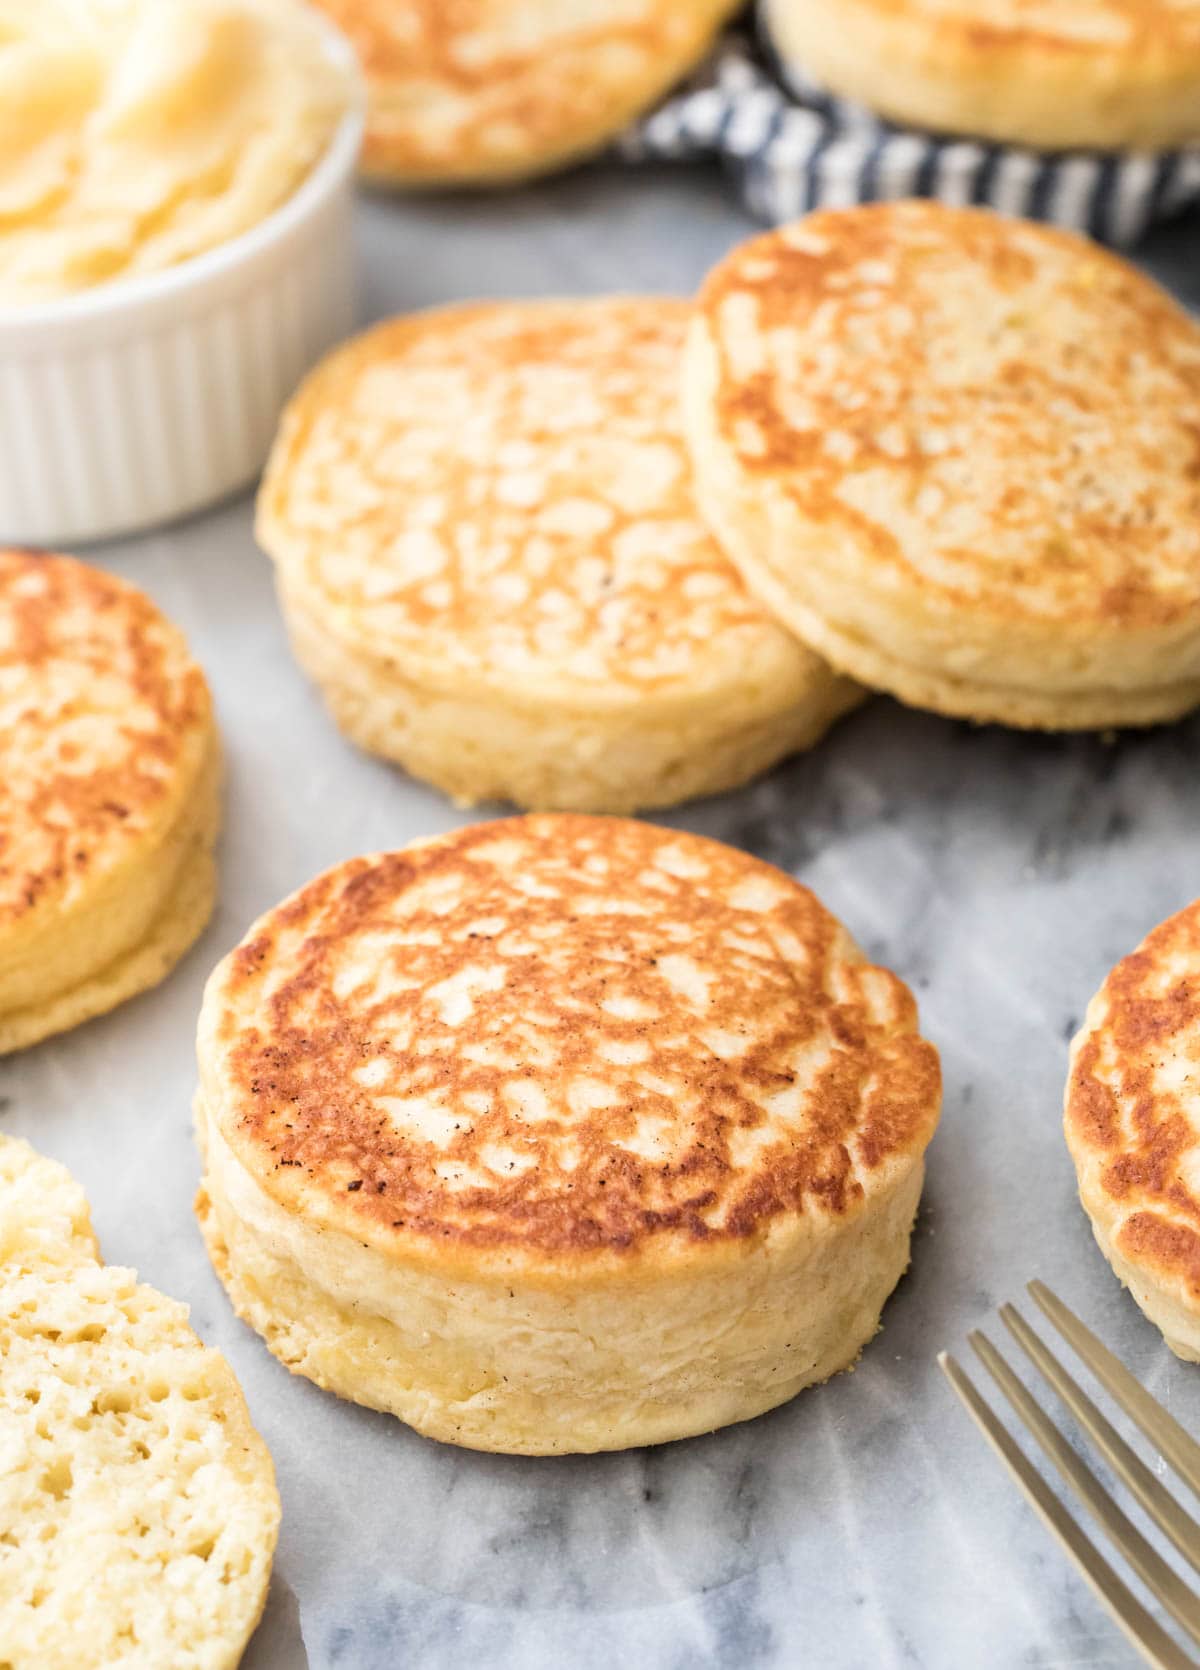
Nooks & Crannies Galore
Many English muffin recipes are nothing more than basic bread recipes shaped into discs and cooked on a griddle. This method “works”, but the end result falls flat with no nooks, no crannies, and a very bread-y flavor that just doesn’t ring true to the classic English muffin. My recipe is different.
While my homemade bread was a good starting point, there were a few drastic and key changes that needed to be made in order to make true English muffins. It took quite a bit of troubleshooting, but to say I’m happy with the way these ultimately turned out is an understatement, I’m downright thrilled and I can’t wait for you to try them.
They’re so easy (no mixer, no kneading!), so quick (5 minutes to stir together and just 30 minutes of resting, no overnight proofing!) and they taste like the real thing. They are the real deal, and you’ll never go back to store-bought, ever. So what is it that makes my recipe so darn good?
English Muffin Dough, Perfected
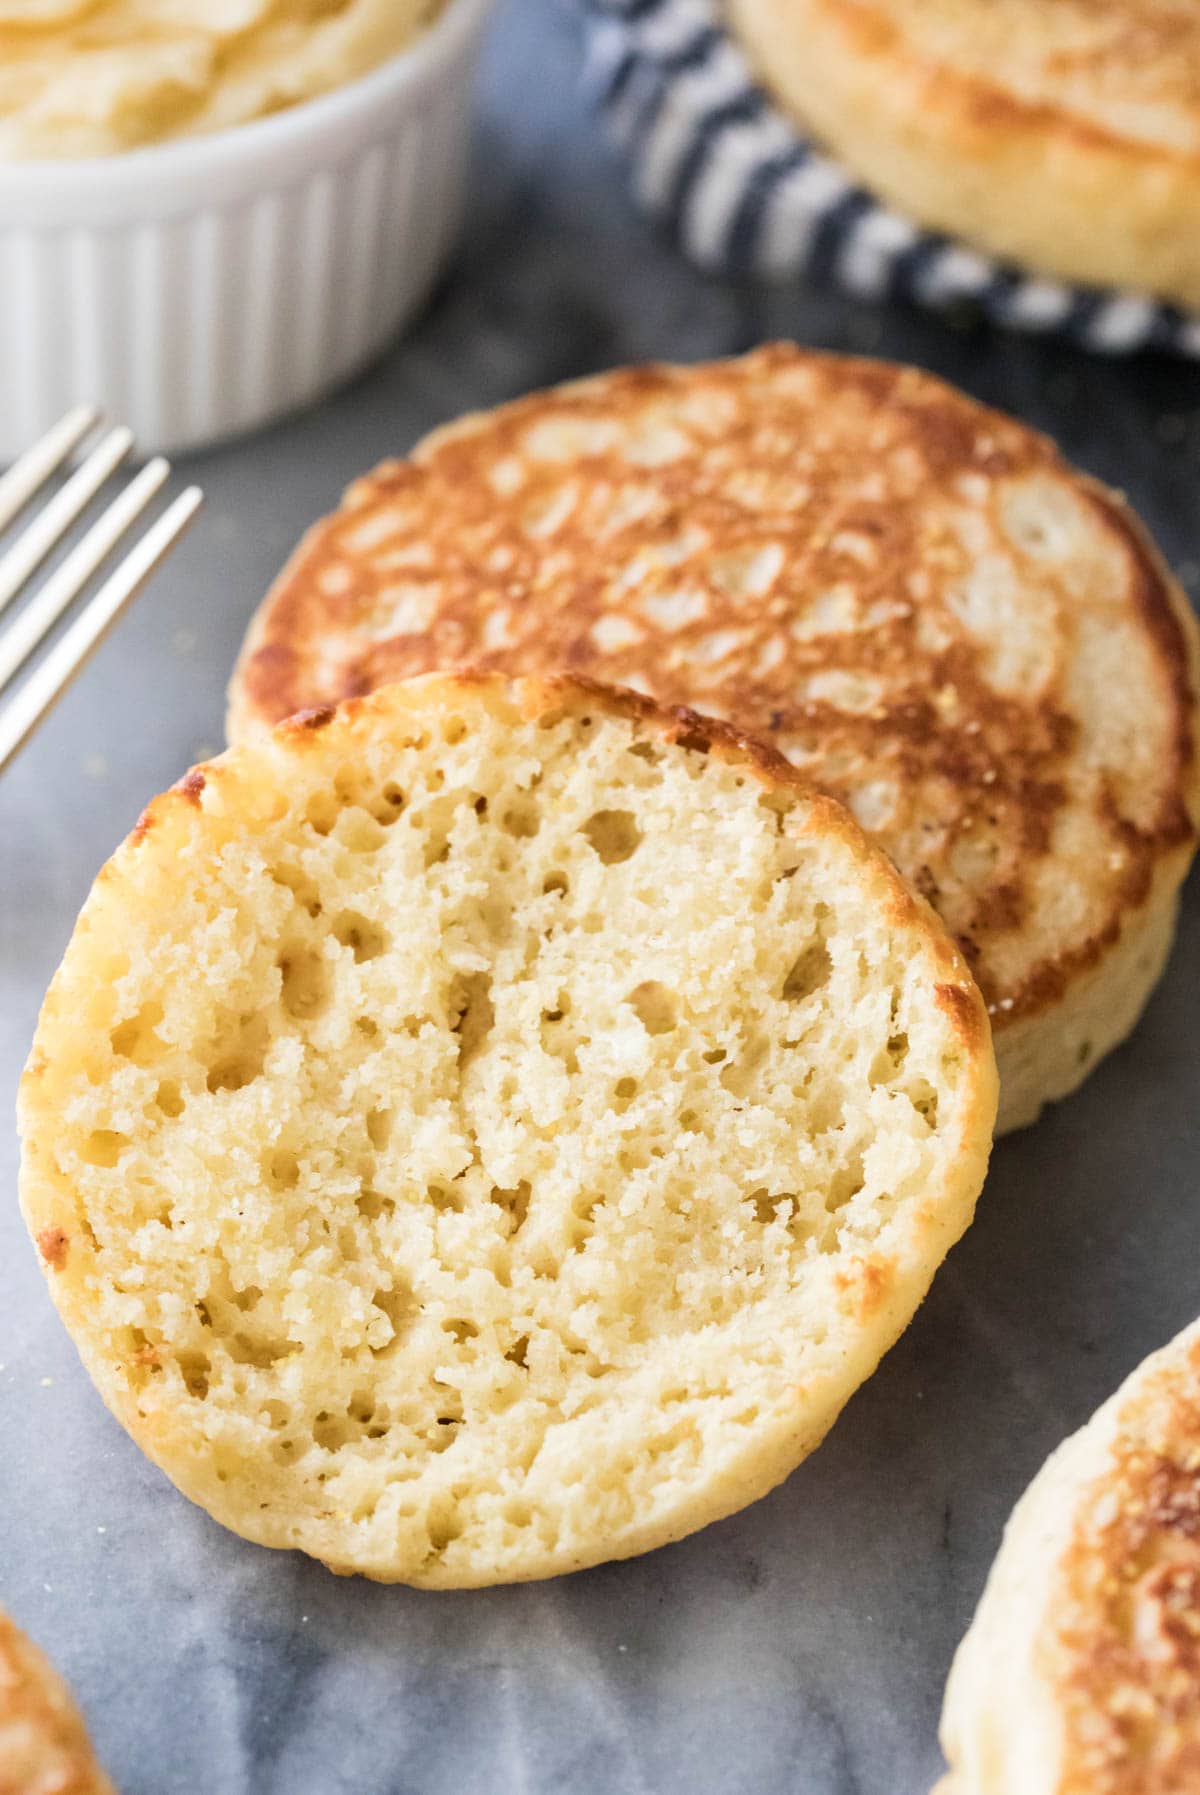
The difference is all in the dough. While most yeast doughs (like sweet bread or pizza dough) are made with a dense, elastic dough that you can knead and shape, English muffins require a very different sort of dough. In fact, it’s more of a batter, and it’s incredibly simple to make with absolutely no kneading required (and only a brief 30 minute rise/rest)!
This is a very (almost shockingly) thin dough, at least where yeast doughs are concerned. The flour has been drastically reduced, but this is for two very important reasons.
First, reducing the flour creates a loose and sticky batter (as opposed to a firm, dense one). This matters, because as the dough cooks on your stovetop, tiny air pockets form and tunnel through the dough (which couldn’t happen if you had a more classic, dense dough). These become your nooks and crannies.
Because of its structure, my English muffin dough can’t be kneaded, rolled, or shaped, it must be scooped! It’s similar to an elastic pancake or muffin batter, and once you uncover it after its risen you might even panic a bit and think something’s wrong… Don’t panic! Forge onward. Do it for the nooks and crannies.
Second, reducing the flour helps to gives the English muffins their characteristic, subtle savory/sour/tangy flavor. A good recipe must have this flavor (which traditional bread does not). When I reduced the flour trying to achieve nooks and crannies, I was thrilled to find the flavors fostered by the yeast shone a bit more and gave me the distinct, signature taste I was looking for. Perfection (and much less fussy and time consuming than some of the other methods I’d tried, including using buttermilk and letting the dough rise for 18 hours)!
So what do you need for the BEST English muffins?
Ingredients
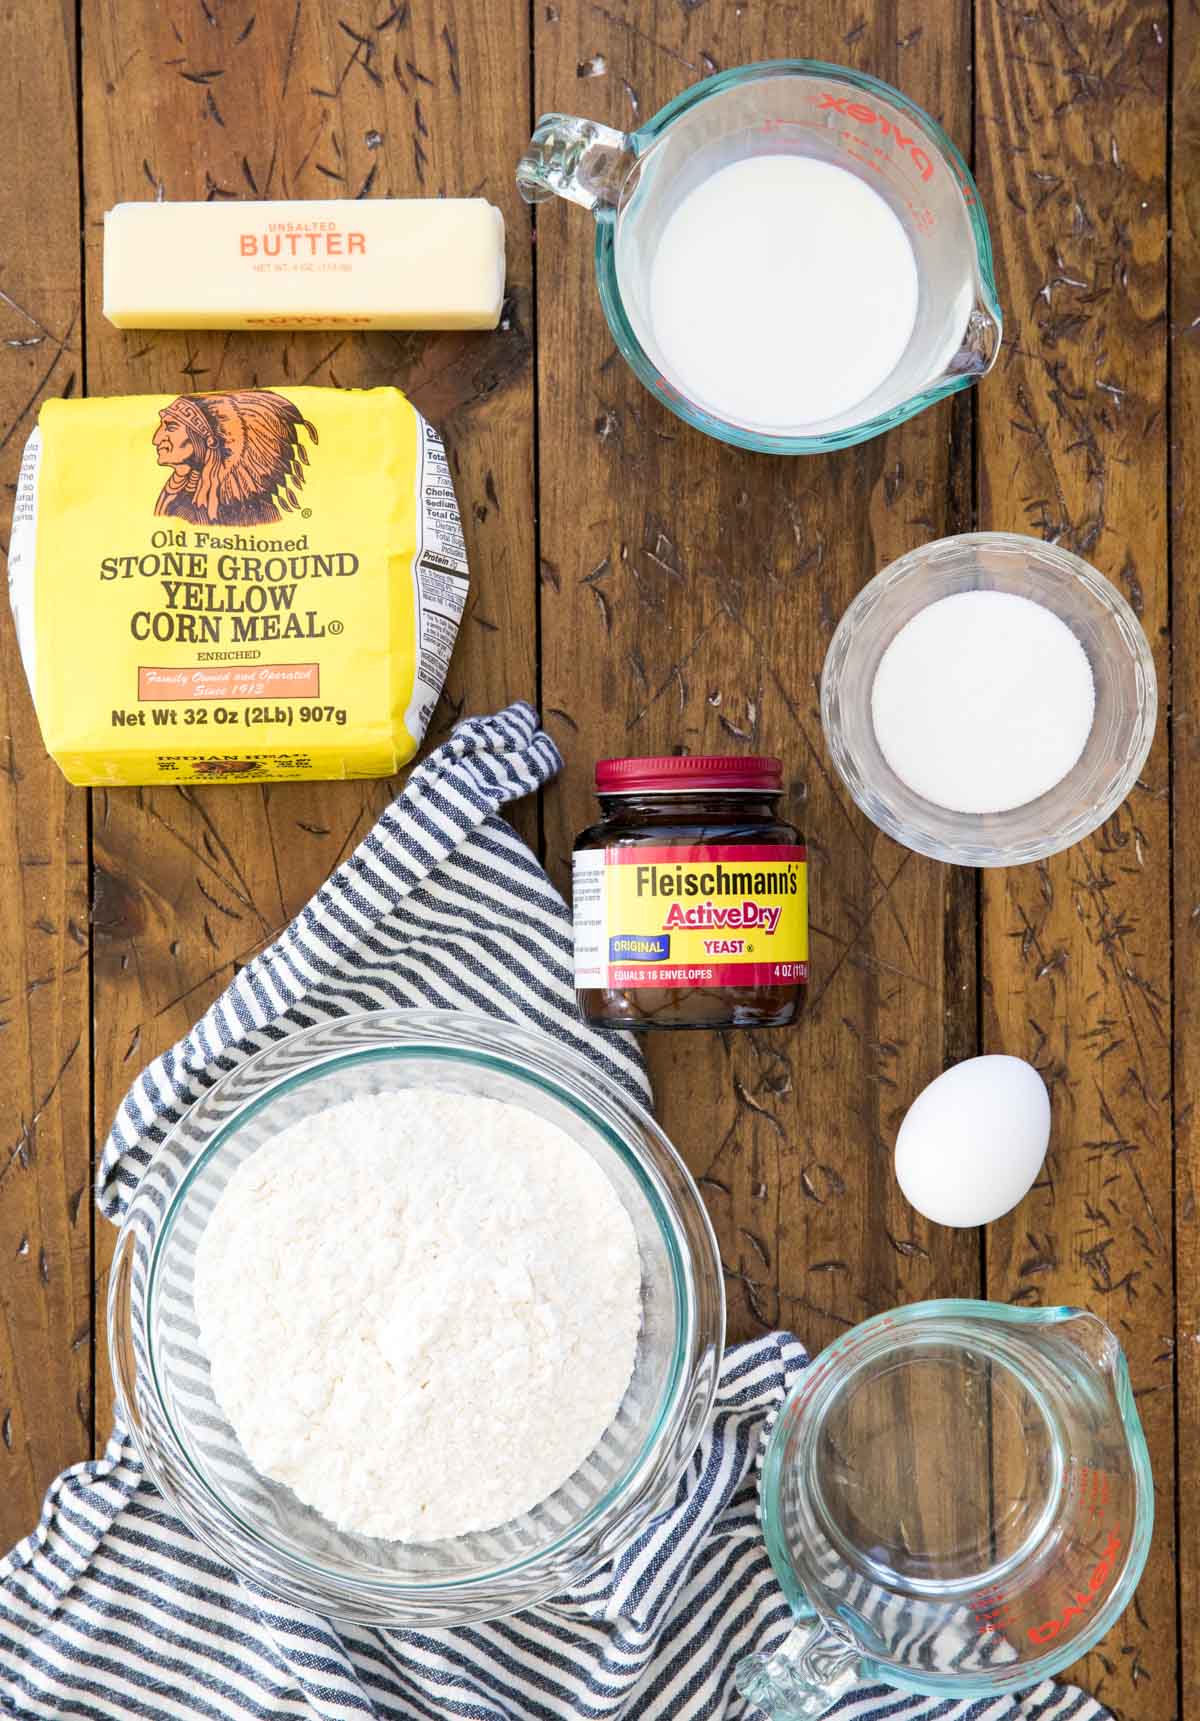
- Milk. A blend of both milk and water gives the English muffins adequate tenderness and flavor without compromising on fluffiness.
- Yeast. The yeast is responsible for both the flavor and light texture of the dough. I use and recommend active dry yeast, but instant (/rapid rise) would work instead (see FAQ section).
- Granulated sugar. Sugar feeds the yeast, adds flavor, and helps to make the muffins turn their classic golden brown color. Don’t worry, the English muffins won’t be sweet!
- Unsalted butter. As with most of my recipes, I opt to use unsalted butter and then add salt. This gives us better control over the final flavor of the English muffins.
- Flour. Either all-purpose or bread flour will work in this recipe. Bread flour will give the muffins a chewier texture that is characteristic of breads, but I often make these with all-purpose flour.
- Cornmeal. This is optional. A light dusting of cornmeal on your baking sheet helps to keep them from sticking to the pan. Since I recommend lining your pan with parchment, this realistically isn’t totally necessary, but since cornmeal has become such a characteristic addition to the muffins, I recommend you include it when making yours for the full effect!
This is just an overview of the ingredients I used and why. For the full recipe please scroll down to the bottom of the post!
How to Make English Muffin Batter
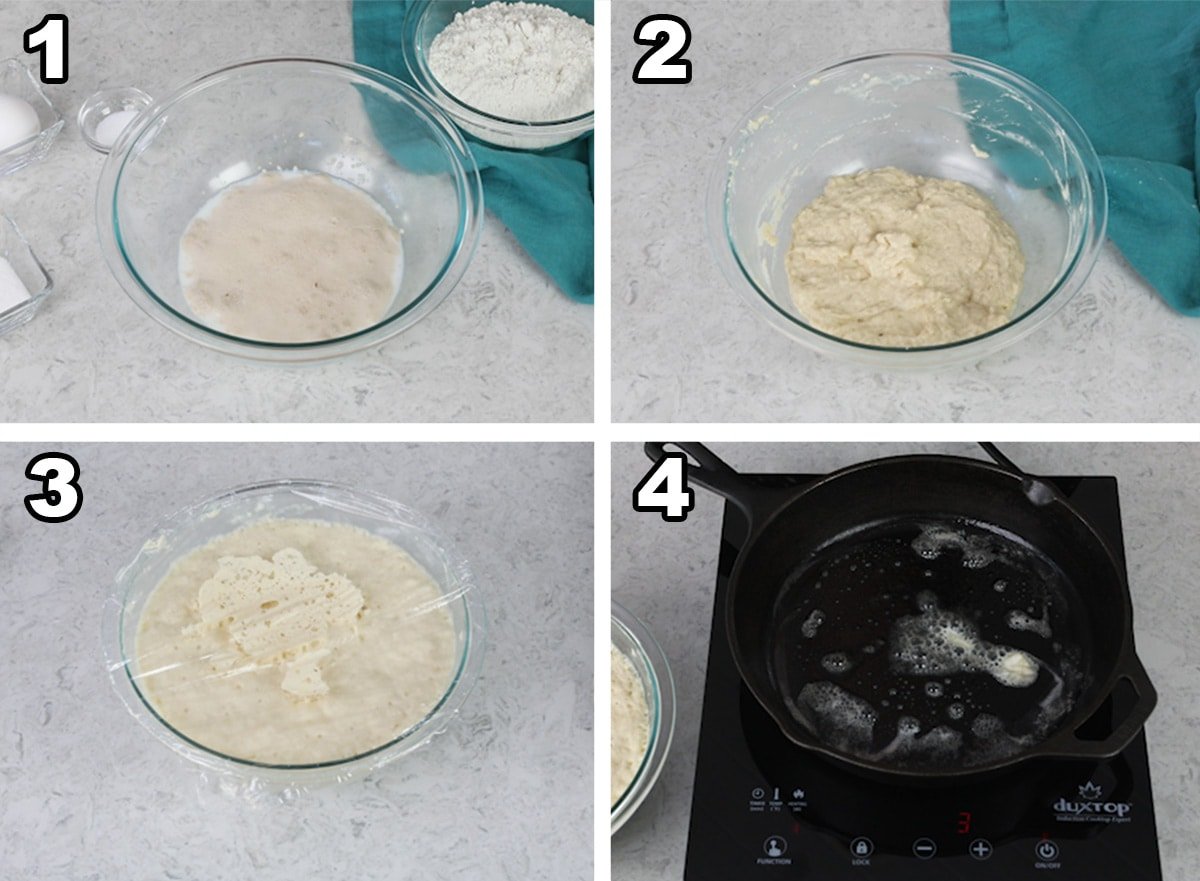
- Combine milk and water in a heatproof dish and warm in the microwave (no hotter than 115F!). Pour this into a large bowl and add the yeast and a pinch of sugar; allow to sit until you have a foamy yeast cap over the liquid (if this doesn’t happen you’ll need to toss out the mixture and start over).
- When your yeast mixture is foamy, add the rest of the sugar and the salt, melted butter, egg, and flour, and stir until combined. Your dough will be wet and sticky, nothing like most yeast doughs you’ve used before (if you’ve made cinnamon rolls, be warned that this is a whole new kind of dough!).
- Cover with plastic wrap and allow to rise in a warm and non-drafty area of your kitchen for 30 minutes. Preheat the oven to 350F once the dough is finished rising (you won’t need this yet, first we’ll head to the stovetop).
- Melt a small bit of butter in a skillet over medium heat. Make sure you do not turn the heat up too high on your stovetop; the nooks and crannies form as the muffins are cooked slowly!
How to Cook English Muffins
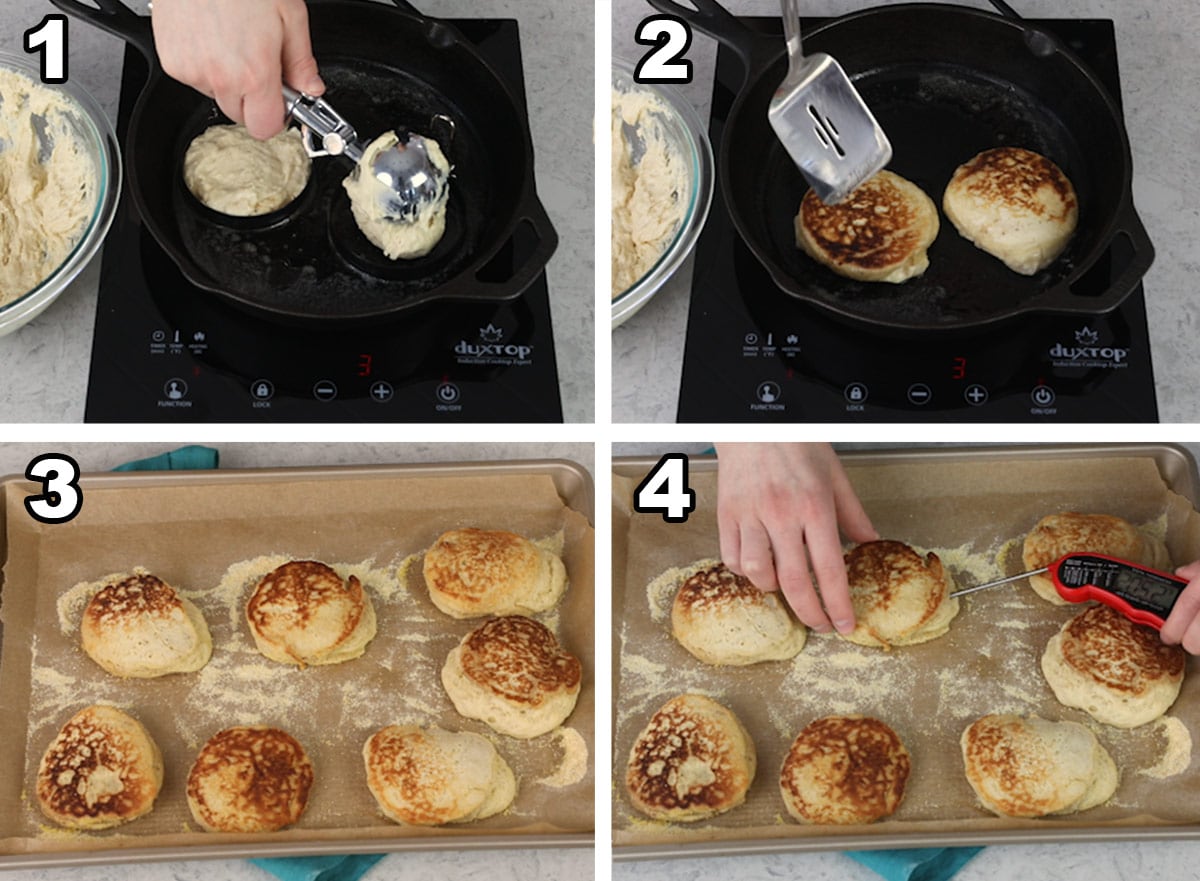
- Once the butter is melted, place your English muffin rings (if using) in the pan and scoop about ⅓ cup of batter. The dough will deflate (don’t punch it or deflate more than you need to to scoop) and will be like a thick, sticky, and very elastic pancake dough… this is normal!
- Cook on each side until golden brown (the exact time will vary greatly depending on the type of pan you are using: nonstick or stainless steel will take much longer than cast iron). Most likely your first muffins will be your test muffins as you test how quickly they turn brown, mine got a little bit too dark in the photo above, it’s life but whoops!
- Once golden brown on both sides, place the English muffins on a cornmeal-dusted baking. Repeat steps 1 and 2 until you’ve used all of your batter (you’ll get 7-8 muffins out of this recipe).
- Bake for 10-15 minutes, or until the internal temperature of the English muffins is 205F or muffins are cooked through. A thermometer is the most surefire way to sensure they’re cooked properly!
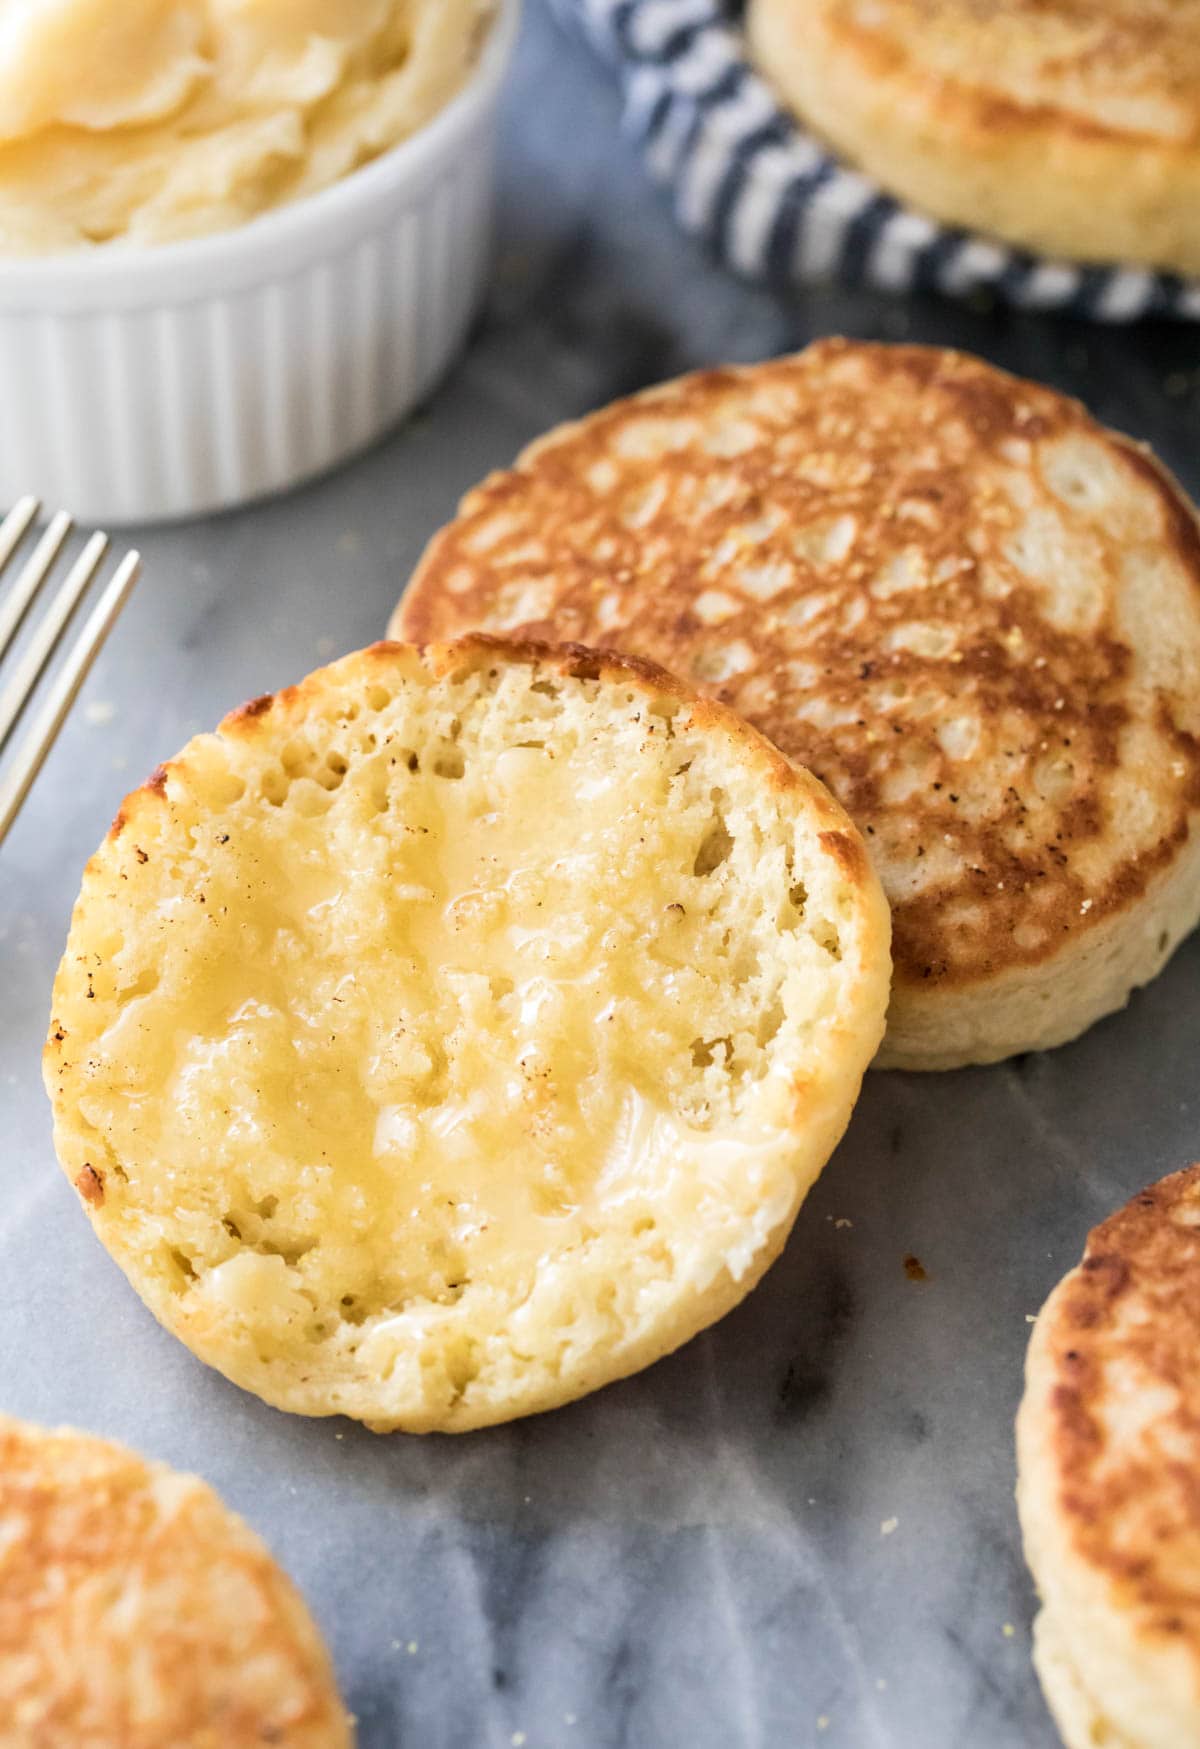
SAM’S Tip: Never use a knife to split your English muffins! Always use the tines of a fork, piercing all around the sides of the muffin in a line until split in two. Cutting with a knife can actually ruin/hide the nooks and crannies!
Frequently Asked Questions
I prefer the results from using active dry, but yes you can. You won’t need to proof the yeast if using instant, just combine it with your flour, sugar, and salt, and then stir in the warmed water/milk. Next stir in melted butter and eggs and then proceed with the recipe as instructed.
It’s not impossible to make these entirely on the stovetop, but because of the density of the dough it is difficult to do properly. Often you end up with a scorched exterior and a gooey center.
For this reason I found that a hybrid method of half skillet/half oven worked best, so this is what I recommend. It ensures the nooks and crannies have time to form and then finishes the interiors in the oven, resulting in a perfectly cooked, golden brown, and fluffy English muffin every time.
Absolutely not! While rings will help keep the English muffins round and can also help them to grow a bit taller, they are not necessary. If not using rings, simply try your best to portion the batter into a circle when dropping it on the pan. Just remember, even if they look a little wonky, they’ll still taste delicious!
Note that this dough is not handled very much before or after rising and there is no kneading necessary. Over-working the dough can work air pockets out of it. Don’t do this, you need those air pockets to make your nooks and crannies!
The nooks and crannies develop even further on the stovetop, make sure you cook on a lower heat (medium/low) so they have time to tunnel through the dough and develop properly. If the dough isn’t cooked long enough on the skillet before being transferred to the oven, the nooks and crannies may not have time to develop properly.
It can be tricky to find just the right heat on your skillet and the first muffin usually serves as a test, you can even see in my video I almost ruined my first two muffins because I was using a hot plate that I’m not as familiar with instead of my typical stovetop… I was kicking myself for losing all those extra nooks and crannies!
Lastly, if you cut your English muffin in two using a knife, you may not see the nooks & crannies. Always use a fork!
When stored at room temperature in an airtight container these will be good for up to 5 days.
Yes! Store in an airtight container (a plastic bag will work), they will keep for up to 3 months in the freezer.
More Recipes You Might Like
Enjoy!
These nook and cranny-filled muffins are not just for breakfast! Trying covering them with a simple strawberry sauce for a snack or dessert, or make mini-pizzas by topping them with homemade pizza sauce and cheese!
Let’s bake together! Make sure to check out the how-to VIDEO in the recipe card!
English Muffins Recipe
Ingredients
- ½ cup (118 ml) water
- ½ cup (118 ml) milk
- 2 ½ teaspoons active dry yeast (see FAQ section above to substitute instant yeast)
- 2 Tablespoons (25 g) granulated sugar
- ¾ teaspoon salt
- 3 Tablespoons unsalted butter melted
- 1 large egg lightly beaten, room temperature preferred
- 2 cups (250 g) all-purpose or bread flour
For Cooking
- 3 Tablespoons unsalted butter
- 2 Tablespoons cornmeal optional, but recommended
Recommended Equipment
Instructions
- Combine water and milk in a heat-proof dish (I use my Pyrex measuring cup) and heat until temperature is between 105-115F (40-46C) (make sure to stir before checking the temperature).½ cup (118 ml) water, ½ cup (118 ml) milk
- Pour into a large mixing bowl and add yeast and a teaspoon of your sugar. Stir and let sit until foamy, approximately 5-10 minutes.2 ½ teaspoons active dry yeast, 2 Tablespoons (25 g) granulated sugar
- Once yeast is foamy, add remaining sugar, salt, melted butter, egg, and flour. Stir until completely combined (but don't over-mix).¾ teaspoon salt, 3 Tablespoons unsalted butter, 1 large egg, 2 cups (250 g) all-purpose or bread flour
- Cover and place in a warm, draft-free place to rise for 30 minutes.
- Once dough has risen, preheat oven to 350F (175C) and dust a parchment paper lined baking sheet with the cornmeal (if using). Set aside.2 Tablespoons cornmeal
- Meanwhile, Place a skillet over medium/low heat and melt ½ Tablespoon of butter.3 Tablespoons unsalted butter
- Once butter is melted and skillet is warm (you should feel heat radiating off of it if you hold your hand several inches from the surface), place two English muffin rings on the pan (if using) and portion approximately ⅓ cup of the batter into the center of the ring (batter will deflate and be similar to a sticky pancake batter). Use the back of a spoon to nudge the batter gently towards the edges of the ring so it is evenly distributed (if not using a ring, use the back of a spoon to try and gently shape the dough into a circle-ish shape).
- Cook until golden brown (about 60 seconds but this will can vary drastically depending on your stove and the type of pan you use) then remove the ring and carefully flip. Cook until golden brown on the other side and then remove to cornmeal-dusted baking sheet.
- Use a paper towel to (carefully) wipe the pan clean and then repeat steps above (starting by melting ½ Tablespoon butter) until you have cooked all of your batter, spacing English muffins at least 2” apart.
- Transfer baking sheet to oven and cook 10-15 minutes or until internal temperature reaches 205F (96C). Allow to cool then use the tines of a fork (don’t use a knife) to split open each muffin. Enjoy!
Notes
Storing
Store English muffins in an airtight container at room temperature for 3-5 days. They may also be frozen for 3 months or so (in an airtight container).Nutrition
Nutritional information is based on third-party calculations and should be considered an estimate only. Actual nutritional content will vary based upon brands used, measuring methods, cooking method, portion sizes, and more.



Becca
Infinitely better than store-bought muffins, and easier to make than I thought! Thanks, Sam.
Sam
I’m so glad you enjoyed them, Becca! 🙂
Laura Simmons
Wow! These are yummy! First time I made them, and they’re a hit- and so easy! Question: could you double this recipe?
Sam
I’m so glad you enjoyed them so much, Laura! You shouldn’t have any issues doubling this. 🙂
Megan
I make this recipe over and over again! These turn out delicious every time. So yummy!
Sam
I’m so glad you enjoyed them so much, Megan! 🙂
Matt
I think they taste great but they are more like biscuits than English muffins.
Donna
Very easy with good results.
Sam
I’m so glad you enjoyed them so much, Donna! 🙂
Kathleen
I love them English muffins. I made them with my gluten-free flour blend (60% starch/40% gluten free grains) I added 1 1/4 tsp xanthan gum to flour, too. they turned out perfect Thank you.
Sam
I’m so glad you enjoyed them so much, Kathleen! Thank you so much for the feedback using your substitutes. 🙂
Sarah
I made these today with dairy free milk/butter and they were amazing!
Sam
I’m so glad you enjoyed them so much, Sarah! Thank you for the feedback using your substitutes. 🙂
Rosanna T Oxhorn
Made these muffins and have decided this recipe is a “keeper.” Besides finding these muffins to be delicious, I like being able to control the size. Store bought are too small for making breakfast egg sandwiches. However, I do have a question. Can the batter be refrigerated over night and if so, will that change the flavor and texture?
Sam
Hi Rosanna! Instead of letting it rise for 30 minutes I would probably cover it and refrigerate it at that point. I haven’t tried it so I can’t say for sure how it would turn out. If you do try it, I would love to know how it goes. 🙂
Sandra Bartram
I mix my English muffins and cover and put in the refrigerator before I go to work. That evening I set it out when I get home and about 2 hours later I proceed with the recipe. It works great!
Jermaine
I’m about to make this recipe but noticed it calls for 2 cups of flour and also shows weight measurement at 250 g.
I always weigh my flour and one cup of flour converts to 120 g… Sometimes a difference of 10 g can be huge in the texture of the end product.
Is this a typo?
Thank you!
Sam
Hi Jermaine! 125 grams is a standard measurement for a cup of all-purpose or bread flour for me. All weight measurements listed are what I use myself in all of my recipes (I don’t convert the amounts, they are how I personally test and make my recipes) so here you are always safe to use the weights listed as they’ve been tested. I hope that helps, and I hope that you love the English muffins!
Debbie G
I made the recipe exactly as is, using cups of flour, spoon and level method.. My ” batter ” was more like a heavy dough and I knew it was too thick but went through the process anyway. I also did not have rings, but my dough was so thick I had to spread it, so that wasn’t an issue. Not many nooks and crannies. The edges has a nice little crunch. Still it seems like they are too ” heavy “.
I like the process alot, so will try this again, maybe weighing the flour this time, or reducing it. I don’t have any altitude or special environmental situations to deal with. I do believe that 120 grams per cup is correct. Mine could have used a little more tang, but overall great flavor. My husband loved them for breakfast sandwiches just as they are anyway.
JC
Hi Sam! Experienced baker here. Made several of your recipes over the years. Stumbled across you yet again while searching for a quality base recipe of a proper English Muffin, and let me tell you, you’ve got one! I never stop until I “perfect” whatever I’m trying to make and you have got a huge hit here. It was a couple years ago when I was trying various ones out, and let me tell you none matched yours in terms of taste and texture, and especially those beautiful nooks and crannies. I didn’t find any that really approached them, honestly. I’ve been making them again lately and remembered I never commented. Love your site, these are divine.
Sam
Thank you so much! I’m so glad you enjoyed them so much! I appreciate you taking the time to leave a comment. 🙂