
Homemade Marshmallows
This post may contain affiliate links. As an Amazon Associate I earn from qualifying purchases. Please read my disclosure policy.
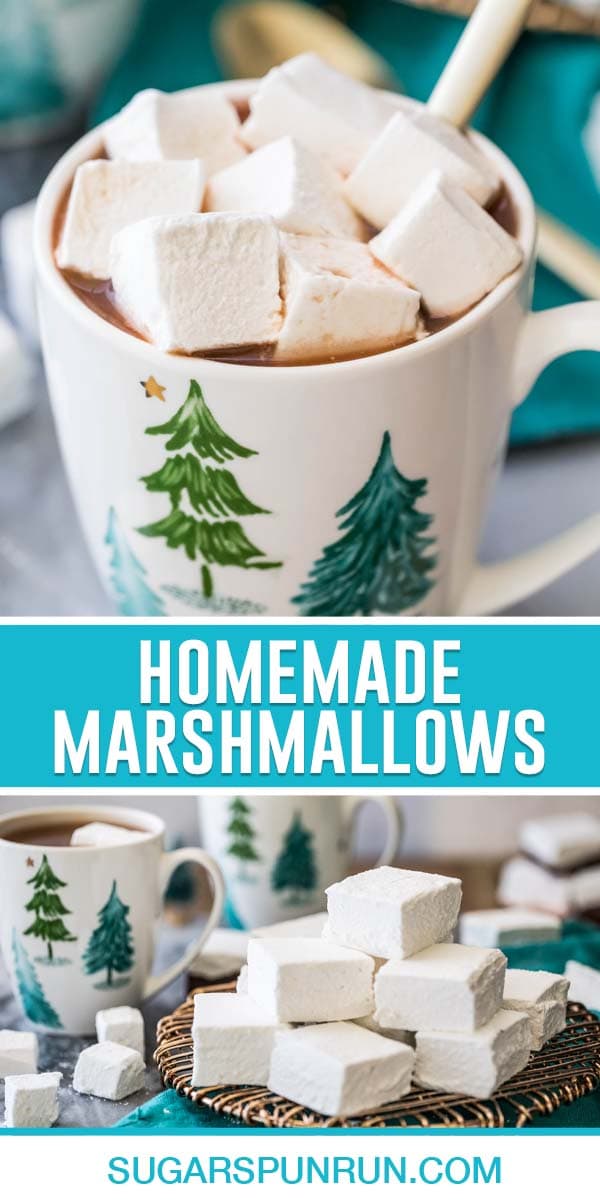
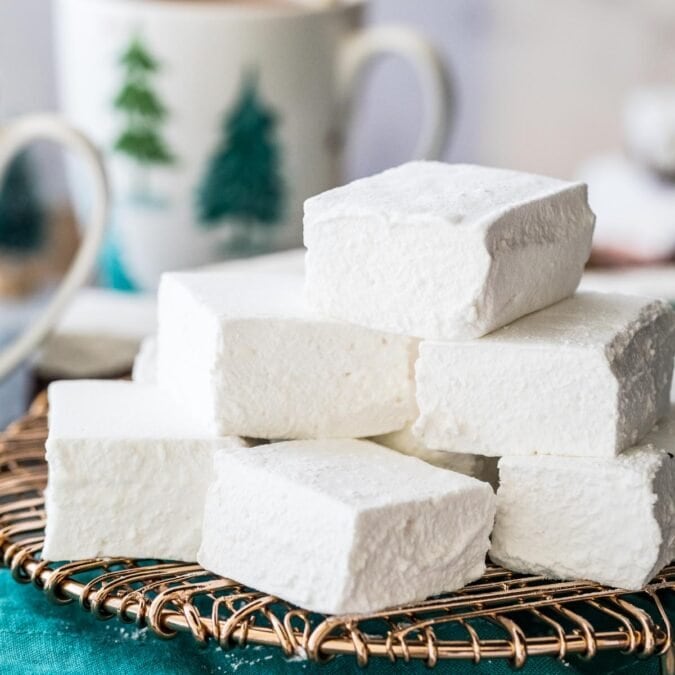
With a light vanilla flavor and a springy, squishy texture, these Homemade Marshmallows will make you forget that the store-bought version even exists. Recipe includes a how-to video!

Are Homemade Marshmallows Worth It? 100% Yes!
These springy-sticky-squishy, light and airy homemade marshmallows are going to be your new favorite treat. Yes, they do require a candy thermometer and a few hours to set up, but we forgive them for it because they’re just that good!
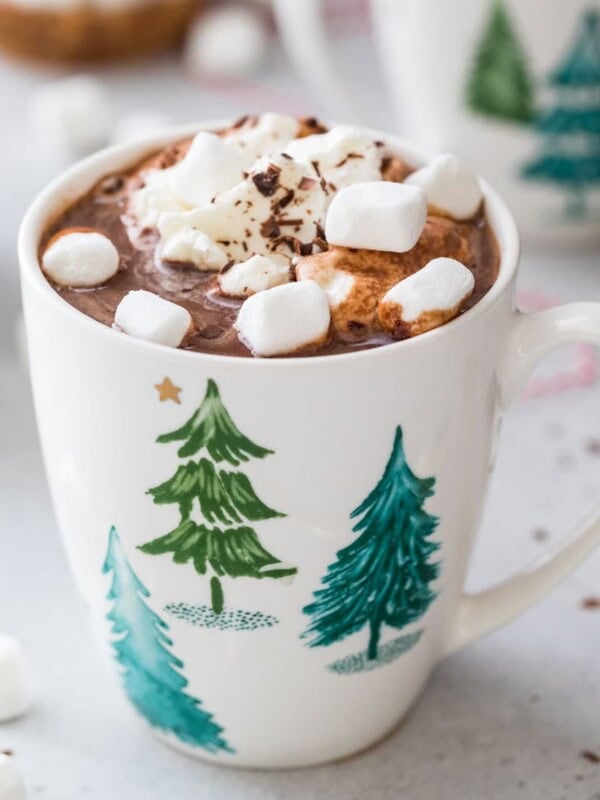
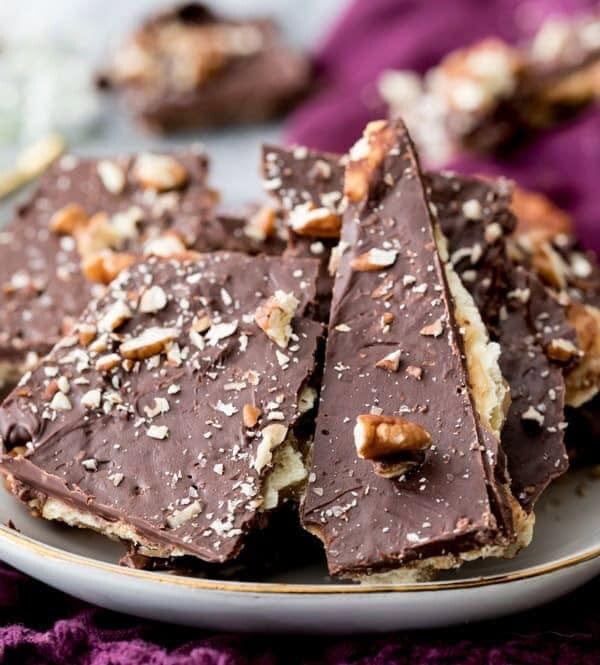
These marshmallows have a gorgeous vanilla flavor that reminds me of my meringue cookies, and they are equally delicious in a s’more or mug of hot chocolate as they are by themselves. Sometimes I even like to cloak mine in chocolate before enjoying.
While making homemade marshmallows is admittedly more time consuming than just buying a bag from the store, they truly put the store-bought version to shame. Far better in both texture and flavor, homemade marshmallows are 100% worth the effort and time it takes to make them–I promise! Plus, they’re not at all difficult to make (your mixer will do most of the work!) and the ingredients are super simple. Here’s what you need!
What You Need

With only eight ingredients (nine if you count water), my homemade marshmallows are so simple. Here are the stars of today’s recipe:
- Gelatin. These homemade marshmallows use gelatin for stability and structure, much like my stabilized whipped cream frosting. You’ll need three packets for today’s recipe. As far as a substitute goes, while you can sometimes substitute cream of tartar to stabilize whipped cream, I unfortunately don’t have a substitute for the gelatin in this recipe.
- Light corn syrup. This is not the same as high fructose corn syrup! If you’re still concerned about using it, glucose syrup could be substituted, but an invert sugar like corn syrup is really necessary to give the marshmallows their proper texture and keep the sugars from crystalizing.
- Granulated sugar. We’ll be boiling this with the corn syrup until it reaches 242F, so you’ll be using your candy thermometer today.
- Water. You’ll need ice water for the gelatin mixture, but you can use any temperature water for the syrup.
- Vanilla extract. I use vanilla for a classic marshmallow taste, but you can always switch up the flavor. Coconut, strawberry, or peppermint (a very tiny amount) would all taste great! Let me know in the comments if you try any other flavors.
- Cornstarch and powdered sugar. This makes up the dusting mixture, which we’ll be sifting over the top of the marshmallows while they set and rolling them in after they’ve been cut.
- Vegetable shortening or oil. Since homemade marshmallows are mostly sugar and corn syrup, they’re very sticky! You can use either vegetable shortening or oil to grease your pan and spatula to prevent the mixture from sticking.
SAM’S TIP: While you could opt to use all powdered sugar for the dusting powder, it will make the marshmallows stickier, messier, and even sweeter than they already are. A blend of powdered sugar and cornstarch keeps the marshmallows from sticking to each other, gives them a manageable exterior (even where they’re sticky from being cut), and tastes similar to what you’ll find on a store-bought marshmallow.
Remember, this is just an overview of the ingredients I used and why. For the full recipe please scroll down to the bottom of the post!
How to Make Homemade Marshmallows
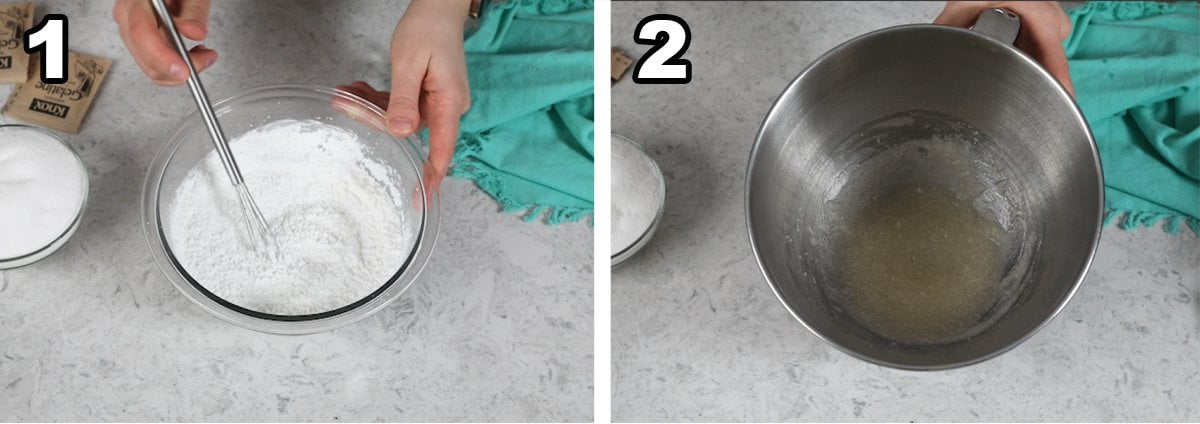
- Grease your pan and spatula, then set both aside. Whisk together your powdered sugar and cornstarch to make your dusting powder, and set that aside too.
- Combine the ice water and gelatin in the bowl of a stand mixer fitted with a whisk attachment.
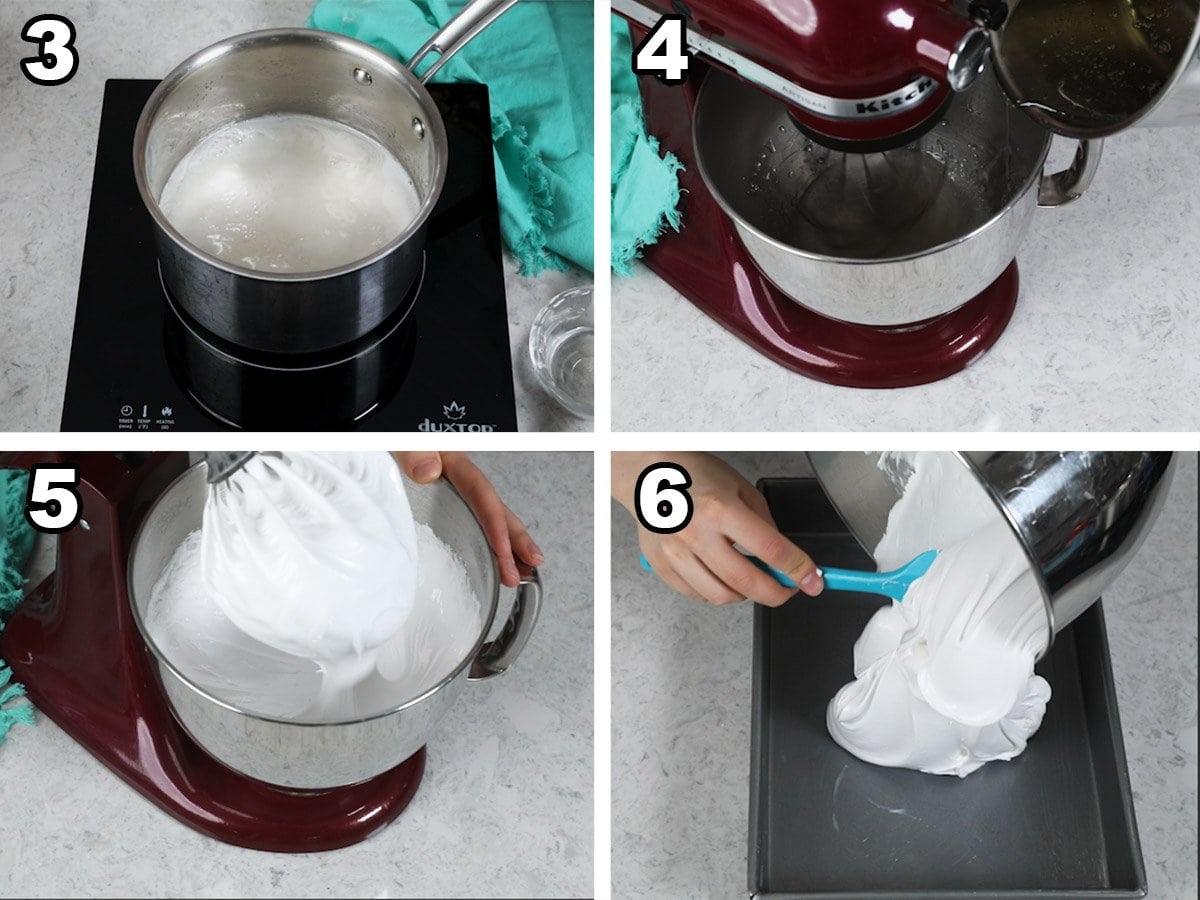
- In a medium pot, stir together the granulated sugar, corn syrup, water, and salt. Turn the stove to medium heat and stir frequently until the sugar is dissolved. When the mixture comes to a boil, attach your candy thermometer and keep cooking (do not stir!) until the mixture reaches 242F.
- Remove the syrup from the heat. Turn your stand mixer to low speed and carefully begin drizzling the syrup into the gelatin mixture.
- Once all of the syrup has been added, increase the mixer speed to high and beat until the mixture is fluffy, glossy, and thick–about 10 minutes. Add the vanilla and stir until fully incorporated.
- Pour your marshmallow into your prepared pan and use a spatula to smooth the top. Sift a few tablespoons of the dusting powder over the top, and put the rest in a bowl for later. Let the marshmallows sit for 4-6 hours, until firm.
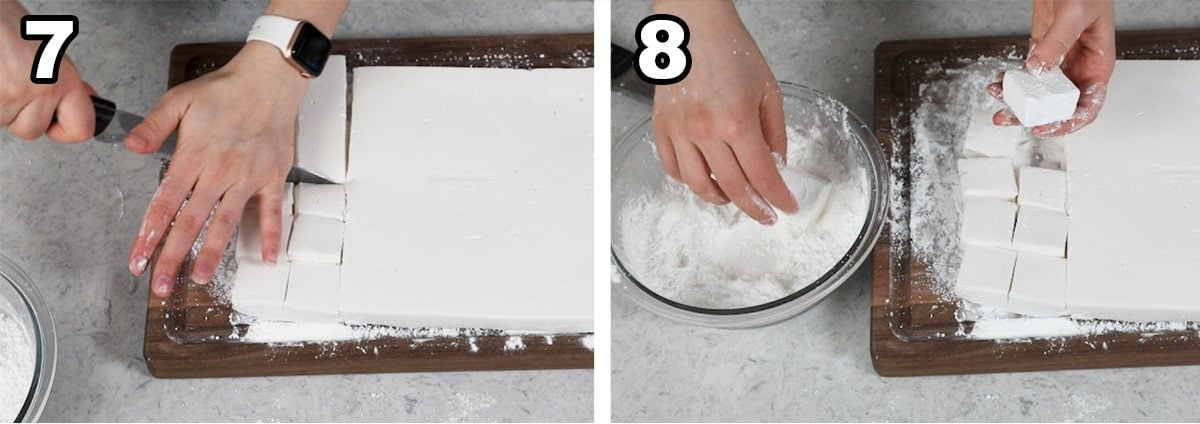
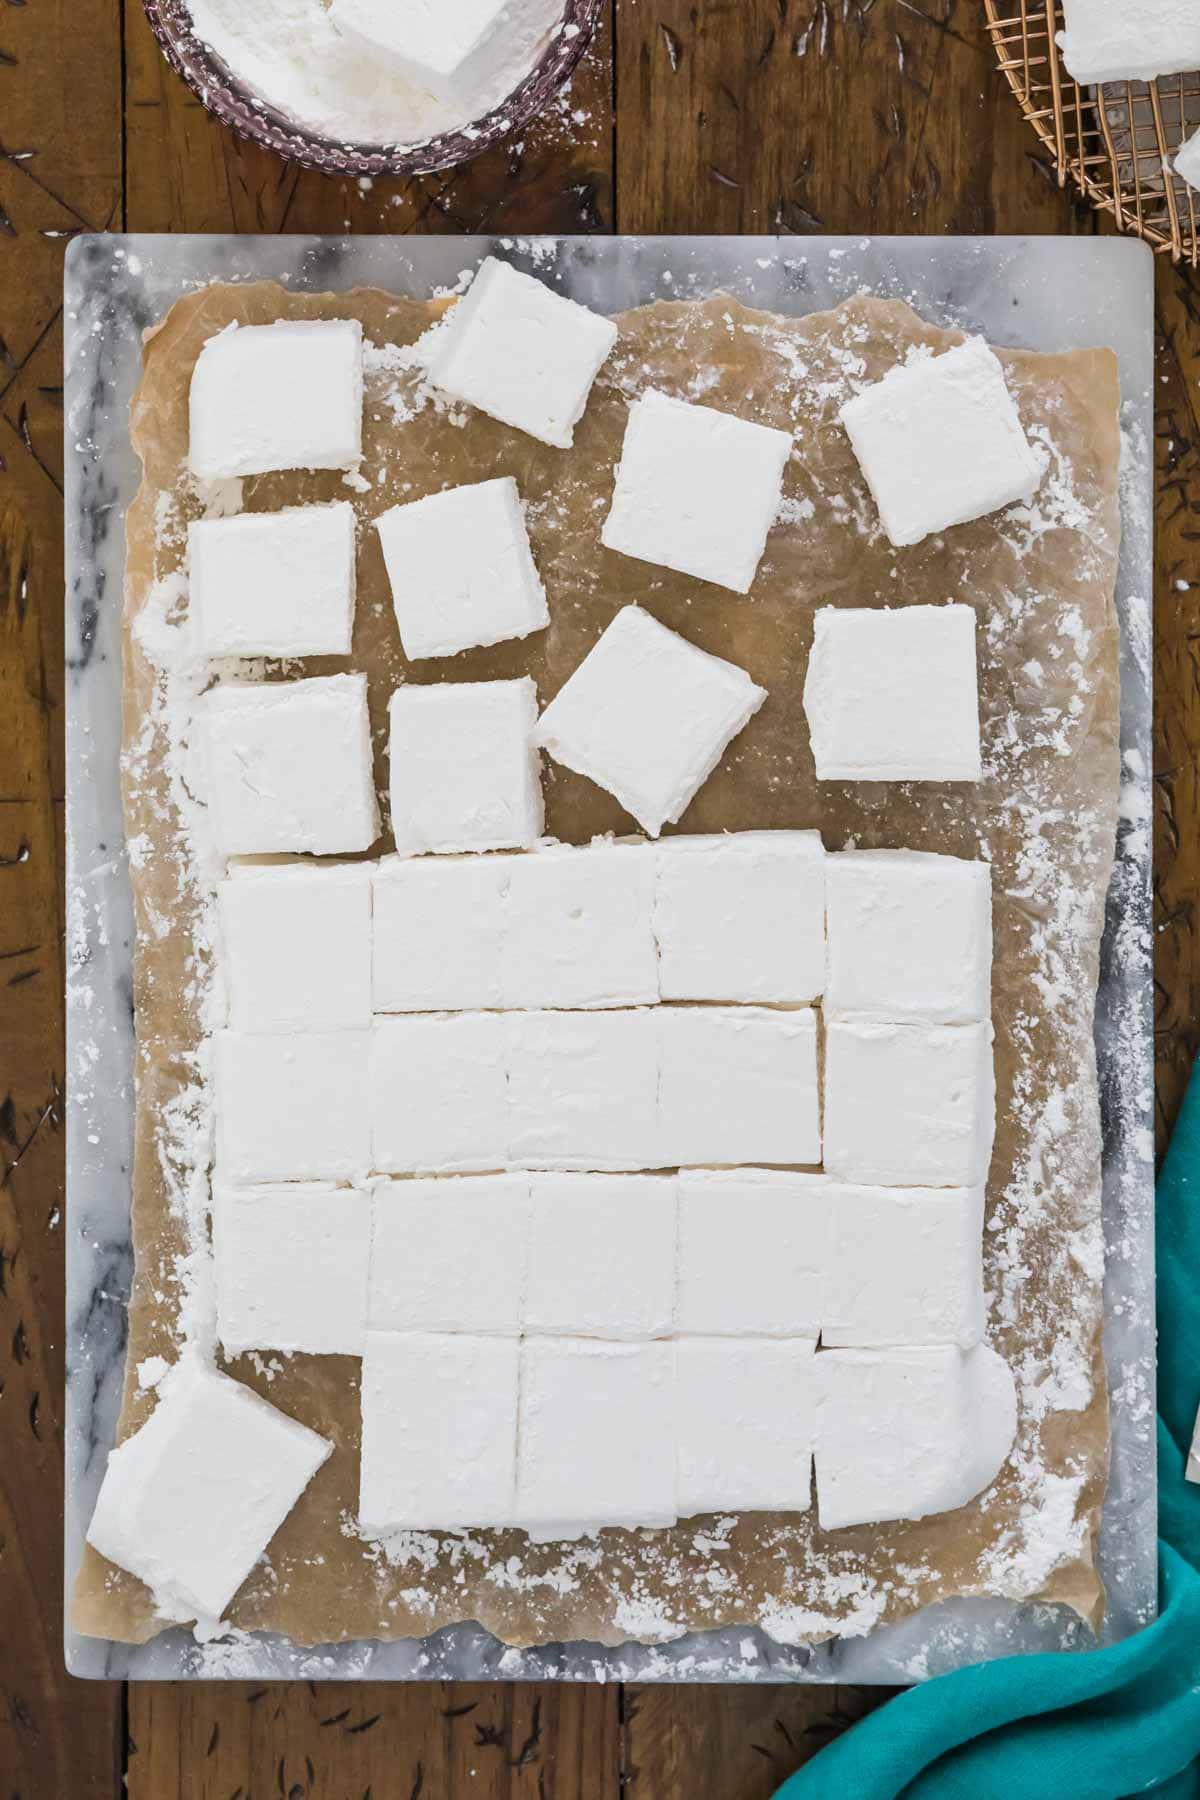
- Sprinkle your cutting board with some of your reserved dusting powder. Turn your marshmallows out onto the cutting board and cut them into squares with a greased knife or kitchen shears.
- Toss the cut marshmallows in the bowl of dusting powder, making sure each side is coated. Enjoy!
SAM’S TIP: Be very careful when handling the hot syrup! Keep your mixer speed very low until it’s combined, because if it splashes on you, it will burn you.
Frequently Asked Questions
As long as you’ve let them set up properly, they should roast beautifully! If you try to roast them before they’ve firmed up, they will just melt.
Yes you can! Just add it when you add your vanilla extract (or whatever flavor you’re using).
They’ll last for about a month when stored in an airtight container at room temperature.

Enjoy!
More Recipes You Might Like
Let’s bake together! I’ll be walking you through all the steps in my written recipe and video below! If you try this recipe, be sure to tag me on Instagram, and you can also find me on YouTube and Facebook
Homemade Marshmallows
Equipment
- Medium-sized pot
- Sharp knife or kitchen shears
Ingredients
For Dusting
- Vegetable shortening or vegetable oil, for greasing pan and utensils
- 1 cup (125 g) powdered sugar
- ½ cup (65 g) cornstarch
For Marshmallows
- ½ cup (118 ml) ice water
- 3 packets gelatin, (0.75 oz total)
- 2 cups (400 g) granulated sugar
- 1 cup (236 ml) light corn syrup¹
- ½ cup (118 ml) water, any temperature
- ¼ teaspoon table salt
- 1 Tablespoon vanilla extract
- Additional powdered sugar as needed
Instructions
- Prepare a 13×9” (33x23cm) pan by thoroughly greasing the sides and bottom with vegetable shortening (I use Crisco) or a thin layer of vegetable oil. Grease a rubber spatula as well and set it aside nearby (you’ll need this when you pour your marshmallow).Vegetable shortening or vegetable oil
- Prepare dusting powder by whisking together powdered sugar and cornstarch until well-combined and set aside.1 cup (125 g) powdered sugar, ½ cup (65 g) cornstarch
- Pour ice water into the bowl of a stand mixer (see note 2 if you don’t have a stand mixer) fitted with a whisk attachment and sprinkle gelatin overtop, then stir to combine.½ cup (118 ml) ice water, 3 packets gelatin
- In a medium-sized pot, combine sugar, corn syrup, remaining ½ cup (118ml) water, and salt and stir to combine.2 cups (400 g) granulated sugar, 1 cup (236 ml) light corn syrup¹, ½ cup (118 ml) water, ¼ teaspoon table salt
- Turn stovetop heat just a notch above medium and cook, stirring frequently, until sugar is dissolved. If you notice sugar crystals on the side of the pot, use a damp pastry brush to gently wash them down the sides of the pot back into the mixture.
- Continue to stir until mixture comes to a boil, then attach a candy thermometer to the pot (make sure the end of the thermometer is suspended in the middle of the mixture and that it is not touching the bottom of the pot!) and continue to cook without stirring until mixture reaches 242F (115C).
- Remove syrup from heat and turn stand mixer speed to low. With mixer on low speed, gradually drizzle the hot syrup into the gelatin mixture in a steady stream. Once all syrup has been added, gradually increase mixer speed to high.
- Beat on high-speed for at least 10 minutes/until mixture is fluffy, thick, glossy, and greatly increased in volume.
- Stir in vanilla extract (or your favorite extract and any food coloring you may wish to use) at this point until completely combined.1 Tablespoon vanilla extract
- Use your greased spatula to pour/spread marshmallow mixture into prepared pan and smooth the surface. Sift 2-3 Tablespoons of the dusting mixture (save remaining mixture, you’ll need it) over the surface of the marshmallows.Additional powdered sugar as needed
- Let marshmallows sit until firm, about 4-6 hours or overnight.
- Once firm, dust a cutting board generously with about a tablespoon of the dusting mixture and pour the remaining mixture in a bowl.
- Turn out the marshmallows onto a cutting board and use a greased knife or kitchen shears (lightly greased with either shortening or vegetable oil) to cut into squares. Toss marshmallows one at a time in bowl with remaining dusting mixture then enjoy.
Notes
¹Corn syrup
May substitute glucose syrup.²Mixer
If you don’t have a stand mixer, a powerful electric mixer will work, but it will take much longer and will be quite an arm workout. I don’t really recommend trying this by hand.Storing
Store marshmallows in an airtight container at room temperature for up to a month.Nutrition
Nutrition information is automatically calculated, so should only be used as an approximation.
Like this? Leave a comment below!


Could you please update the recipe to show .25 instead of .75 oz packets of gelatin.i originally weighed my packet and opened 9 to match the weight but when it looked concerning I checked your video and decided to go with 3 so that it looked more like yours. An update may save someone else the trouble.
Hi Jennifer! The number in the parenthesis represents the total amount needed for the recipe. 🙂 I can add a note. 🙂
I believe the gelatin packet is .25oz rather than .75. I used 3 packets of .25 and the marshmallows turned out perfect.
Hi Jennifer! They typically are .25 ounces and you need 3. I’m so glad you enjoyed them! 🙂
Hi Sam.
could the marshmallow mixture be poured into a molded cake tin? like a tractor teddy bear for school?
Hi Janine! I haven’t tried it, but I think it could work.
I’ve made this recipe for a few years now. Very popular
I’m so glad you enjoy them, Jan! 🙂
Can I use an instant read thermometer instead of a candy thermometer?
Hi Liz! The temperature here is very important so if you can somehow mount that thermometer and keep a close eye on the temperature then it could work. 🙂
Amazing treat! Not store bought marshmallows at all. They’re almost like a slightly chewy divinity. Not usually a fan of candy thermometer recipes but I would totally make this again.
However, I would love to try other flavors. Would this work with almond flavoring or rose water too? Nuts? Also, can honey be used in place of corn syrup?
Hi Jessica! Almond or rose water would work just fine as would the nuts. I haven’t experimented with the honey so I can’t say for sure how that would work. I’m so glad you enjoyed them! 🙂
Could you use these for making rice crispy treats?
Hi Andrea! I haven’t tried it, but if you do, I would love to know how it turns out. 🙂
Very nice. A good friend told me once that i need to whip up egg whites and gelatine to make marshmallows. I like marshmallow so ill definitely going to try them.
Regards
Felicia
I hope you love them! 🙂
Hi Sam! Just wondering if you or anyone else has tried toasting these in a fire/making s’mores with them??? Can’t wait to try them!
Hi Andrea! I have been wanting to try it, but haven’t quite tried it yet. It’s on my summer to do list. I think they will do just fine. If you try it I would love to know how it goes. 🙂
For anyone looking to up their s’mores game on their next outdoor adventure, this is the way to do it! We made these delicious marshmallows in advance, along with homemade Graham crackers. Sandwich with a generous square or 4 of chocolate and voila, instant winner! They behaved like store bought marshmallows do but taste better! The only thing I would recommend is not to put them on red hot poker to roast, as they will melt off. Thanks again Sam!
I’m so glad you enjoyed them, Andrea! 🙂
Hi, what would I do if I wanted to dip them in chocolate? No dusting powder?
Hi Colette! I would just dip them right in the chocolate. I would still use the powdered sugar as it keeps the marshmallows from sticking to absolutely everything, just tap off the excess before dipping. 🙂