
Scones
This post may contain affiliate links. As an Amazon Associate I earn from qualifying purchases. Please read my disclosure policy.

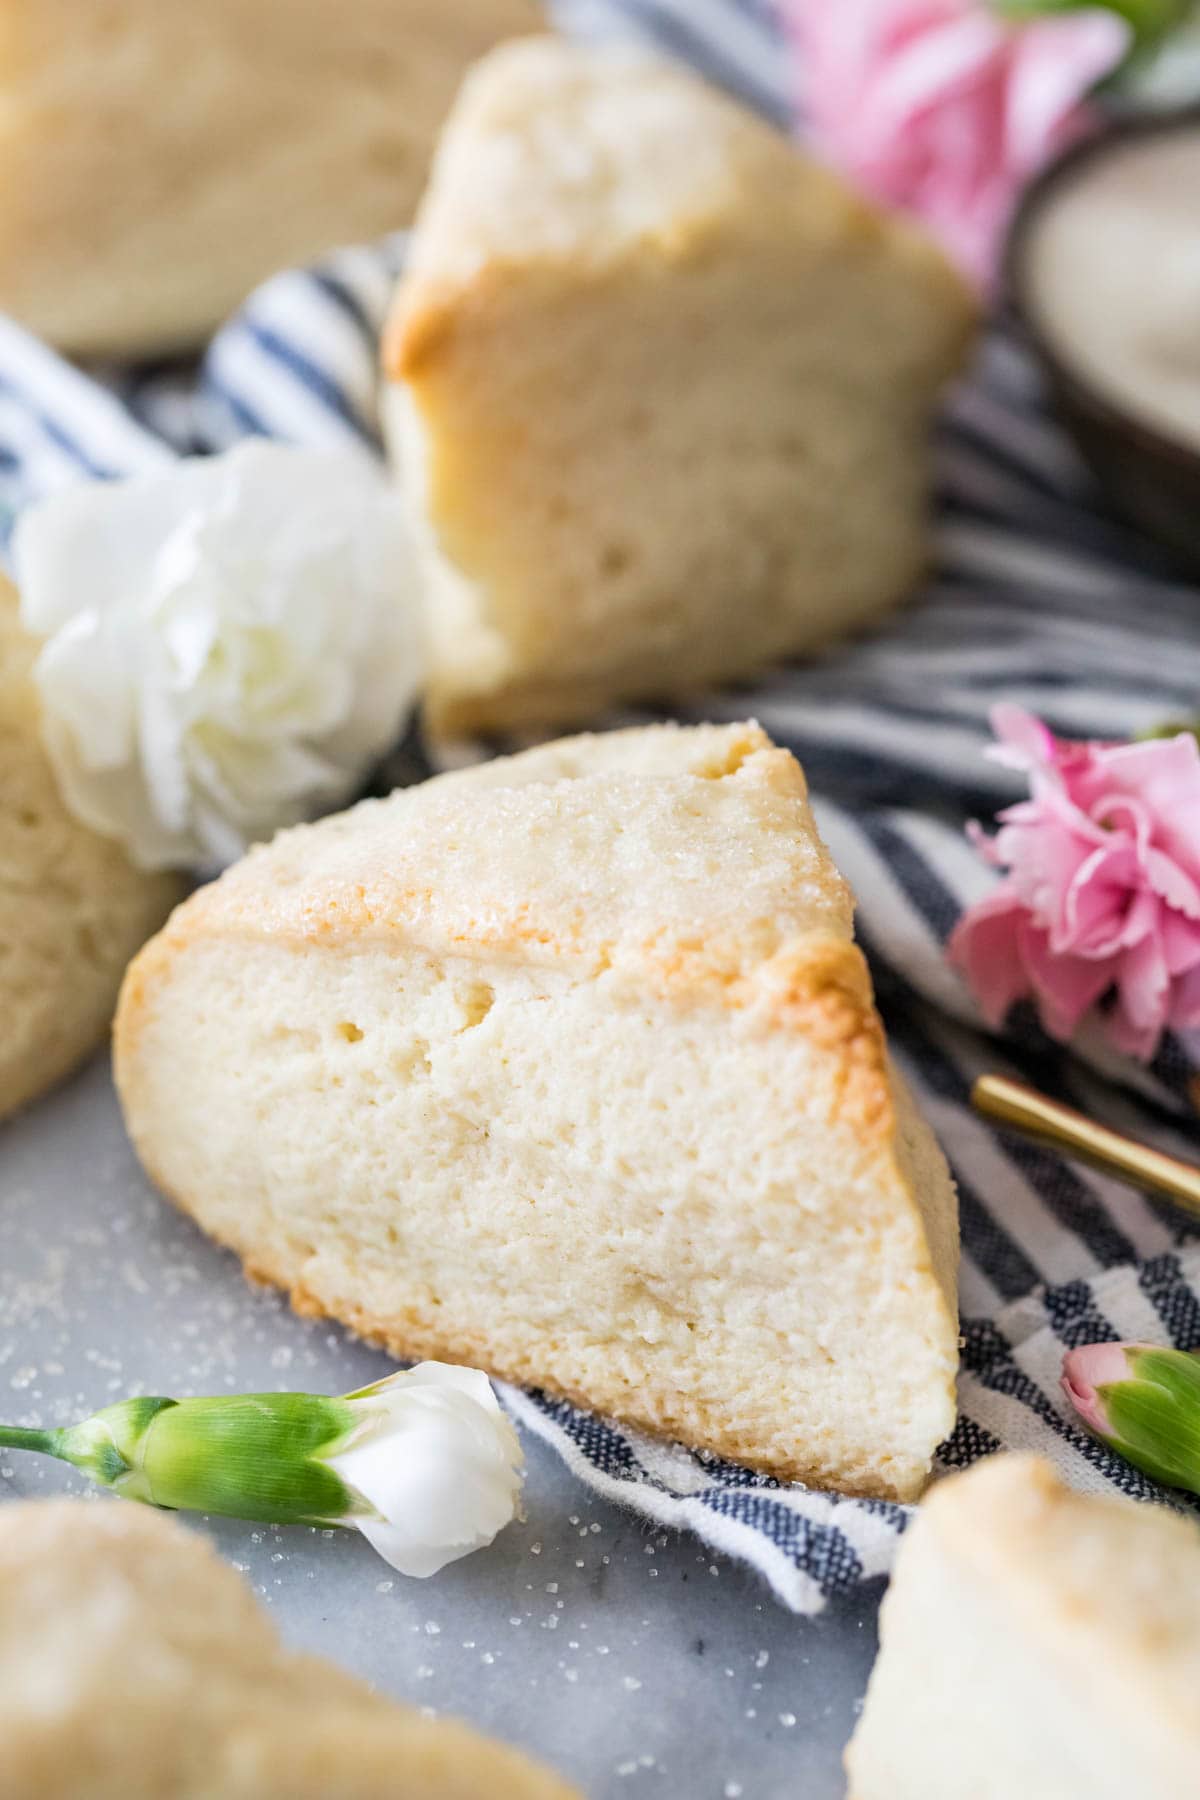
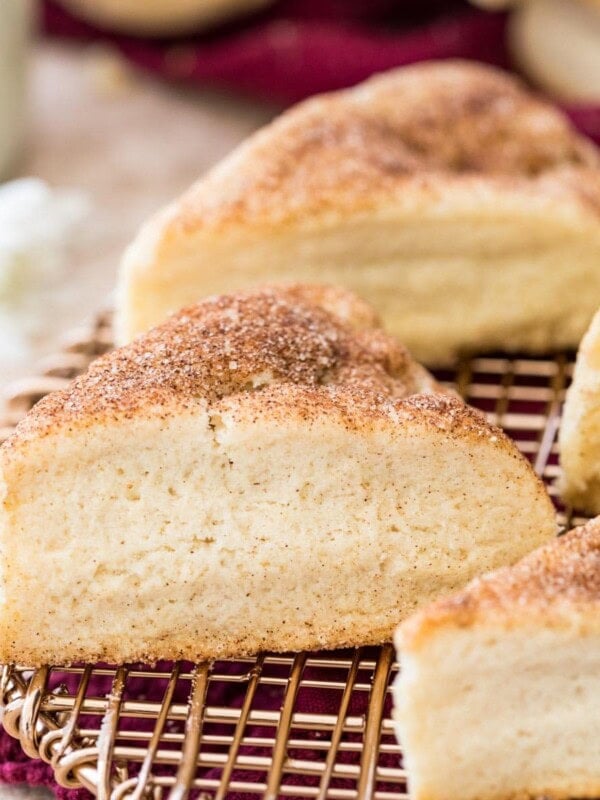
Look no further, you’ve found the best easy, foolproof recipe for tender, buttery, and perfect scones, ready in just 30 minutes! My recipe includes plenty of tips and tricks as well as a detailed video tutorial. Includes notes on how to add your favorite mix-ins like fruit, chocolate, or nuts, too!
A Simple, Classic Scones Recipe
This quick and easy scone recipe makes flavorful, beautifully textured scones without any fuss. It comes together in minutes in a food processor (easy clean-up!) and yields professional, tea-party worthy results every time. They taste terrific plain, but can also be dressed up with add-ins or a sprinkle of sugar or a smear of jam.
If you’ve been too intimidated to make this wedge shaped treat in the past, you won’t be after trying my scone recipe. You’ve got this!
Why you’ll love this recipe:
- No pastry cutter needed! Instead we’ll use a food processor, which does all of the heavy lifting without overworking the dough. Note: I do also provide instructions for how to make them with a pastry cutter or grater, if you don’t have a food processor.
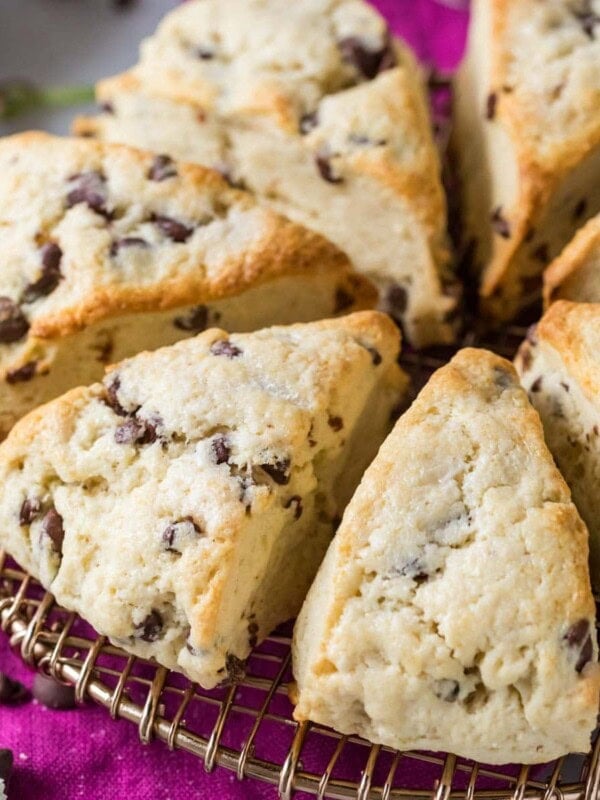
- Completely customizable. Frozen fruit (or fresh fruit, it’s just a bit messier), chocolate chips, dried fruit, nuts, or citrus zest are all great options. I’ve used this recipe for lots of different flavor variations such as my lemon poppy seed scones, chocolate scones, raspberry scones, and more! You can also omit the sugar and make a savory version–yum!
- No eggs. This is no accidental omission. I found that using eggs makes for less flaky and less melt-in-your-mouth results.
- Flaky, tender layers, thanks to a little laminating. This process is easy, and it’s great practice for when you want to try making biscuits or puff pastry 😉
What You Need
One of the best things about my scones recipe is that it uses basic ingredients that you probably already have on hand.
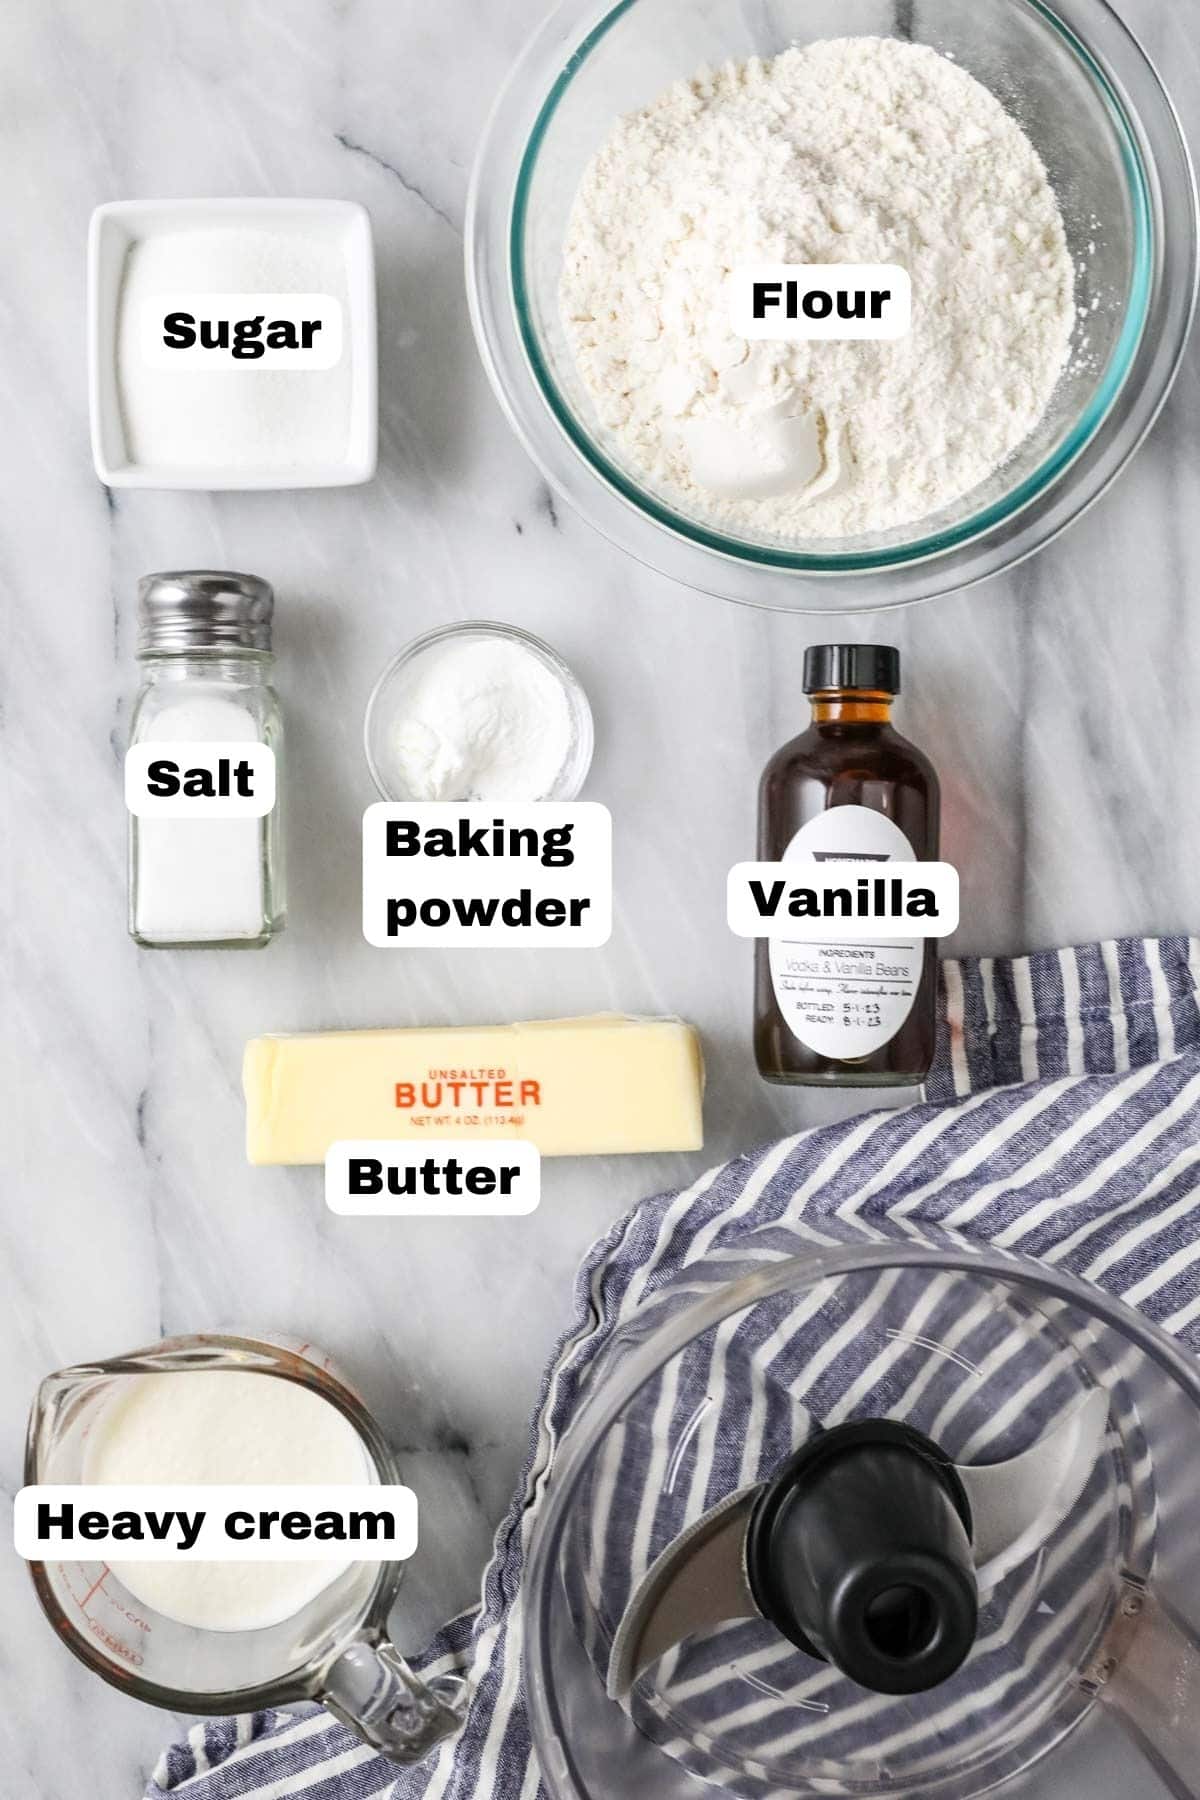
- Butter. Keep your butter as cold as possible, as cold butter pieces distributed throughout the dough makes for tender, flaky, and buttery layers! I like to freeze my butter for at least 15-30 minutes (or longer) before I begin.
- Flour. Do NOT use self-rising flour or your scones will become much too tall and tip over. Stick with regular, all-purpose flour (“plain flour” in the UK).
- Heavy cream. This helps bind everything together, much like an egg would, but the results are much more melt-in-your-mouth. Make sure to keep this nice and cold too!
- Sugar. A small amount adds sweetness, but not so much that you can’t add a vanilla glaze or sweet add-ins. I also add a splash of vanilla extract. You can omit or reduce these if you are making savory scones.
- Add-ins. These scones are great plain, but if you’d like, you can add chocolate chips, nuts, frozen fruit (fresh can get messy), etc. Cheddar cheese is a great addition for a savory version! Note that making this recipe with add-ins, especially moist add-ins like fruit, will result in a slightly longer bake time.
SAM’S TIP: If you can get your hands on it, I recommend using a high quality European butter in this scone recipe. It has a higher fat content and makes for especially delectable, tender results.
How to Make Scones

- Pulse the dry ingredients together in your food processor.
- Add the butter pieces and pulse until incorporated; the butter pieces should be no larger than a chocolate chip at this point.
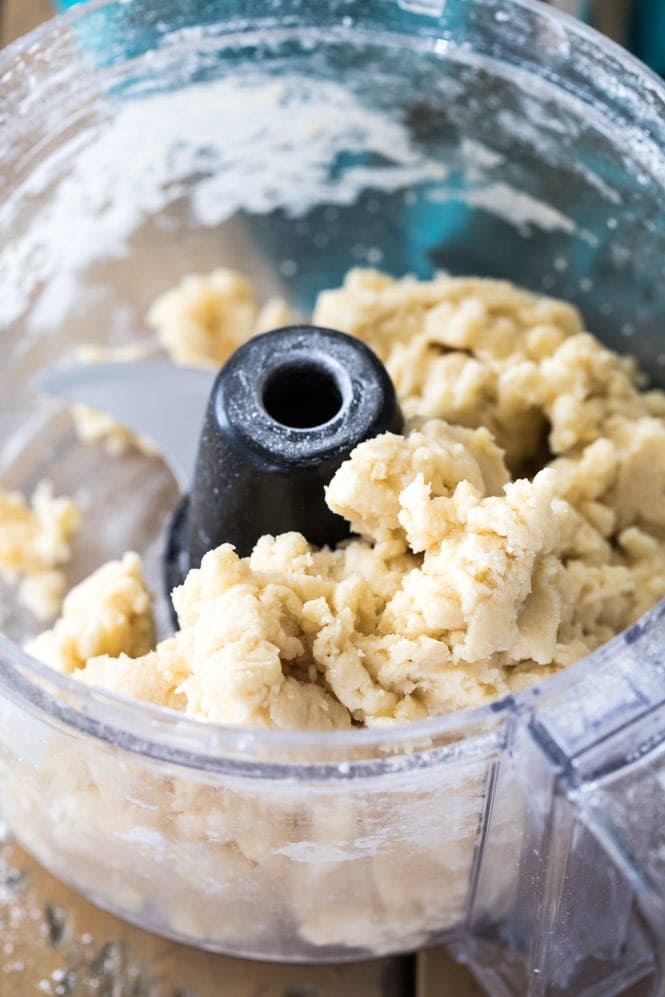
- Pour the cream and vanilla over the butter mixture.
- Pulse until your dough starts to clump together. You can test this by pinching some dough between your fingers–if it clings together, it’s ready!
It’s important to note that you should be pulsing the ingredients in brief spurts and not simply blending. Pulsing make sure everything gets evenly distributed. If you just blend everything, it won’t incorporate evenly and the batter will get too wet, too warm, and over-worked.
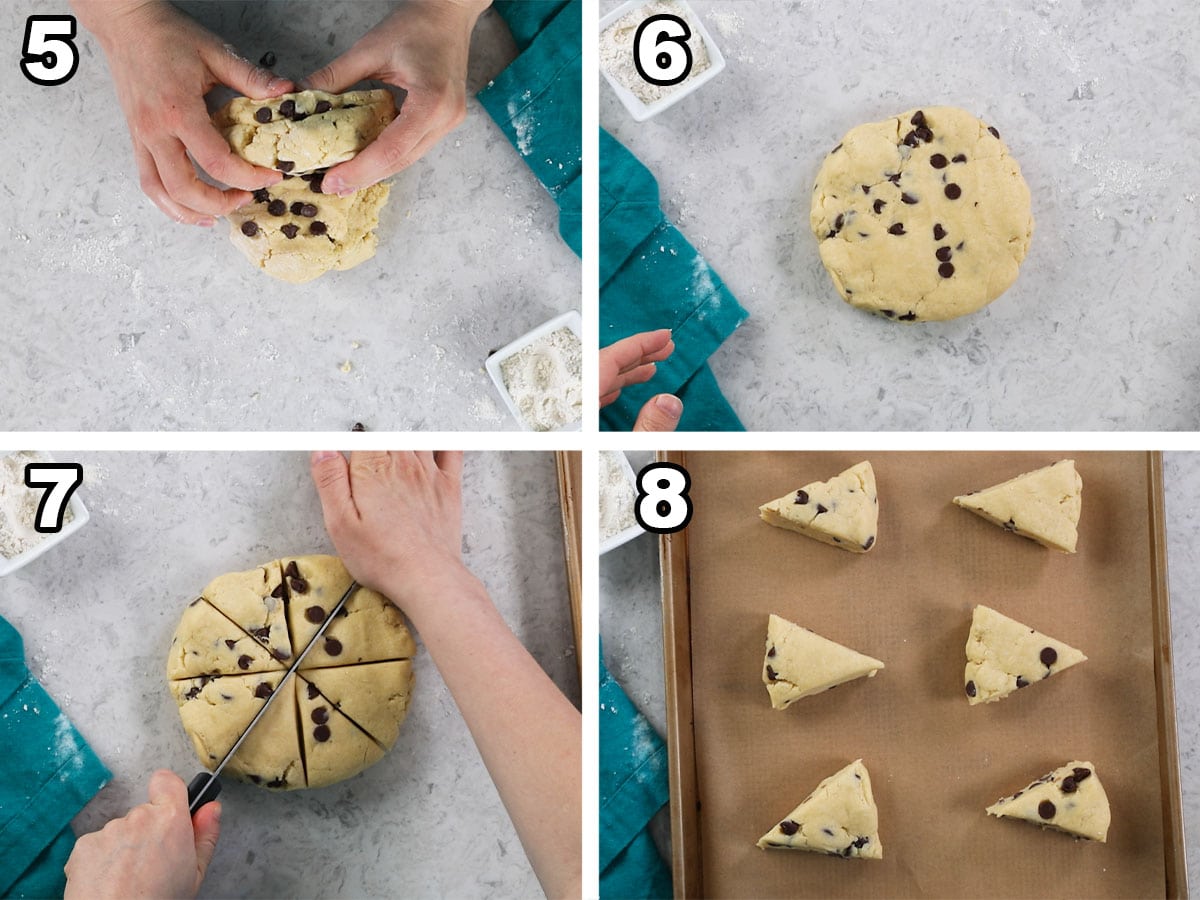
- Lamination: Turn your dough out onto a floured surface. Sprinkle any add-ins overtop, if using, and form it into a disc. Fold the dough over itself (add more add-ins here if desired), flatten, rotate 90 degrees, and repeat. Do this process about 5 times total.
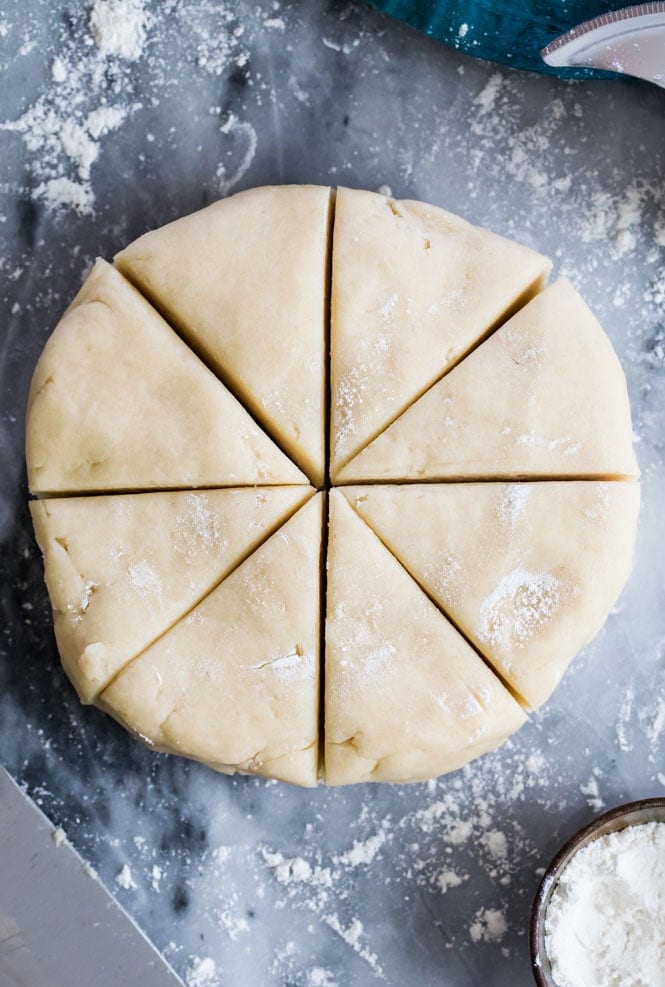
- Form your dough into a disc that is about 1″ thick and 6″ wide. Avoid over-handling your dough and don’t warm it up too much, or your scones could become flat and dense. The disc doesn’t need to be super smooth.
- Cut the disc into wedges, pressing straight down with a sharp knife–do NOT saw! If you do, then your scones may tip over in the oven or have messy edges.
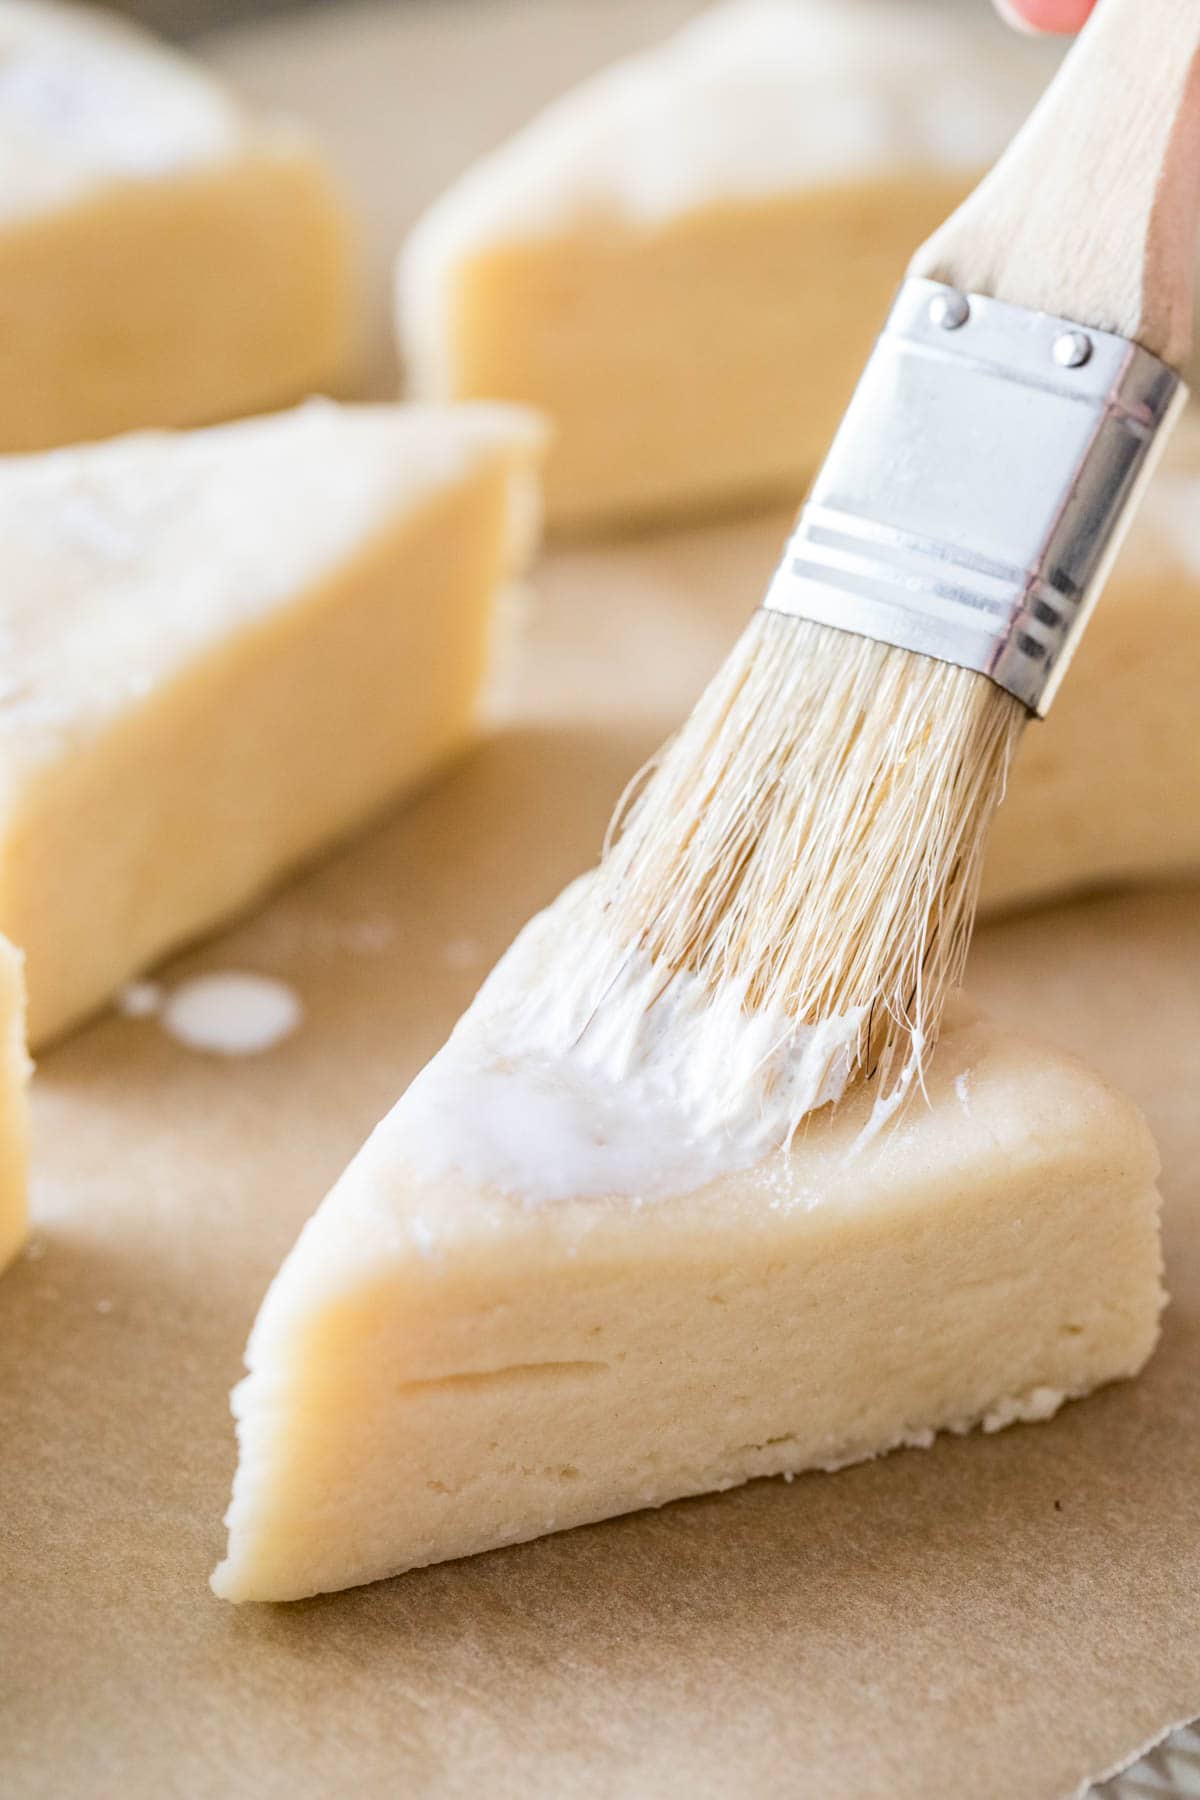
- Place the scones on your baking sheet, brush them with cream, and sprinkle with sugar. Bake until light golden brown and let cool slightly before enjoying.
SAM’S TIP: If your dough gets too warm during the lamination process, you can pop your scones in the freezer for 10-15 minutes before baking. It’s very important that your dough stays nice and cold!
Frequently Asked Questions
You can use a grater or a pastry cutter to cut the butter into the flour instead; however, your dough will be very dry and will require more effort to come together. I provide more detailed instructions for this in the recipe below.
Yes! To do this, prepare your dough as instructed, then wrap in cling wrap (or place in an airtight container) and store in the refrigerator for up to 3 days or in the freezer for up to 3 months.
If baking from the refrigerator, you can follow the recipe as written. If baking from frozen, the scones may need a few extra minutes in the oven. I always wait until just before baking before brushing them with cream and sprinkling with sugar.
Yes! To freeze baked scones, let them cool completely after baking. Once they’ve cooled, transfer them to an airtight container (I like to loosely wrap each scone in wax paper or parchment paper so they don’t stick together) and enjoy within 3 months.

This scones recipe is tasty enough to be served plain, but a little honey butter, strawberry sauce, or whipped cream on the side never hurts!
Enjoy!
Let’s bake together! Subscribe to my newsletter to be notified of all the newest recipes, and find my free recipe tutorials on YouTube 💜

Scones
Equipment
Ingredients
- 2 cups (250 g) all-purpose flour
- ¼ cup (50 g) granulated sugar
- 2 teaspoon baking powder
- ½ teaspoon salt
- ½ cup (113 g) very cold unsalted butter, I like to place my butter in the freezer 15 minutes before beginning to ensure it is cold
- ½ cup (120 ml) heavy cream
- ¼ teaspoon vanilla extract
- ½ cup add-ins, optional: frozen berries, chocolate chips, nuts, etc.
- Additional heavy cream for brushing over scones, optional
- Additional sugar for sprinkling over scones, optional
Instructions
- Preheat your oven to 375F (190C) and line a baking sheet with parchment paper. Set aside.
- Combine flour, sugar, baking powder, and salt in the basin of a food processor and pulse to combine.2 cups (250 g) all-purpose flour, ¼ cup (50 g) granulated sugar, 2 teaspoon baking powder, ½ teaspoon salt
- Cut butter into Tablespoon-sized pieces and scatter over flour mixture, pulse until butter is cut up into the flour mixture and butter pieces are no longer visible.½ cup (113 g) very cold unsalted butter
- Combine the cream and vanilla extract in a measuring cup and pour heavy cream over your flour mixture.½ cup (120 ml) heavy cream, ¼ teaspoon vanilla extract
- Pulse until dough begins to clump together.

- Transfer dough to a lightly floured surface and (handling lightly, as you don’t want to over-work this dough) add any add-ins at this point, gently working them into the dough. Fold the dough in half over itself and use your hands to gently flatten layers together. Rotate the dough 90 degrees and fold in half again, repeating this step 5 times and taking care to not overwork the dough.½ cup add-ins
- Form the dough into a smooth disk about 1″ thick by 6″ round.
- Cut the disk into 8 wedges, pressing the knife straight down with each cut.

- Transfer wedges to prepared baking sheet and place about 2" apart. Brush lightly with cream and sprinkle with sugar.Additional heavy cream for brushing over scones, Additional sugar for sprinkling over scones
- Bake on 375F (190C) for 14-16 minutes or until edges are just beginning to turn golden brown. Don’t over-bake your scones or they will be dry and tough.
- Allow scones to cool on baking sheet before serving and enjoying.
Notes
¹Food Processor
If you don’t have a food processor you can make the scones by whisking together the flour, sugar, baking powder and salt. Cut the butter into the dry ingredients with either a pastry cutter, box grater, or pair of knives. Whisk together heavy cream and vanilla and pour over and stir until well-combined. The dough will be very dry but will come together with some effort. If absolutely necessary you can add a bit more cream, a splash at a time.Storing
Scones are best enjoyed fresh, but you can store in an airtight container at room temperature for up to 3 days. See the FAQ section in the post for instructions on freezing scones (before or after baking).How to Make Lemon Scones
Add 1 Tbsp of fresh lemon zest into the dough with the butter Once scones have cooled, dip in a simple glaze made of 1 1/4 cup (160g) powdered sugar, 1 1/2 Tablespoons (20ml) lemon juice, 1 1/2 teaspoons of water, and 1/4 teaspoon of vanilla extract.Nutrition
Nutrition information is automatically calculated, so should only be used as an approximation.
Like this? Leave a comment below!
I originally published this recipe many years ago, but have just updated it as I thought it could use a new video and some updated tips and tutorial photos.


Just took them out of the oven so I haven’t tasted them yet. I followed the recipe as written measuring everything rather than weighing it. I use white spelt flour for the all-purpose and I use coconut sugar for the sugar. I was afraid I would over bake them so I watch them very cautiously but really wasn’t sure what you meant the edges are turning brown. So I bacon for 14 minutes and took them out. Some of the edges were turning brown but some weren’t. I trust they will taste delicious
I hope you love them, Cheryl! Thank you for sharing your substitutions, too!
great recipe! love your website!
Thank you so much, Veronica! 🙂 I am glad you enjoy everything. 🙂
Hi, can I use regular milk instead of the heavy cream?
Hi Irene. Unfortunately I don’t think they will be as light and flaky if you use regular milk.
Hello,
Great recipe! I had one problem though and not sure what caused it. My scones sort of “warped” for lack of a better word. I made the disc 6″ x 1″ per the instructions, but as they rose, they sort of slumped over during baking instead of staying in tidy triangles. What do you think caused that? Otherwise they were still delicious, just not as pretty as I had hoped. Thanks!
Hi Loralee! Sometimes I’ve had this happen if I make the scone dough without a food processor but usually they stay pretty tidy for me, did you use a food processor or make them by hand? If you did use a food processor, I’m not sure why they might have slumped for you, honestly. I’m glad you enjoyed the taste otherwise, though!
Thanks Sam! I did use a foddering processor, so not sure what happened. I wonder if the butter got too warm. That’s my best guess. Anyhow, great recipe…everyone loved them!
Can I double this recipe?
You shouldn’t have any issues doubling it, Leisha! 🙂
Oh my goodness! These scones are the best I have ever had! The light flaky texture is amazing. I made them plain with only a little of the lemon glaze. So good! Thank you for sharing this recipe.
I am so glad you enjoyed it, Lisa! 🙂
Can i use fresh instead of frozen fruit?
Yes absolutely, just keep in mind that fresh fruit is a bit more delicate and harder to work into the dough without squishing.
I really enjoyed this and they were so easy!
We made them plain, topped them with the lemon glaze you share at the end of your recipe and topped with sprinkles. They didn’t last long!
**My tip for the butter is to slice the butter before freezing 😉
Ok… so now I need your help with creating a savory scone lol.
Haha, I actually have plans for a cheese scone! It might be a while, but I’ll let you know as soon as it is up. 🙂
These are so easy to make and are a real hit with our family. I individually wrapped the unbaked scones in plastic wrap. Then when I needed them I popped them completely frozen in the oven. I’ve even baked them in a toaster oven. I love having them on hand. Thanks for a great recipe.
That’s a great idea, Claire! Maybe I should try that instead of eating them all at once 😂 I’m so glad you enjoyed them.
Can you make them the night before and then bake them in the morning? Leave them in fridge over night ready to pop in oven?
Yes that will be fine! I would cover them with plastic wrap though in the fridge.
Absolutely the Best Scones Recipe there is !$
I am so glad you enjoy them Gwedalyn! ☺️
My scones didn’t rise much — what did I do wrong?
Your baking powder might be bad. There is a fair bit in these scones and if that is bad they won’t rise.
Try using some buttermilk or a squirt of lemon juice. Baking powder works much better with some acid. Read a book called Ideas in Food, which has a chapter on this (and some really cool recipes)
Do I want my scones to be flaky? That doesn’t seem right…
You definitely do! 🙂 Buttery flaky layers, kind of like a biscuit but more tender.
Hi Samantha, greetings from Poland (the country in Europe) 🙂
I’m relatively new to your site (which I love) but have already tried almost all of the newest recipes and quite a lot of the earlier ones (always on the lookout for interesting ideas from across the ocean – with some adjustments due to different quality of ingredients, I have learned to recreate American cuisine at home, of which I’m rather proud).
However, I have a small question about heavy cream in this recipe – which measurement is the right one, 1/2 cup or 237ml…?
Far as I know, 1/2 cup is some 120-125ml, do you perhaps mean grams?
(BTW, thank you so much for g/ml beside the cup measurements – I’m never quite sure how big a “cup” is and it looks like different food bloggers (even in the U.S.) use different “cup” sizes no matter what google says about the “American cup”.)
Hi Joanna! Thank you so much for writing, you are 100% correct regarding the heavy cream, it is just 120ml and I’m not sure how I ended up with 237 ml (I”m thinking it’s a typo from when I tried doubling the recipe, because 237 is about the equivalent of 1 cup). thank you for pointing it out to me and I have fixed it in the recipe.
lol
Oh, wow, do these look good! I made scones once quite a while ago, and was disappointed in them. But yours are so thick and look so moist and delicious, I will have to try the recipe. Thanks!
Thank you, Debbie! I really hope you love them if you try them out 🙂