
Pumpkin Sugar Cookies
This post may contain affiliate links. As an Amazon Associate I earn from qualifying purchases. Please read my disclosure policy.
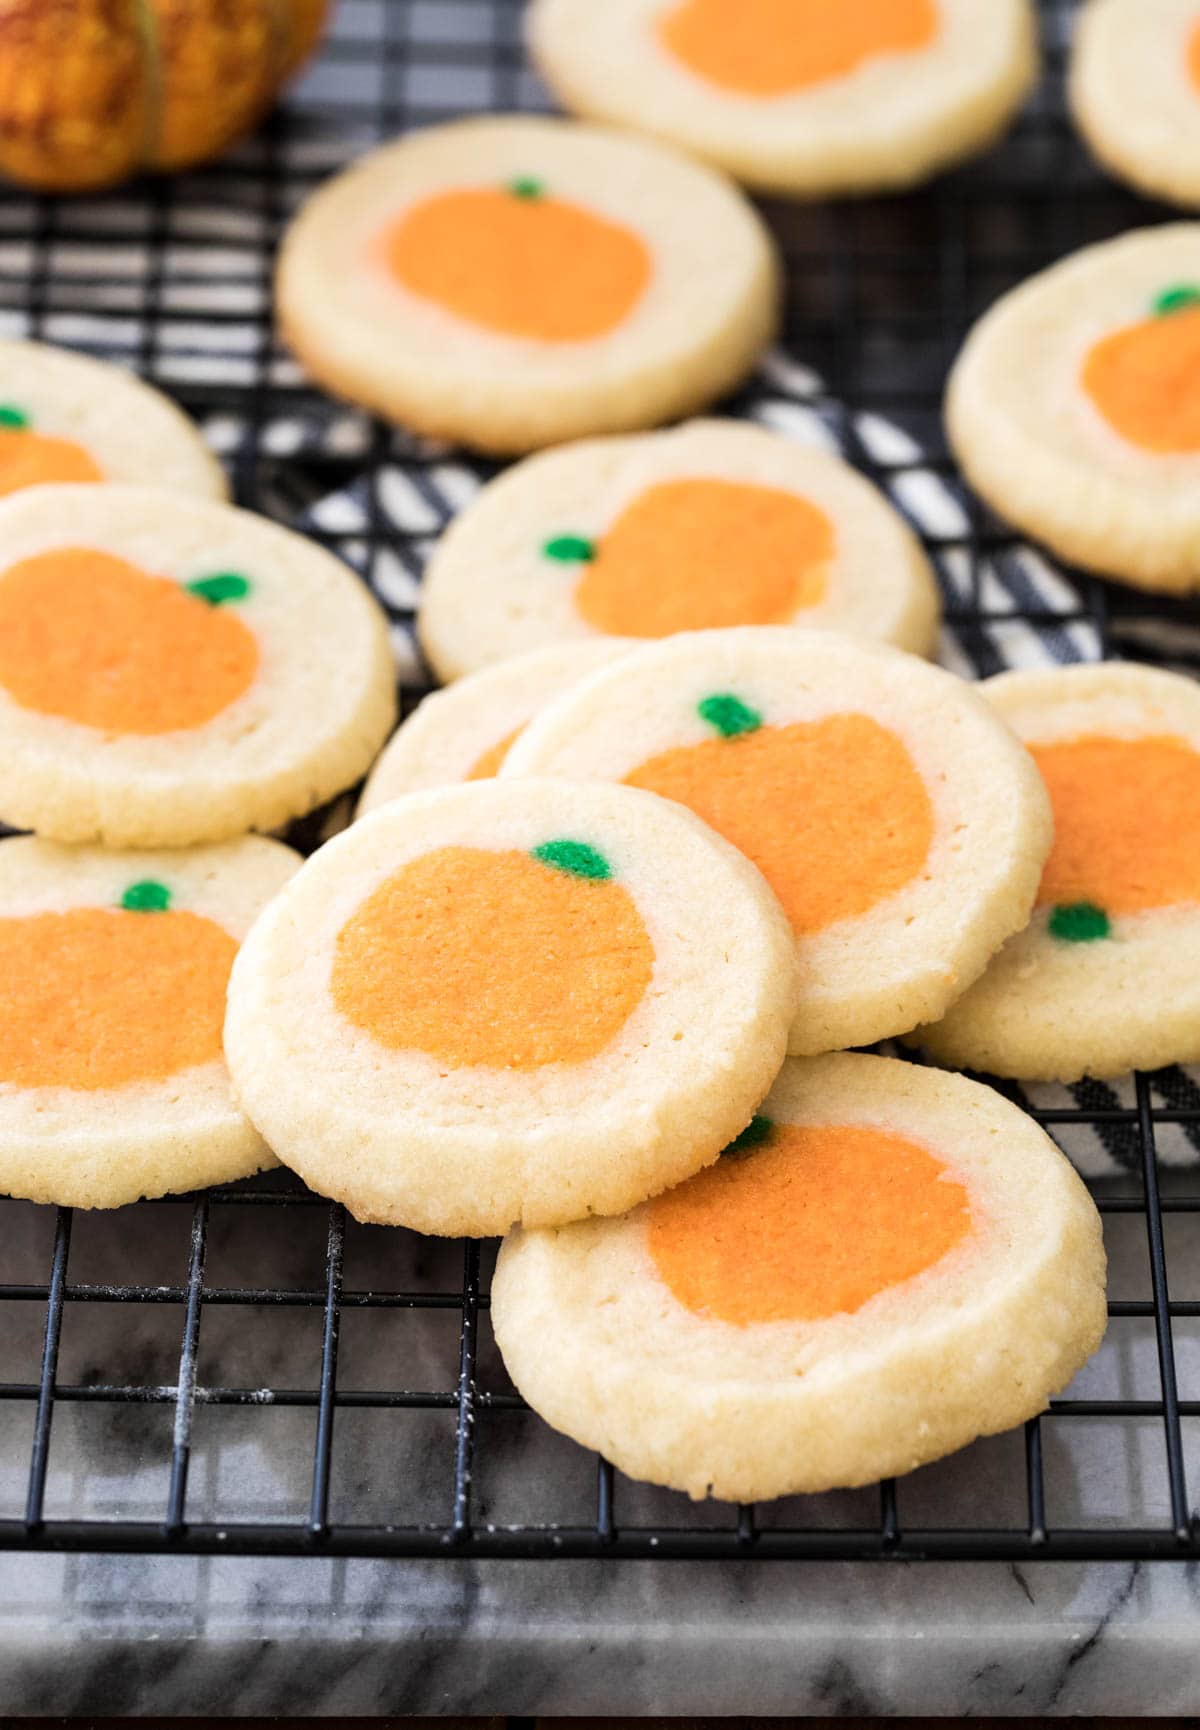
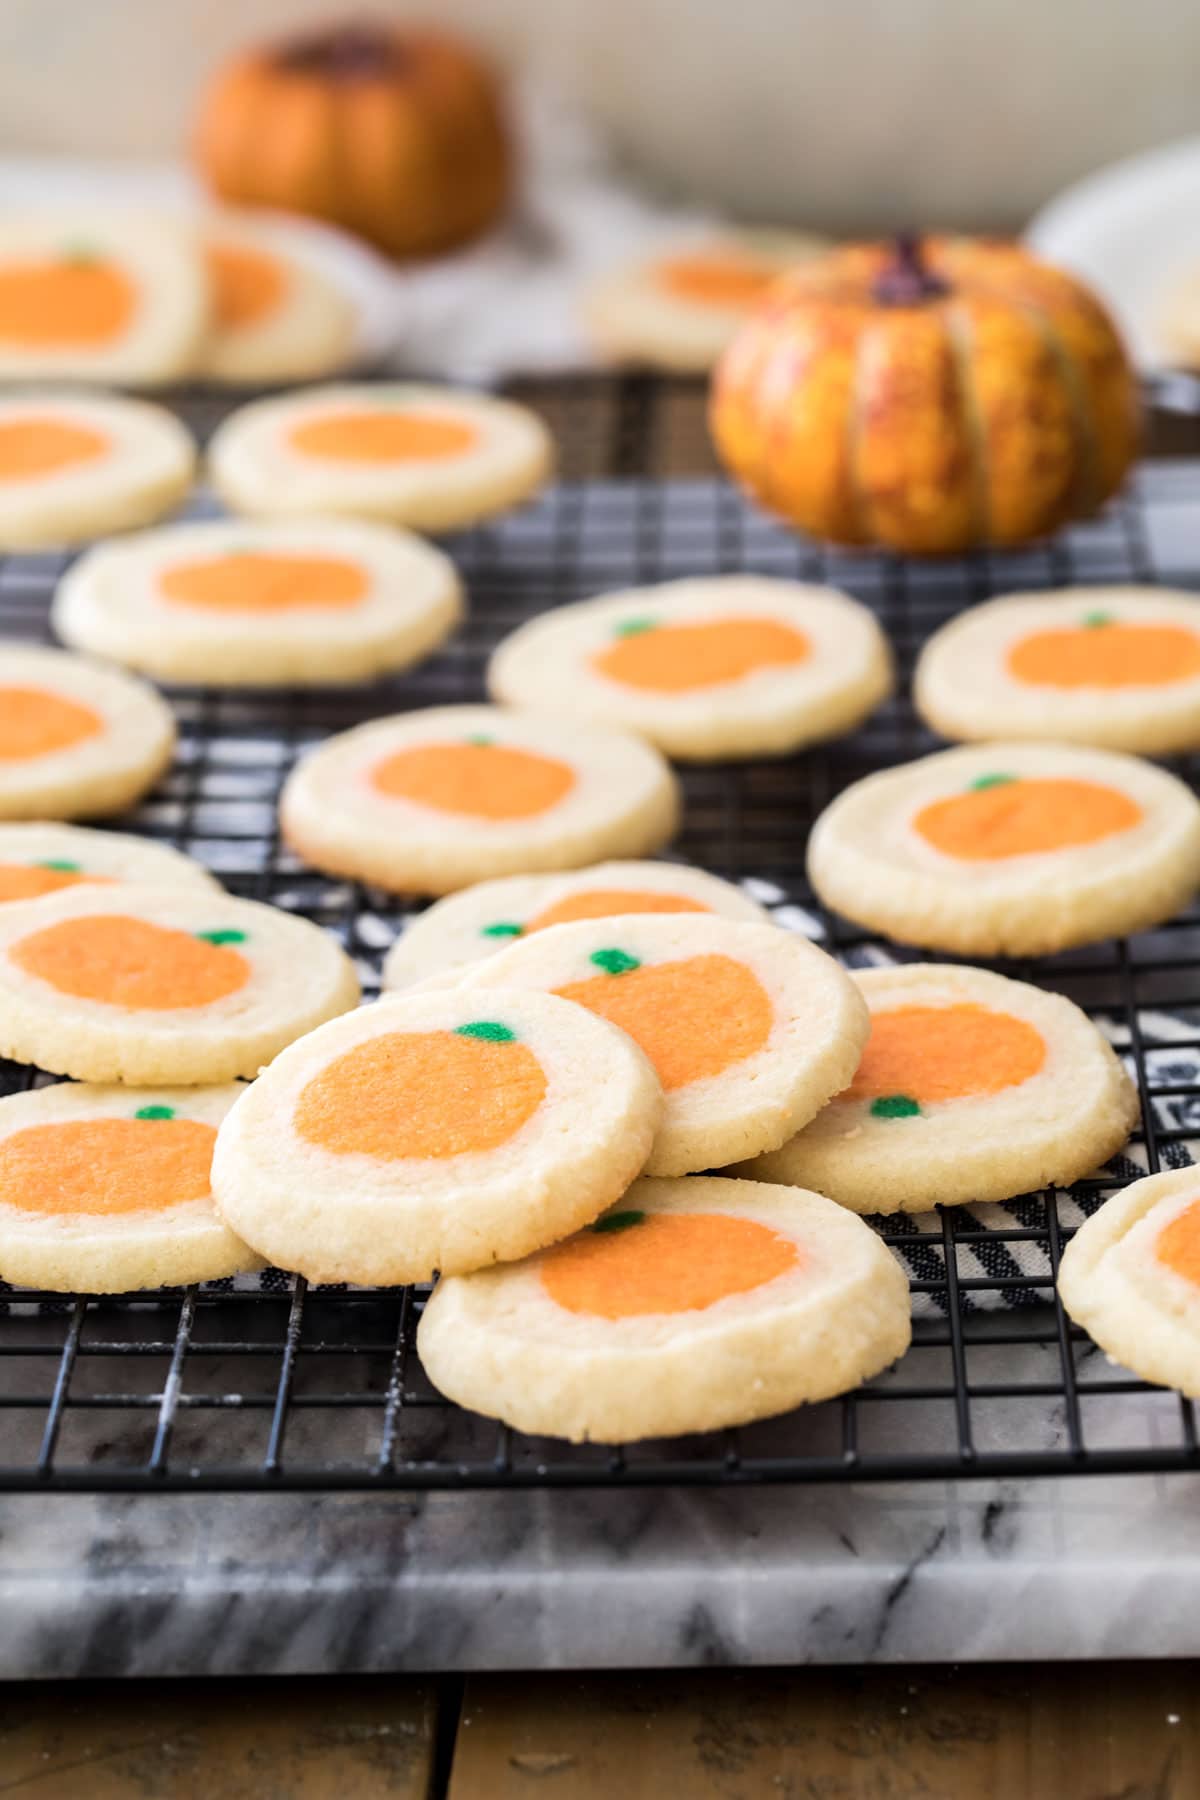
These Pumpkin Sugar Cookies are made slice & bake style! They’re much, much easier than you might think and are the perfect Thanksgiving, Halloween, or Fall-time treat! I’ve included a how-to video to show you exactly how to make them at home!
The Cutest Cookies of Fall
I’m sure you’ve seen these cookies before in the supermarket. You know that holiday-themed cookie dough you can buy at the grocery store with cute Easter bunnies or Christmas trees or pumpkins inside?
They’re adorable and my grandmother always makes them around the holidays and as a kid I ate them right up. As an adult, I tend to avoid them and reach for some of her homemade treats (like her apple cake or hot milk cake). But rather than write off those (adorable) cookies forever, I decided I would just make my own! Everything is better from scratch, and these pumpkin sugar cookies are no exception.
I used my icebox cookies as the base for today’s recipe, the dough is super simple to make and the technique is easier than you might think. Let’s get to it!

Using the Simplest Method Possible
I toyed around with a few options for getting the design in the center of the cookie. First I tried dying part of the dough orange, rolling it out, and using a cookie cutter to cut out dozens of mini pumpkins (finding a pumpkin cookie cutter that was small enough was hard to do!). This worked just fine and would be a good idea if you were trying to do a more intricate design, but let’s be real, pumpkins are just… round, so we don’t really need a cookie cutter to get that shape.
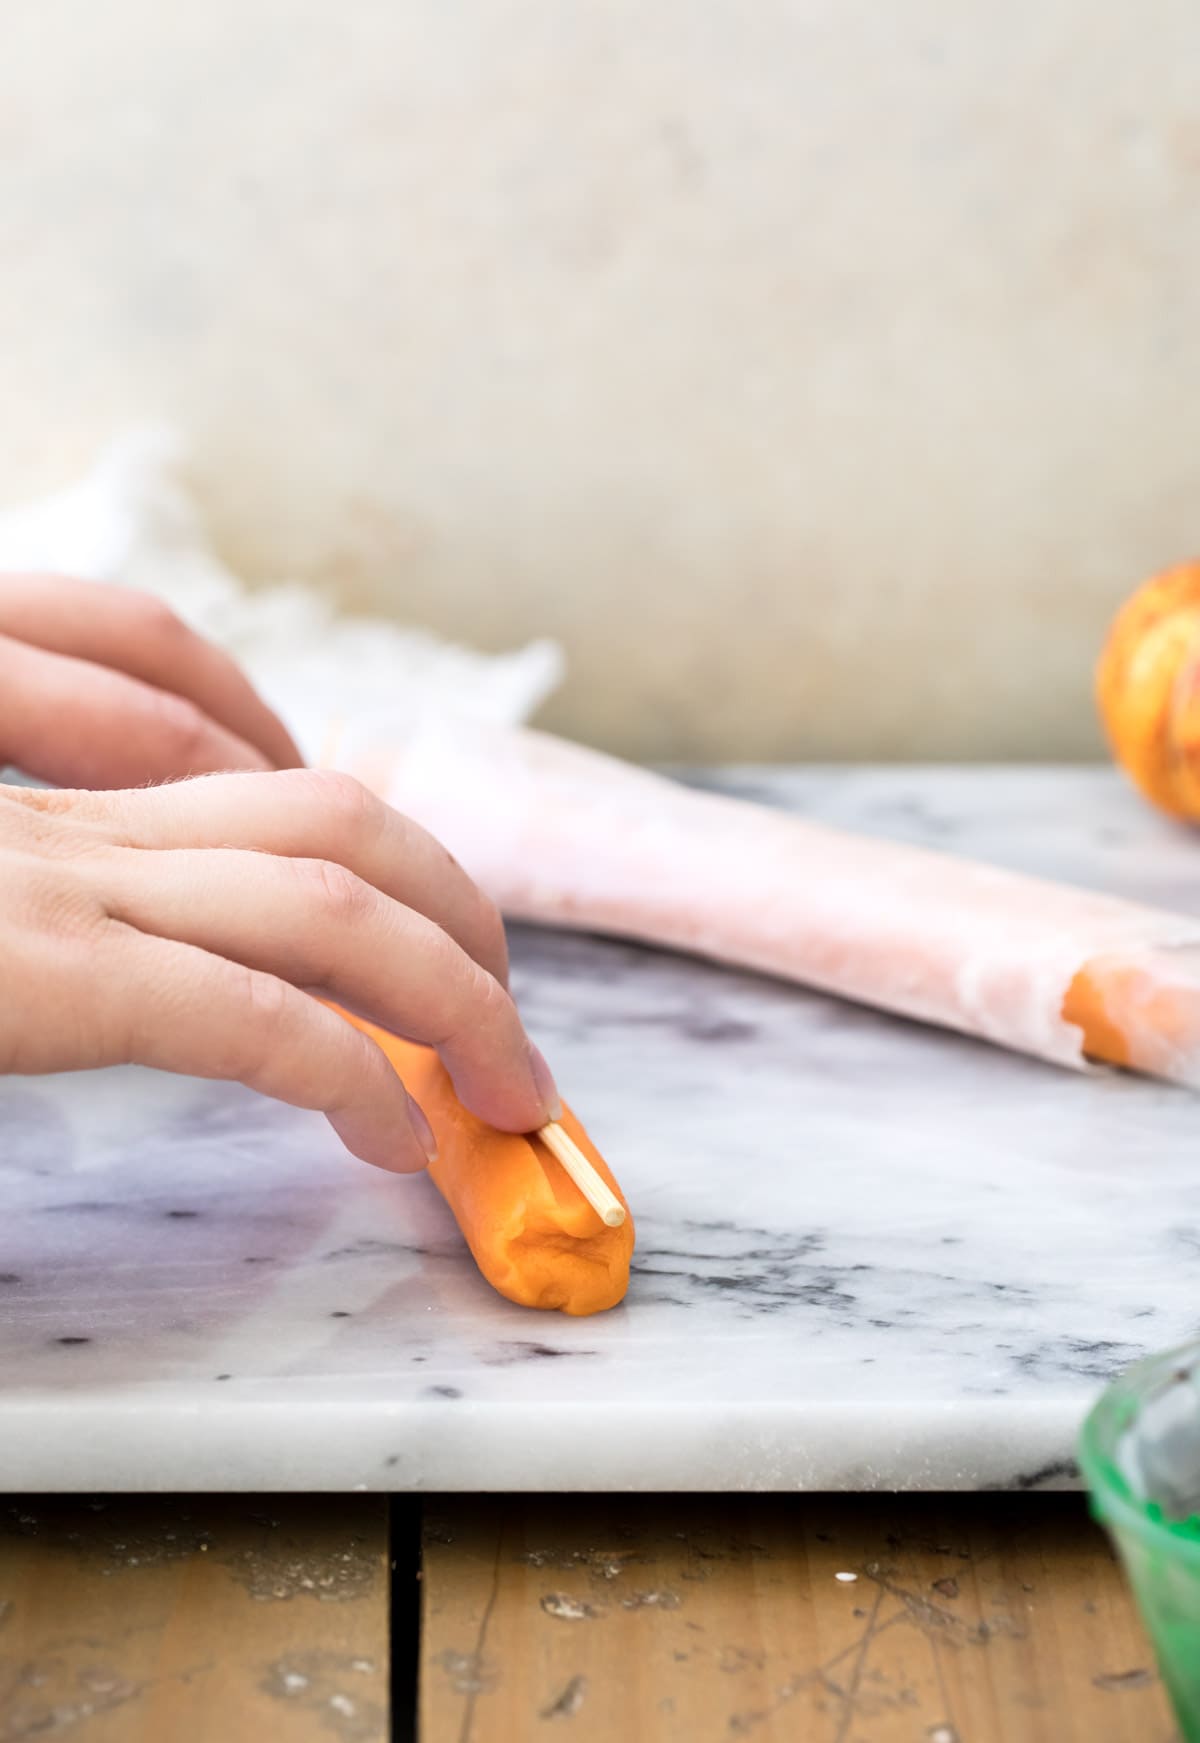
So, rather than use a cookie cutter, I dyed about one fourth of the dough orange and simply formed it into a round log and made it slightly flat on the bottom.
This is how we make our pumpkin!
Details Matter!
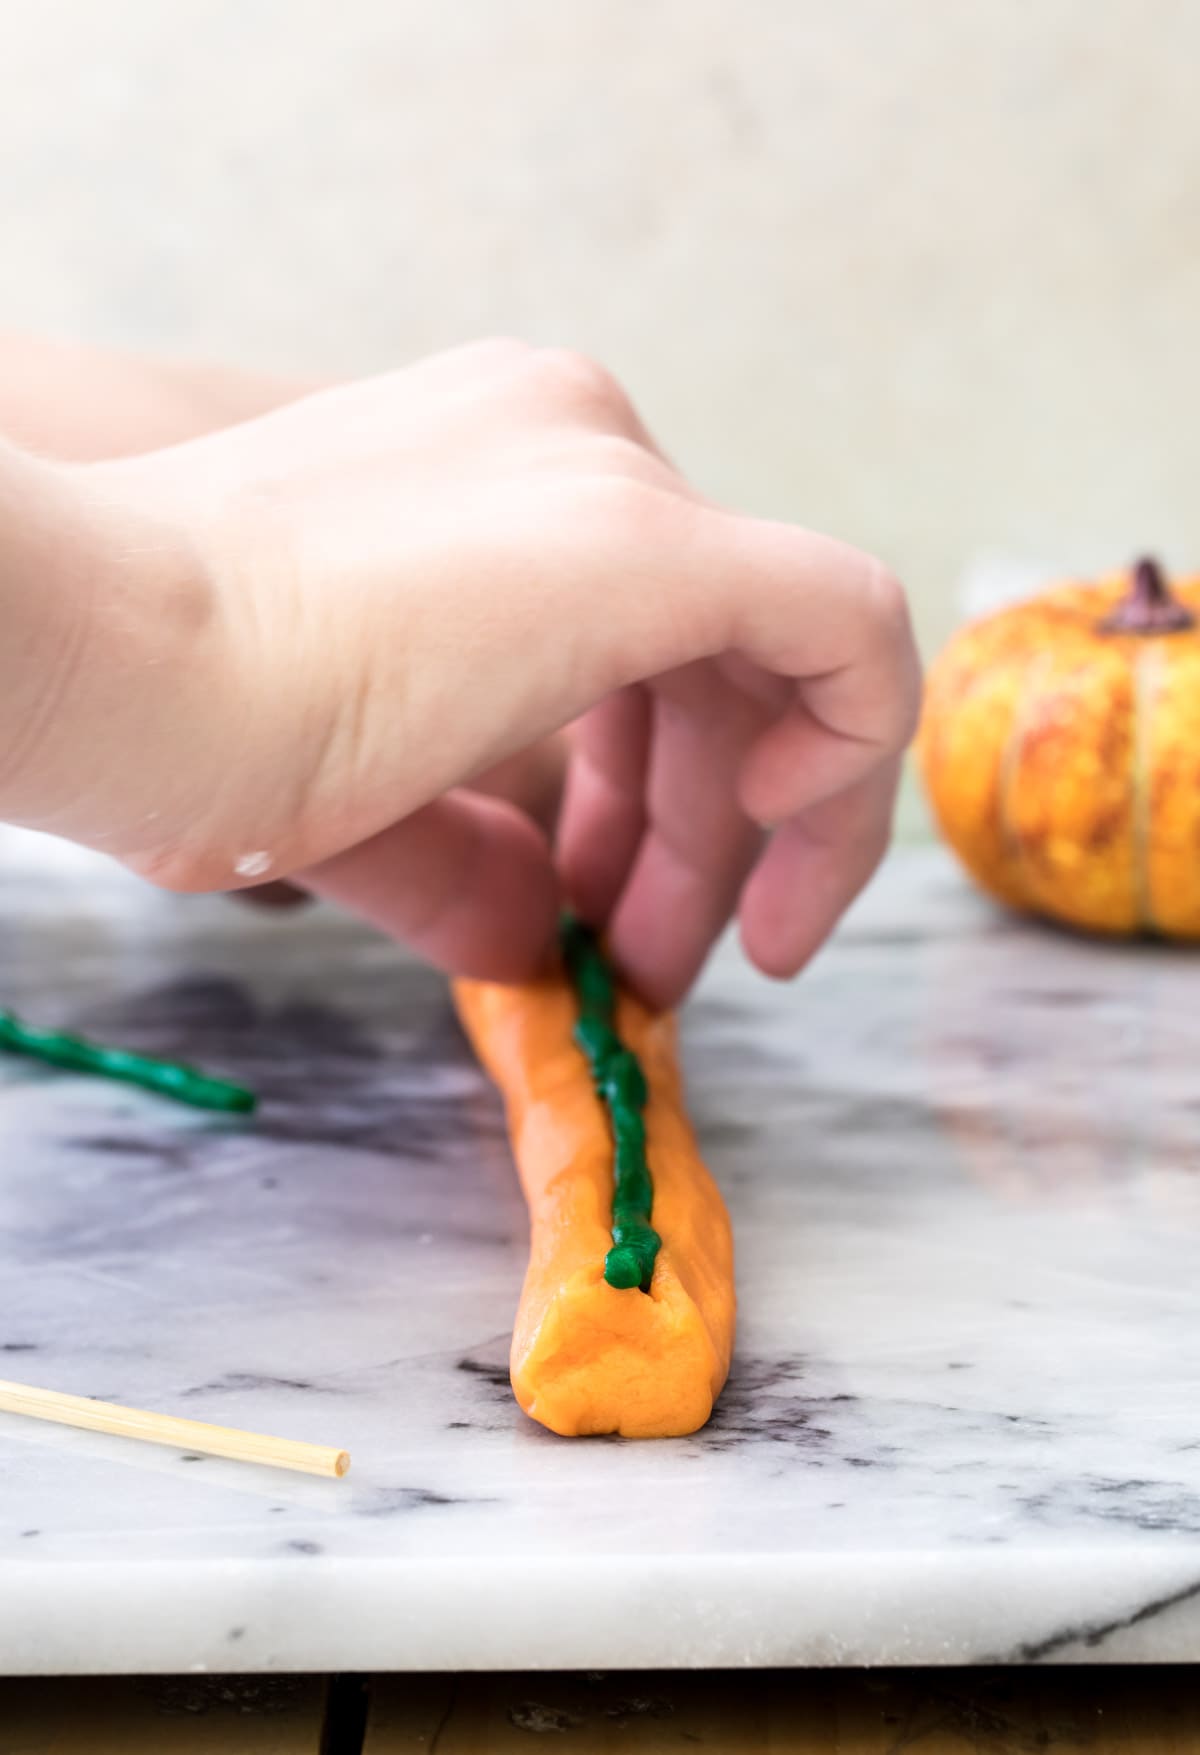
Of course, at this point it’s hard to really tell that it’s a pumpkin, so we need to add another key feature, like a pumpkin stem!
To make the stem I used a wooden skewer (though you could use almost anything, like a butterknife or the edge of a ruler) and make an indent that I’ll place my “stem” into.
Then we make the stem! Take a small bit of the uncolored dough (you only need 1-2 tablespoons) and dye it green (I use gel food coloring because it’s very vibrant, I linked to the colors I used in “equipment” section of the recipe). Roll this into a series of thin ropes (I found that if you try to make one long rope it breaks and can be difficult to manage) and lay it into the indent you just made.
Tip: Don’t bury the stem completely into the indent, you want it protruding from the top of the pumpkin some, like a real pumpkin stem would!
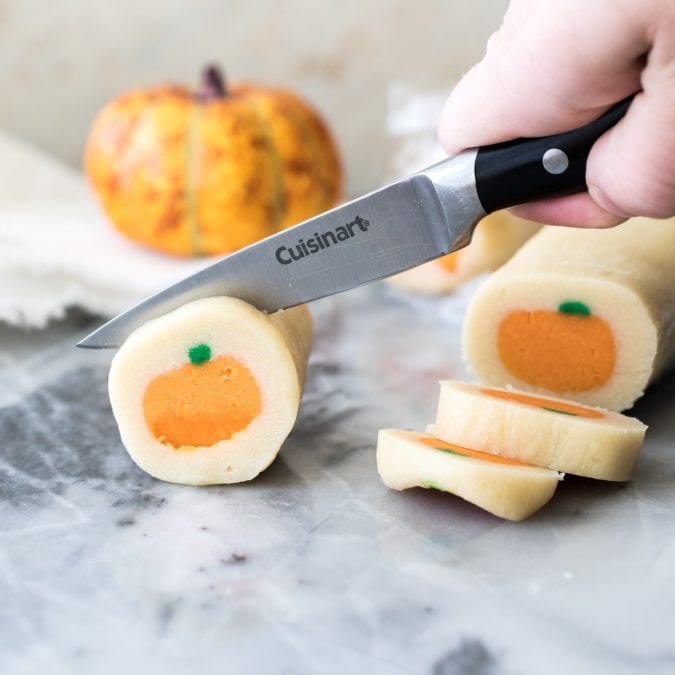
Once you’ve formed your pumpkin log (you’ll actually make two, this is easier to work with than one super long roll of dough) you’ll want to chill it in the freezer until it’s firm enough to be handled without losing its shape.
I usually place mine on a small baking sheet and place them in the freezer for at least 15-30 minutes.
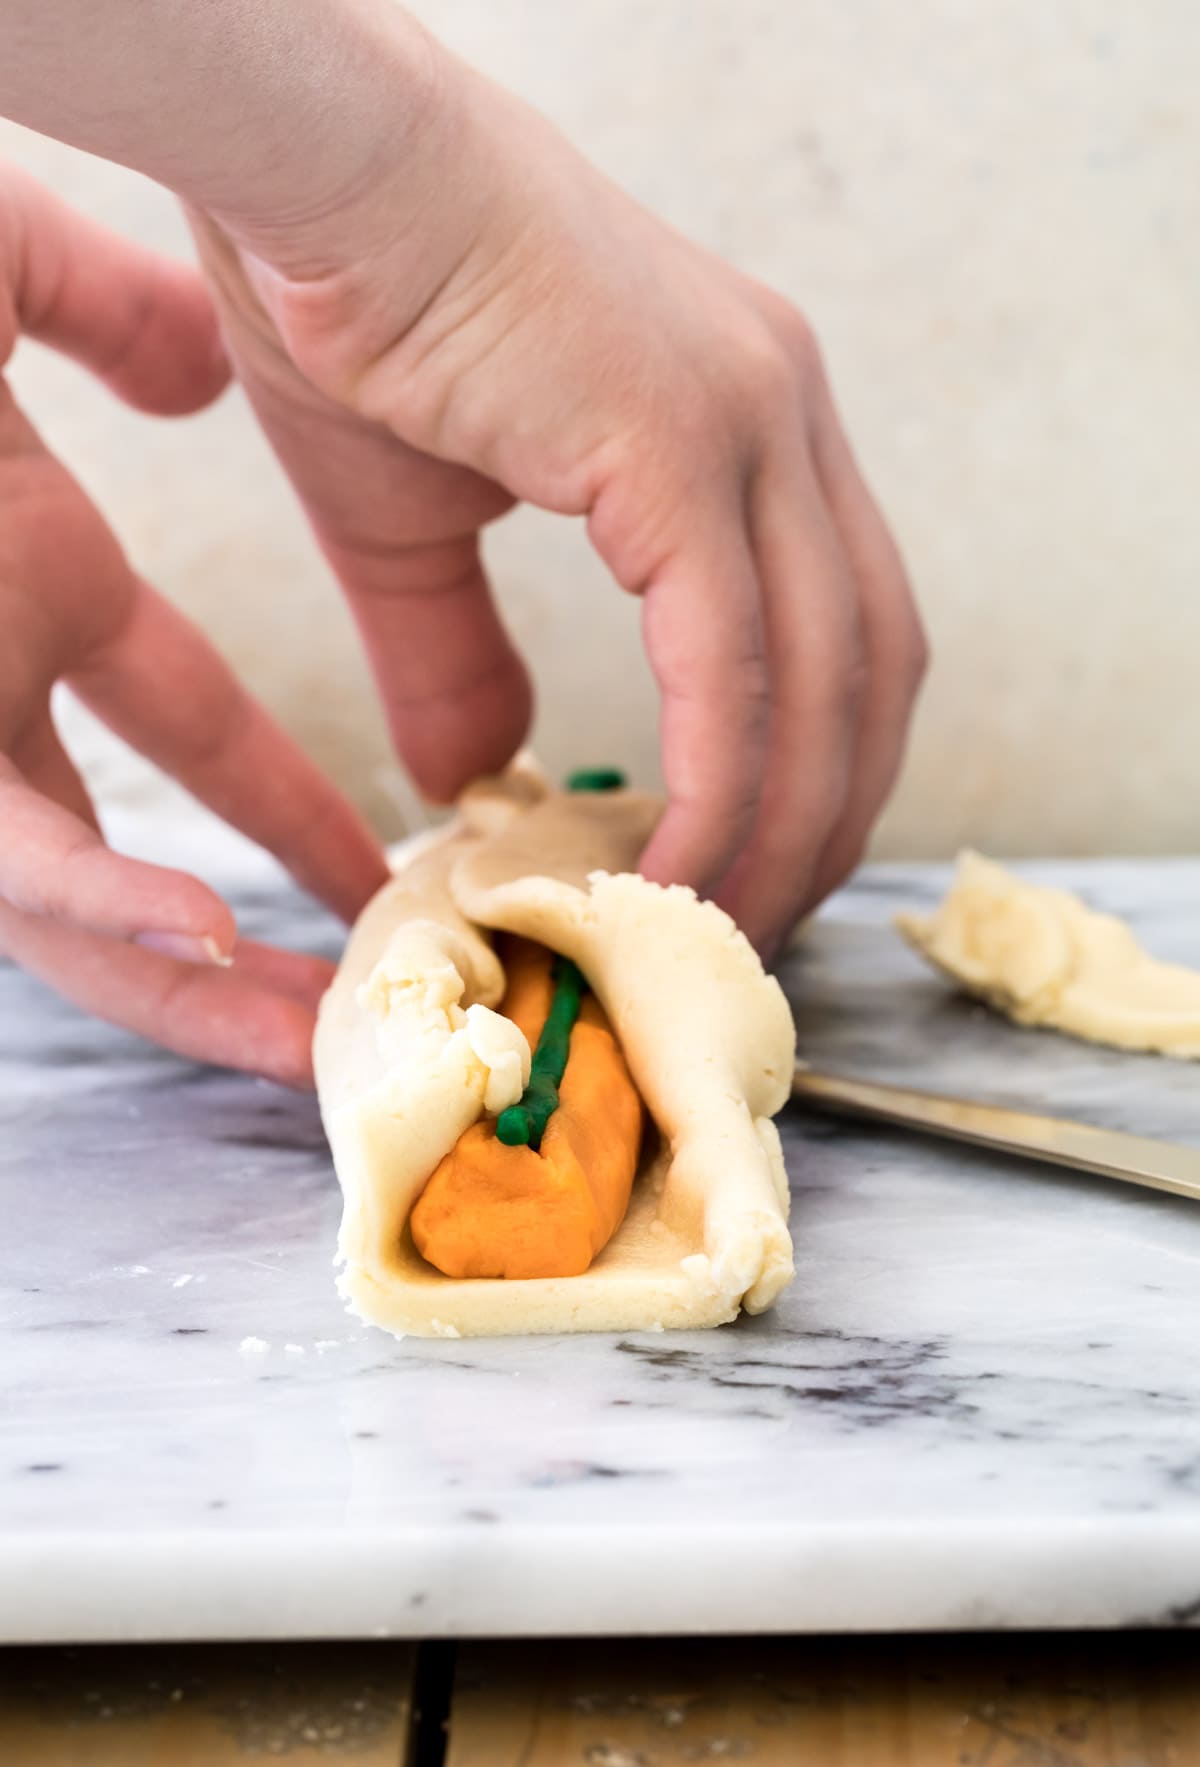
Tip: You don’t want the plain dough to be as cold/firm as the pumpkin-shaped dough, it should be a bit warmer so it’s pliable and easy to wrap around the pumpkin without ruining its shape. Keep it at room temperature, or, if it’s too sticky, pop it in the fridge for about 15 minutes while your pumpkin dough is in the freezer!
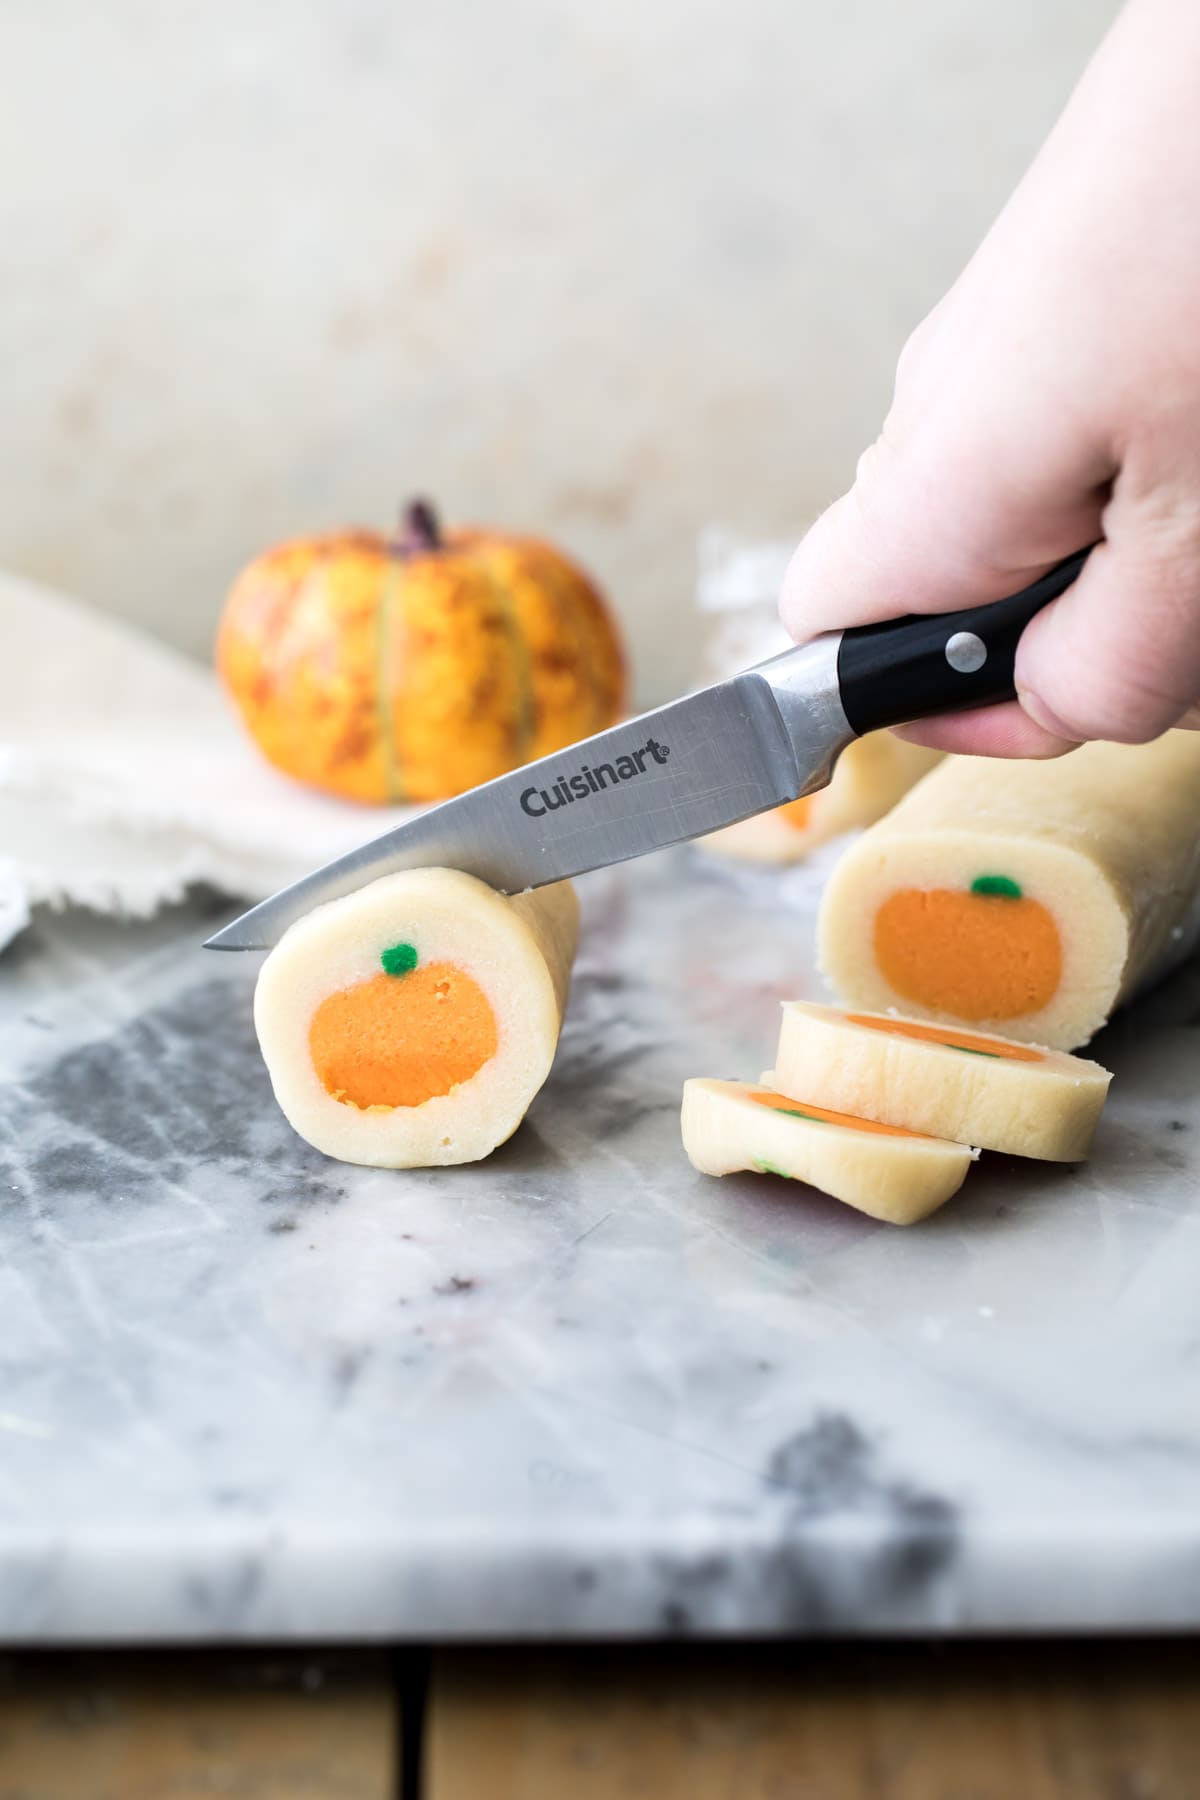
Getting A Pumpkin In A Cookie
Once your pumpkins are prepped and very, very well chilled, it’ time to wrap them in the remainder of your dough. In the photo above, I flattened the uncolored dough quite a bit, more than you really need to. This works just fine, but after making these pumpkin sugar cookies a few times I found it was easier to just wrap the dough around the pumpkin-shaped log the way I did it in the video.
The important thing is that you keep the pumpkin in the center of the dough, so that it has an even perimeter of uncolored cookie around it.
It’s very important that the pumpkin sugar cookie dough chill completely after you form it into logs. It will need to chill for several hours, but you can make it up to a week in advance of slicing and baking (just keep the logs tightly wrapped in plastic wrap!).
Tip: Place the cookie dough logs on a plush kitchen towel to keep them from getting a flat bottom from sitting on the hard refrigerator shelf!
Frequently Asked Questions
Yes, I just prefer gel food coloring because it is more vibrant and you need much less of it than you do liquid.
Yes! After forming the complete cookie dough logs, the dough can be frozen for several months. Thaw the dough overnight in the refrigerator the day before baking, then bake as instructed in the recipe.
You can do this recipe with basically any design, so long as you can shape the design! Small cookie cutters would work (using the method I discussed earlier in the post) or, if it’s a simple shape like a ghost or a Christmas tree, you can form the shape yourself based off of the tips here and otherwise follow the instructions in the recipe.
More Recipes You Might Like
- Spooky Spider Cookies
- Pumpkin Pie Cheesecake Dessert Shooters
- Ghost in the Graveyard Dessert Shooters
- Witch Cauldron Brownie Bites
Enjoy! If you try this recipe (or if you get creative and use this method to make cookies with a different shape!) please make sure to leave a comment or share a picture on Instagram and tag me! 💜
Let’s bake together! Make sure to check out the how-to VIDEO in the recipe card!
Pumpkin Sugar Cookies
Equipment
Ingredients
- 1 cup (226 g) unsalted butter, softened (but not melty!)
- 1 ½ cups (300 g) granulated sugar
- 1 large egg
- 1 teaspoon vanilla extract
- 2 ½ cups (315 g) all purpose flour
- 1 teaspoon baking powder
- ¾ teaspoon salt
- Orange food coloring, I prefer gel food coloring and used Amerigel electric orange, which I’ve linked to in the equipment section
- Green food coloring
Instructions
- Combine butter, sugar, egg and vanilla extract and use an electric mixer or stand mixer to beat until creamy, fluffy, and well-combined.1 cup (226 g) unsalted butter, 1 ½ cups (300 g) granulated sugar, 1 large egg, 1 teaspoon vanilla extract
- In a separate bowl, whisk together flour, baking powder, and salt.2 ½ cups (315 g) all purpose flour, 1 teaspoon baking powder, ¾ teaspoon salt
- Gradually add flour mixture to butter mixture, stirring on low-speed, until all ingredients are completely combined. Pause occasionally to scrape the sides and bottom of the bowl.
- Remove about ¼ of the dough (this is ¾ cup or 220g) and place it in a separate bowl. Remove a tablespoon from that and place in another bowl.
- Add orange food dye to the ¾ cup of dough and stir, adding more until it’s a nice pumpkin-y color. Add green food coloring to the 1 Tablespoon of dough and stir until it’s a vibrant green. Leave the uncolored majority of the dough plain.Orange food coloring, Green food coloring
- If the colored dough is too sticky to manage, pop it in the fridge for about 15-30 minutes. When manageable, divide the orange dough into two pieces and roll each into a skinny log that’s about ⅔” tall by 1” wide. Use a wooden skewer or knife to indent a line into the top of the orange dough (see photo or video for visual if needed).
- Roll the green dough into a series of skinny strips and line these into the indent of the orange log (see photos or video for visual if needed). Repeat with the remaining orange and green dough. Place these on a tray and place in the freezer to chill for 15 minutes to an hour. Cover your uncolored dough and place that in the refrigerator in the meantime.
- When pumpkin logs are firm, remove from freezer and remove uncolored dough from refrigerator. Divide uncolored dough into two pieces and wrap one half around one pumpkin log and the second half around the other. Form a smooth log and mold the dough so the pumpkin is the center. Wrap dough logs with plastic wrap and place on a plush kitchen towel (so the bottom doesn’t flatten) and place in the refrigerator to chill for at least 4 hours and up to one week.
- Before baking, preheat oven to 375F (190C) and line baking sheets with parchment paper (or you may bake directly on ungreased baking sheet).
- Slice dough into ¼” thick slices and space cookies at least 2” apart on prepared baking sheet.
- Bake in 375F (190C) oven for 10 minutes or edges are just beginning to turn a light golden brown. Allow cookies to cool completely on baking sheet before enjoying.
Nutrition
Nutrition information is automatically calculated, so should only be used as an approximation.
Like this? Leave a comment below!


I made these today, and they turned out so good and look absolutely adorable! Thank you for the recipe!
I’m so glad you enjoyed them so much, Cindi! 🙂
This is a HUGE HIT at my house!!! Thank you so much for coming up with this delicious recipe!! I made these for Thanksgiving (they were gone so fast, that I had to make a(nother) double batch just to bring to our family dinner!)
I just made this recipe into pink hearts instead of pumpkins, for Valentine’s Day today. My kids and husband can hardly wait!! They’re chilling in our fridge right now… We love your reliably delicious recipes. Thank you 🥰 I would buy a cookbook of your recipes!
I’m so glad they were such a hit, Julianna! I am working on a cookbook currently. It is taking me some time, but I am working on it. 🙂