
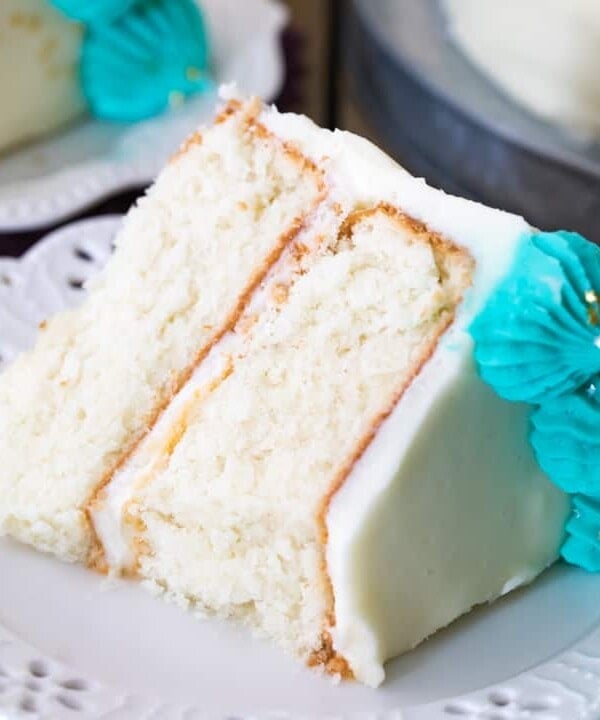
Oreo Cake
This post may contain affiliate links. As an Amazon Associate I earn from qualifying purchases. Please read my disclosure policy.
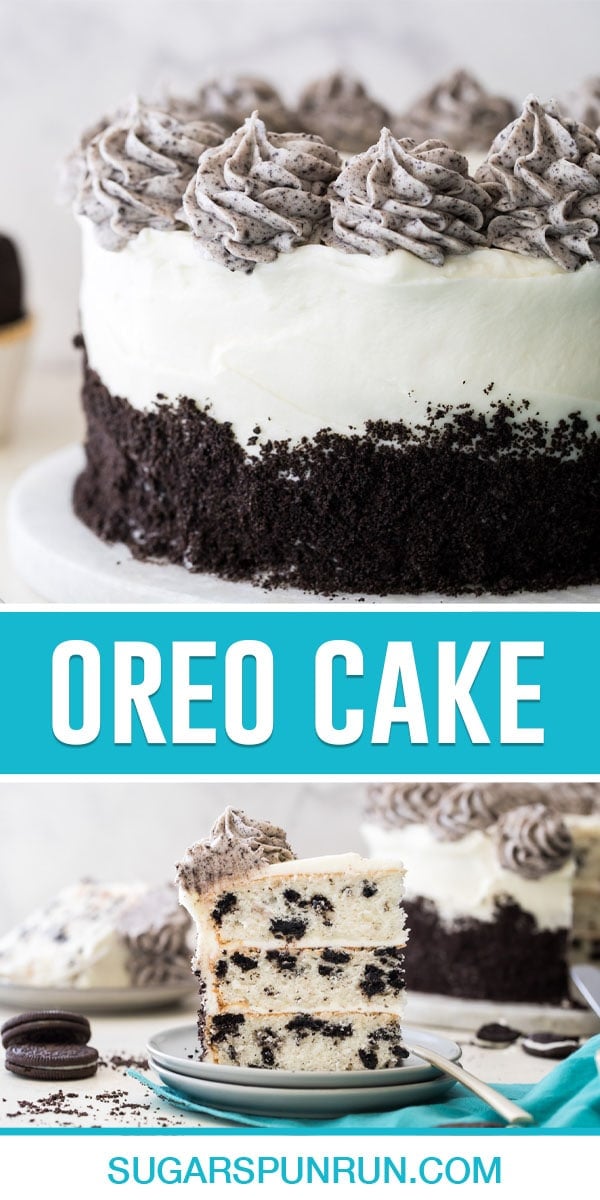
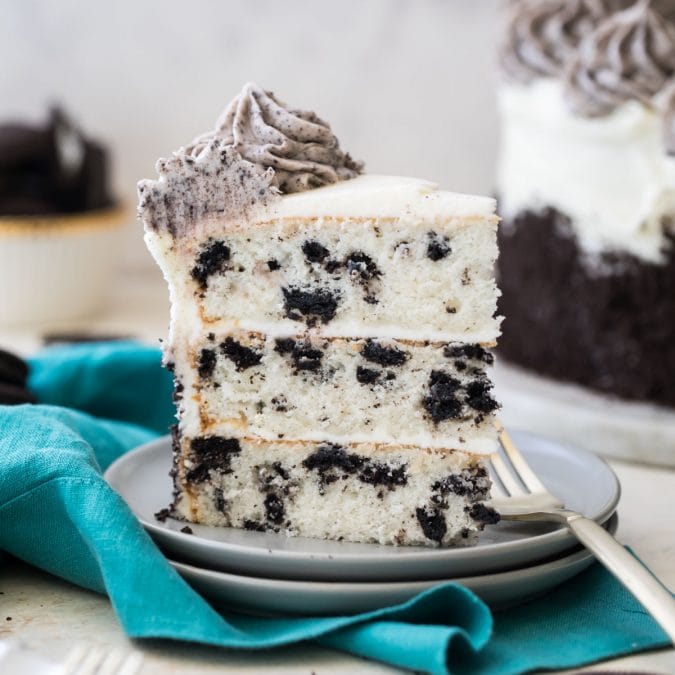
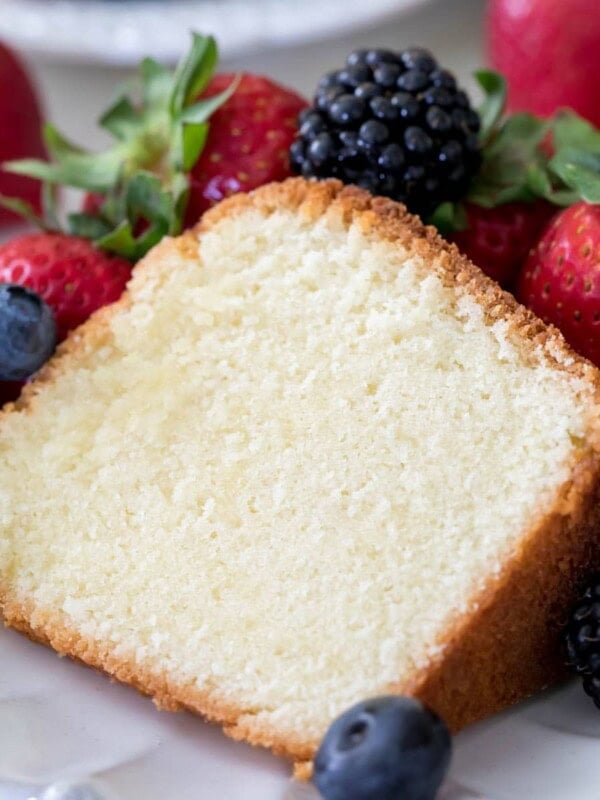
You’ll love this fluffy, made-from-scratch Oreo Cake! It’s peppered with cookie pieces and covered in a cookies & cream-style frosting. My recipe can be made as a two or a three layer cake and includes a how-to video!
The BEST Oreo Cake Recipe
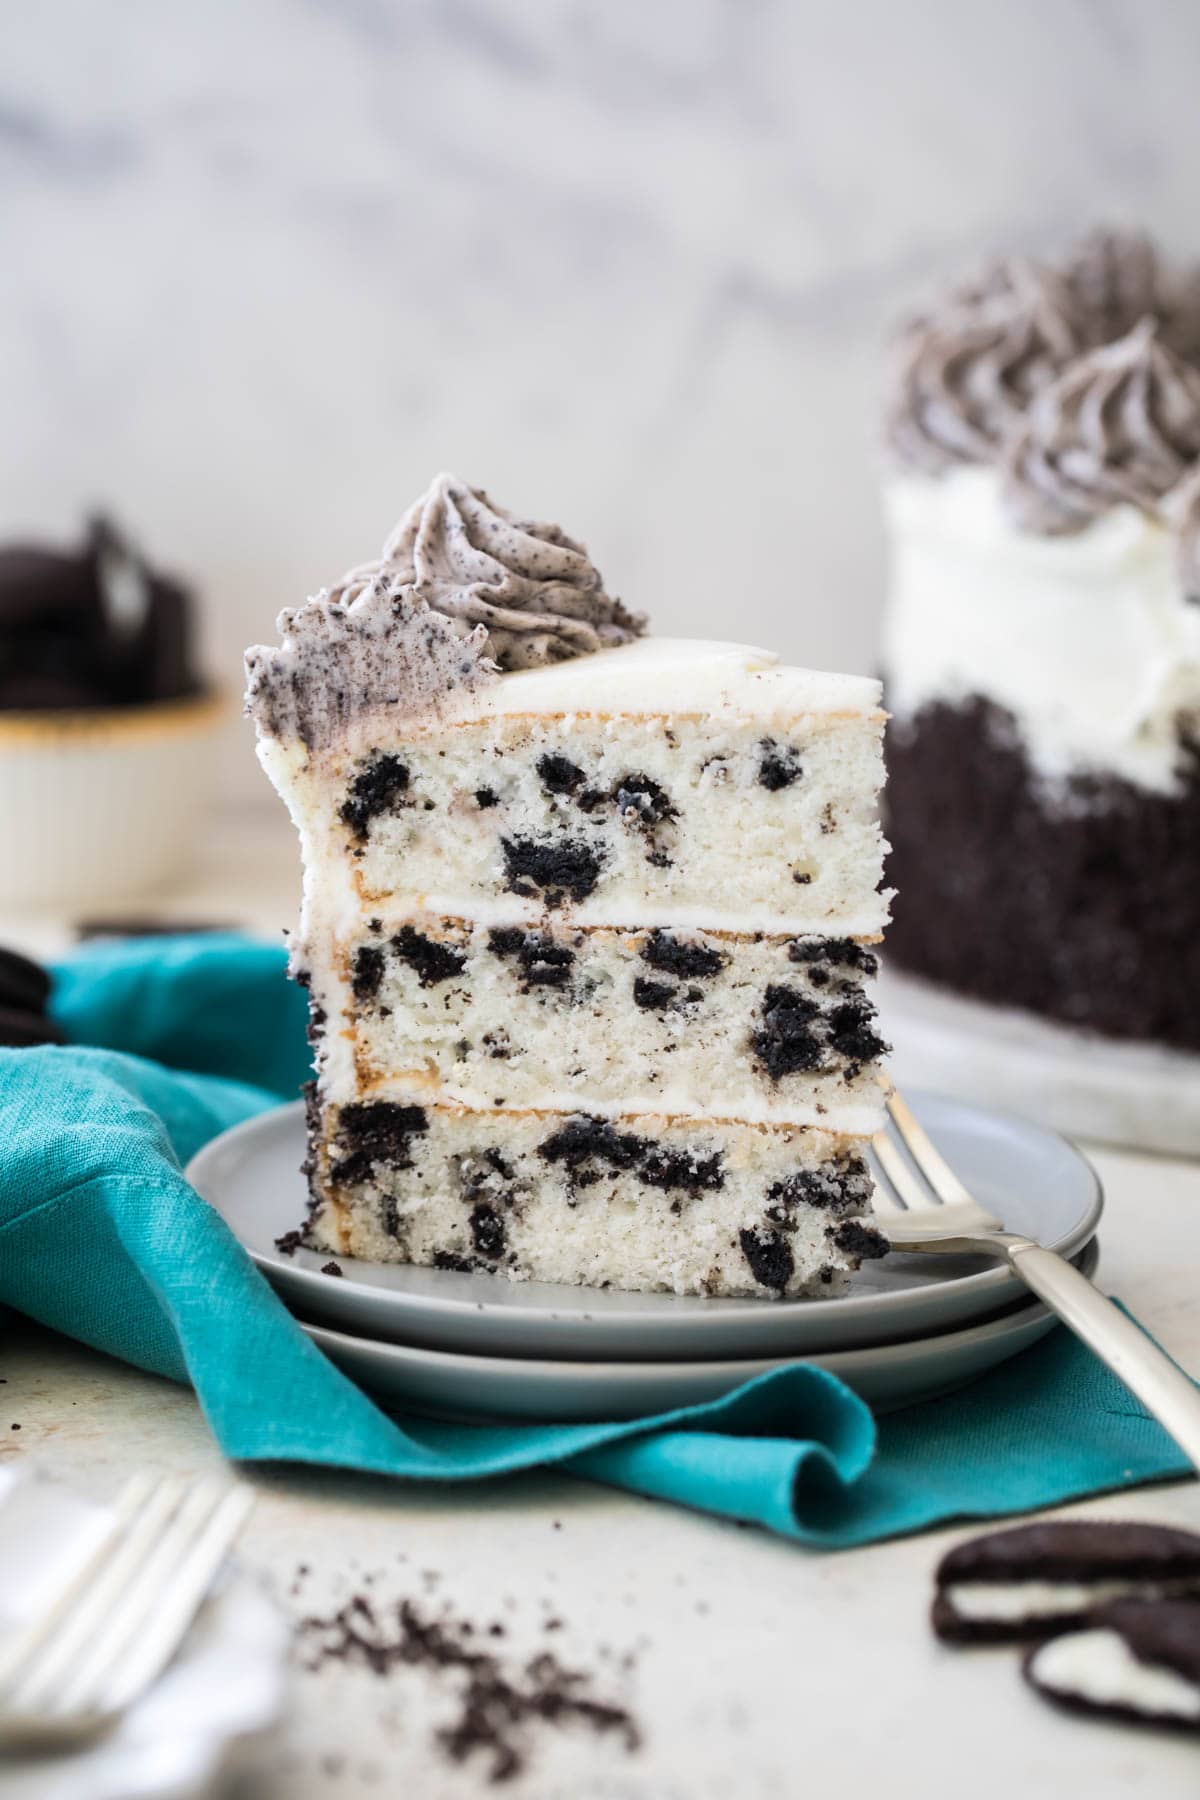
Why choose between cookies and cake when you can have both? My Oreo cake combines the best of both desserts and turns them into a plush, soft, amazingly tender, cookie-filled cake! It’s frosted with my favorite cream cheese frosting (though I do include a few alternative options) and stacked tall for impressive results. For such humble inspiration, this one is a stunner!
Cakes have always been an endeavor for me to develop because I am a cake perfectionist (OK, I’m a perfectionist with every recipe, my madeleines took over 100 attempts to get right). Fortunately, developing this Oreo cake was easier than usual because I borrowed heavily from my zebra cake. Just as with that recipe, we’ll also be using the reverse creaming method today (it’s easy, a new favorite of mine and I think it’ll be a new favorite technique of yours, too!).
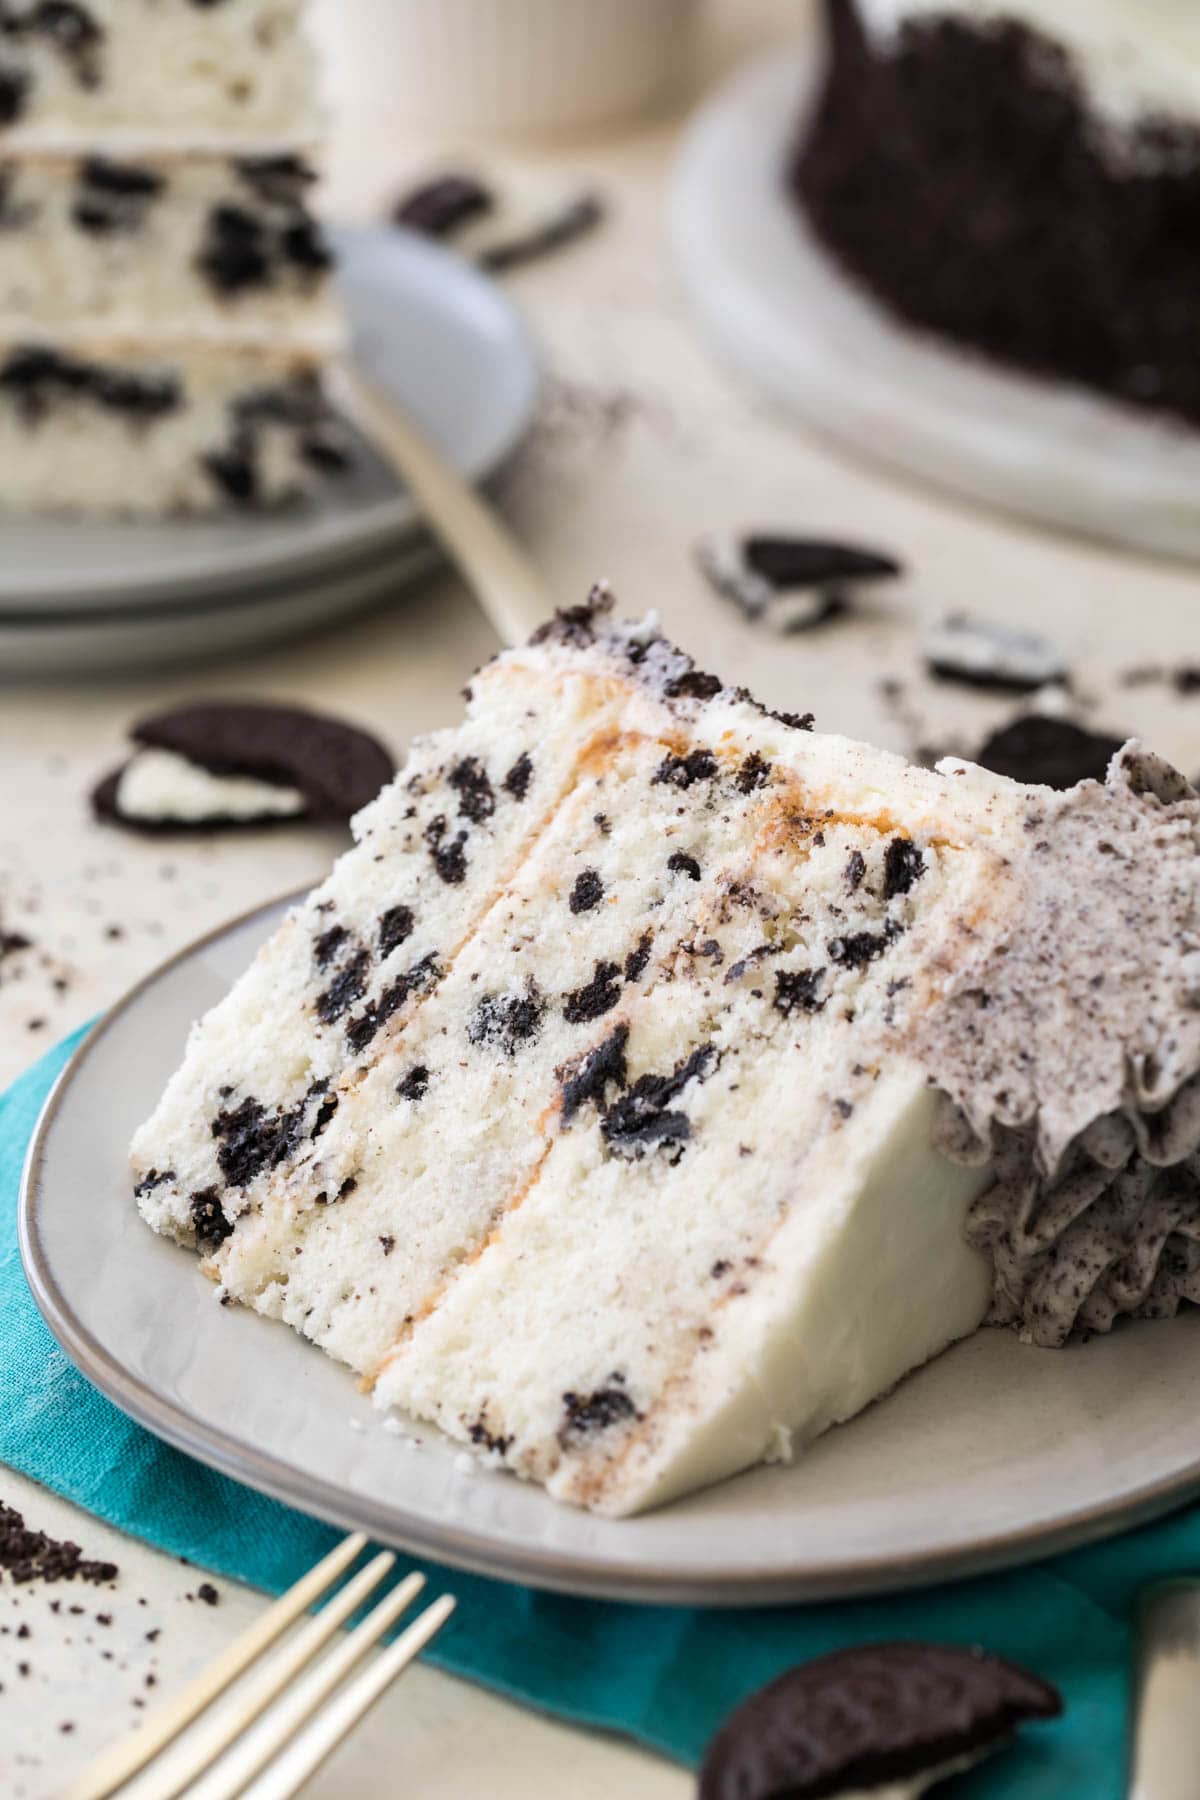
Combined with whipped egg whites, this method creates a bright white base that contrasts beautifully against the black cookies pieces…and don’t even get me started on the texture! It’s wonderfully light, springy, and fluffy (just like my strawberry cake), but still stable enough to stack. And yes, it can hold its own under fondant too!
What You Need
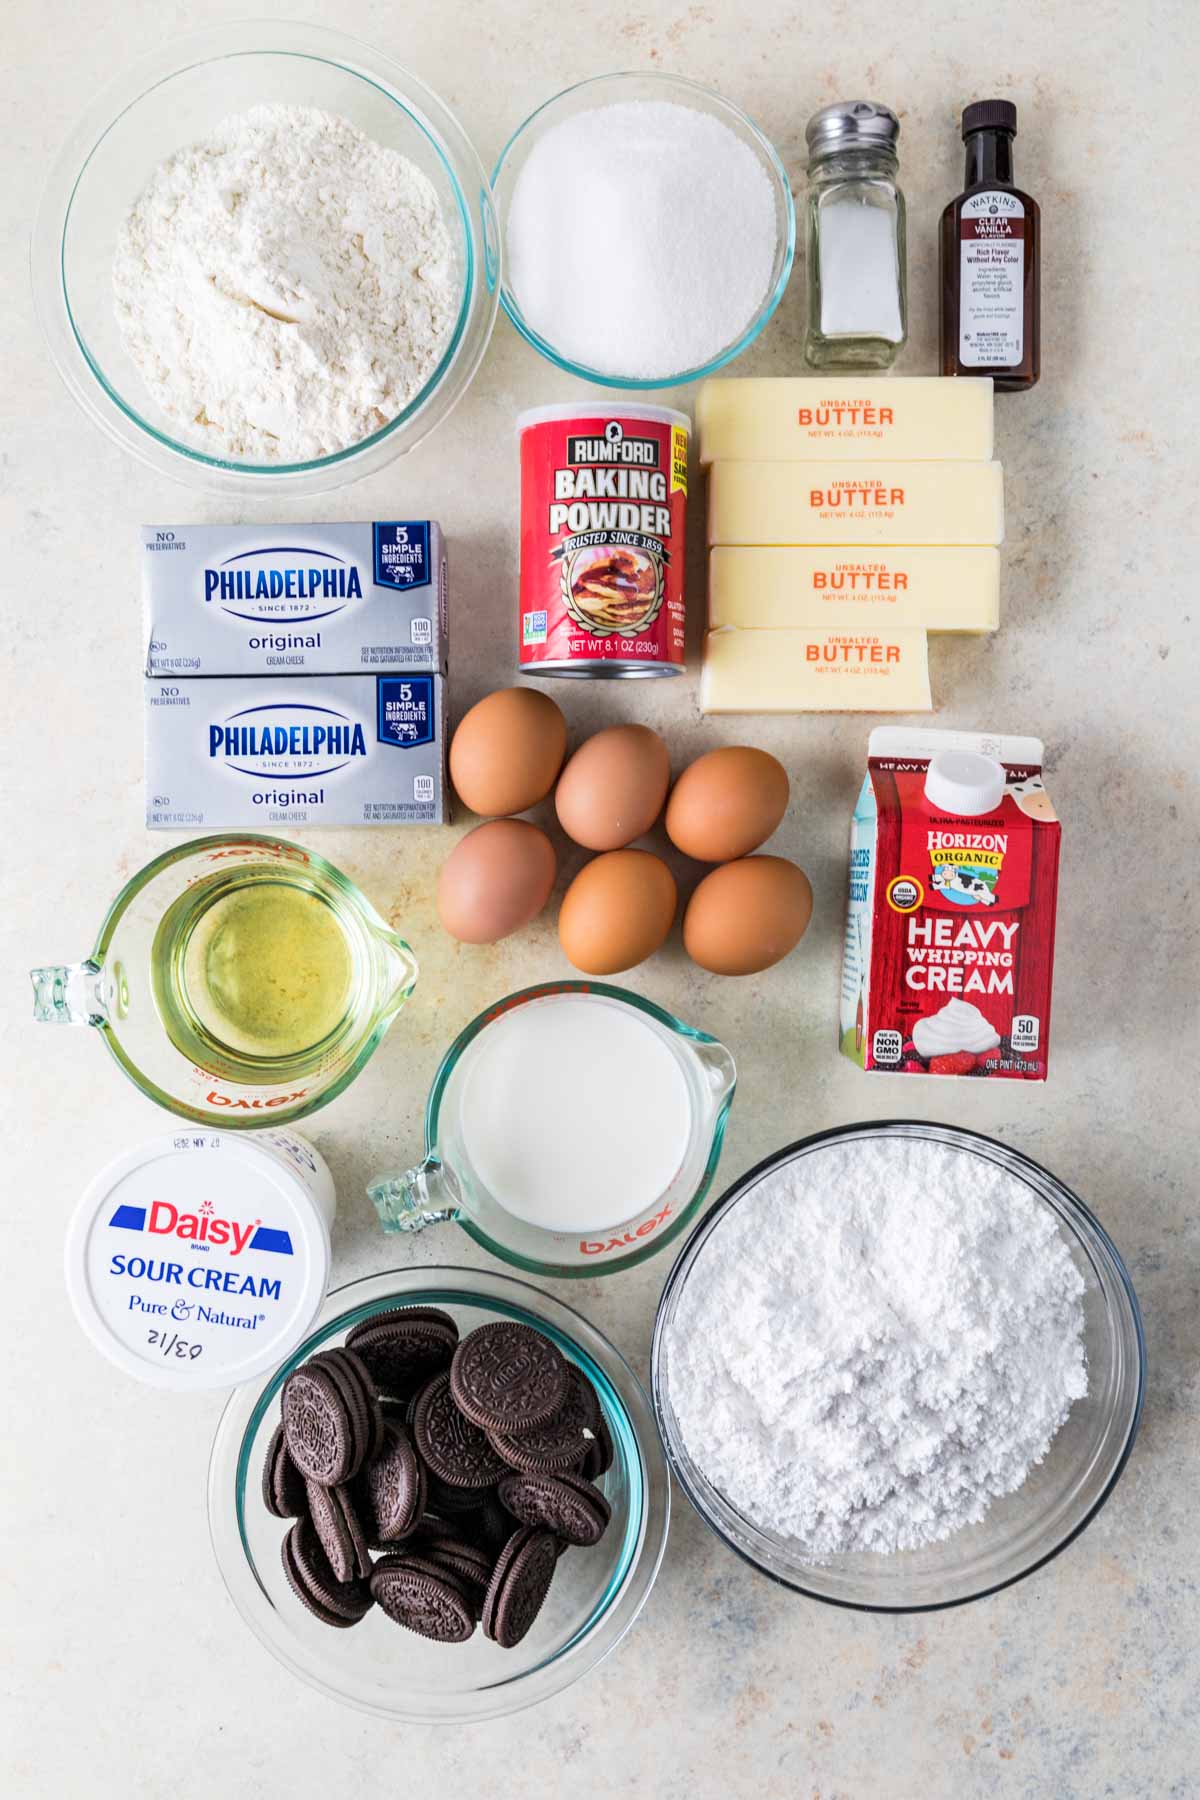
Here are the key ingredients in today’s Oreo cake recipe:
- Oreos. You’ll use the entire cookie sandwich–no need to remove the filling. I just roughly break my cookies into pieces by hand. Don’t make the pieces too small and don’t over-mix once you add them to the batter, or you’ll end up with an Oreo cake that’s grey without discernible pops of cookie.
- Egg whites. Separate your eggs yourself and do NOT use the kind from the carton–those don’t always whip nicely. Don’t want to waste your egg yolks? Use them to make my pound cake, chocolate pie, creme brulee, lemon pie, or key lime cheesecake.
- Sour cream. I love using sour cream in my cakes to add moisture and flavor (it won’t make it taste like sour cream though!). If you can’t find sour cream, full-fat, plain Greek yogurt will also work.
- Vanilla extract. If you can find it, use clear vanilla extract. This will yield the whitest, brightest Oreo cake that will contrast beautifully against the cookies.
- Cream cheese. Use full-fat, brick-style cream cheese for the frosting. Tub-style or low-fat cream cheese makes for a runny, messy frosting that is nearly impossible to use.
SAM’S TIP: While we want our Oreos in larger pieces for the Oreo cake itself, we want them totally pulverized for the frosting decoration (use a food processor if you have one; I love this multi-tool for quick jobs like this). Otherwise, when you pipe the swirls on top, the cookie pieces will clog the piping tip, and there is not much more frustrating than that!
Remember, this is just an overview of the ingredients I used and why. For the full recipe please scroll down to the bottom of the post!
Reverse Creaming
As with my caramel cake and yellow cake, I make my Oreo cake batter by using the reverse creaming method. I’ve been on a kick with this method recently, not only for the results, but also the process. It’s much harder to over-mix a cake when using this technique.
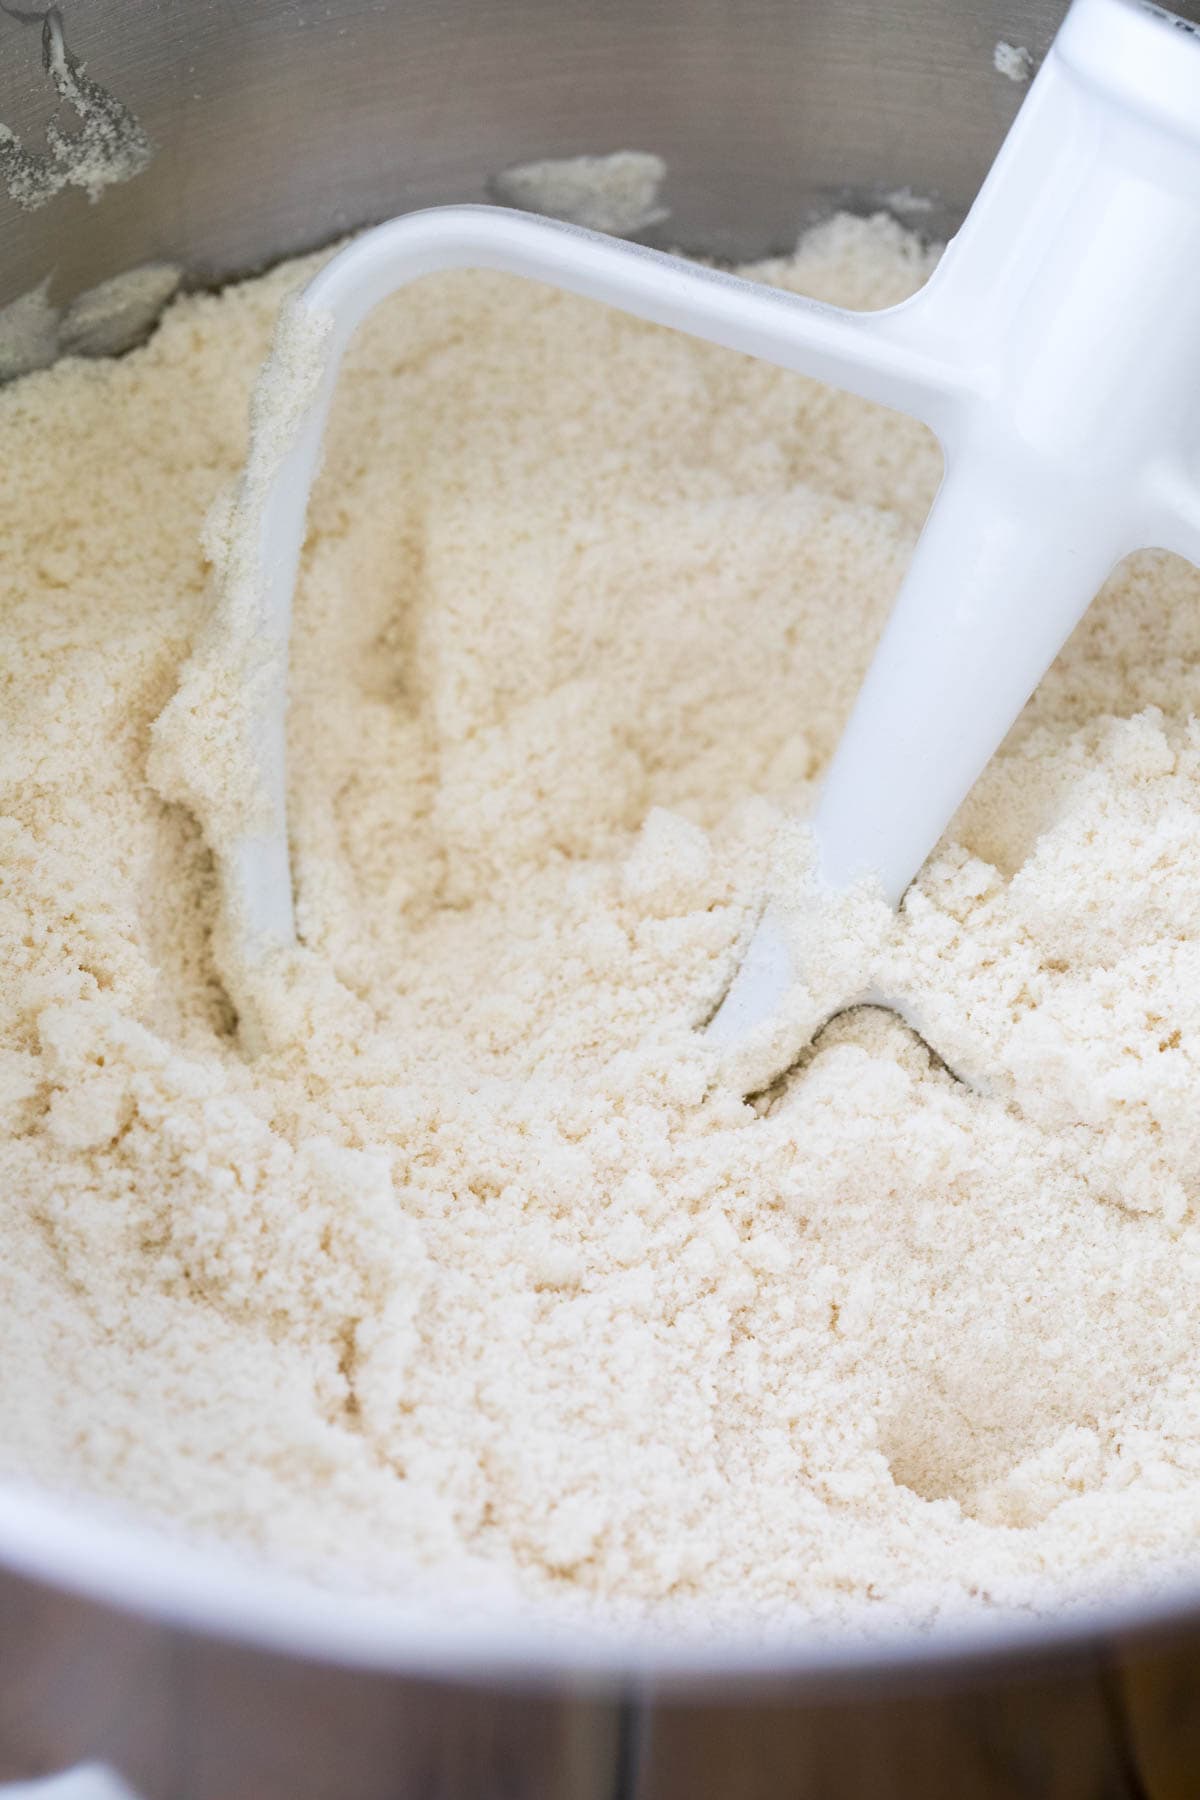
It does take a bit of patience, though. We’ll slowly be adding our butter to the dry ingredients, adding one tablespoon at a time until it’s been incorporated into the flour. This method allows us to coat all of the flour with fat from the butter, making for a supremely tender and moist cake with a tight (but soft) crumb.
Whipped Egg Whites
We are using just egg whites in this recipe for two important reasons:
- Color. By eliminating the egg yolks, we keep the crumb of the Oreo cake a pristine white color, which contrasts nicely against the black cookie crumbs. I first dabbled with egg whites when I developed my white cake recipe, and I was so impressed with the results, I’ve used them over and over (and over and over).
- Texture. The color is a lovely plus for this black & white cake, but more importantly, whipped egg whites = light and fluffy texture. This Oreo cake is sturdy enough to be stackable, but its crumb is still very light, plush, and soft.
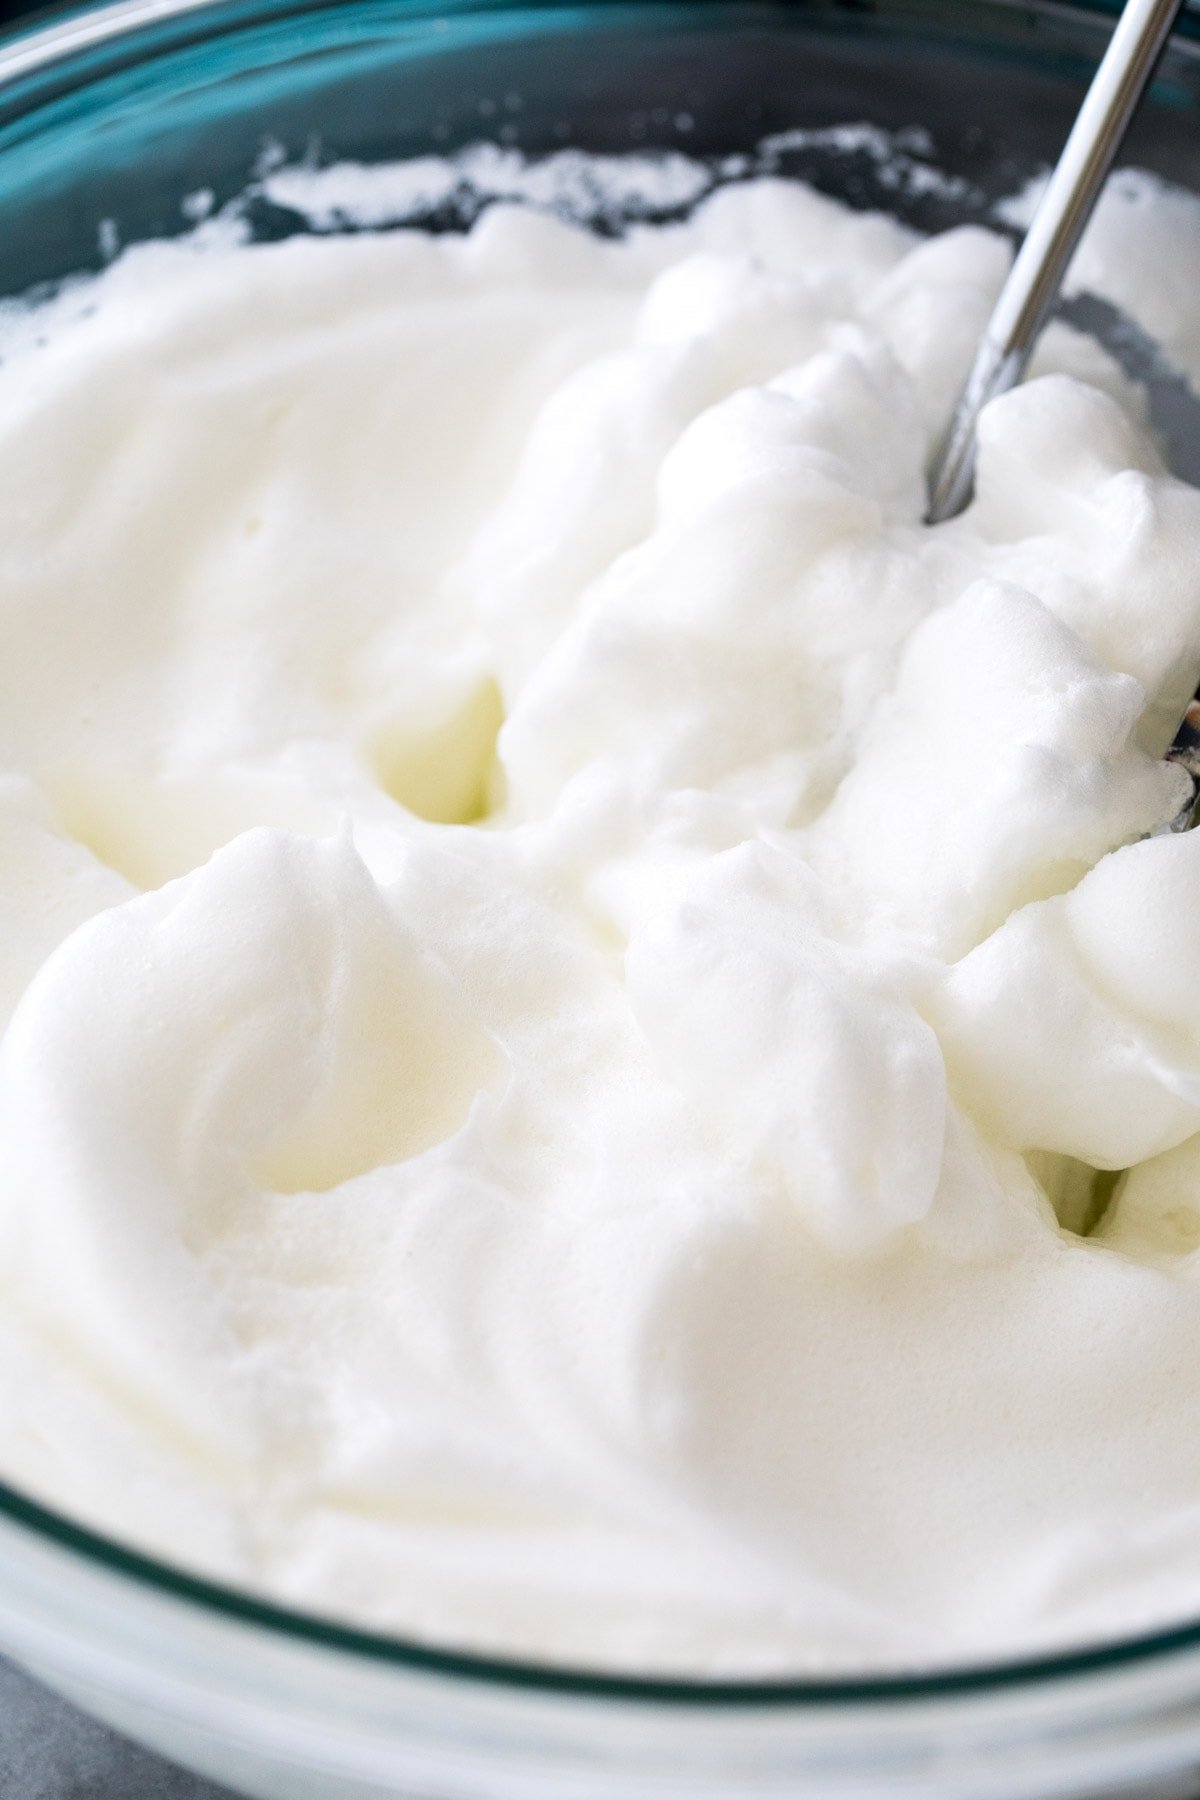
The photo above shows what your whites should look like once they reach the “stiff peaks” stage. They’re billowy, opaque, and thick and will have increased in volume greatly. If you lightly touch them should hold their shape. They’ll feel almost foam-like (but sturdy) and are more solid than wet. This will take several minutes to achieve, and I highly recommend using an electric mixer, as doing this by hand would take a very long time.
To ensure you’ve achieved stiff peaks, lift your beater directly out of the whites; the peak that forms should hold its shape (a peak!) without dissolving back into the bowl or folding over itself.
Once you add your egg whites though, switch to a spatula and be gentle–never use an electric mixer for this step! The whites should be thoroughly incorporated to ensure there are no lumps; however, you don’t want to mix too much, or you could deflate all the air you just whipped in.
SAM’S TIP: Whip your eggs in a completely clean, dry, and grease-free bowl. And don’t even get a tiny bit of yolk in there with the whites–otherwise your whites may never reach stiff peaks!
Once you master whipping egg whites to stiff peaks, you’ll be ready to tackle many other recipes, like meringues and pavlova!
How to Make Oreo Cake
- Combine the dry ingredients – Whisk together the flour, baking powder, sugar, and salt.
- Gradually add the butter – Add the softened butter one tablespoon at a time with the mixer on low speed.
- Stir in the wet ingredients – Add the oil, then stir in the sour cream and vanilla. Add the milk and stir on low until fully incorporated.
- Whip the egg whites – Beat the egg whites to stiff peaks in a separate, grease-free bowl, then gently fold them into the batter.
- Divide between pans and bake – Stir in the broken Oreo pieces, then transfer your batter to your greased, floured, and lined pans. Bake for 30-35 minutes at 350F.
- Frost and enjoy! Let the cakes cool in their pans for 15 minutes before removing to a cooling rack. Once cooled completely, stack and frost the cake as desired.
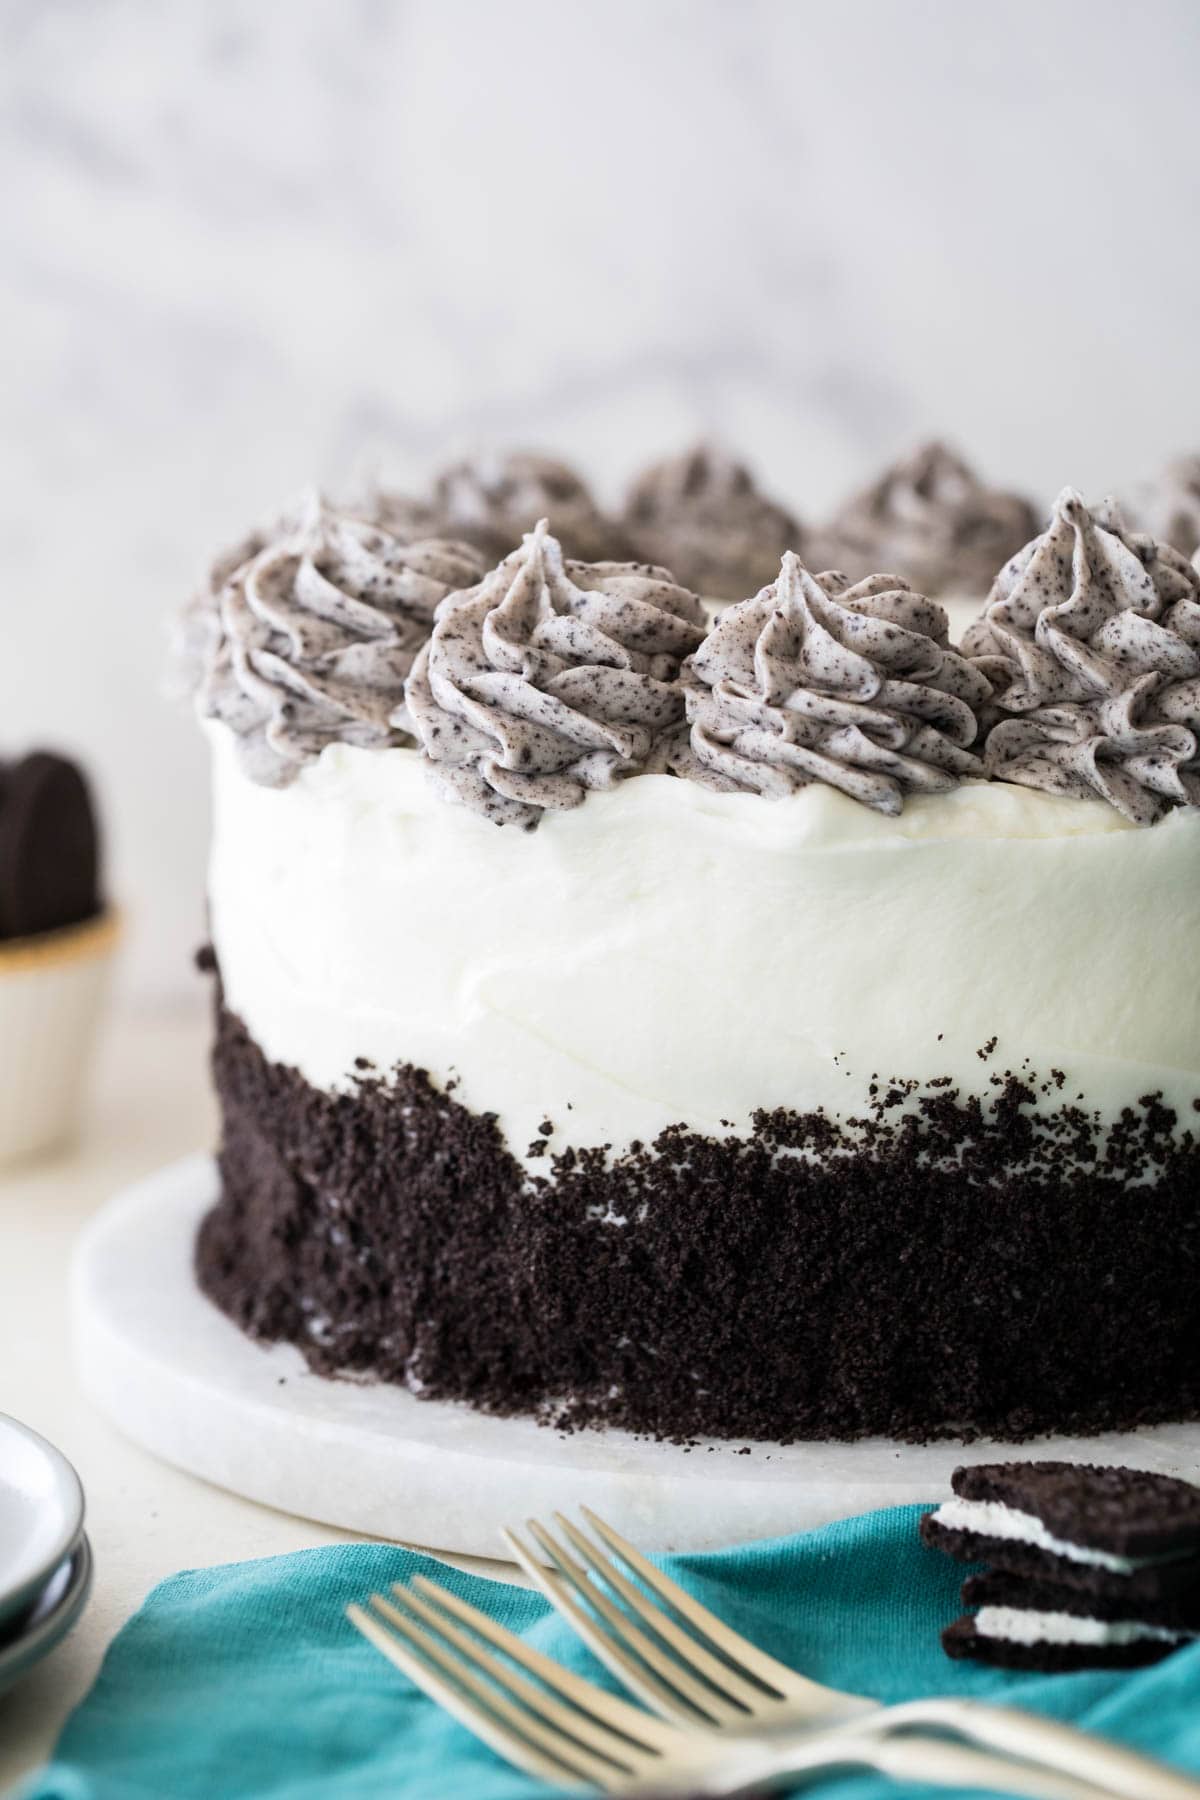
SAM’S TIP: I like to decorate my Oreo cake by pressing Oreo crumbs halfway up the sides and piping swirls on the top (instructions included below!), but you can get as creative or simple with the decoration as you like.
Frequently Asked Questions
The cake layers can be made and stored at room temperature for 1-2 days, in the fridge for up to a week, or in the freezer for several months (wrap them really well in plastic first!). Always store in an airtight container.
The frosting can be made up to a week in advance and stored in an airtight container in the fridge. You will need to let it sit at room temperature for about 30 minutes and stir well before using. Don’t add the additional cookie crumbs for the decorative swirls on top until you are ready to decorate.
If you want a 2 layer cake, don’t change the recipe, just only fill each cake pan 3/4 of the way full (no higher!) and discard the extra batter (or use it to make a couple of cupcakes or mini cupcakes!). I provide detailed instructions on this in the recipe notes below.
For cupcakes, I recommend using my Oreo cupcake recipe instead.
This Oreo cake recipe can also be made in a 9×13 sheet pan (no adjustments to the recipe needed).
Over-mixing, over-baking (by even a minute or two) and over-measuring your flour will result in a cake that is dense, dry, or even one that tastes like cornbread. Avoid all of these things!
Use clear vanilla extract and break your crumbs by hand, shaking out any fine crumbs. Crushing your Oreos too small or using too many finely crushed crumbs will cause your cake to look dirty or grey.
I know you’re going to love this one ❤️
Enjoy!
Let’s bake together! I’ll be walking you through all the steps in my written recipe and video below! If you try this recipe, be sure to tag me on Instagram, and you can also find me on YouTube and Facebook
Oreo Cake (Cookies & Cream Cake!)
Ingredients
- 2 ½ cups (315 g) all-purpose flour¹
- 2 cups (400 g) granulated sugar
- 1 Tablespoon baking powder
- 1 teaspoon salt
- 6 Tablespoons (85 g) unsalted butter softened to room temperature
- ⅔ cup (157 ml) avocado oil, canola oil or vegetable oil
- ½ cup (120 g) sour cream
- 1 Tablespoon clear vanilla²
- ¾ cup (175 ml) whole milk room temperature preferred
- 6 large or extra large egg whites³, , room temperature preferred (see note for suggestions on recipes to try with leftover egg yolks.)
- 20 Oreo cookies, broken into pieces
Cream Cheese Frosting ⁴
- ¾ cup (170 g) unsalted butter, softened, use full-fat brick-style cream cheese
- 12 oz cream cheese, softened
- 5 ¼ cup (655 g) powdered sugar
- ¼ teaspoon salt
- 1 ½ teaspoons clear vanilla extract
- 1 Tablespoon heavy cream, optional
- 10 Oreo cookies, pulverized to fine crumbs (if any significant pieces remain they will clog your piping tip)
Instructions
- Preheat your oven to 350F (175C) and prepare three 8-inch round cake pans (see note 5 to make in two pans) by lining the bottom of each pan with a round of parchment paper and greasing the sides with baking spray.
- In the bowl of a stand mixer (or in a large bowl using an electric mixer) whisk together flour, sugar, baking powder, and salt.2 ½ cups (315 g) all-purpose flour¹, 2 cups (400 g) granulated sugar, 1 Tablespoon baking powder, 1 teaspoon salt
- Turn mixer to low-speed and add butter, one tablespoon at a time, not adding the next tablespoon until the first is completely combined. When you’re finished, the mixture should resemble coarse sandy crumbs (see video above for visual).6 Tablespoons (85 g) unsalted butter softened to room temperature
- Add canola oil and stir until combined, then add sour cream and vanilla extract and stir on low-speed until completely combined. With mixer still on low-speed, add milk until combined.⅔ cup (157 ml) avocado oil, canola oil or vegetable oil, ½ cup (120 g) sour cream, 1 Tablespoon clear vanilla², ¾ cup (175 ml) whole milk room temperature preferred
- In a separate bowl that is completely clean, dry, and grease-free, use clean, dry beaters to beat egg whites to stiff peaks (I show a visual of this in the post above and in the video if it's your first time doing this!).6 large or extra large egg whites³,
- Use a spatula to gently fold your whipped egg whites into batter (don’t overmix, but make sure there are no lumps of egg white remaining).
- Carefully fold in broken Oreo pieces. Divide batter evenly into prepared baking pans and transfer to 350F (175C) oven and bake for 30-35 minutes or until the tops spring back if lightly touched and a toothpick inserted in the center comes out clean or with a few moist crumbs. If your oven does not bake evenly you may need to rotate pans halfway through baking.20 Oreo cookies
- Allow cakes to cool in pan for 15 minutes then carefully invert onto cooling rack and allow to completely cool before assembling and decorating.
Cream Cheese Frosting (makes enough to decorate cake as seen in photos)
- Prepare frosting by creaming together butter and cream cheese with an electric mixer or stand mixer until creamy and well-combined.¾ cup (170 g) unsalted butter, 12 oz cream cheese
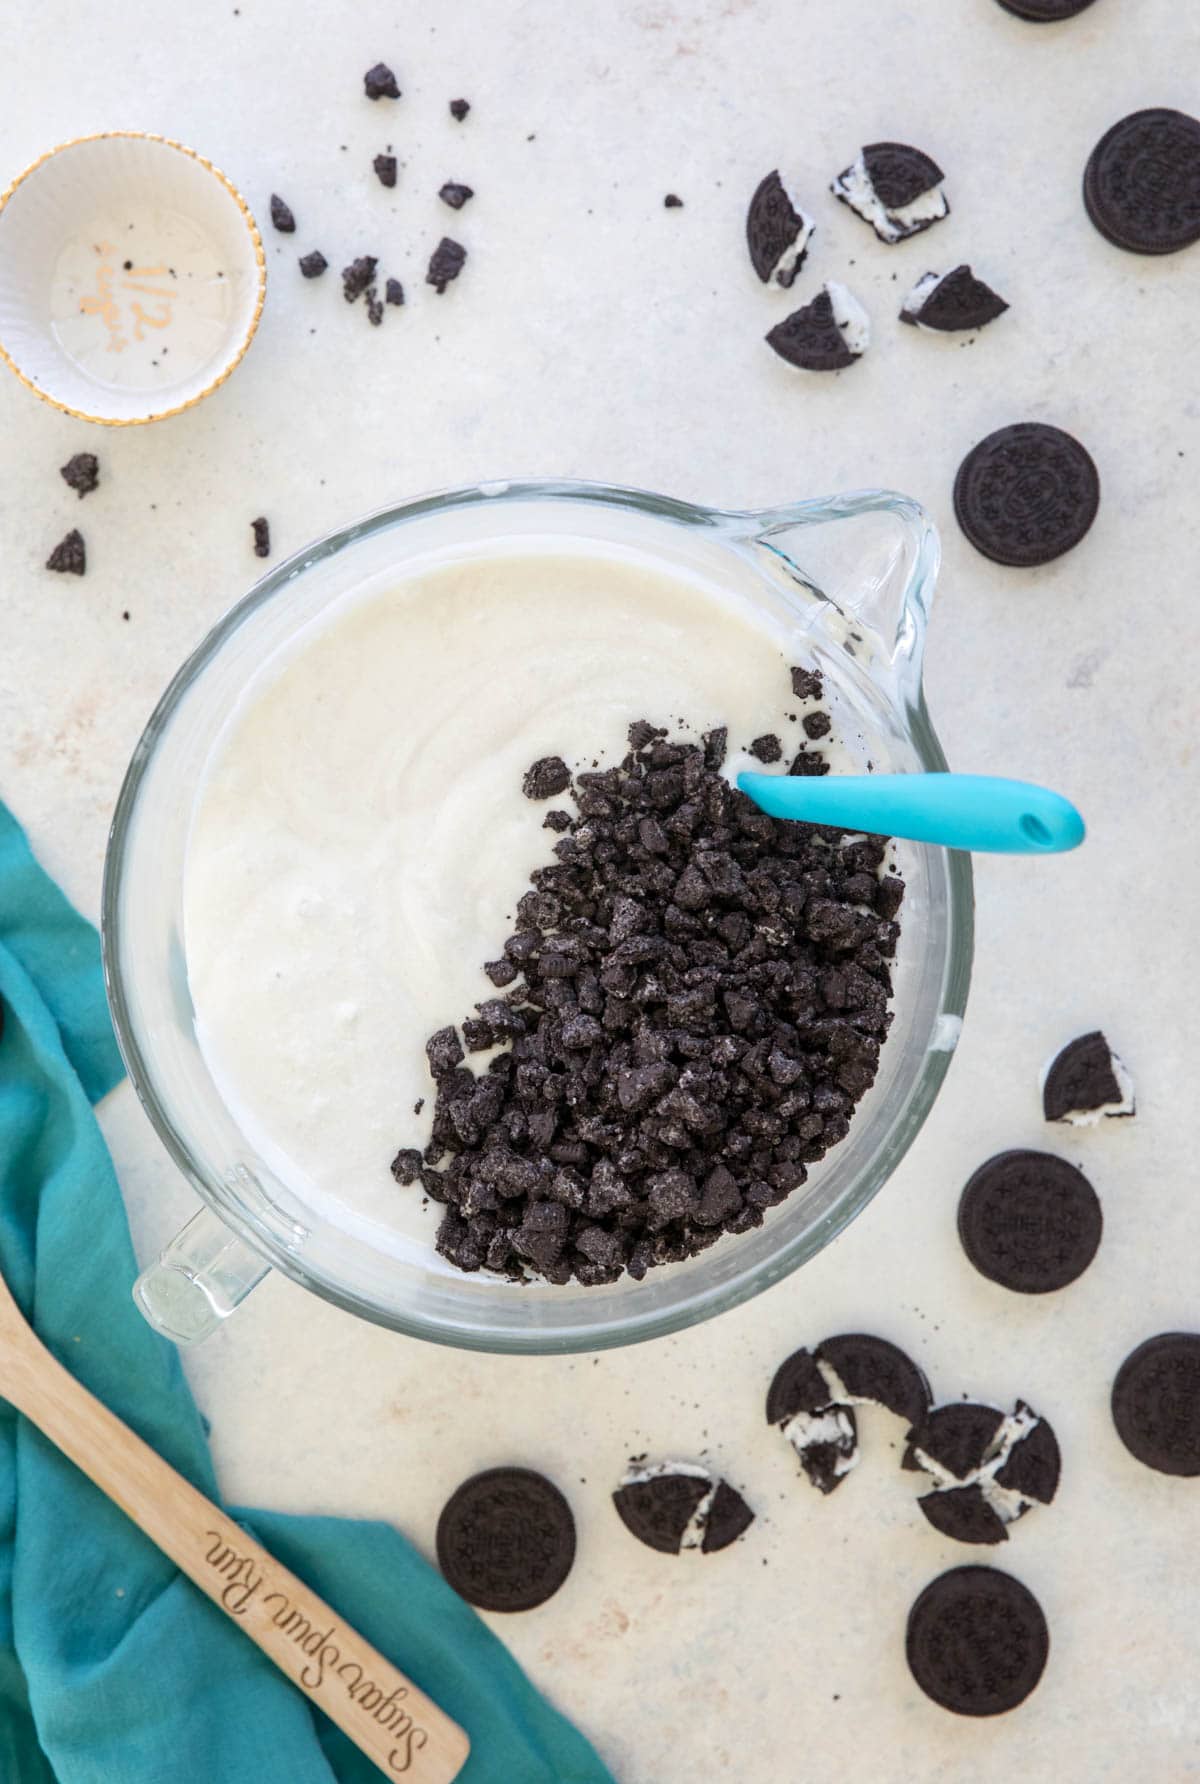
- Gradually add powdered sugar with mixer on low-speed (or see my video for a tip for adding all the sugar at once without making a mess!), scrape the sides and bottom of the bowl, and stir in salt and vanilla extract. With mixer on low speed, add cream and gradually increase mixer speed to high. Beat for 15-30 seconds until light and smooth.5 ¼ cup (655 g) powdered sugar, ¼ teaspoon salt, 1 ½ teaspoons clear vanilla extract, 1 Tablespoon heavy cream
- Evenly ice cake (you'll only need approximately ⅔ of the icing for this), and once whole cake is covered in icing use your hands to press pulverized Oreo crumbs evenly halfway up the cake. Pour about 3-4 Tablespoons of remaining Oreo cookie crumbs into remaining frosting and stir to combine (you can adjust how many crumbs you'd like to use according to how light or dark you would like your frosting to be). Fit a large piping bag with Ateco 848 piping tip and fill with frosting. Pipe swirls around the top of the cake. Serve and enjoy.10 Oreo cookies
Notes
¹Cake flour
You may substitute 2 ¾ cup or 315g cake flour, if desired²Clear vanilla
Clear vanilla helps to keep the cake bright white (rather than tinted slightly yellow) but regular/classic vanilla extract can be used instead.³Egg whites
I recommend using fresh and not carton egg whites. Some readers have used carton egg whites with success, but for others they never whip to stiff peaks (and many say on the side of the packaging that they will not), so whether or not they will work for you is a bit of a gamble.⁴Frosting
Here are a few of my other favorite frosting options: Swiss Meringue Buttercream Chocolate Cream Cheese Frosting Ermine Frosting⁵Baking in two pans instead of three
This recipe can be made in two 8” or 9” round pans but only fill each pan ⅔-¾ of the way full and discard any extra batter, otherwise it will overflow in your oven. Two 8” pans will take approximately 35-40 minutes, and two 9” pans will take a bit less time. Keep in mind dark-colored pans typically take less time in the oven and light-colored pans usually require longer.Storing
This cake will keep in an airtight container at room temperature for 1-2 days or refrigerated for up to a week (unfortunate fact: refrigerators dry out cakes!). It may also be frozen for several months. Please see the post for more detailed information about storing.Nutrition
Nutrition information is automatically calculated, so should only be used as an approximation.
Like this? Leave a comment below!


Hi Sam,
Does the frosting on this cake come out like a cream cheese frosting or does it have more of the sweet buttercream taste? My family hates buttercream, it is way too sweet for us and looking at the amount of powdered sugar I’m worried that we may not like it.
Hi Jessica! This cake uses a cream cheese frosting. 🙂
Currently making this cake now, but after I added the milk; it wasn’t a runny batter?
Hi Madison! Did you compare your batter to the batter I have in the video? If your’s is too stiff there may have accidentally been too much flour added to the batter. I hope it turns out and you love it! 🙂
Turned out perfect…and i even overwhipped the egg whites…. delicious…getting those crumbs on the bottom were a bugger. thank you for all you’re wonderful recipes…all your muffins rock too! the sugar cookie with the pink icing is the only sweet baked treat my 11 year old grandson will eat !….. loves them.. thanks again
I’m so glad you enjoyed it so much! 🙂
We absolutely love this cake at my house and sometimes I’ll add in herseys cookies n creme chocolate and it tastes amazing but I feel like the cake is too sweet. Can I take out some sugar? Or will it mess up the texture of cake? If so what do you suggest to help make the cake a little less sweet
Hi Tiffany! I know others have reduced the sugar a little bit, but I haven’t tried it to be able to comment on how much you can reduce it.
Hello!
Could I possibly omit the vegetable oil?
Thank You!
You will want to use a neutral oil here. I wouldn’t recommend completely omitting it. You could use all butter instead but the cake won’t be as soft or moist.
Thank you for taking time to reply!!
Hi! This looks amazing — would halving the recipe be enough batter for two 6″ pans?
Thank you!
Hi Jenna! Halving it will make more than you need for 2 6 inch pans. Make sure not to overfill the pans and you could use any extra batter to make some cupcakes. 🙂
Thanks so much Sam! 🙂
Hi there. This looks like an amazing recipe. We’re a very small family. Can I half this recipe to get one cake and some cupcakes with the leftover batter if any? Will I need to adjust anything?
Hi Dee! That will work just fine. Just make sure you cut all of the ingredients in half and you should be good to go. 🙂
I’m going to make this cake for my sons birthday this weekend but the cake will need to take a 3 hour road trip. I’m thinking about doing it as a sheet cake (9×13 pan) to keep the damage at a minimum. I know baking time will need to be adjusted and I will have to frost differently. But can you think of any reason this might not work?
TIA!
Hi Tawny! This cake will definitely work in a 9 x 13. The only thing I would caution is that will make more batter than what will fit in that pan so be sure not to overfill it. I think it will definitely hold up for the car ride. 🙂
Thank you! I will just make a mini cake or a few cupcakes with the leftover batter. That way I can make sure they are safe for everyone else! 😉
I’m looking for an oreo cake recipe and I am reading thru this one. You say all purpose flour and put 2 ½ cups, then grams say 315. Which is correct? According to all purpose flour facts on the bag (at least the 2 bags I have) it says it’s 30g per ¼ cup, which would then be 120g per cup which 2 ½ cups would be 300g. Your recipe says 315g. Which should I go by, I really want it to turn out well and like yours. I’m thinking go by the amount of grams you use so it’ll be like what you did. Thanks for any reply!
Hi Amy! I have standardized 1 cup of all purpose flour to be 125g on my website. You will find slight variations from brand to brand or website to website. They are all pretty close though. I find it’s always best to use grams if possible. the 315 is correct here. 🙂
Hi there!
this cake sounds delish! I want to do it for my son’s birthday, but am wondering if I could bake it in two Pyrex pans instead? what do you think? any modifications necessary if I were to bake it that way?
thanks!
Hi Jane! It really depends what size pyrex pans you are putting them in. Your bake time will almost certainly change.
Do you think it’d turn out okay with light sour cream, 2% milk, and 1/3 fat cream cheese? Not sure if the cake needs all the fats for a specific reason or if this would work?
Hi Casey! I would be worried that reducing the fat that much would lead to a dry cake, but I haven’t tried it so I can’t be sure. The reduced fat for the frosting won’t work. 🙁
Hi does this recipe work for cupcakes?
Hi Kayla! This cake doesn’t work very well for cupcakes. They will turn out but they won’t be the best cupcakes. I do have an oreo cupcake recipe though. 🙂
Are you supposed to separate the oreos? The video is not working for me.
Hi Carrie! There’s no need to take the oreos apart here. Make sure you don’t have any ad blockers enabled as they also shut down the video player. If that doesn’t work you can also view the video on youtube. 🙂
Any substitute for sour cream? Or can I void the sour cream?
Plain greek yogurt will work well as a substitute. 🙂
Can I use buttermilk instead of whole milk or will the buttermilk make it to soft?
Hi Leah! That should work just fine. 🙂
If you ever want to one up the gain and help out readers in the Rockies, a little side note for high altitude bakers would be amazing
I honestly would love to be able to provide more tips for high altitude baking, but I have never done it so I don’t feel qualified to provide tips. I would have to google it and trust what someone else says. 🙁
Hi Sam, I live in Bogota, (2640 mt above sea level), I have to reduce leavening agents because of the air pressure in high altittude, as a rule of thumb I use max 2% of leavening agents
As a matter of fact I just baked this cake today and reduced baking powder to 3%, (9.45gr), ant it sunk in the middle so I think I’ll give it another try with just 2%, but it was the softest cake ever !!!
I hope it goes better next time! I’m glad you still enjoyed the taste. 🙂
Hi Sam, I just baked it again yesterday reducing baking powder to 1.7% and came out perfect, I hope this helps other people with high altittude baking doubts
Thank you for sharing your recipes with us !!
Hi Sam! I love all of your recipes and I am planning on doing this one next. By any chance would you know what I would have to do with the frosting recipe if I do not have any cream cheese? Thanks again and I hope that you have a great day!
Hi Josie! If you don’t have cream cheese for the frosting I would recommend trying my buttercream frosting or my swiss meringue buttercream. 🙂
This cake is fantastic. I baked for my own birthday. I’ve been baking for about 2 years. My husband said this is his favorite cake so far. Thanks for sharing.
Danielle
I’m so glad you enjoyed, Danielle! Thank you so much for trying my recipe and for letting me know how it turned out for you (and Happy Birthday!).
Thank you. Looking forward to trying more recipes on your site.