This classic lemon meringue pie recipe yields a perfectly set filling and billowy meringue that won’t weep–every single time! It’s made 100% from scratch with just 10 ingredients. Recipe includes a how-to video!
Perfect Lemon Meringue Pie Recipe
If you’ve ever struggled with making lemon meringue pie–whether it’s a filling that’s too runny or a meringue that’s too watery–today’s recipe is for you!
Honestly, I avoided this recipe for for too long. Like my red velvet cake (took me years to approach that one!), I neglected to develop a lemon meringue pie recipe simply because it was a dish that I just didn’t love. In my experience, this pie was never pleasant to eat; I disliked the loose, watery lemon filling and the weepy layer that always puddled between the meringue and the filling. The texture just threw everything off for me!
But, as with that red velvet cake, my sister insisted I needed to share a version. So I got to work, and in the trenches (no, seriously, it felt like we were in the trenches), I discovered solutions for the common problems that pop up making lemon meringue pie.
I now understand why the meringue is so often weepy–I can recall a particularly sad slice with a deflated, wet meringue that puddled all over the plate. Even Luke, typically aggressive with his dessert fork, wouldn’t dare touch this pie. “Mom, this is disgusting” he said. And he was right.
It took a lot of pies gone wrong, tried-and-true pie recipes, and even my grandmother’s pie recipe carved on her pie plate (I was SO SAD that one didn’t work out–I even tried it several times just to be sure!) in order to arrive where we are today. But wow, was it worth it!

What to expect from my perfected recipe:
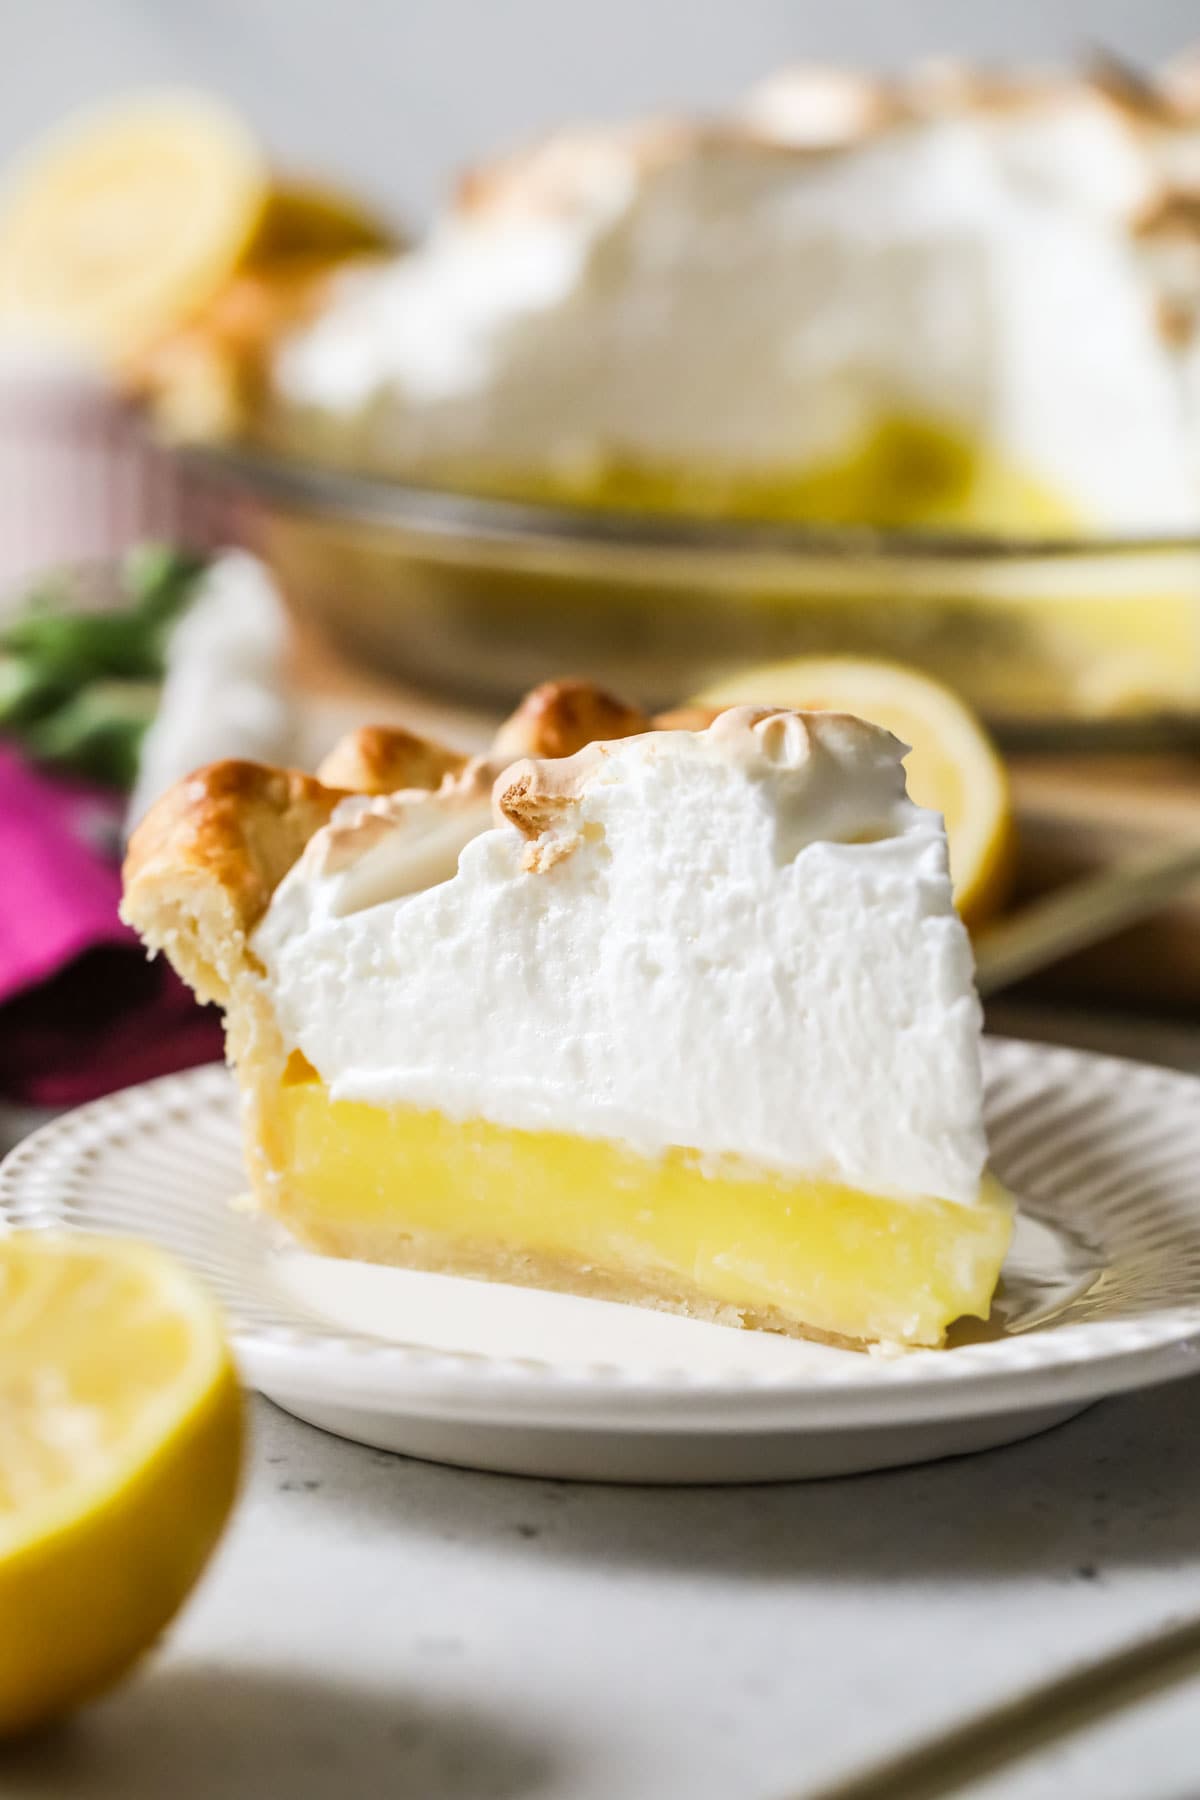
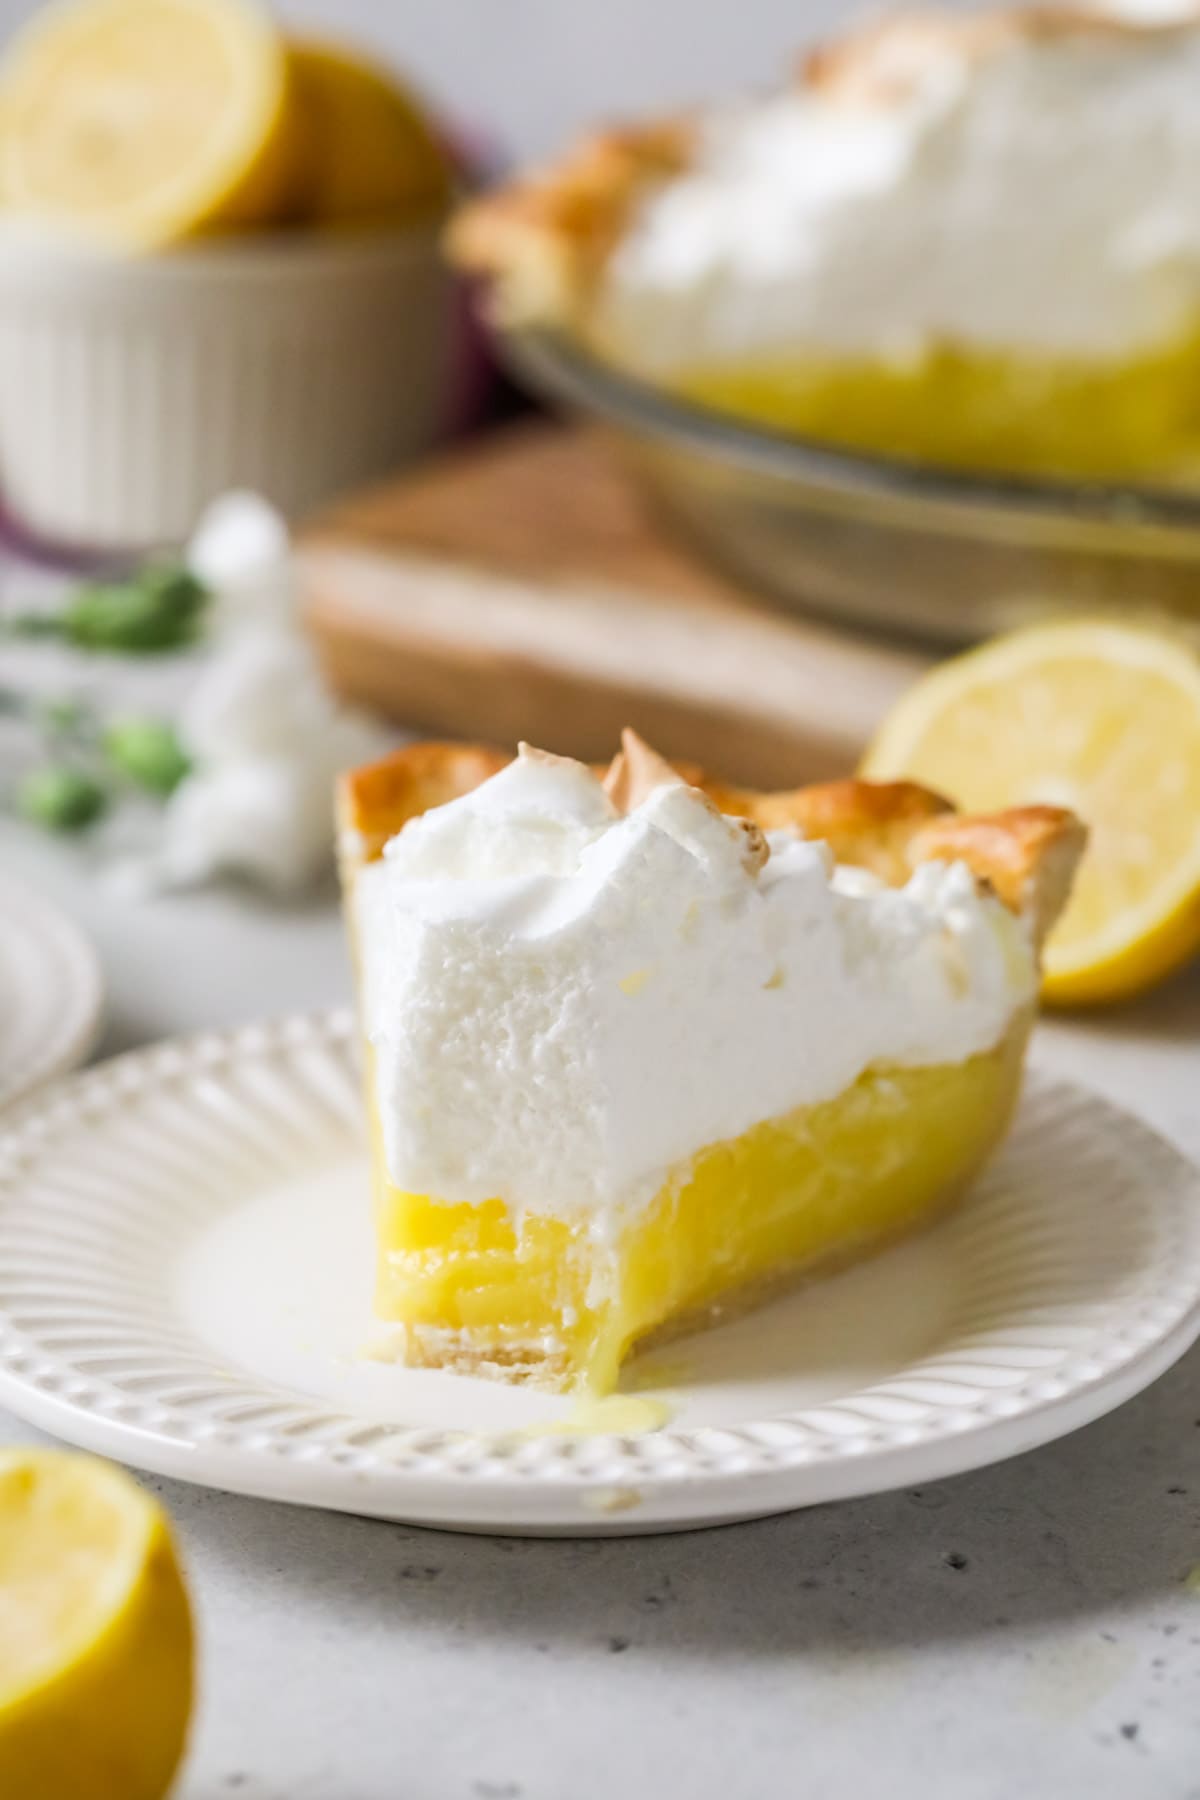
- Flawless, tart, bright and easy filling with true, real lemon flavor (no box mixes). It’s firm enough to slice, but still soft enough to maintain that classic texture and melt in your mouth. Oh, and there’s no need to temper any eggs to make it!
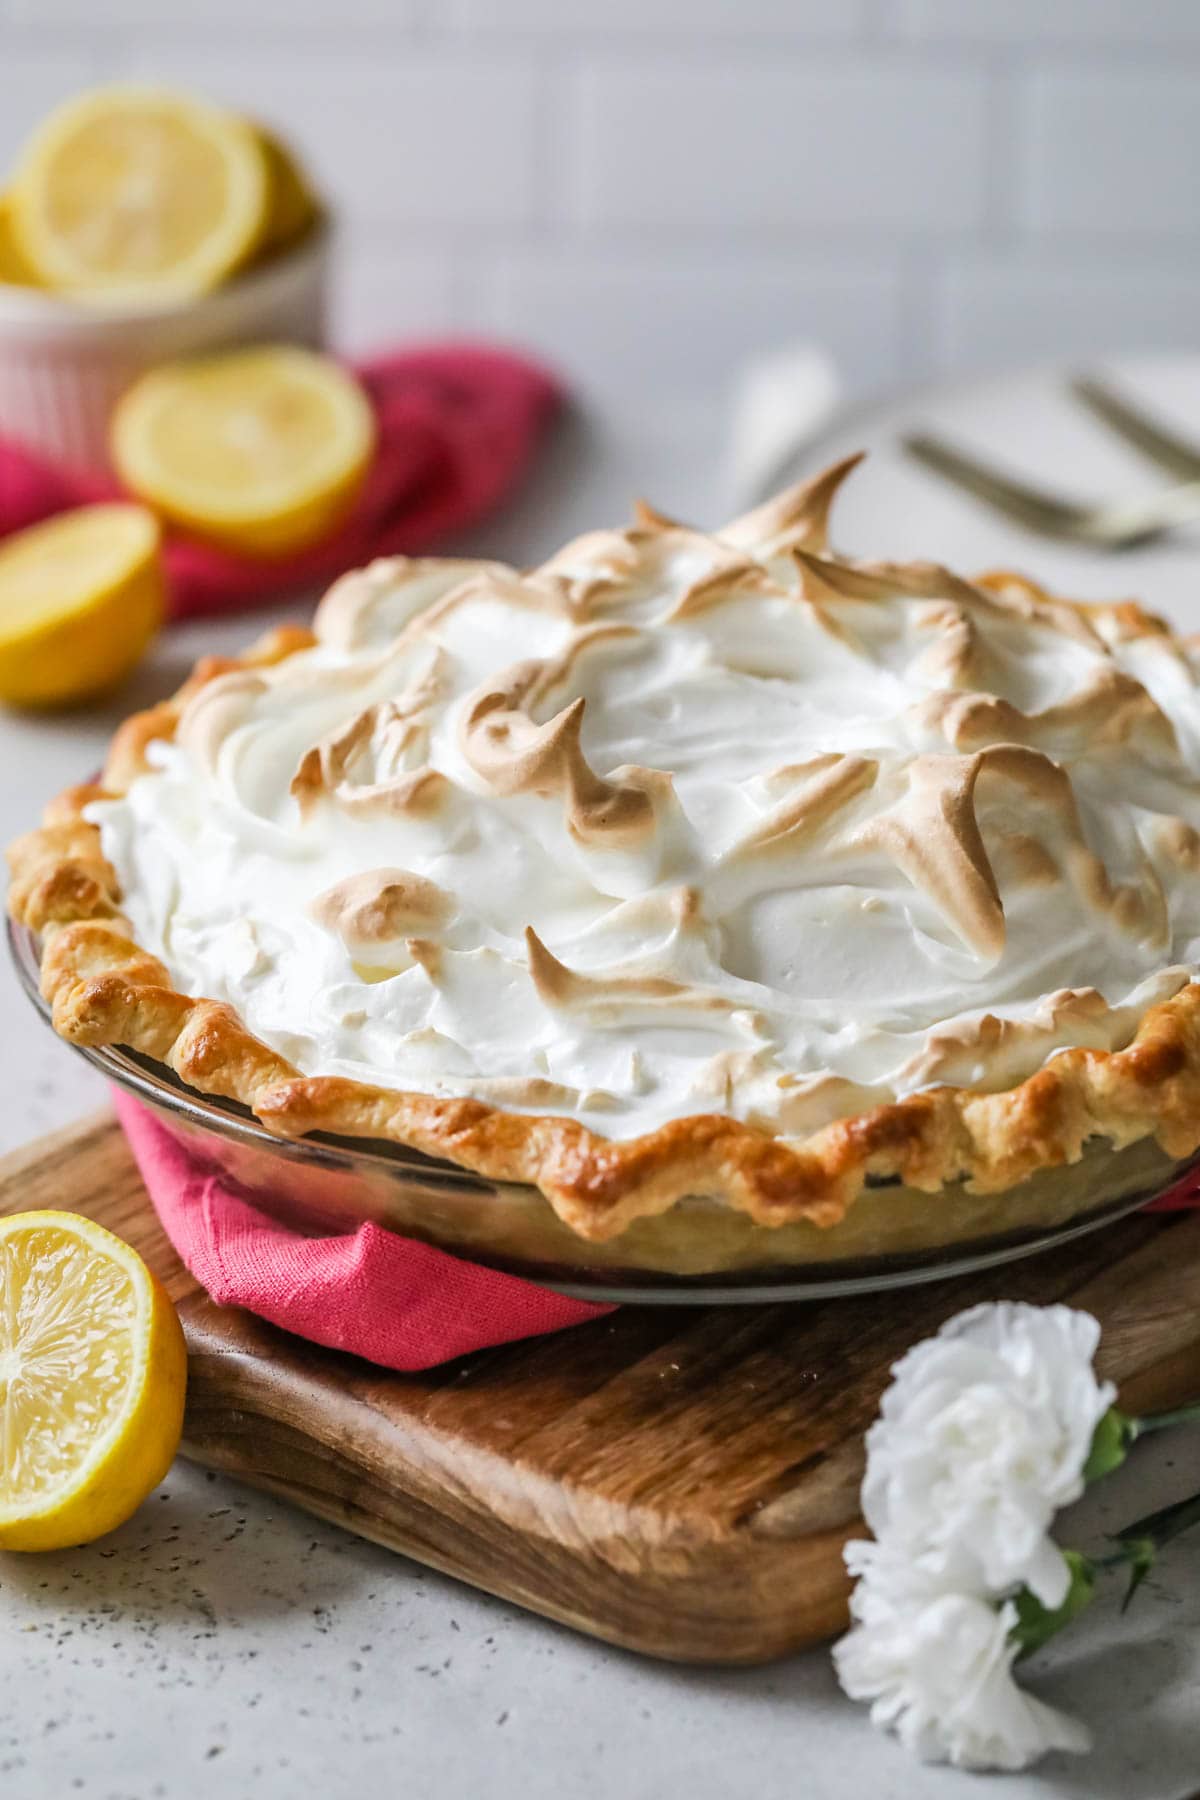
- Plenty of meringue that billows beautifully over the pie layer. I designed my recipe to have a generous amount of meringue for making those gorgeous peaks and whorls over the pie, because what’s a lemon meringue pie without them?
- Absolutely no weepy meringue. This was so important to me with this recipe. Now you will have to roll up your sleeves and dirty an extra dish, but the payoff is worth it. It’s not ridiculous or complicated work, but it does require love. Good pies take some effort!
- Crisp, buttery crust. We can’t forget the crust! Blind baking the pie crust beforehand means there will be no soggy bottoms here, thank goodness.
Let’s get baking!
What You Need
My lemon meringue recipe sticks with classic, basic ingredients. Here are the most important ones we’ll be using.
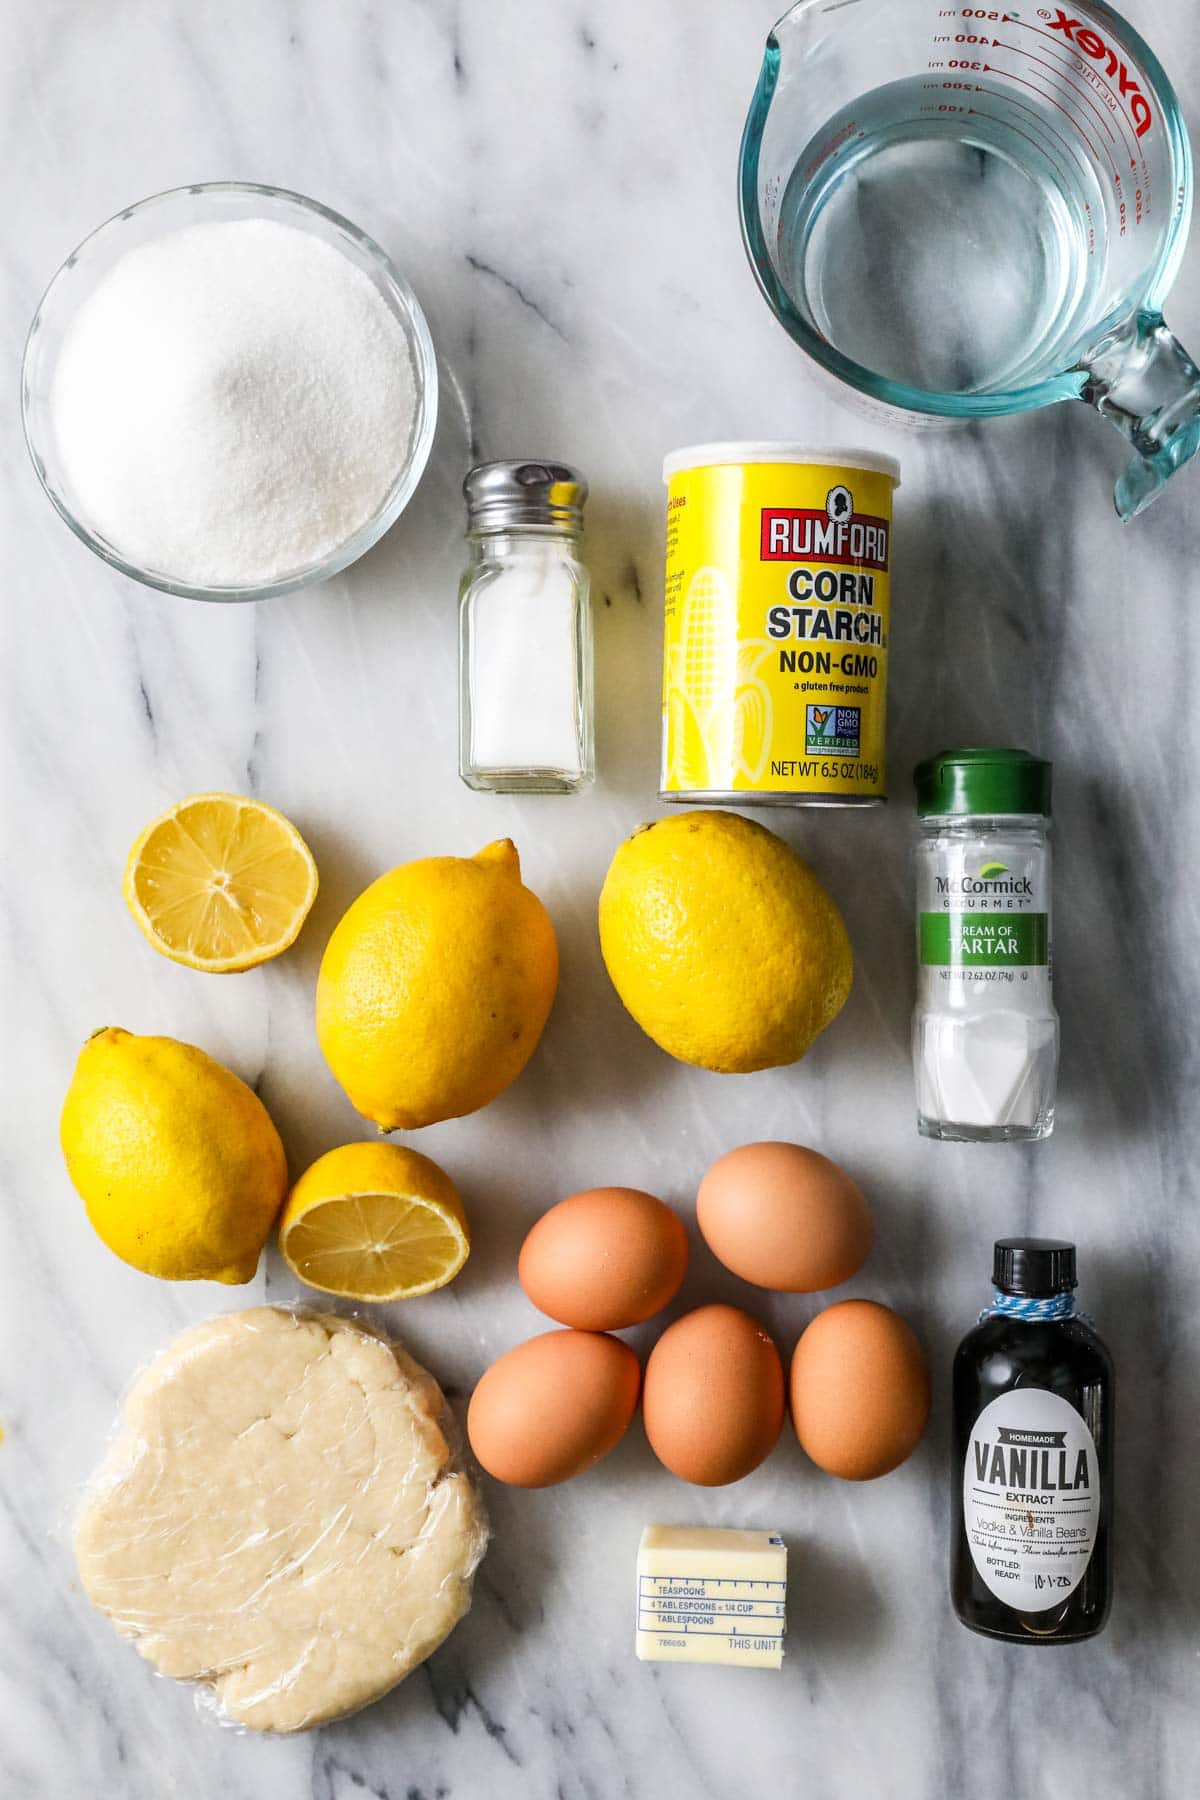
- Lemons. Fresh lemons are a must here–bottled lemon juice simply won’t cut it. Make sure you zest your lemons before juicing them.
- Eggs. We’ll be using 5 whole eggs in this lemon meringue pie recipe. The yolks will go in the lemon filling (it’s similar to lemon curd!) and the whites will go in the meringue topping (so no waste or leftovers!). Make sure when you separate them that you don’t let any yolk get into your whites, or you will have to start over. Also, using eggs that are at room temperature, as they tend to whip faster and higher than cold egg whites.
- Cornstarch. This works to help stabilize and thicken the base of the pie, keeping it from being too loose or runny.
- Cream of tartar. If you’ve made meringue cookies or macarons, you know how helpful cream of tartar can be for stabilizing egg whites. We’ll use it here for the exact same reason.
- Vanilla. Many recipes skip the vanilla in the meringue, but I think it adds an extra special, almost marshmallow-like touch.
- Pie dough. As always, I recommend making your own pie crust instead of using a store-bought crust. Even better, use my pie crust recipe! It’s not as easy as store-bought, but it’s so good and full of flavor. And it’s practically foolproof, since it comes together in the food processor.
SAM’S TIP: Even the tiniest drop of egg yolk can prevent your egg whites from whipping to stiff peaks, so be very careful when separating your eggs! Also, make sure the bowl and utensils you plan to use for your meringue are completely clean, dry, and grease-free.
Remember, this is just an overview of the ingredients I used and why. For the full recipe please scroll down to the end of the post!
How to Make Lemon Meringue Pie
Blind-Bake the Crust
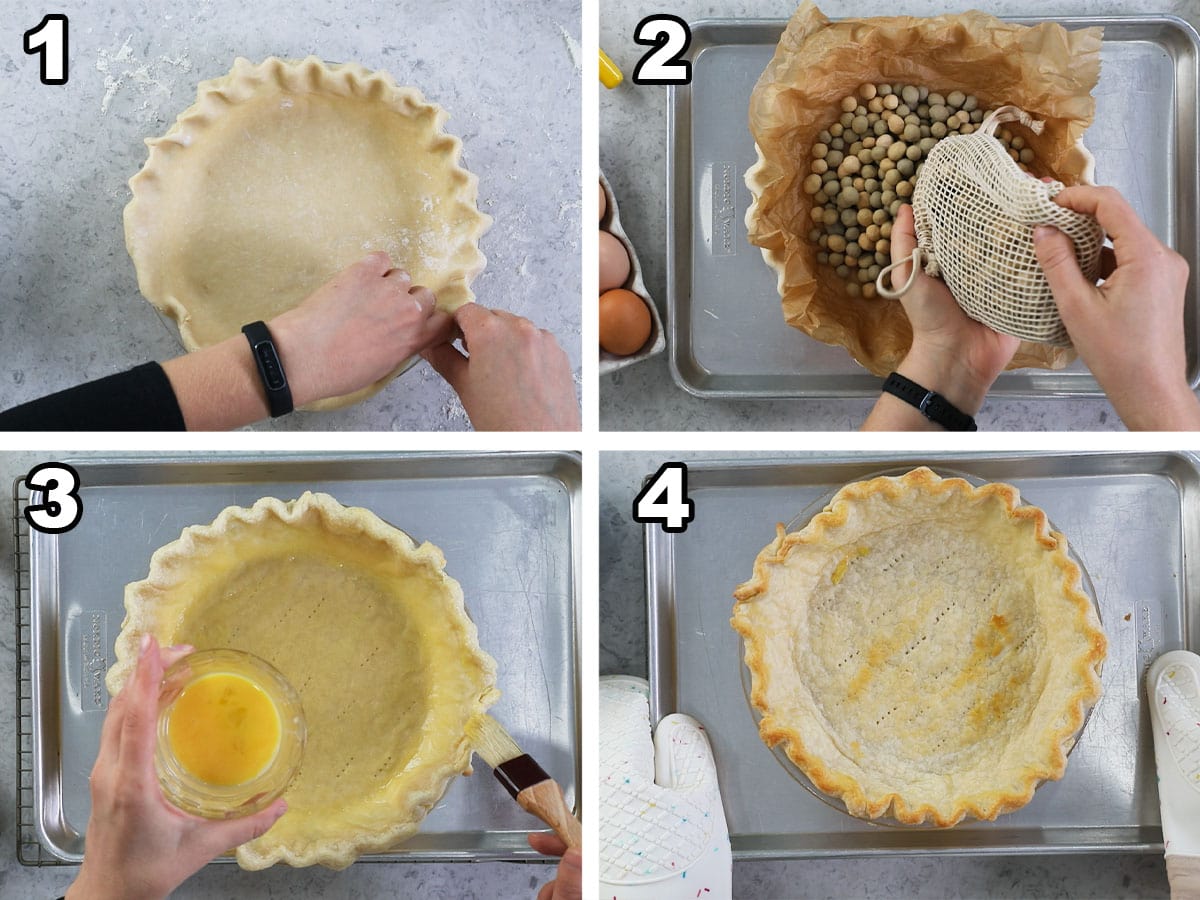
- Roll out your chilled pie dough, then transfer it to a 9″ pie plate. Crimp or flute the edges, then place in the freezer for 15 minutes.
- Place your pie plate on a baking sheet and line with parchment. Fill with pie weights, then place in your preheated oven for 15 minutes.
- Egg wash: remove the crust from the oven, carefully lift out the parchment and pie weights, and set aside. Poke the bottom crust with a fork, then brush all over with egg wash (this helps keep the pie crust from becoming soggy).
- Bake for an additional 10-12 minutes or until the crust is beginning to turn golden brown, then let cool completely.
Make the Lemon Filling
Since I made the meringue a tad more complicated, I wanted to find other ways to simplify the pie, and I was able to do this in the filling. My version comes together with no need to temper eggs (this method is similar to what I use for my pastry cream, and it works like a dream!)
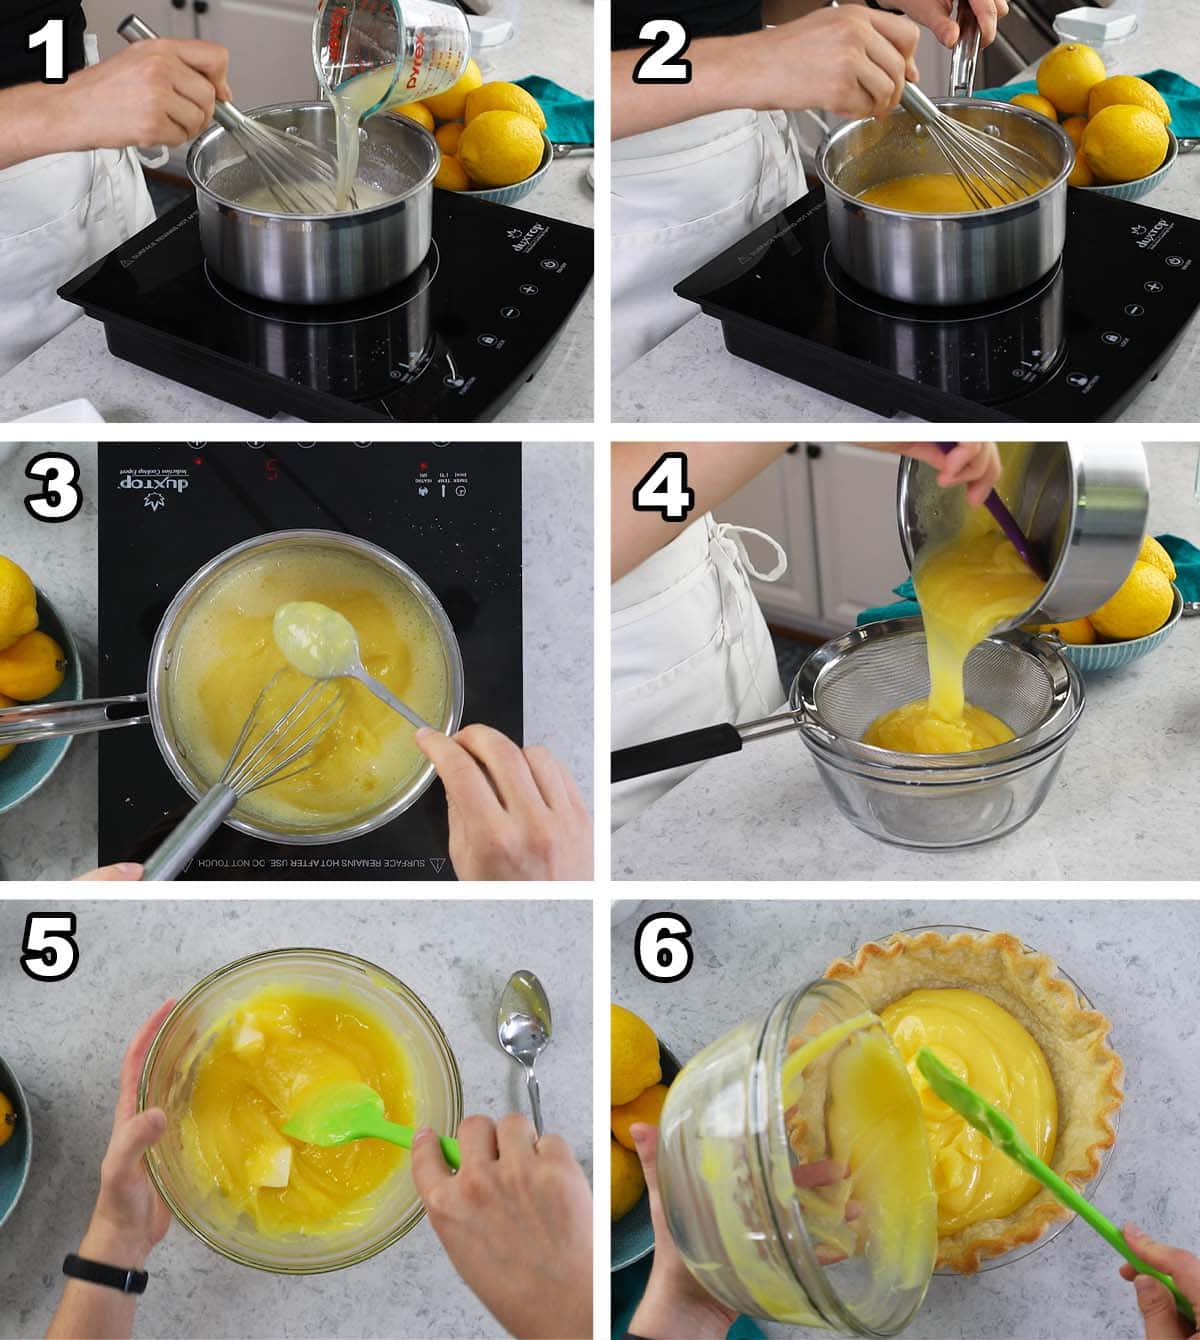
- Whisk together the sugar, cornstarch, and salt in a medium saucepan, then drizzle in the lemon juice while whisking. Keep whisking until the mixture is smooth and combined.
- Whisk in the egg yolks and lemon zest, then drizzle in the water.
- Cook just below medium heat while whisking constantly. Once the mixture thickens, remove it from the heat.
- Pour the curd through a fine mesh strainer and into a heatproof bowl. A fine mesh strainer is critical here, if any bits of egg cooked or any lumps formed while cooking, the strainer will catch them so your filling will be completely smooth.
- Add the butter and whisk until smooth and fully incorporated.
- Pour the filling into your cooled crust and set aside. I like to tent mine with foil so the filling stays warm–this helps the filling and meringue stick together and avoids that slippery, weepy layer that no one wants to find in their pie.
Make the Meringue
To prevent the meringue from weeping and to help it hold its shape, we’re technically using a Swiss meringue (whereas most lemon meringue pies use French meringue like you’d find in my macarons or meringues).
If you’ve made my marshmallow frosting or Swiss meringue buttercream, you’ve done this before; it’s not complicated and is a great way to stabilize the meringue so you don’t have to worry about undercooking it in the oven (a big weeping culprit). Swiss meringue also stands up better to humidity and other issues that trigger weeping!
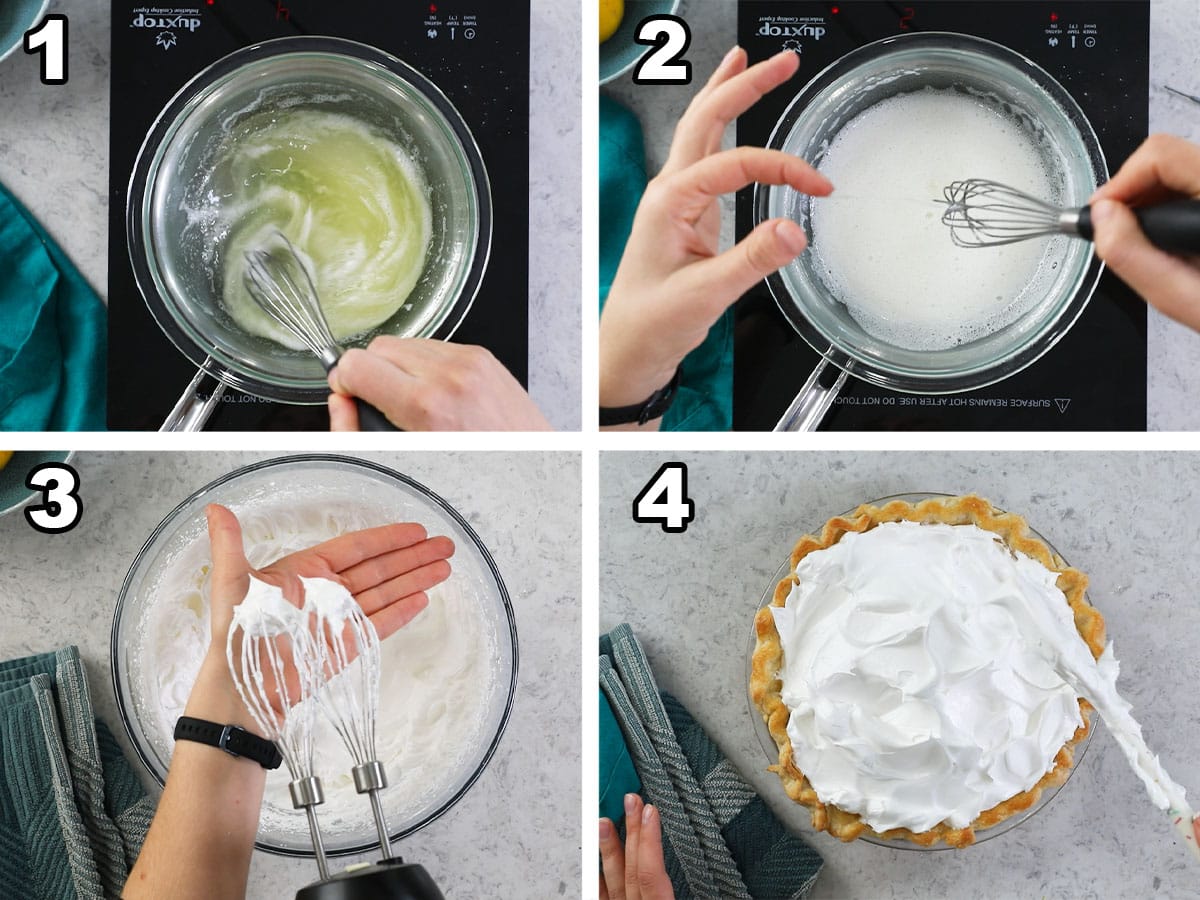
- Whisk together the cream of tartar, sugar, and salt in a clean, dry, grease-free bowl. Add the egg whites and whisk until incorporated, then place over a double boiler that’s simmering on medium-low heat (the bottom of your bowl should not touch the water!).
- Whisk constantly until the sugar dissolves; test this by carefully rubbing a small drop of the mixture between your fingers (it’ll be hot, be careful and let it cool first!) — you shouldn’t feel any grit from the sugar granules!
- Remove the bowl from the heat, dry it off, then place in a stand mixer. Beat on medium high speed until the meringue reaches thick, stiff, and glossy peaks. Add the vanilla extract and stir until combined.
- Gently scoop the meringue over the pie filling and use the back of a spoon or spatula to create peaks. Bake for an additional 10-12 minutes or until the peaks are beginning to turn a nice brown color. Let the pie cool to room temperature for an hour, then place in the fridge to chill for about 4 hours before slicing and serving.
SAM’S TIP: Make sure the bottom of your bowl doesn’t touch the water when place in your double boiler; it should stay suspended! I often use my stand mixer bowl and a medium saucepan, then I can just dry off the bottom of the bowl and place it on my stand mixer with the whisk attachment to easily make my meringue.

Frequently Asked Questions
Yes! Even though we are cooking the meringue portion of this pie, the custard base still requires refrigeration. It will be fine to sit at room temperature for a few hours, but after that I recommend covering it well and placing in the fridge.
This pie will last up to four days; however, it tastes best when enjoyed within the first day or two. Because of this, lemon meringue pie is not the best pie to make when you need to bake your dessert far in advance (try my pumpkin cheesecake pie or chocolate pie instead).
I do not recommend it. The meringue will not thaw nicely and you will likely have a weepy topping, which is the exact opposite of what we’re going for here. If you’re looking for a lemon pie that you can freeze, try my lemon pie or lemon tart.
There are so many causes: humidity, under or overcooking the meringue, using old eggs, and refrigeration (a necessary evil) just to name a few. Luckily, cooking the meringue first before adding it to the pie does wonders for preventing weeping, which is why I prepare my pie this way. It’s not 100% foolproof, but so long as you follow the steps (watch the video if you are a beginner) I’m confident you will have success, and no weeping!
I know many of you have been looking forward to this recipe, and I can’t wait to hear how you like it!
Enjoy!
Let’s cook together! Subscribe to my newsletter and follow along on YouTube where I have over 500 free video tutorials! 💜

Lemon Meringue Pie
Ingredients
Pie Crust
- 1 pie dough click the link to use my recommended homemade recipe
- 1 egg for egg wash
- 1 teaspoon water for egg wash
Lemon Filling
- 1 cup (200 g) granulated sugar
- ⅓ cup cornstarch
- ½ teaspoon salt
- ½ cup fresh squeezed lemon juice
- 5 egg yolks save the whites for the meringue!
- 1 Tablespoon lemon zest
- 1 ¼ cup water
- 3 Tablespoons salted butter
Meringue
- ⅔ cup (113 g) granulated sugar
- ¾ teaspoon cream of tartar
- ⅛ teaspoon salt
- 5 large egg whites
- ½ teaspoon vanilla extract
Recommended Equipment
- 9” pie plate
- Pie weights (recommended, may substitute dry beans)
- Saucepan non-reactive material such as stainless steel or enameled
- Stand mixer or electric mixer
Instructions
- Prepare and chill pie dough according to recipe instructions.1 pie dough
- Roll out chilled pie dough on a lightly floured surface into a 12” circle. Transfer to a 9” pie plate and crimp or flute the edges of the crust. Place in the freezer to chill for 15 minutes, and meanwhile preheat your oven to 375F (190C).
- Remove pie plate from freezer and place on a baking sheet (to easily remove from the oven without damaging the crust). Line the pie crust with parchment paper and fill with pie weights.
- Bake on the center rack of 375F (190C) oven for 15 minutes. Meanwhile, prepare egg wash by whisking together egg and water.1 egg, 1 teaspoon water
- Remove pie plate from oven and carefully remove the parchment paper and pie weights. Pierce the bottom of the pie plate repeatedly with a fork and use a pastry brush to lightly brush the pie crust all over with prepared egg wash. Return to oven (without pie weights or paper) for 10-12 minutes, until crust is beginning to turn light golden brown.
- Allow crust to cool completely before filling.
For the lemon filling
- In a medium-sized, non-reactive saucepan (see note), whisk together the sugar, cornstarch, and salt, then drizzle in lemon juice while whisking. Whisk until smooth.1 cup (200 g) granulated sugar, ⅓ cup cornstarch, ½ teaspoon salt, ½ cup fresh squeezed lemon juice
- Add egg yolks and lemon zest and whisk until well-combined.5 egg yolks, 1 Tablespoon lemon zest
- Gradually drizzle in water, stirring until incorporated.1 ¼ cup water
- Turn stovetop heat just below medium and whisk constantly until mixture begins to thicken (the whisk will leave trails in the mixture, and if you dip a spoon in the lemon mixture will coat the back of the spoon).
- Remove from heat and pour through a fine mesh strainer into a heatproof bowl.
- Immediately add butter, whisking in until completely incorporated.3 Tablespoons salted butter
- Pour filling into cooled pie crust and set aside while you make your meringue, it’s best if the meringue is added while the filling is still warm, so I’ll usually lightly tent the pie with foil to help keep the warmth from escaping. Note that your oven should still be preheated to 375F/190C, as you will need it to toast the meringue in the next step.
For the meringue
- Prepare a double boiler. I like to use my stainless steel KitchenAid mixing bowl and a medium-sized saucepan that is large enough to suspend the bowl without it touching the bottom of the pan. Make sure that the bowl is completely clean, dry, and grease-free.
- In the bowl of the double boiler, whisk together sugar, cream of tartar, and salt.⅔ cup (113 g) granulated sugar, ¾ teaspoon cream of tartar, ⅛ teaspoon salt
- Add egg whites and whisk until completely combined.5 large egg whites
- Fill the bottom of the double boiler with about 1 ½ inches of water and bring to a simmer over medium-low heat. Rest the bowl of your mixer over the simmering water (it should not be touching the water).
- Whisk mixture constantly until the sugar is dissolved. You can test this by carefully (it’s hot!) rubbing a small bit between your fingers, it should be smooth and not gritty. Continue whisking until mixture reaches 160F (70C).
- Remove mixing bowl from heat and dry the bottom of your bowl. Fit bowl into your stand mixer (if using a stand mixer, otherwise use an electric hand mixer for the next step).
- Use the whisk attachment on medium-high speed to beat the egg white mixture to stiff peaks. Meringue should be thick, billowy, and glossy. This typically takes around 10 minutes.
- Stir in vanilla extract until combined.½ teaspoon vanilla extract
- Immediately, gently scoop meringue over pie filling. Use your spatula or the back of a spoon to create peaks from the meringue. Place on a baking sheet and transfer to the center rack of 375F (190C) oven for 10-12 minutes, until peaks of meringue are browning.
- Allow pie to cool at room temperature for at least an hour before transferring to the refrigerator to cool completely (about 4 hours) before slicing and serving. This pie is best served the day it is made or next day.
Notes
Lemons
Fresh lemons are best, bottled lemon juice will yield a subpar filling and I don’t recommend it. Strongly.Saucepan
Use a non-reactive pan, such as stainless steel, glass, or enameled cast iron. Avoid using aluminum, copper, or iron (such as non-enameled cast iron) pans, which can react with the lemon and cause a metallic taste.Storing
Lemon meringue pie simply doesn’t keep very well and should ideally be enjoyed within 48 hours but will keep for up to 4 days. I do not recommend freezing this pie.Make ahead tips
The pie dough can be prepared and even baked up to several days in advance.Nutrition
Nutritional information is based on third-party calculations and should be considered an estimate only. Actual nutritional content will vary based upon brands used, measuring methods, cooking method, portion sizes, and more.






Ardis Adrian
looked great out of the oven but meringue cracked while cooling down.
Sam Merritt
I’m so sorry to hear this happened, Ardis! The meringue can crack if it’s over-baked. 🙁
A
Followed recipe exactly. Tastes delicious but pie weeps. Also next time I might cut back the water in filling and increase lemon juice just to have it a bit more tart.
Sam Merritt
There are so many causes for weeping with this pie: humidity, under or overcooking the meringue, using old eggs, and refrigeration (a necessary evil) just to name a few. Luckily, cooking the meringue first before adding it to the pie does wonders for preventing weeping, which is why I prepare my pie this way. It’s not 100% foolproof, but so long as you follow the steps (watch the video if you are a beginner) I’m confident you will have success, and no weeping!
A
Wanted to clarify it wasn’t meringue that weeped. That was perfect. It was lemon colored water in bottom of pie, enough to pour out. Any ideas why? Filling was perfectly set. Pie is still delicious but would like to solve this for the future.
Sam Merritt
It would have been the meringue that weeped causing that water in the bottom of the pie. Just make sure to follow those few tips next time. I’m glad you still enjoyed it. 🙂
Lillian
Amazing!
This was the first time I made lemon meringue pie, and it turned out gorgeous! It did take me about three hours before cooling because I am terrible at doing things quickly, but definitely recommend the recipe! Thank you so much!
Sam Merritt
I’m so glad it was such a hit, Lillian! 🙂
Leslea
As I’m cleaning the splatters and flour from my phone, I just want to ask, Sam, where you 37 years ago when I was a young wife eager to bake??
Your recipes are superb and EVERY TIME I want to make anything, your website is the first, and often ONLY, place I go to. Thank you for this wonderful Lemon Merengue Pie. I have struggled with weepy merengue for DECADES. I weep no more!
Sam
I’m so glad you enjoyed it so much, Leslea! I’m so honored that you trust my recipes so much. 🙂
Thaasviyn
Hi, Sam. I tried your lemon meringue pie and it was whimsical. Everything turned out well—except for the meringue. It didn’t come out as fluffy and as stiff as yours. I do have to admit that some yolk did spill into the egg white when I attempted to separate them. I’m from Malaysia where it is rather hot. Do you think any of these factors may have affected the formation of my meringue?
Sam
I think both of these things could have caused issues. 🙁 The egg yolk can prevent the meringue from whipping properly, as can the humidity. 🙁 I’m glad you were still able to enjoy it. 🙂
Lily
My go to lemon meringue pie recipe.
Whenever I bring it to events it’s definitely highly enjoyed
I also love how the instructions are super clear and easy to follow.
Thank you
Sam
You’re welcome, Lily! I’m so glad you enjoyed it so much! 🙂
Tricia
Another winner, Sam! Oh my goodness… The tartness with the sweetness and the yumminess from the Swiss meringue. Wow!!!! Made our hearts happy! Thank you as always for giving such clear instruction. I trust everything you do! –Trish
Sam
I’m so glad you enjoyed it so much, Trish! 🙂
Joanne
Great recipe! Made ur lemon pie , it was ! Fresh lemony beautiful sky high mereinge! Fun to make , proud to serve, everyone enjoyed! Thanku!
Sam
You’re welcome! I’m so glad it was such a hit! 🙂