
Hot Chocolate Bombs
This post may contain affiliate links. As an Amazon Associate I earn from qualifying purchases. Please read my disclosure policy.

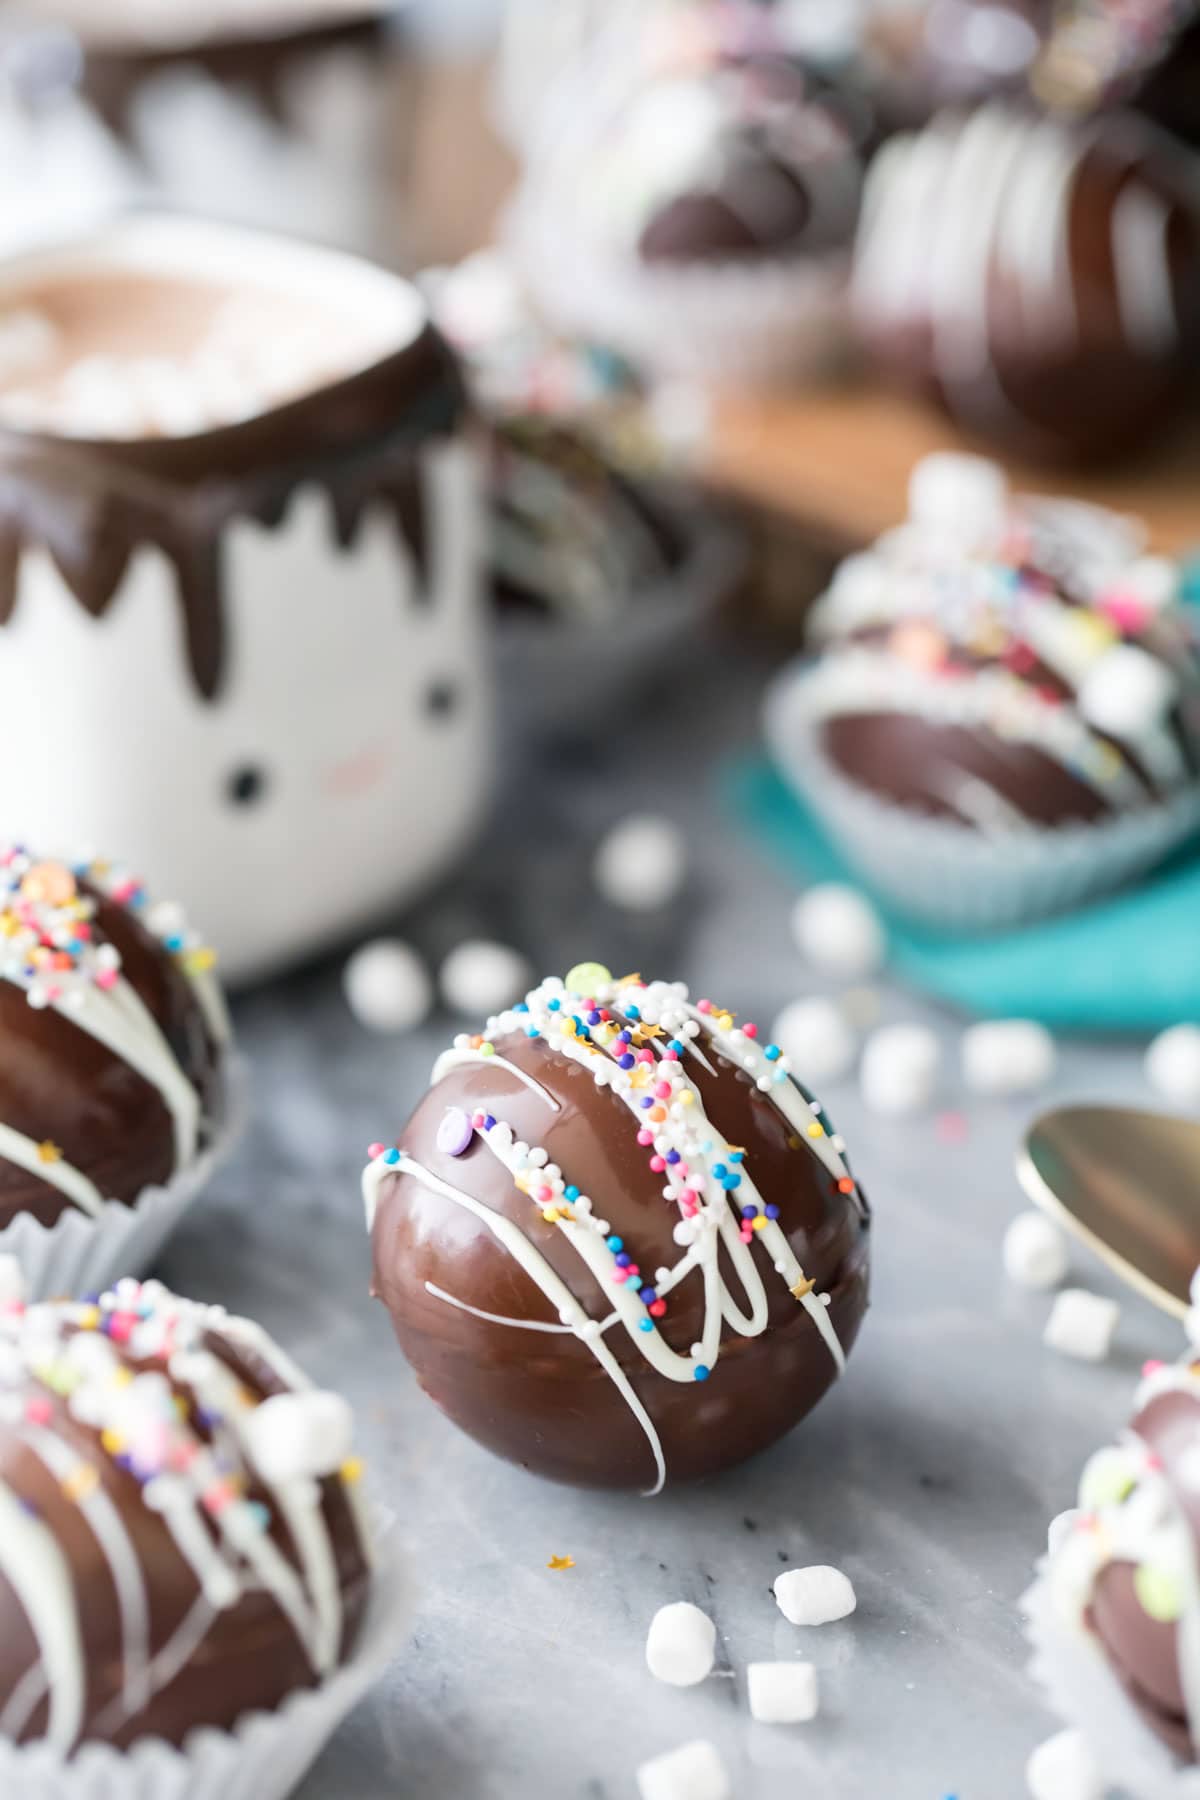
The ultimate guide to making perfect Hot Chocolate Bombs! Learn how to make these super cute confections that have been blowing up the internet! In today’s tutorial I’m walking you step-by-step in plenty of detail through the process with lots of tips, photos, and a video!
Hot Chocolate Bombs (a Tutorial!)
By popular demand! I have received so many requests for these hot cocoa bombs recently, and for good reason. They’re adorable, fun, delicious, and absolutely blowing up the internet right now. I’m squeezing this one in just before the holidays so you can still make them and give them as a last minute gift.
While hot chocolate bombs are overall quite simple to make, there are a few important things you need to know so that your chocolate comes out flawlessly. I have lots of tips, tricks, and step-by-step photos below (plus a video in the recipe card), so this post is a long one and jam-packed with information.
If you’ve never tempered chocolate before or have ever struggled with streaky chocolate, I strongly recommend that you read through the entire post before you begin. This is a long one, but I’m pretty sure you’ll be able to find all of your answers in the post 😉
What You Need to Make Hot Cocoa Bombs
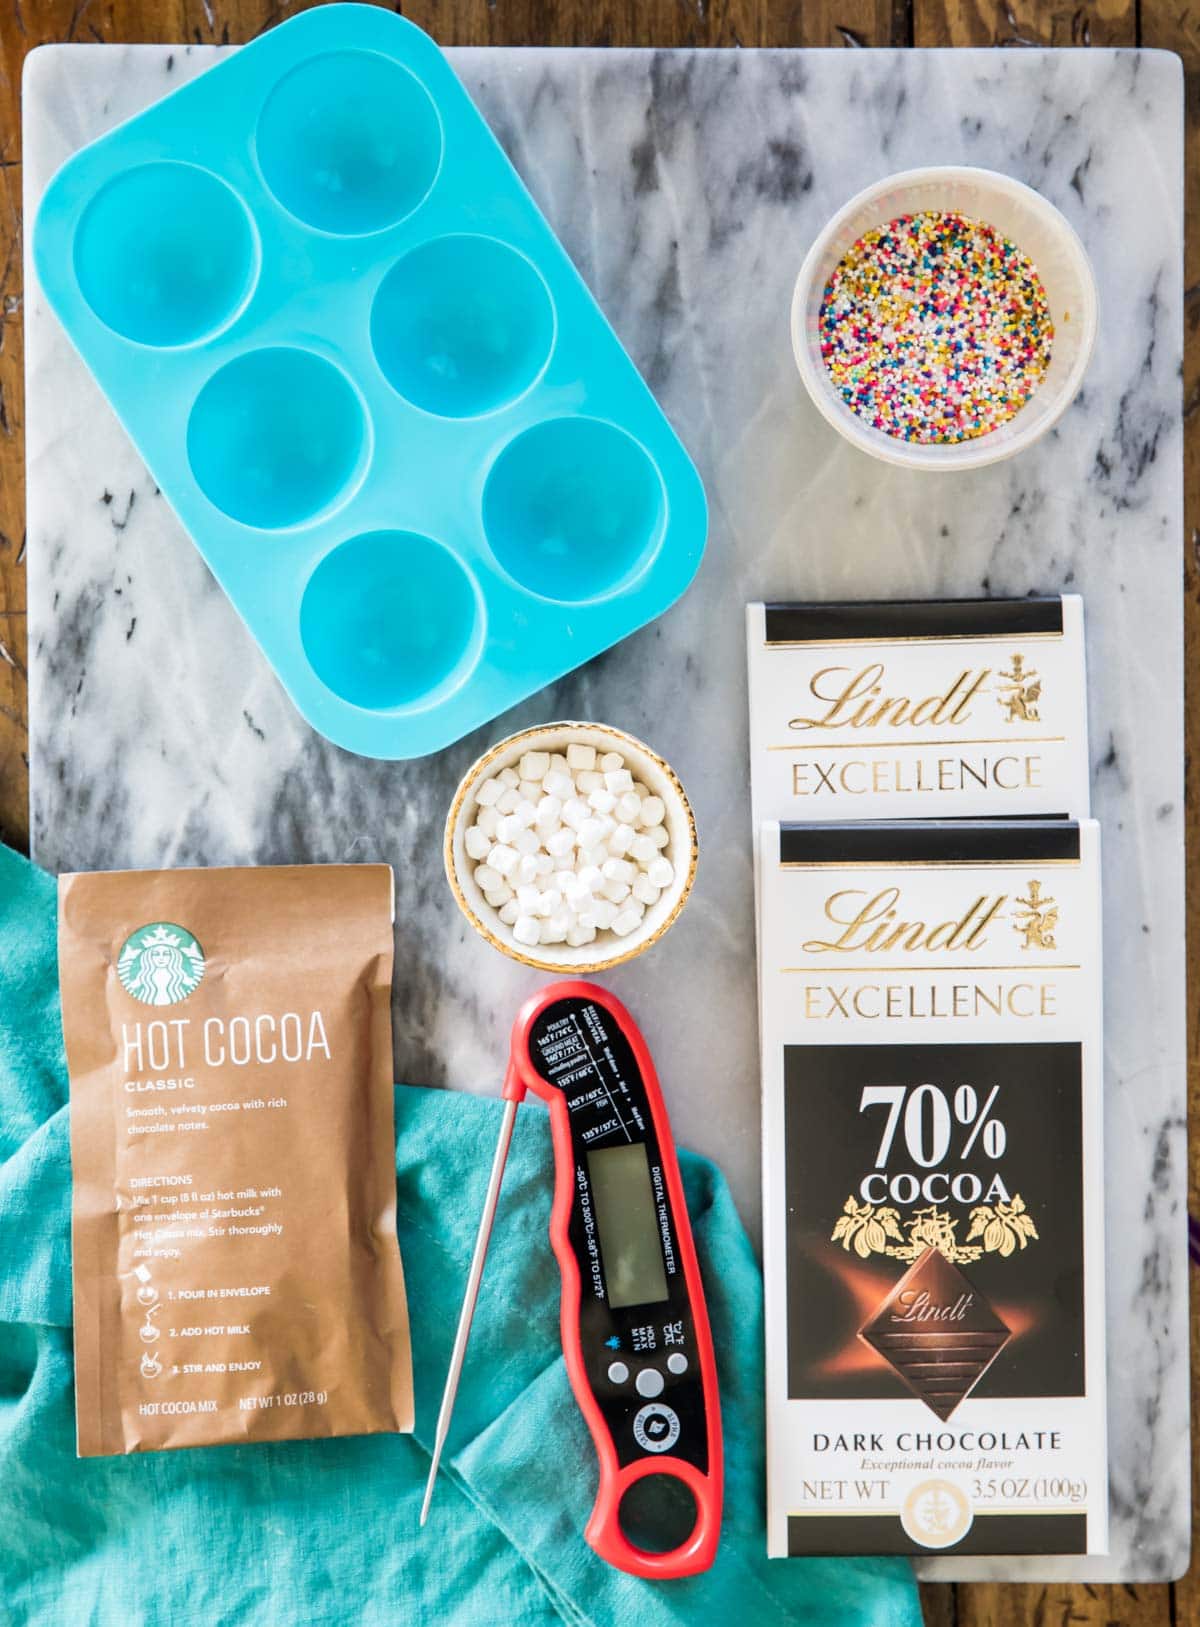
- Quality chocolate. I recommend a premium quality bar with a high percentage of cocoa (between 55% and 85% is my preference). Cocoa butter should be listed as one of the ingredients. Chocolate chips are not ideal for this recipe. I’ve been using Lindt 70% cocoa bars. Couverture chocolate would also be a good choice.
- Hot cocoa mix. Use your favorite variety. You will only be able to fit about 2 teaspoons of mix in each cocoa bomb, two packets of mix is usually sufficient for me to fill all of mine. Note: I’m working on a homemade cocoa mix for these, hope to have it ready soon!
- Additional fillings. I like to add mini marshmallows or dehydrated marshmallows, but you can get creative. There are some fun filling options near the bottom of the post.
Then there’s the equipment. I recommend:
- Silicone molds. I use half spheres that are 2″ in diameter. This recipe makes 6 hot chocolate bombs of this size, so I have two molds so I can make them all at once. You can really use any shape mold you would like. Find the link to the ones that I used in the “Equipment” section of the recipe.
- A thermometer. You don’t need a candy thermometer for this recipe, and in fact I just use a meat thermometer.
- I also recommend a medium-sized microwave safe bowl and a rubber spatula. While the chocolate for the molds can be painted on using just a regular small spoon, some people like to use a food-safe paintbrush for applying the chocolate.
Remember, this is just an overview of the ingredients and materials. For the full recipe please scroll down to the bottom of the post!
Let’s Talk About Tempering Chocolate
First of all: Do not panic! If you’re itching to hit that “back” button on your browser after realizing you need to temper chocolate I get it. I used to be there, avoiding glossy chocolate perfection just because I was scared of using my thermometer.
Tempering chocolate is NOT something reserved for practiced, professional chocolatiers. You can do it at home and while there is some precision required, it’s actually not that hard. The method that I’m sharing is an easy one (we’re using the microwave!). I don’t think you’ll have any problems (just beautiful, flawless hot chocolate bombs) so long as you follow my steps.
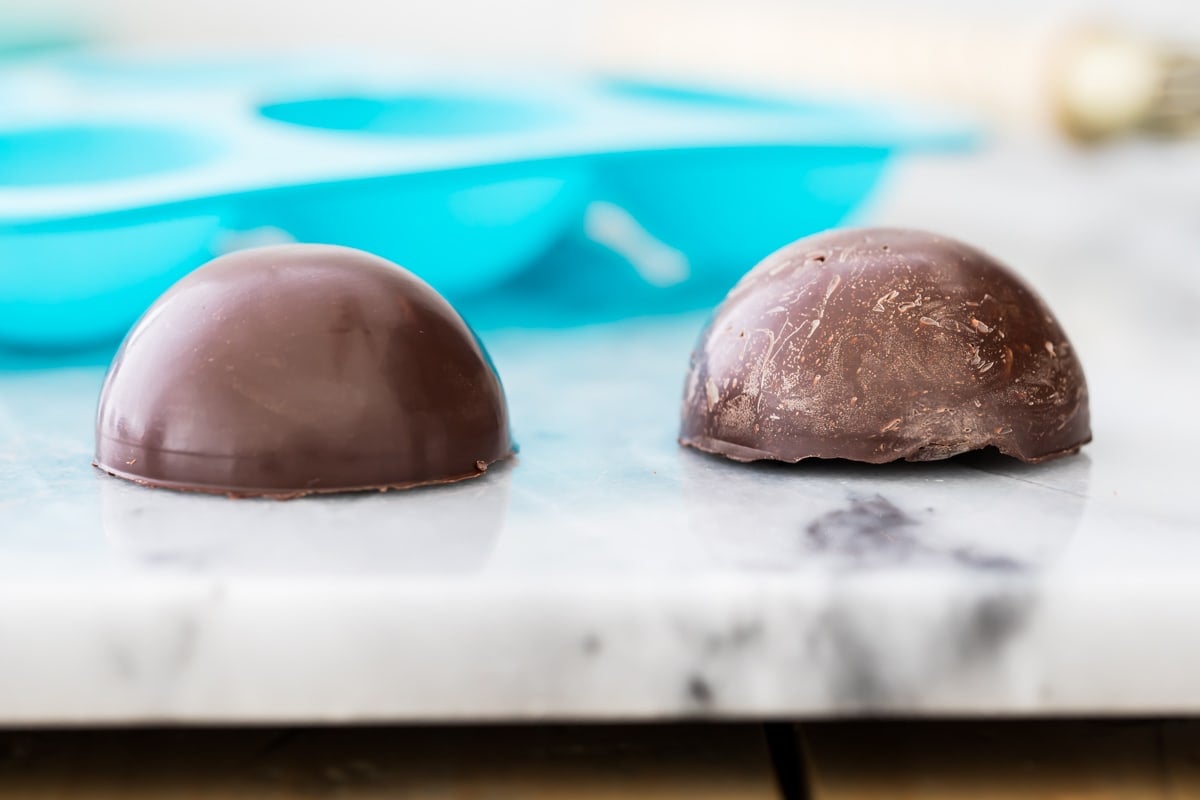
But why do I need to temper my chocolate? I hear you, so let me show you why. In the photo below, the chocolate sphere on the left has been properly tempered. It’s smooth, glossy, and shiny.
On the right, we have a half-sphere made with untempered chocolate. It has a streaky, chalky appearance with messy white flecks and swirls. It will melt quickly in your hand (faster than the chocolate on the left) and it’s just not desirable.
If you love the science behind this sort of thing like I do, here’s an interesting and extremely informative post that I found on the science behind why this happens. Please note that Alton Brown uses a different technique than I do to temper. Either will work but I personally prefer mine (obviously, or I wouldn’t have shared it!). Now let’s get to the technique:
How to Temper Chocolate for Hot Chocolate Bombs

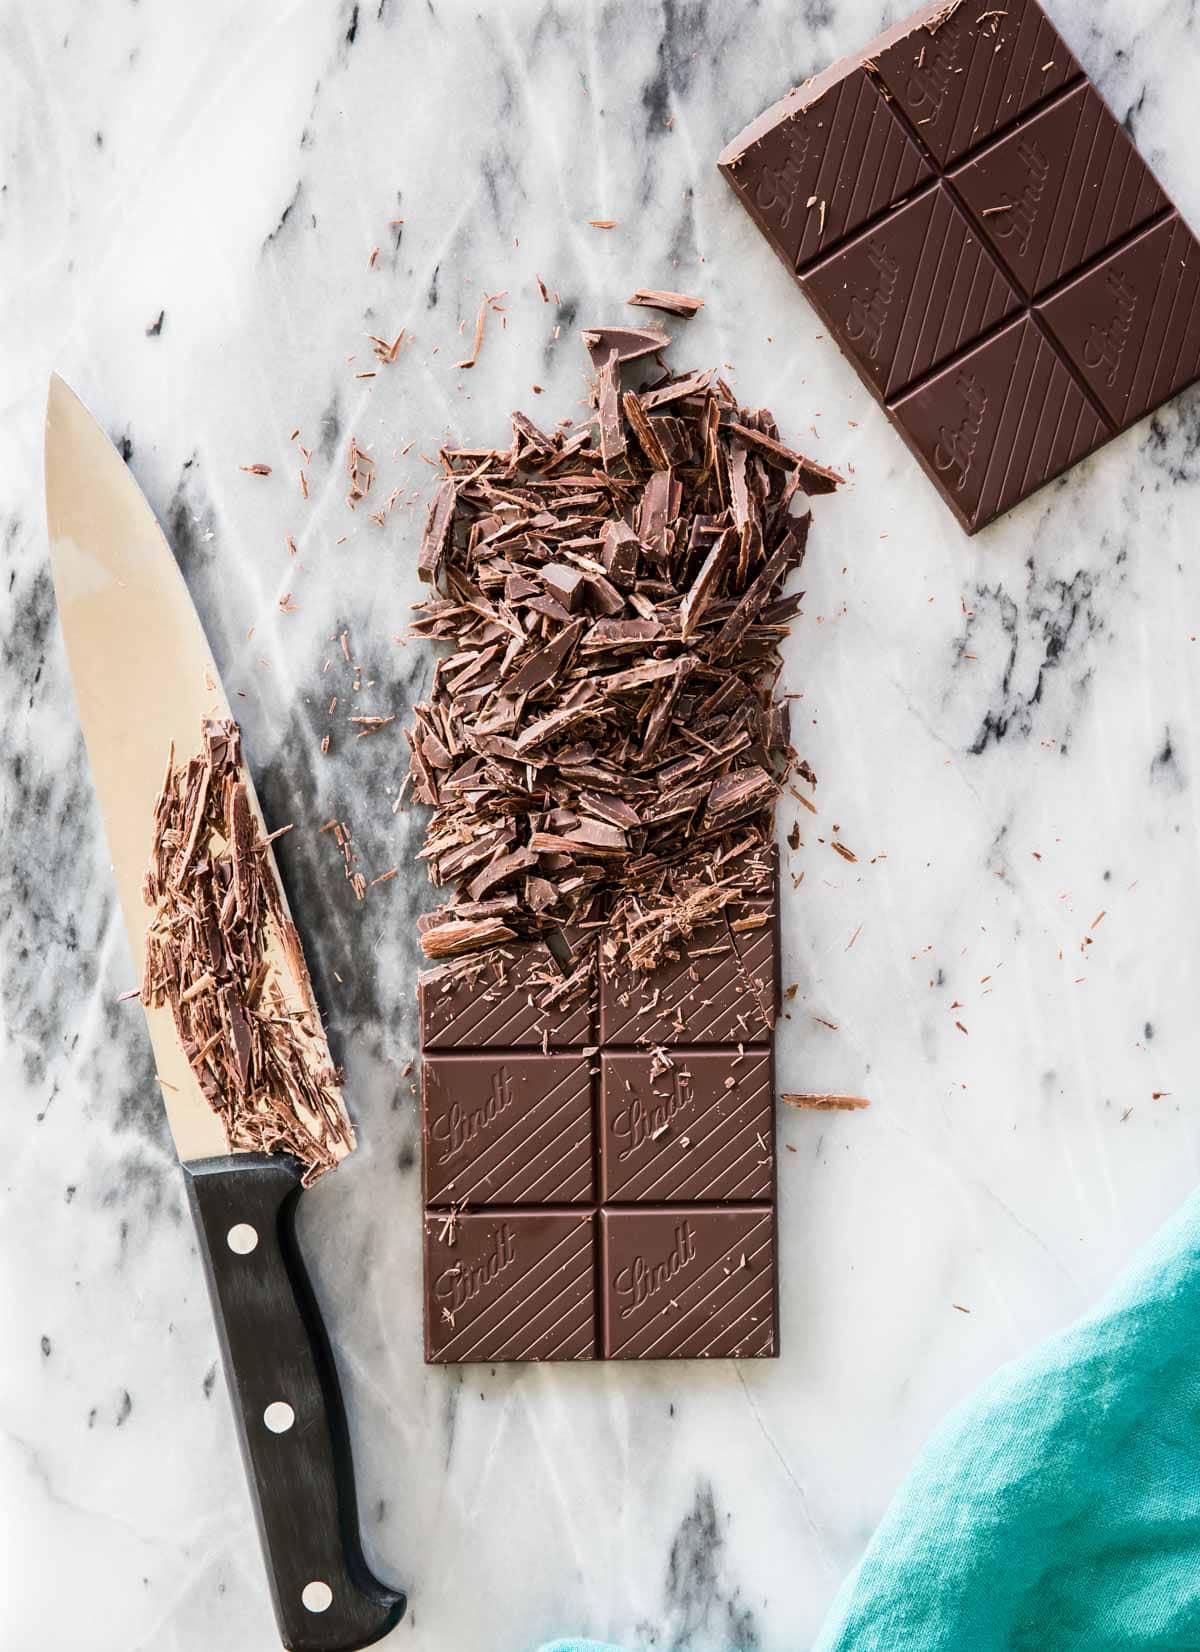
- If using chocolate bars, chop as finely as possible. I go over my chocolate with a large knife just like I’m mincing garlic, it gives it an almost shaved texture. Place in a heatproof bowl and microwave for 25 seconds.
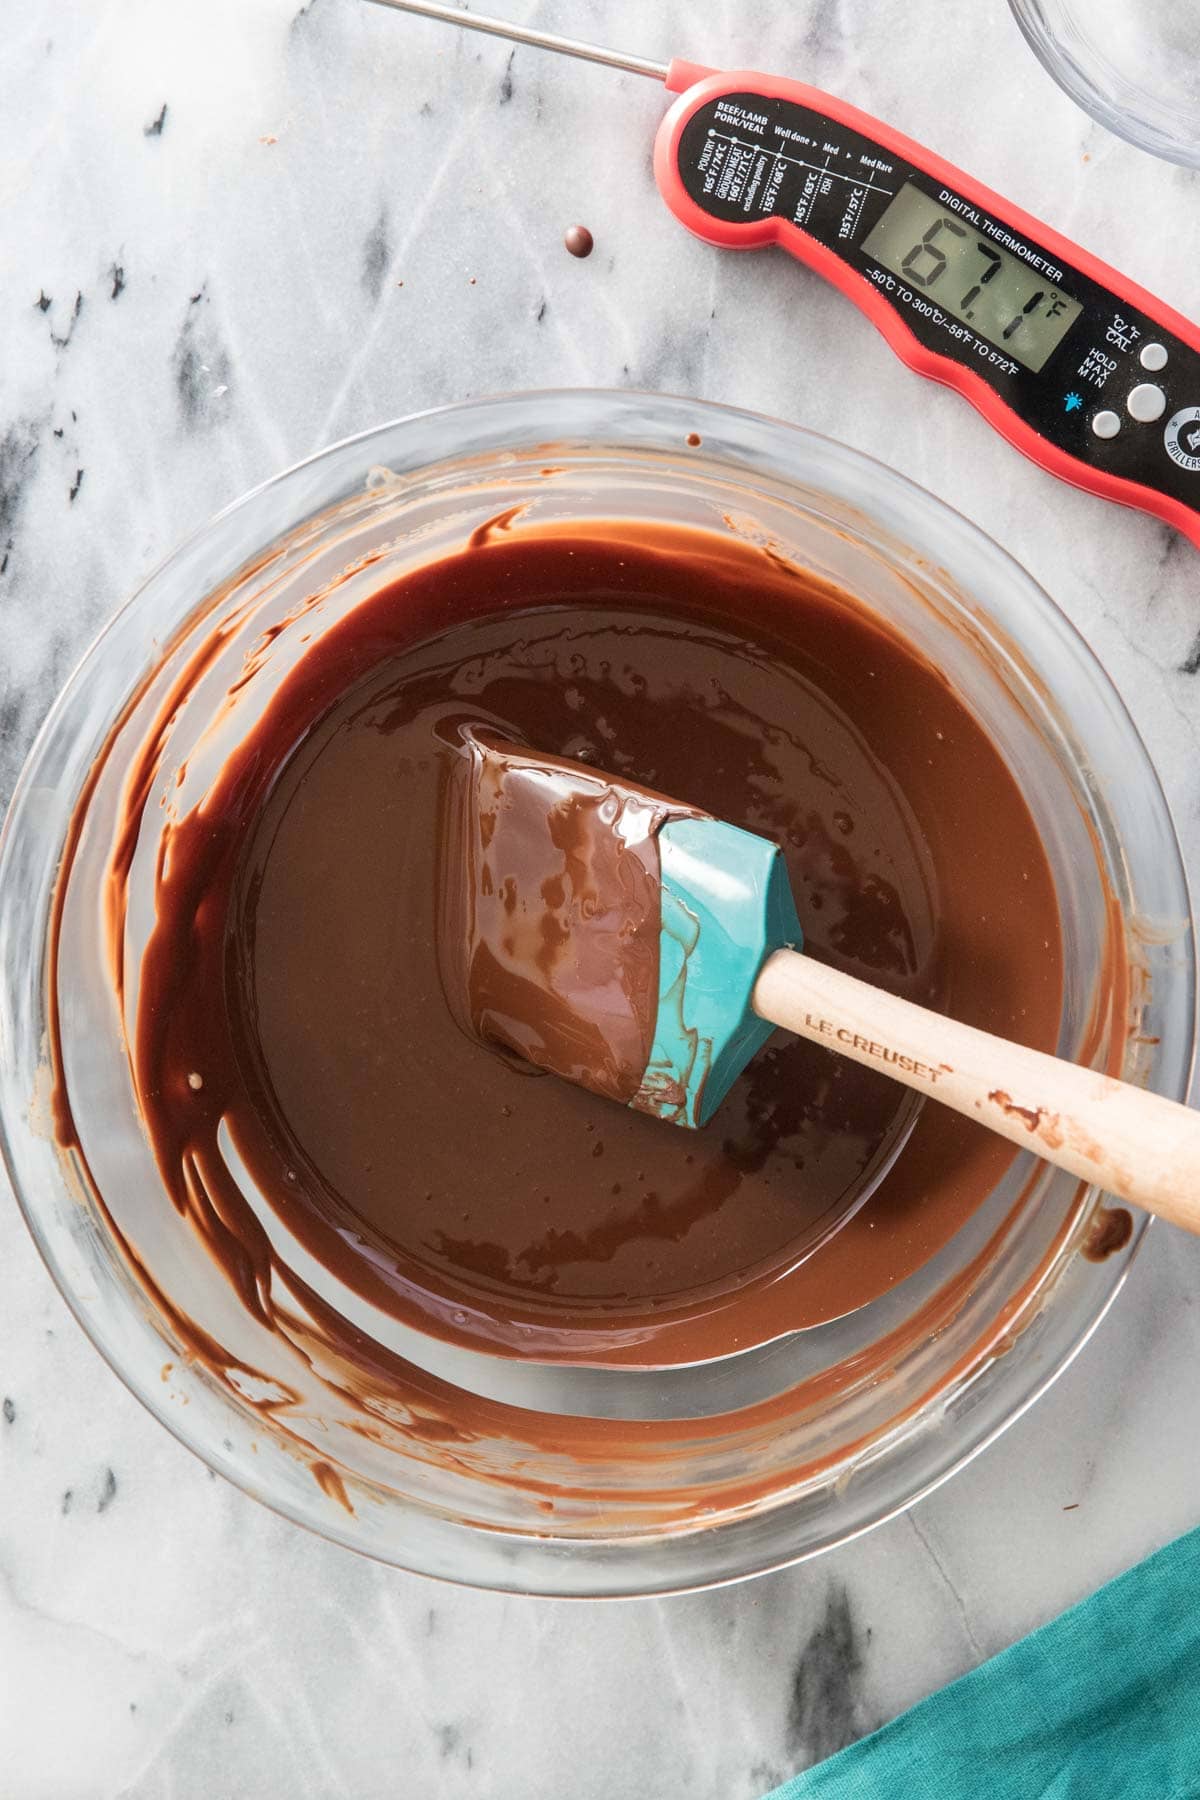
- Remove and stir thoroughly. It will seem like almost nothing has happened, but stir anyway. It is critical that none of your chocolate exceed a temperature of 91F (this is for dark chocolate, see a bit further down for notes on white and milk chocolate) or it will go out of temper and you’ll have streaky chocolate.
- Continue to heat the chocolate in 15-second intervals and stir thoroughly, being sure to scrape the sides and bottom of the bowl, every 15 seconds. Once your temperature gets to 90F or very close to that, you may have some chocolate pieces that aren’t entirely melted. Usually you can just stir and stir and they should melt. If you keep stirring and it’s just not happening, pop the chocolate back in the microwave again for just 5-second increments.
- It is imperative that throughout the process you keep your chocolate at a temperature between and 87 and 91F (30-32C), this is your sweet spot temperature. If the chocolate becomes too cool or too hot, it is no longer in temper and you can expect streaky results.
Tip: Want to make sure you tempered your chocolate properly before filling all of your molds? Smear a small amount on a piece of wax paper and pop it in the fridge for a few minutes. If it’s shiny/glossy when you take it out (and not chalky or streaky), you’re golden!
Using Different Types of Chocolate
These temperatures above are specific for dark/semisweet chocolate.
If you are using milk chocolate: Your sweet spot is a temperature between 86F and 88F (30-31C).
If you are using white chocolate: Your sweet spot is a temperature between 82F and 84F (27-29C).
If you are using chocolate melts: You don’t need to worry about temperature, just follow the instructions on the package. While these wafers do have a place in my kitchen (I often use them with my buckeyes), I don’t prefer them here because they have added ingredients that take away from the taste and mouthfeel of real, quality chocolate.
See the FAQ section below if you are curious about making these with chocolate chips.
Tip: If you do not have a microwave, you can temper chocolate in a double boiler instead. Be sure to not get any of the water in the chocolate, though, or it will seize and become unusable!
How to Make Hot Cocoa Bombs
Once you’ve tempered your chocolate, it’s smooth sailing. See the images and steps below for a step-by-step visual for making hot chocolate bombs.
Preparing the Chocolate Spheres
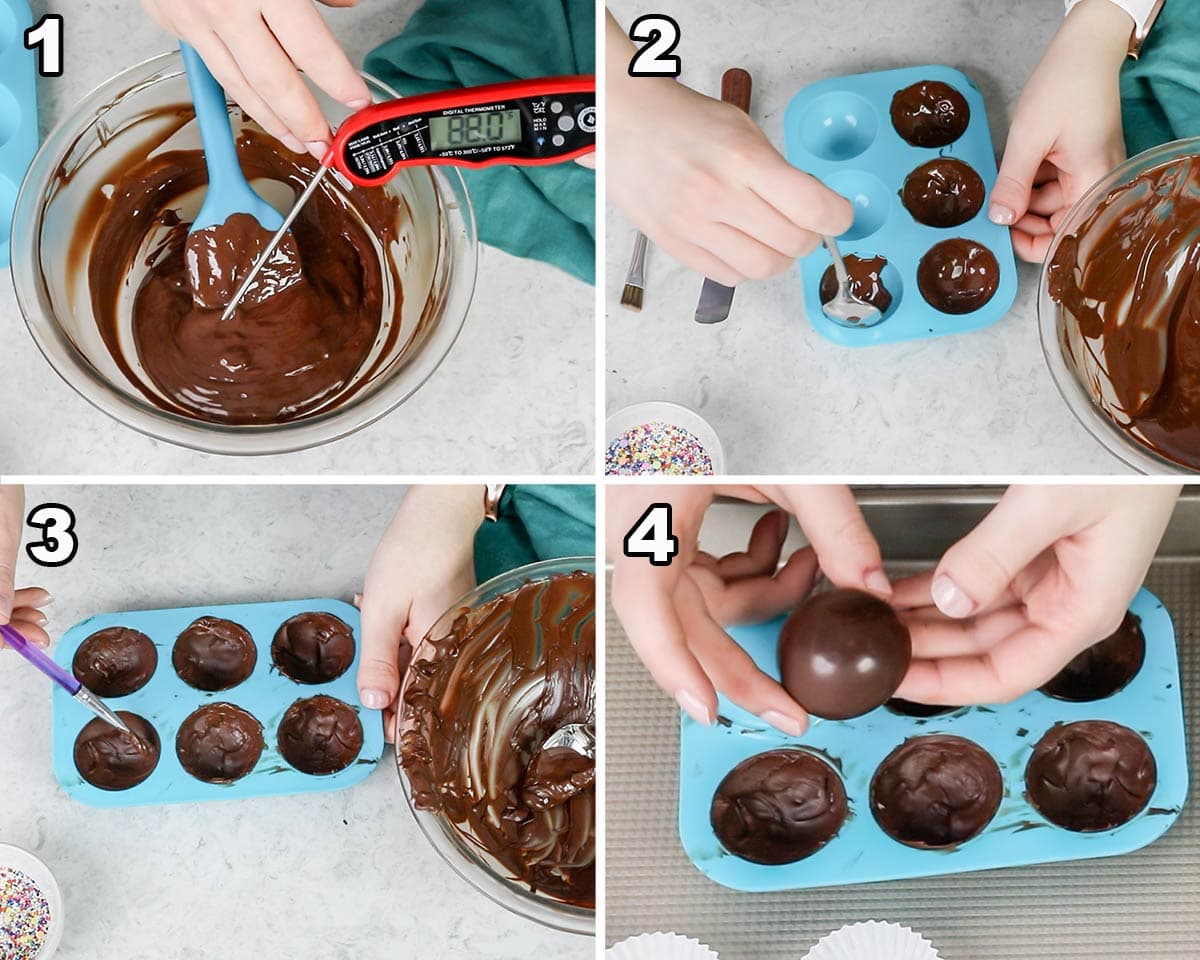
- Carefully temper your chocolate by melting as per the instructions above.
- Use a spoon or paintbrush or small offset spatula to evenly cover the interior of the mold with chocolate. Don’t skimp on the edges or they’ll be fragile! Chill in the fridge for several minutes.
- After chilling, remove and carefully examine your molds, reapplying more chocolate where needed. If you were too thin on the edges, apply more chocolate (the last thing you want is a fragile edge, the molds will break! If there are any holes or thin spaces, add more chocolate. If your layer of chocolate was really thin and you can see the mold through it, re-layer the whole mold with chocolate.
- Chill again for another 5 minutes, then carefully remove the half-spheres from the mold.
Tip: Keep an eye on your chocolate temperature while you are working with it! If it gets too cool, you can reheat it in the microwave, but do so in brief intervals and be sure to keep it in that temperature sweet spot!
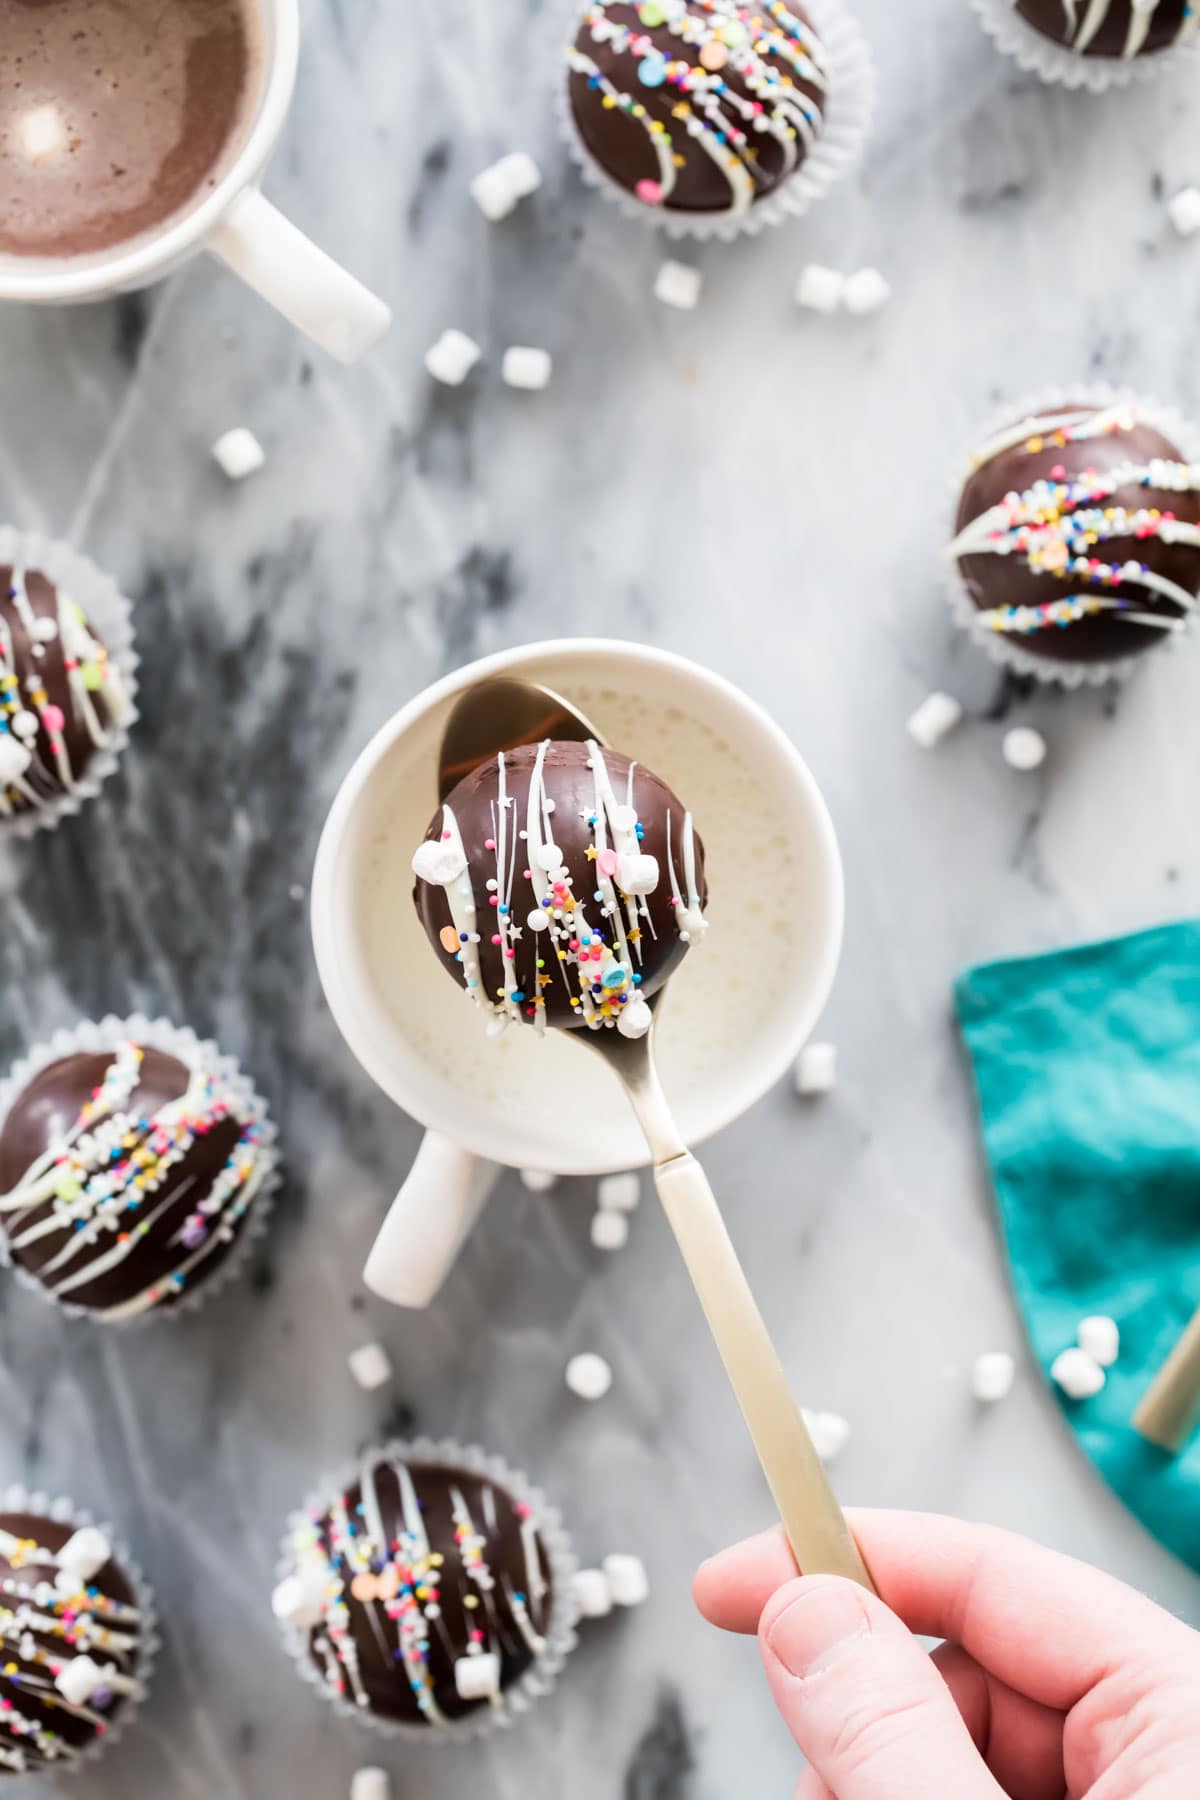
Filling & Assembling Hot Chocolate Bombs
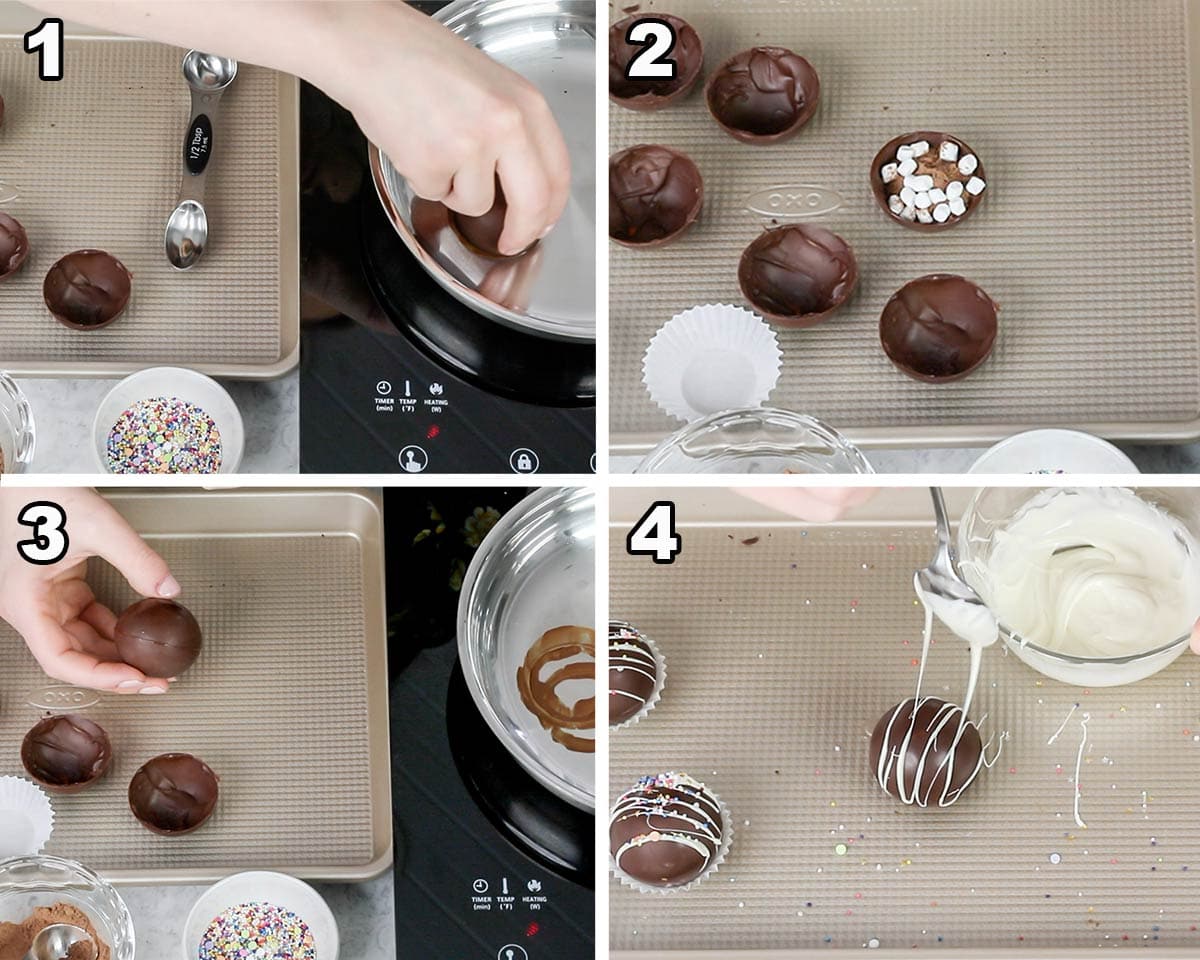
- Heat a small saucepan over low heat. Take one sphere and briefly touch the edge of the sphere against the surface of the pan to make a smooth edge (it takes only a second, just long enough to leave a chocolate ring on the surface of the pan).
- Add your filling! Fill with 2 teaspoons of cocoa mix and any other add-ins you’d like (I do mini marshmallows, see further down in the post for more options).
- Take another half-sphere and very briefly melt the edge of that on the saucepan. Press the filled half-sphere and the half you just melted together carefully but firmly. Line the edges up as well as you can to minimize the appearance of the seam.
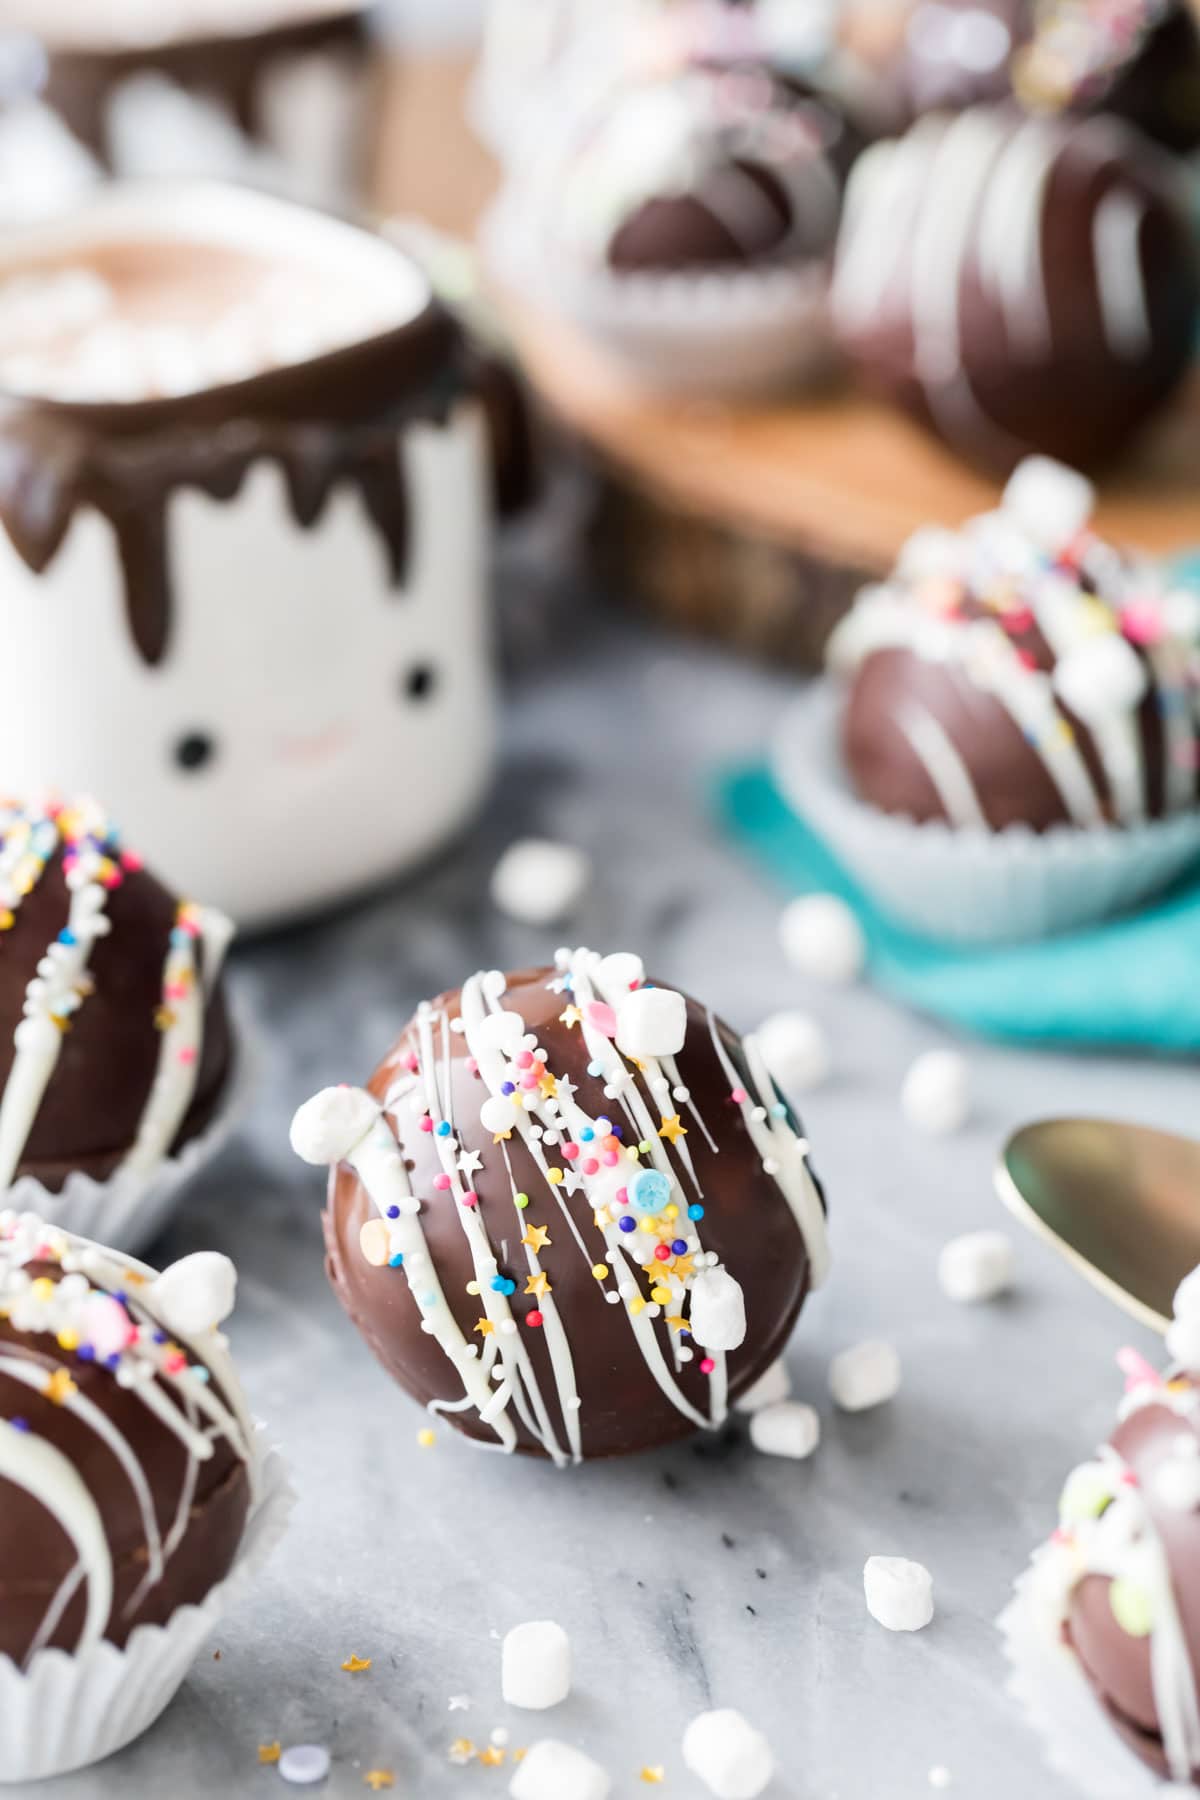
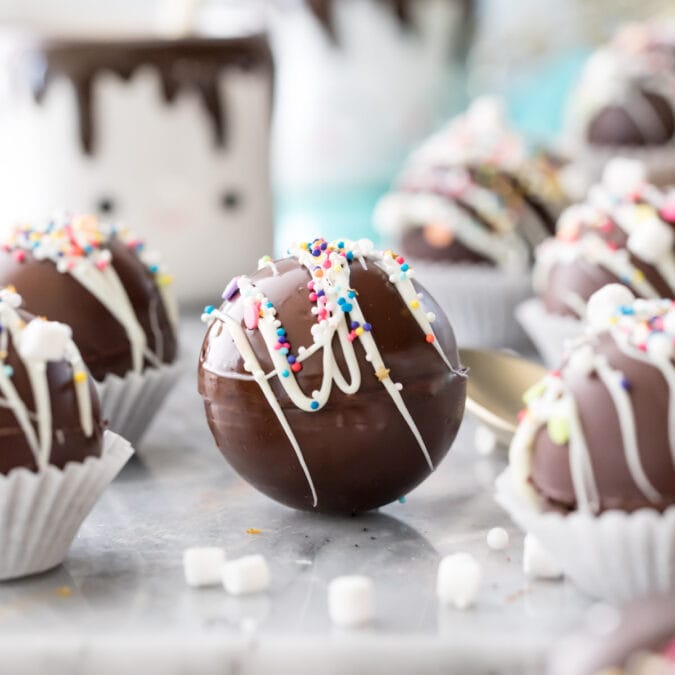
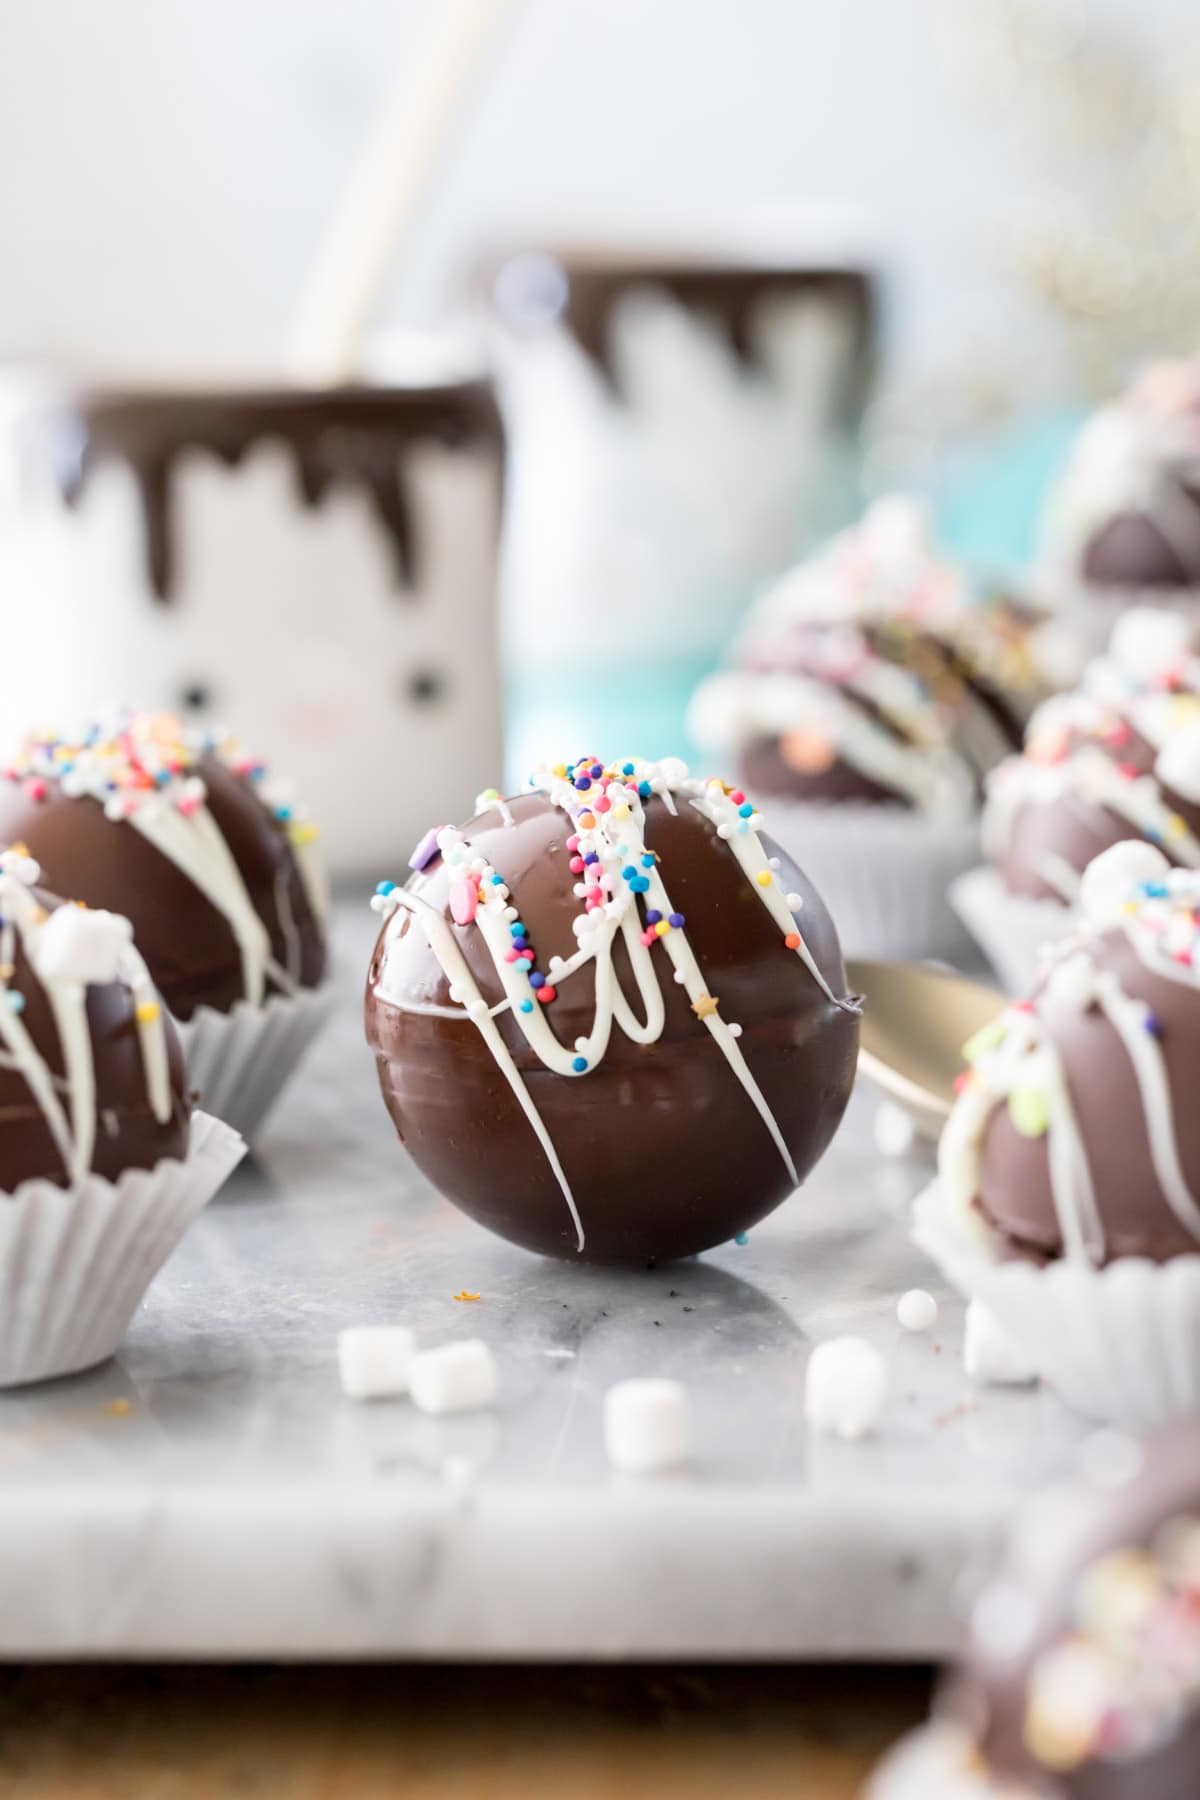
- If desired, decorate the top with melted white chocolate and sprinkles!
I tested a lot of different ways to fuse the two halves together, from piping chocolate on the center to using a culinary torch and I feel that this method with the saucepan was the easiest, most practical, most efficient, and yielded the most seamless results.
Frequently Asked Questions
Officially & professionally I do not recommend this and discourage you from using chocolate chips in order to guarantee best results. They contain added ingredients that inhibit smooth melting, and the quality of the chocolate simply isn’t as good.
Unofficially and totally off the record… I have done so with success. If you’re going the chocolate chip route, I do recommend a high quality chocolate chip. I’d recommend Ghirardelli semisweet or preferably dark (60%) chocolate chips. You should still follow the tempering instructions or your results will be streaky.
Was there any water or residue in your mold? Did the temperature of the chocolate drop out of your sweet spot temperature? Is your thermometer accurate (always check the temperature after stirring)? When you were melting, were you thorough in stirring the chocolate, and scraping the sides and bottom of the bowl (including droplets on the side near the rim) to ensure that none of the chocolate exceeded the “sweet spot” temperature? Any of these things could cause imperfections in your finished product.
Add more chopped chocolate to the mix and stir until it gets back down to 90/91F. It’s a good idea to have some extra chopped chocolate on the side just in case this happens.
Yes and yes. Use the technique that I use in my chocolate covered strawberries.
Wear food safe gloves when handling the chocolate, it will prevent you from marring the surface with fingerprint marks. I rarely ever do this, but if you’re handling the hot chocolate bombs a lot or it’s warm when you’re making them, this tip can help preserve the surface.
Hot chocolate bombs will keep for several months at room temperature! Keep in mind if you add different flavors you will need to be mindful of the expiration of any additional ingredients.
Different Flavors for Hot Cocoa Bombs
Consider adding some of these fun fillings to your cocoa mix:
- Peppermint Mocha: Add sprinkle of instant coffee with crushed candy canes.
- Dark chocolate & sea salt: Add a sprinkle of sea salt with the cocoa mix.
- Peppermint bark: Add finely crushed candy canes to the inside with a white chocolate drizzle (and maybe some more crushed candy canes on top!).
- Butterscotch: Crushed butterfingers candy.
- Sea salt Toffee: A few crushed toffee bits (I would crush them even though they’re already small to ensure they melt completely) and a sprinkle of sea salt. This is great with a dark chocolate shell.
- Funfetti: Add some colorful sprinkles and colorful marshmallows inside and on top.
- Mexican Hot Chocolate: A sprinkle of cinnamon and a teeny tiny pinch (like just a few grains) of cayenne.
More Recipes You Might Like
Whew! OK, that was a lot but I wanted to be thorough. I think I’ve covered everything you need to know about making perfect hot chocolate bombs. I cannot WAIT to see how yours turn out, so make sure to tag me on Instagram! Enjoy!
Let’s bake together! Make sure to check out the how-to VIDEO in the recipe card!
Hot Chocolate Bombs
Equipment
Ingredients
- 6 oz (170 g) quality dark chocolate, (see note)
- ¼ cup hot cocoa mix
- Mini marshmallows, if desired
- Sprinkles, if desired
- Other fillings, as desired (see post for some great flavor suggestions!)
Instructions
- Finely chop chocolate and place in a microwave-safe bowl. Heat in the microwave for 25 seconds.6 oz (170 g) quality dark chocolate
- Remove from the microwave and stir thoroughly, scraping the sides and bottom of the bowl with a rubber spatula. It will seem like basically nothing has happened, stir anyway.
- Return chocolate to the microwave and heat for 15 seconds, remove and stir thoroughly again. Repeat until chocolate begins to melt. Once it starts to melt, start using your thermometer to watch the temperature of the chocolate. It is important that you heat the chocolate above 87F (30C) but keep the temperature below 91F (33C) to temper the chocolate so that it’s easy to work with and yields shells that are smooth and shiny. If you’re at or close to 90F (32C) and the chocolate still has some small clumps of unmelted chocolate in it, just keep mixing and it should melt. If it’s still not melting, heat in 5-second spurts.
- Once your chocolate is in the right temperature range, use a spoon or paintbrush to thoroughly coat the entire inside of each sphere mold (make sure to get the edges!). If chocolate starts to become firm, return it to the microwave, heating in 5-second spurts and stirring. Remember to keep it in that sweet spot!
- Transfer to the refrigerator and chill for 5 minutes. Remove from the fridge and touch up any places where the chocolate is thin (especially the edges!) or any holes that may be in your coating.
- Return to fridge again for another 5 minutes. Meanwhile, heat a small pan on the stovetop over low heat.
- Remove chocolate from refrigerator and carefully remove from molds. Briefly touch the rim of one half-sphere on the surface of the pan until it just starts to melt (this will take only a second and gives you a smooth surface so your "bomb" will have a smooth seam).
- Fill with two teaspoons of cocoa mix and mini marshmallows/other fillings, if desired.¼ cup hot cocoa mix, Mini marshmallows, Other fillings
- Take another half-sphere and briefly touch the edge against the surface of the pan and immediately, carefully, but firmly press onto the edge of the filled half to form a full sphere. Hold for a second to give the chocolate a minute to harden
- If desired, drizzle with additional chocolate (I used white chocolate) and sprinkles or other decorations.Sprinkles
- To serve, place in a mug and then slowly pour steaming hot milk over the hot chocolate bomb (or just drop the cocoa bomb in a mug of steaming milk). I've found that 8-10 oz of milk seems to be just the right amount.Enjoy! These make great gifts!
Notes
Chocolate
I recommend using a high quality chocolate bar with a high percentage of cocoa (I use Lindt 70%). Couverture chocolate is a great choice as well. You won’t use all of your chocolate, having a bit extra helps to keep the chocolate in temper (it cools too fast if you use less), so don’t panic if you feel like you have too much left over.Using Different Kinds of Chocolate
This recipe is written using dark (or semisweet) chocolate, which requires a temperature between 87F-91F (30-33C) to temper. For milk chocolate keep the chocolate between 86F and 88F (30-31C) and for white chocolate between 82F and 84F (27-29C). For best results I don’t recommend using chocolate chips, but you can see my post for more info on this.Giving as Gifts
You can wrap these in cellophane or nestle them in mini cupcake liners. I like the cupcake liners, especially if you are placing them in a box, it keeps them from rolling around.Different Size Molds
You can use different shapes and sizes, but this recipe is specifically written to make six 2″ diameter spheres. You can find the link to the exact mold that I use in the “Equipment” section above in the recipe card. Many recipes make larger bombs, but I prefer this slightly smaller size.Storing
Hot chocolate bombs will keep for several months at room temperature! Keep in mind if you add different flavors you will need to be mindful of the expiration of any additional ingredients.Nutrition
Nutrition information is automatically calculated, so should only be used as an approximation.
Like this? Leave a comment below!


i am having so many issues. they look great coming out of the fridge. i then assemble and they start to melt and fall apart.
That’s so frustrating, Rayetta, I’m sorry to hear this. I would make sure you are working in as cool of an environment as possible and let the chocolate sit in the fridge a bit longer. Also make sure you have thick enough coating of chocolate in the monld. I’d also recommend wearing gloves to help keep the heat from your hands from melting the chocolate, and make sure when you place the edges on the pan you are doing so very, VERY briefly. If you haven’t watched the video yet I would recommend taking a peek at that, too. I really hope this helps!
How much milk do you use when you prepare/get ready to drink the hot cocoa? Since the bomb only holds 2tsp of cocoa, I’m assuming 8oz would just really water the flavor down.
Hi Melissa! 8-10 oz is what I would recommend. You get a lot of chocolate from the shell as well. 🙂
I made mine!
I hope you loved them! 🙂
Love this! How do you keep your fingers from “rewarming” the chocolate and putting finger prints on the chocolate bombs??
Gloves are the best way to keep from leaving prints! 🙂
Thanks so much for sharing how to make hot chocolate bombs. I’m waiting on my molds to come from Amazon. I plan on making them for Christmas. Your video is so helpful. You make it look easy.
I’m so glad it is helpful, what a perfect Christmas treat! <3 Please let me know how they turn out for you 🙂
I love this. Its so cute. I am a holiday baker/candy maker. My next adventure is to learn to make homemade chocolate. I was wondering if you have made your own chocolate yet and if so could you do a video or give tips/instructions.
Thank you, Angela! I have not yet, but adding to my list of things to tackle for 2021! 🙂
Thank sam for helping me can you do baked cheesecake it will be good in holidays
Hi, what’s the name of the induction cooktop used in the video?
Duxtop 🙂
Sounds great but complicated unless you have a mold, and I don’t. Where did you find your mold?
Yes I definitely recommend a mold, which I know can be a pain if you don’t already have one (I didn’t have one until I started developing this recipe so I totally get it!). Whenever possible I try to minimize non-typical kitchen tools, but I really feel one is necessary to make this particular recipe. Mine is from Amazon, if you click the link in the “Equipment” section in the recipe you’ll be able to purchase the exact one I use.
I have slowly been buying the ingredients and supplies to make these. Was planning on it this weekend, now I am not so afraid to jump right in. Thanks for the wonderful step by step and notes on doing these. Great timing !!
I’m so glad the notes are helpful, Mary! I hope you have fun making yours!! 🙂
I’ve been hoping for this one so thank you!! What are your thoughts on using almond bark?
You’re very welcome! It would definitely work and there would be no need to temper, BUT personally I feel the quality will suffer. You won’t have quite as rich of a chocolate flavor.
I was literally about to make these today and was planning on just winging it- but I will definitely do this! Thank you! Would you say I would be able to gift these- or would they melt (like if I put them in little boxes)
That is a great gift idea! I actually have a bunch of notes below the recipe on storing them that should be helpful. 🙂
Hi I am going to try this but what of I don’t have the sphere mold what can I do
Hi Salma! The best way to get that perfect shape is to use a mold, but I know those are hard to find recently. I have heard of some people wrapping an egg in plastic wrap and then dipping/brushing the larger half of the egg with the chocolate for a makeshift mold. I have not personally tried this myself and the shape might not be perfect, but that’s one way to get creative with it!
I am using the Kinder Chocolate egg (with the little surprise in it) as my mold. I loved everything you have on your site and plan to make many gift boxes for neighbors, friends, and family. I found boxes that will nestle four eggs at the Dollar Tree. I am using Walmart pickup for the ingredients and found a four-pack of the eggs there. Thank you so much for posting this recipe.
BTW I am a FACS teacher for middle schoolers and I will follow you for other unique ideas!
That’s such a creative idea for the mold, thank you for sharing! I’m so glad you enjoyed the recipe, thank you for following, Trish! 🙂
I have been scared to attempt making these. You make it look so easy. I’m gong to have to try. Thanks so much for all of your great recipes. 💜
I really hope you love them, Lori! I tried to be extremely detailed with the post so if you read through it I don’t think you’ll have any problem. I can’t wait to hear how you like them 💜
I can’t believe it. The minute I was talking about learning to temper chocolate and how to make hot chocolate bombs, I get a notification on my phone for it, from my favorite site ! When I went to the post, I expected to see candy melts, but you went to the next step. Thank you! I’m surely gonna make these Christmas eve.
Haha! It must be fate! I hope you love the recipe, Andres! 🙂