
Fried Donut Holes (No Yeast)
This post may contain affiliate links. As an Amazon Associate I earn from qualifying purchases. Please read my disclosure policy.
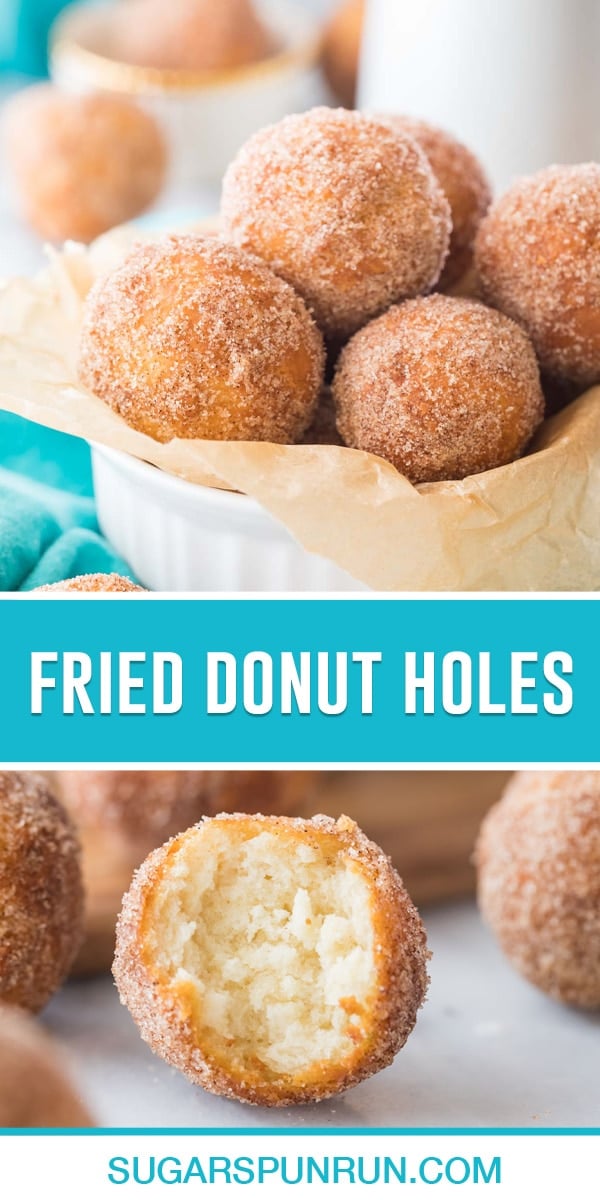
This is an easy, from-scratch, no-yeast donut hole recipe! They make a great quick & easy breakfast treat or snack! These take just minutes to whip up for the best fried donut holes you’ve ever tasted! Recipe includes a how-to video!
An Easy Donut Recipe Without Yeast!
Today I’m sharing my favorite donut recipe — and it’s made without yeast.
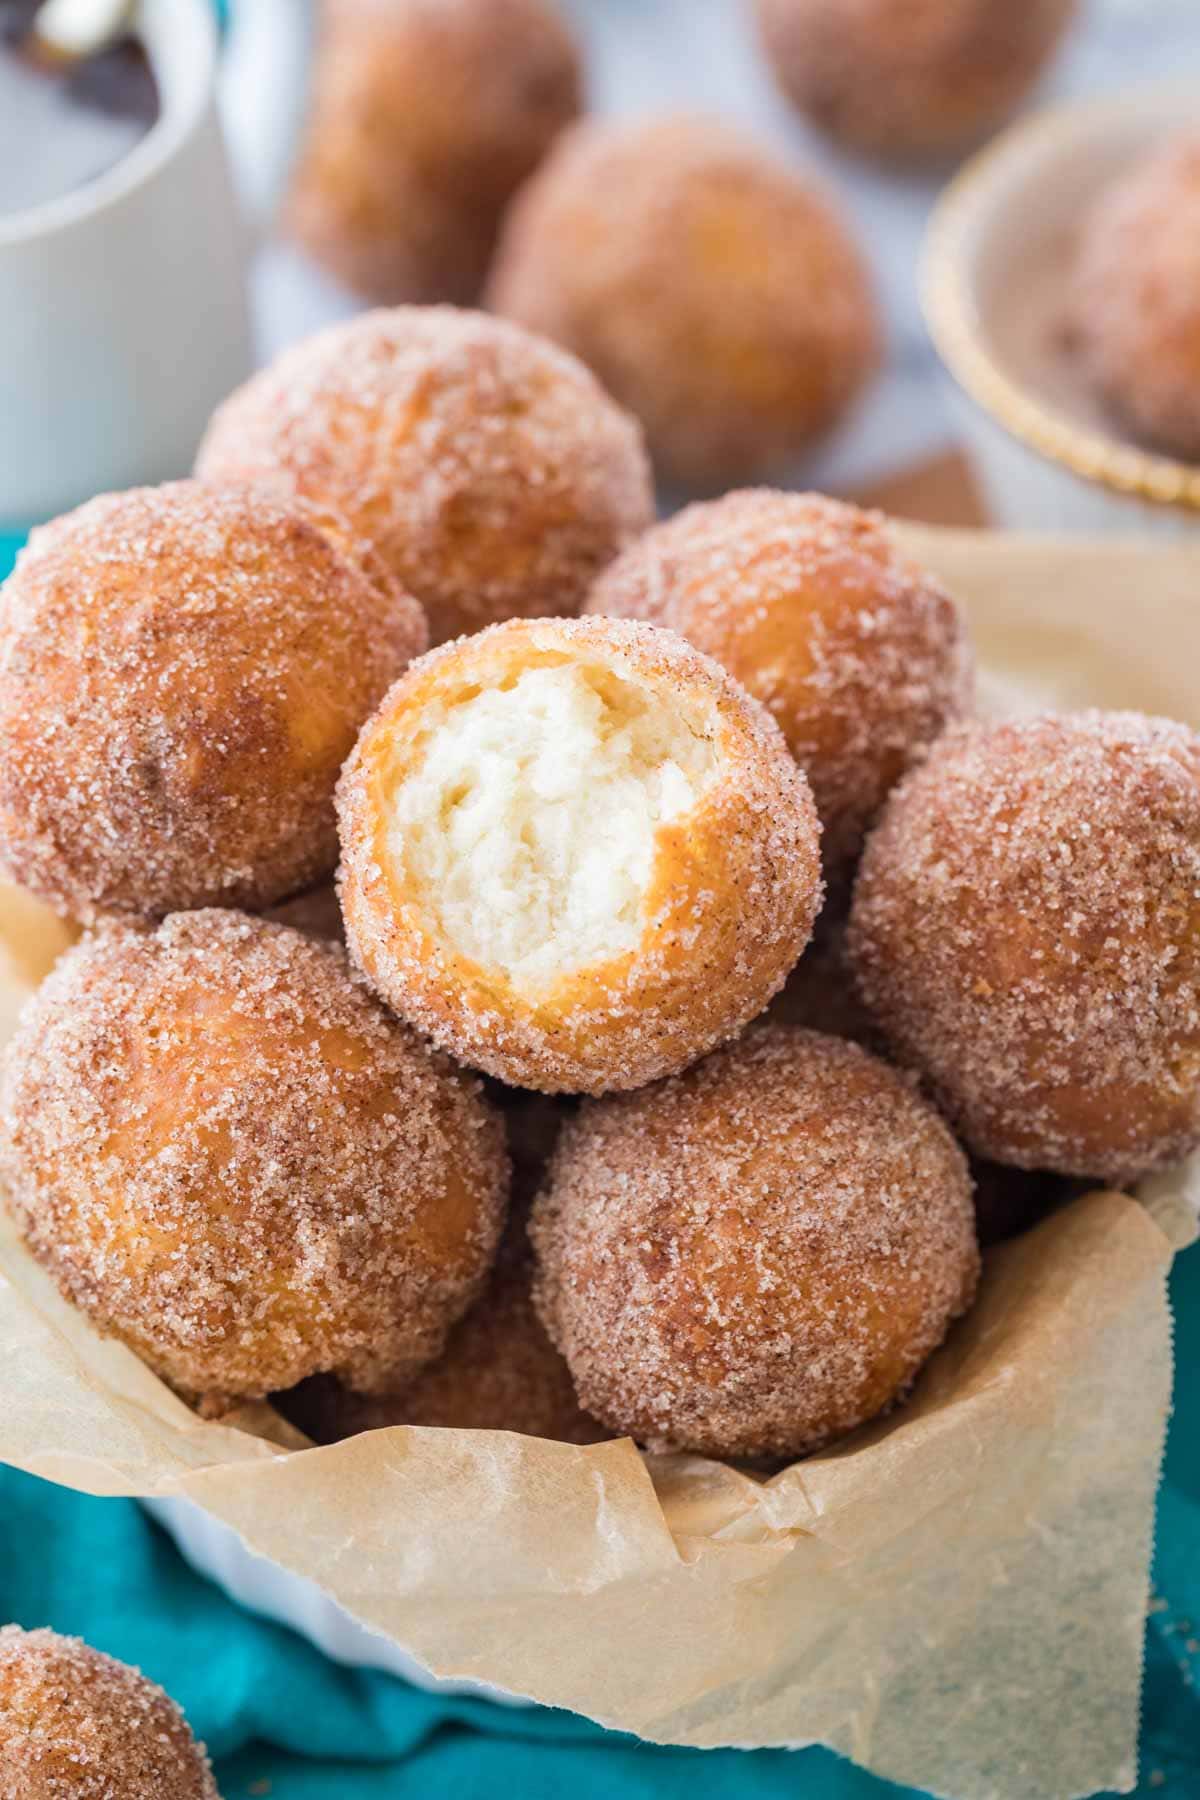
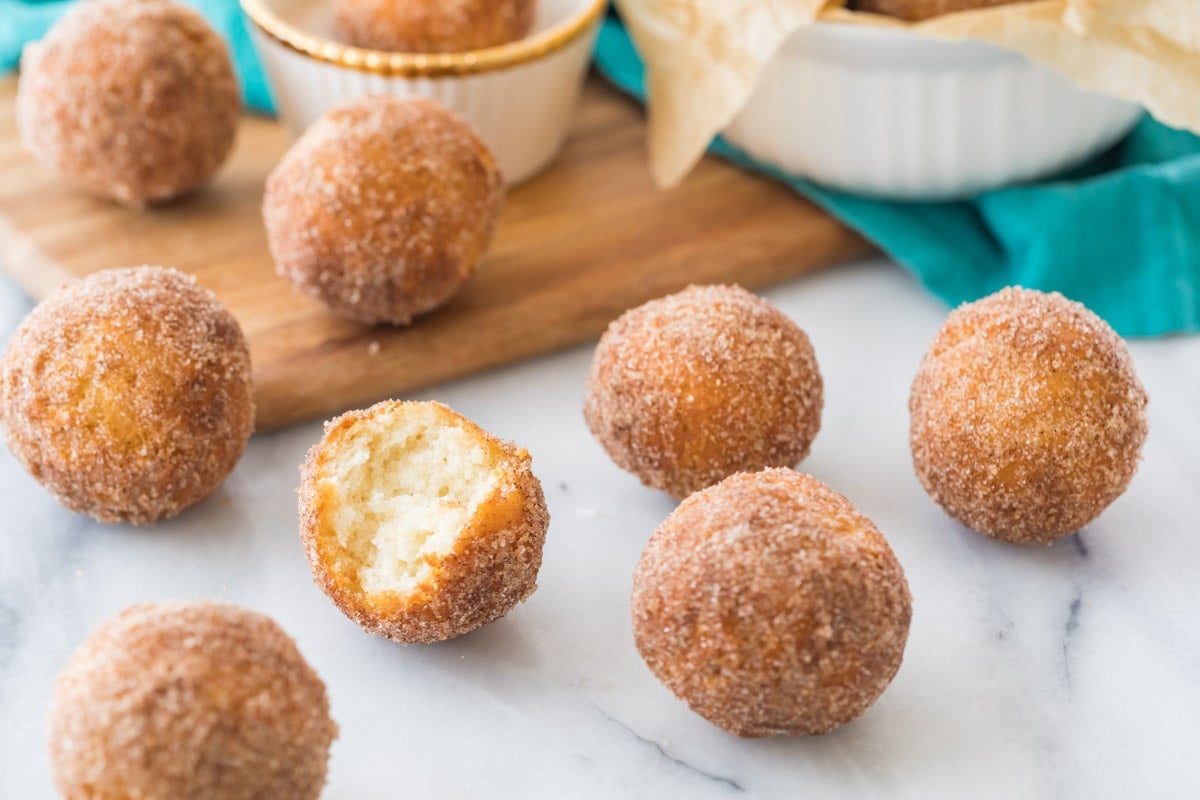
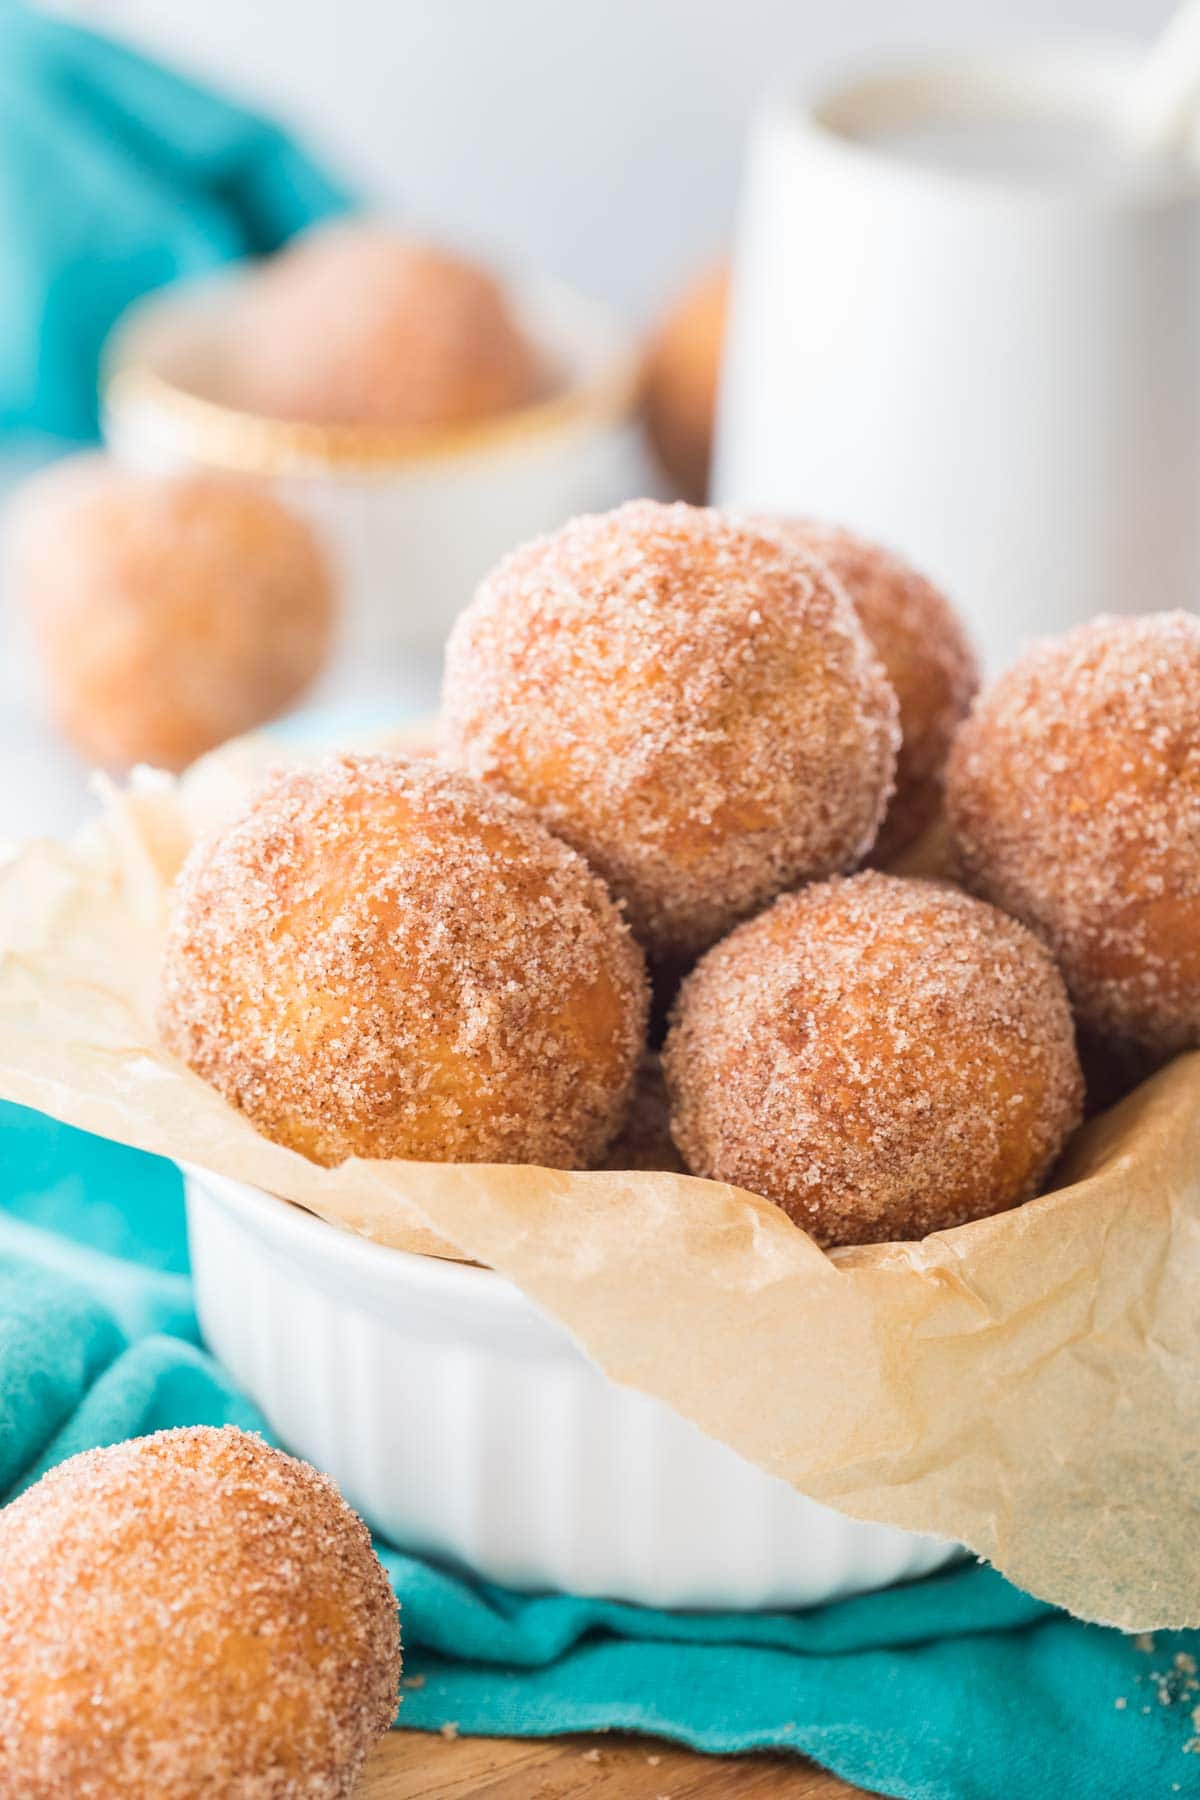
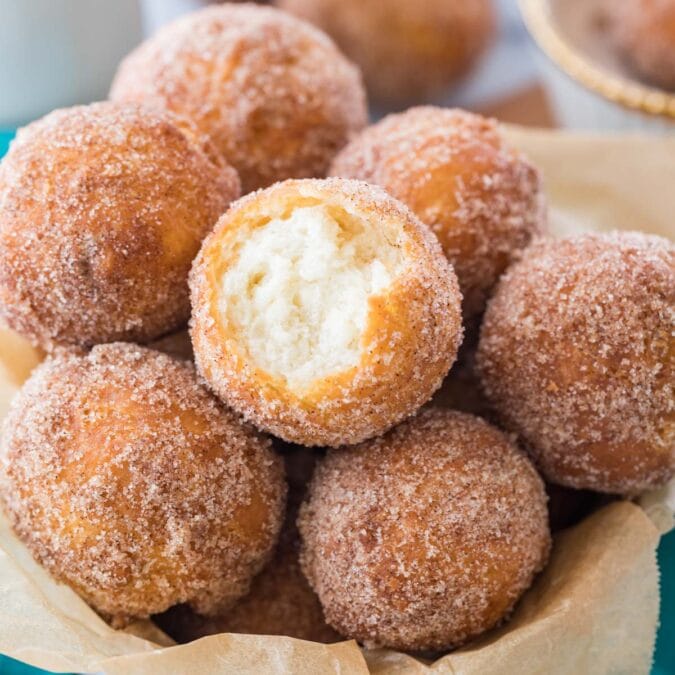
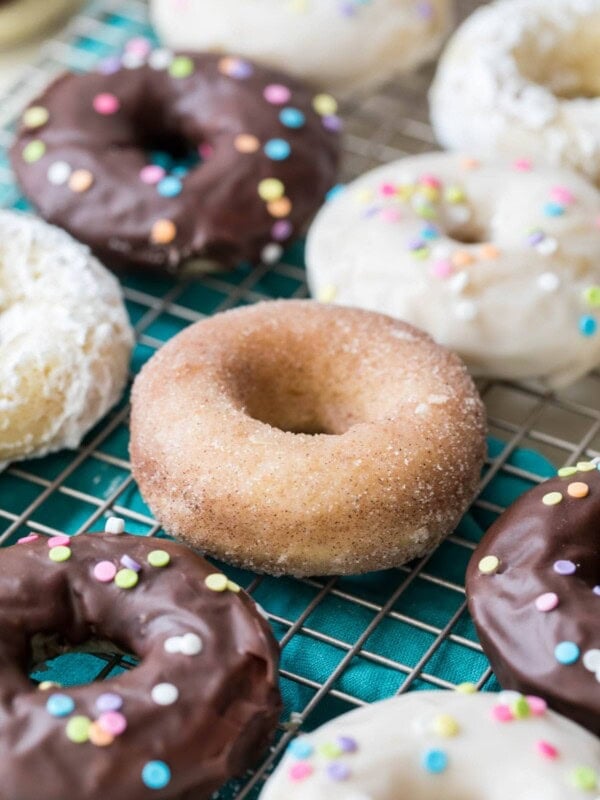
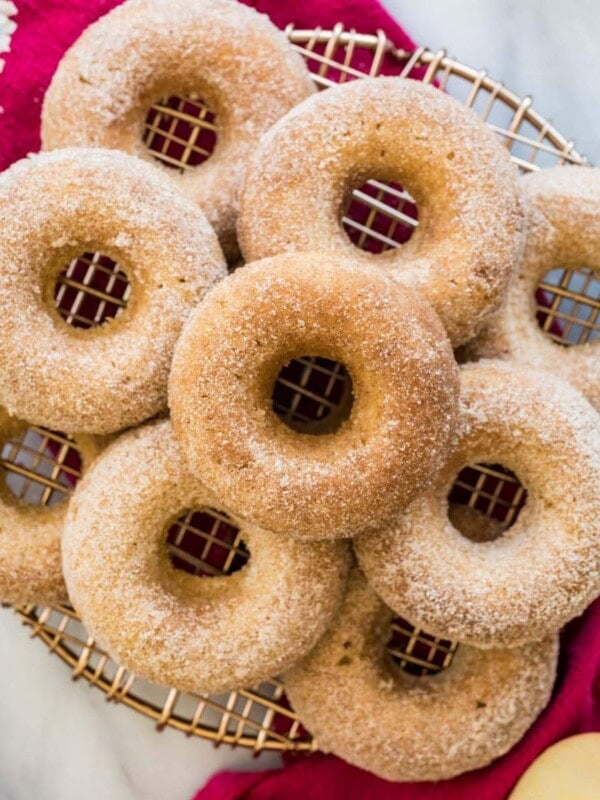
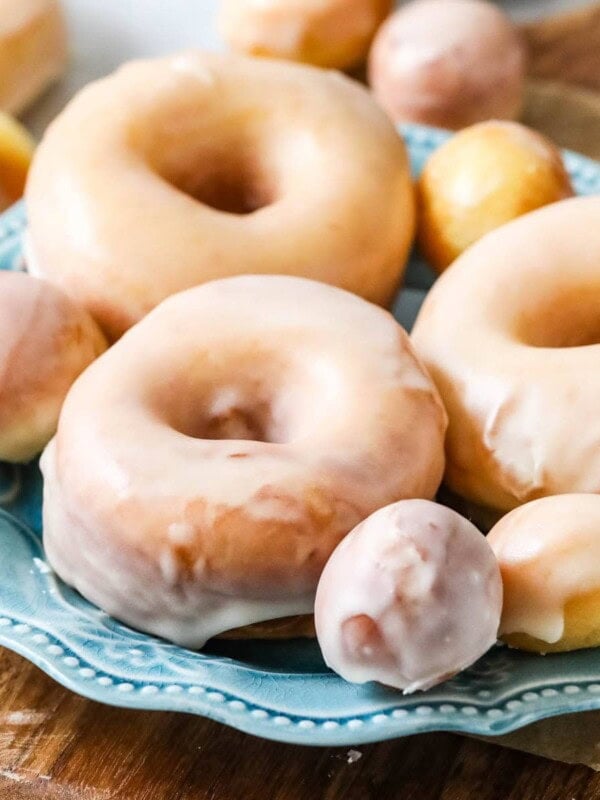
These simple donut holes are so quick and satisfying, you won’t even miss the yeast! They’re easy to make, with no proofing, kneading, or rising–simply mix, roll, and fry. I love rolling them in cinnamon sugar after frying, but they’re also great in confectioners sugar or just plain sugar too.
Preparation-wise, these are very similar to my cinnamon rolls without yeast; though I borrow a technique from my biscuits and cut in the butter with a grater. I suppose you could even go the way of my scones and use a food processor instead–but I digress!
Why this is the BEST donut hole recipe:
- Quick: Takes just 30 minutes to make.
- Flavorful: They truly melt in your mouth!
- Simple: Uses just a few pantry staples.
- Easy: No yeast makes prep a breeze!
If you’ve never fried anything before–don’t worry! I walk through all the steps in detail and I’m including a how-to video too. You’ve got this!
What You Need
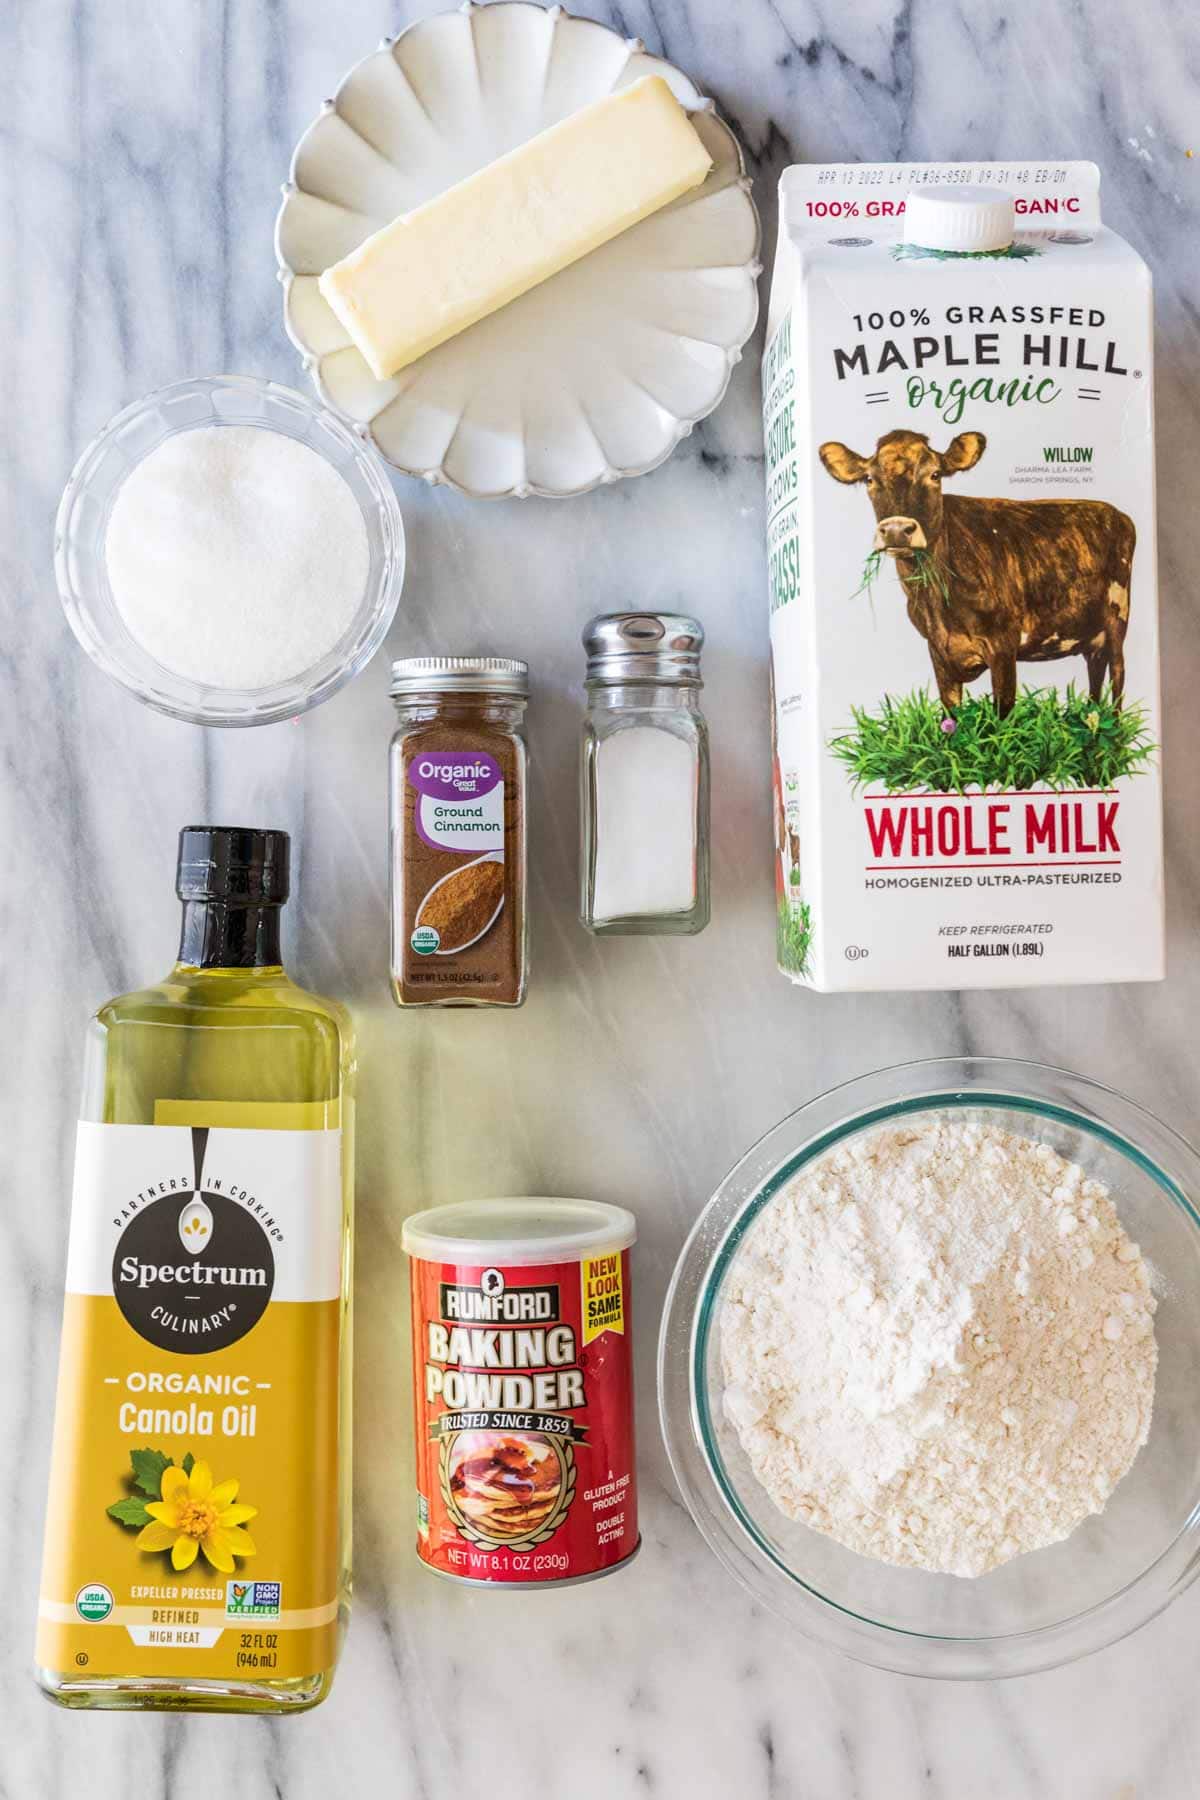
Just eight basic ingredients make these perfectly poppable fried donuts. Let’s go over a few:
- All-purpose flour. I do not recommend using self-rising or whole wheat flour. Make sure you know how to measure flour properly, or your donut holes could end up dense or dry.
- Milk. My preference is whole milk. You could use a non-dairy milk if you like, but your donuts might not be as tender.
- Butter. Use unsalted butter and make sure it’s VERY cold! I like to freeze my butter and grate it into my dry ingredients, but you can use a pastry cutter, fork, or two knives instead.
- Baking powder. Many of you have either asked if you can leave out the baking powder or substitute it with baking soda. This recipe needs baking powder and you cannot substitute baking powder with baking soda! I talk about this in detail in my baking powder vs. baking soda post if you’d like a full explanation.
- Oil. This is for frying. Vegetable or canola oil works well here.
SAM’S TIP: Oil temperature is critical for good results! Use a thermometer and monitor your oil temperature constantly; do not let the oil get too hot, and do not add your next batch of donuts until your oil comes back up to temperature!
Remember, this is just an overview of the ingredients I used and why. For the full recipe please scroll down to the bottom of the post!
How to Make Donuts Without Yeast
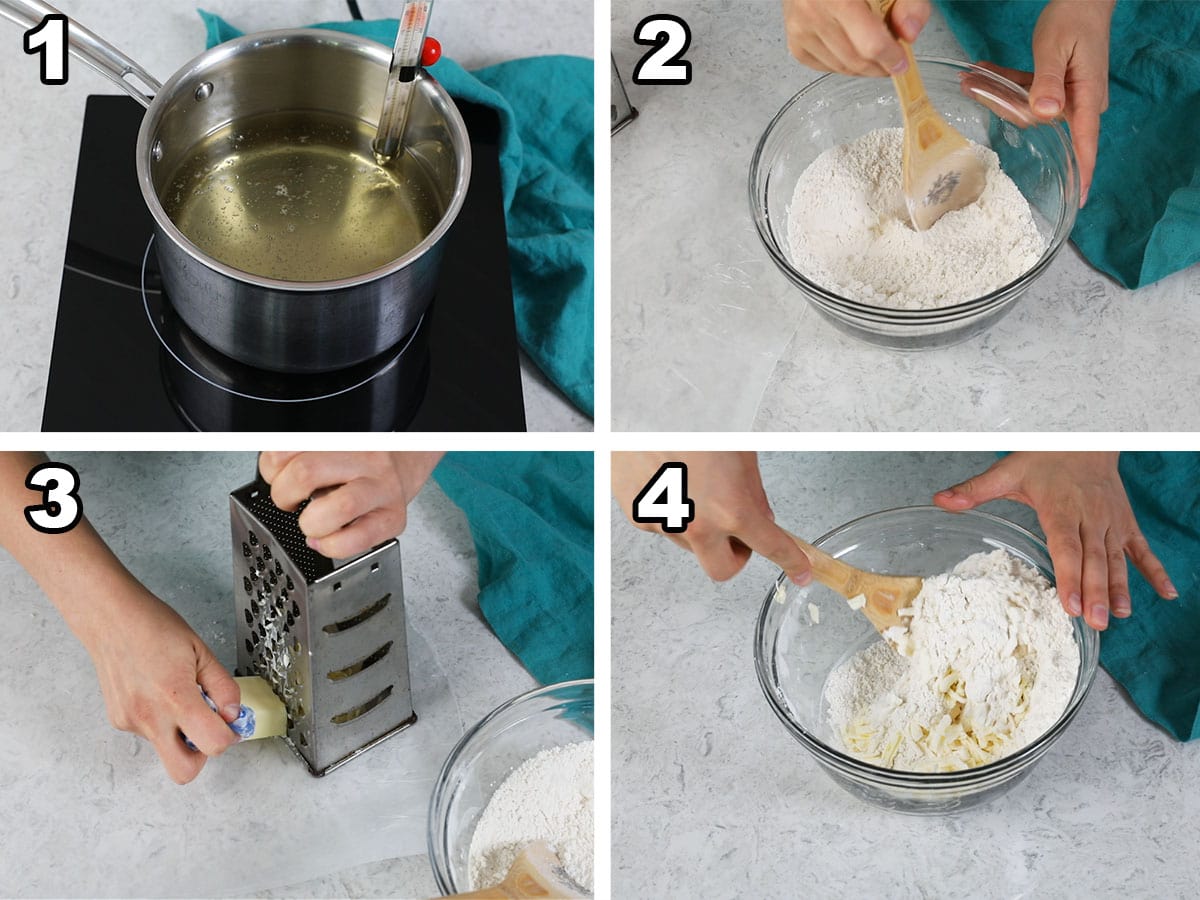
- Fill a heavy-bottomed pot with 2-3 inches of oil, attach a thermometer, and heat to 350F (but not too quickly! Set your stovetop to medium heat!).
- Combine the dry ingredients with a whisk.
- Grate very cold butter into the dry ingredients.
- Stir the butter into the dry ingredients until incorporated (large, discernible butter pieces will remain, this is fine!).

- Add the milk and stir until the dough comes together.
- Place dough on a well-floured surface and knead gently and briefly until it forms into a ball.
- Tightly roll the dough into smooth, 1.5 tablespoon sized donut balls.
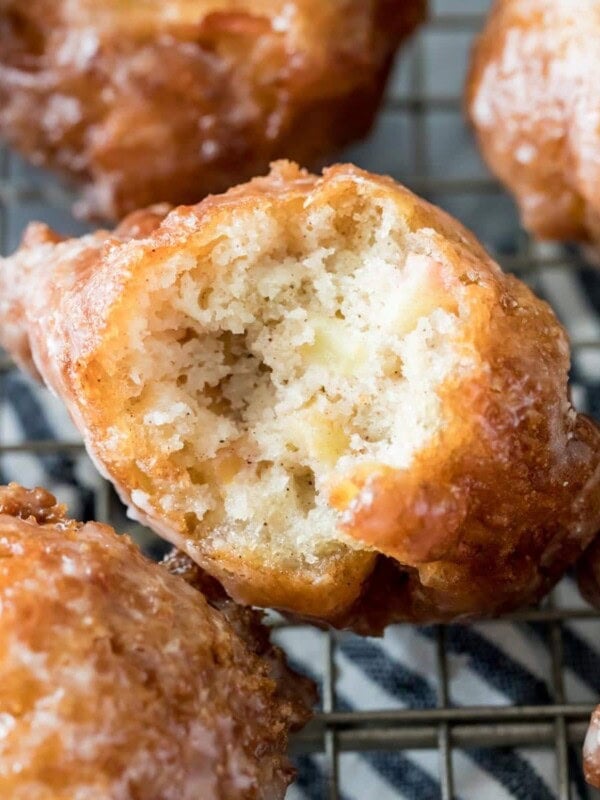
- Fry 2-3 donut balls at a time for about 90 seconds or until evenly golden. Let the first batch of donut holes cool for about a minute and then break into them to make sure they’re cooked through and also that they’re not overcooked! These will be your guide for how long your future donut holes will take.
SAM’S TIP: If the dough is too wet while you’re working it together on the counter, you can sprinkle in a bit more of flour. Make sure it’s well-combined and that you roll your donut holes into tight balls so they don’t disintegrate when introduced to the oil.
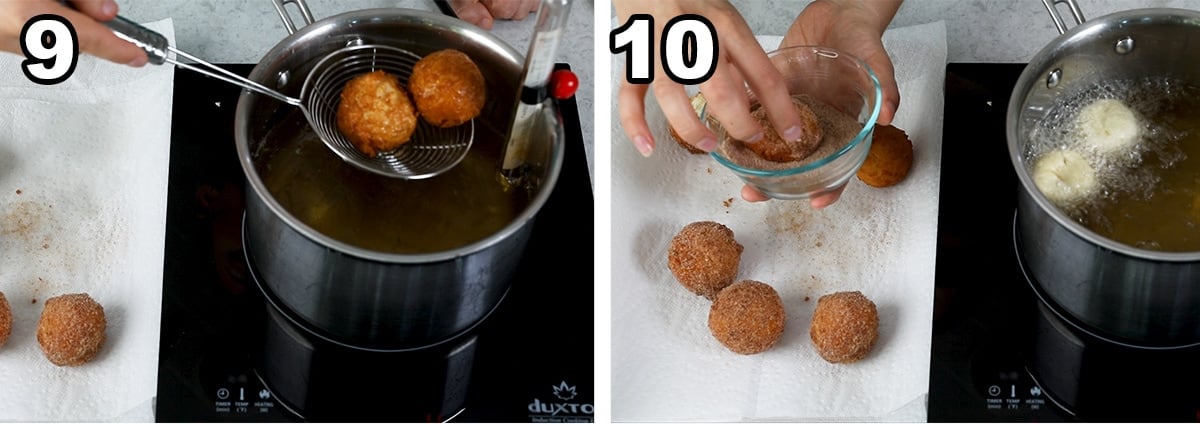
- Remove donuts to a paper towel lined plate and let cool for a few minutes.
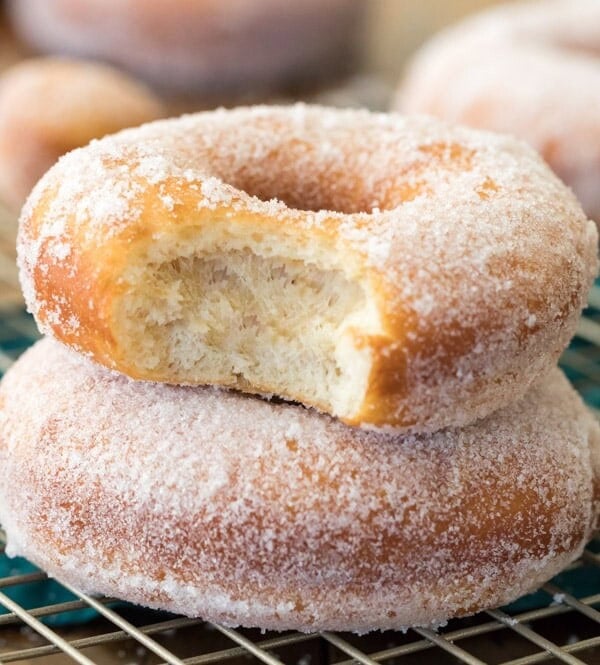
- Roll through cinnamon sugar and enjoy!
Troubleshooting
Dough that is too sticky/wet:
If your dough is wet and sticky and difficult to work with, don’t be afraid to add more flour! Do this once you transfer the dough to your countertop and begin to work it together. Sprinkle the countertop with flour and the dough and gently work the flour into the dough until it’s no longer wet and is easy to manage.
If they disintegrate/fall apart in the oil:
This is most likely due to the dough being too shaggy. While it’s important to not over-work the dough (this would leave you with dense, dry donut holes rather than fluffy, melt-in-your-mouth ones), it should cling to itself and you should be able to roll the dough into tight balls that hold their shape. If any dry bits of flour remain, they’ll cause the dough balls to fall apart when they are being fried.
Fried donut holes that are raw/gooey inside
There are several factors that could cause this. If you’ve been monitoring your oil temp (you should be!) then you may simply need to cook the next batch a bit longer. I always use my first batch as a gauge to know exactly how long I’ll need in the oil (the recipe provides a time, but oil temperature can fluctuate quite a bit depending on the amount used and the number of donut holes added to the pot, and if yours are a bit larger or smaller than indicated you may need to adjust your time accordingly).
Note that this sometimes happens if your oil temperature is too high. The exterior of the donuts turns a deep golden quickly, making you think they’re finished cooking, but the interior hasn’t had time to cook through!
Dense/tough or greasy
Dense or tough means they simply were cooked too long or the dough was over-managed when it was being made.
Greasy is typically a result of frying in an oil temperature that is too low.
Frequently Asked Questions
I think this could work, since this recipe uses more of a dough than a batter. I haven’t tried it myself though and can’t say for sure how to do it. If you try it, I’d love for you to comment below and let me know how it went!
Yes! Just store your dough in an airtight container in the fridge. It will last this way for a few days.
Yes! You can just form your dough into a donut shape instead of a ball. I have several other yeast and yeast-free donut recipes if you prefer real donuts vs donut holes.
If you’re looking for a donut recipe with yeast, you NEED to check out my homemade donuts!
Enjoy!
Let’s bake together! I’ll be walking you through all the steps in my written recipe and video below! If you try this recipe, be sure to tag me on Instagram, and you can also find me on YouTube and Facebook
Donut Holes (Fried, No Yeast)
Equipment
Ingredients
- Vegetable oil or canola oil, for frying
- 2 cups (250 g) all-purpose flour
- 3 Tablespoons granulated sugar
- 1 Tablespoon baking powder
- 1 teaspoon salt
- 5 Tablespoons (70 g) unsalted butter, (very cold, I like to place mine in the freezer 15 minutes before beginning)
- ¾ cups (175 ml) whole milk
For rolling
- ⅓ cup (67 g) granulated sugar
- 1 ½ teaspoons ground cinnamon
Instructions
- I find my oil takes about 20 minutes or longer to come to temperature, so I typically start the oil just before I start my donuts. Fill a medium-sized, heavy-bottomed saucepan 2-3 inches (5-7cm) deep with your oil over medium heat. Use a candy or frying thermometer (make sure it isn't touching the bottom of the pot) to monitor your temperature and heat oil to 350F (175C). Monitor the heat pretty regularly and note that you may need to increase/decrease your stove temperature to keep it consistent.Vegetable oil or canola oil
- Combine flour, sugar, baking powder and salt in a large bowl and whisk until well-combined.2 cups (250 g) all-purpose flour, 3 Tablespoons granulated sugar, 1 Tablespoon baking powder, 1 teaspoon salt
- Use a box grater go grate the butter into small pieces and then add to the flour mixture and stir until well-incorporated (visible butter pieces will still remain). Note: If you do not have a box-grater, use a pastry cutter to cut the butter into the dry ingredients until the mixture resembles coarse crumbs, instead.5 Tablespoons (70 g) unsalted butter
- Add milk and gently stir until all ingredients are combined and the dough clings together.¾ cups (175 ml) whole milk
- Transfer dough onto a well-floured surface, and knead gently until it forms a cohesive ball. If dough is too sticky to manage, continue to work in flour until it is smooth and manageable (I’ve found on hot days or if my butter isn’t cold enough the dough can be quite sticky)
- Portion off approximately 1 ½ Tbsp-sized pieces of dough and roll into smooth, tight balls. Set aside.
- Prepare your cinnamon/sugar mixture for rolling by stirring together cinnamon and sugar in a small dish. Set aside.⅓ cup (67 g) granulated sugar, 1 ½ teaspoons ground cinnamon
- Prepare a large plate or baking sheet for your cooked donut holes by lining generously with paper towels.
- Once oil has reached 350F, very carefully fry your donut holes, only 2-3 at a time, carefully transferring them to the oil with a slotted spoon (don't drop them in or the oil may splash, lower them into the oil instead).
- Fry donut holes for approximately 90 seconds*, turning half way through so they become evenly golden brown.
- Remove carefully with a slotted spoon, and place donut holes on a paper towel laden plate. Allow them to sit for about a minute/until no longer too hot to touch, and then transfer them to your cinnamon/sugar dish, roll them in the mixture until fully covered. Make sure to allow your oil to return to 350F (175C) between batches.
- Repeat until all donut holes are cooked and have been rolled in cinnamon sugar.
Notes
*Verify that your donut holes are cooked!
For best results, fry only one donut hole the first time you try this, and gauge how thoroughly it is cooked. Time how long it takes for your first donut hole to turn golden, allow to cool for at least a minute, then use a knife to cut into it to check whether it is underdone, just right, or overdone, and then fry the rest of your donut holes accordingly. While these should take under 2 minutes under optimal conditions with a consistent oil temperature of 350F, it’s still important to check so that you don’t end up with a full batch donuts that are still gooey in the middle (or dry and crumbly!)!Storing
These donuts are best enjoyed warm/hot, and do not carry over well to the next day. However, you may store any leftovers in a paper-towel lined air tight container for up to a day.Nutrition
Nutrition information is automatically calculated, so should only be used as an approximation.
Like this? Leave a comment below!
Related Recipes


This recipe was originally published April of 2016. I’ve updated the post to be more helpful and include notes and a troubleshooting section, updated the photos, added a video, and while the recipe remains the same I’ve edited it to be easier to follow.

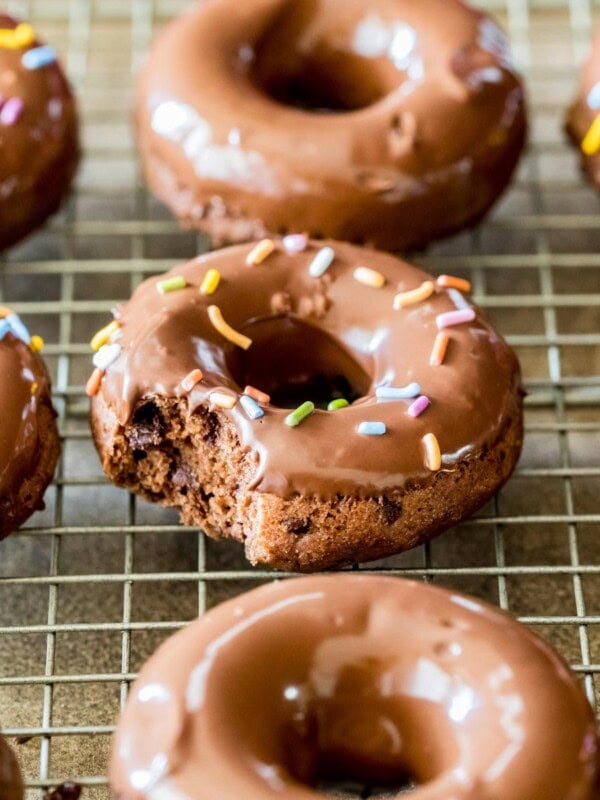


Can we make these chocolate, if so how much powder do you recommend.
I’ve never tried them that way so I can’t say for sure, but I think you could probably add 1/4 cup cocoa powder.
Can’t we make the Donets in its original shape ?? Do we have to make them round as shown in the picture !?!?
Hi Pragya,
You can, but I recommend making them as balls. I’ve tried making them in the donut shape and found that they lose that element of a soft, fluffy interior unless you make particularly thick donuts. Hope this helps!
Hi, I came across your recipe and was wondering if these are like cake donuts or raised/fluffy donuts? I love the no yeast recipe, but wasn’t looking for a cake-like consistency. Thanks!
Hi Lisa! They’re not quite as dense as cake donuts and not as light and airy as true yeast donuts. Between the two I’d say they’re probably closer to cake-like. I hope that helps!
I have never made donuts before because I thought they were going to be difficult. I’ve looked at so many recipes but yours caught my eye because of the no yeast, which is not easy to find where I am! I have just made them they were so easy and taste amazing! Might have to get hubby to hide the baking stuff or I’ll end up living off them! 🙂
Thank you for this recipe Sam! I’m wondering if I can chill the dough so I can cook it later on?
Yes, I have done this before! Hope you love them, Yesha! 🙂
Hi there, I made these and they turned out hard….can you tell me why? I fried them until golden outside, or do they need to look white?
Hi Laura! They should be golden brown, but if they’re coming out hard the oil may be too hot. You can try cooking them for slightly less time and making sure they are still cooked all the way through to the center. I hope that helps!
turned the temp down and still ended up with hard brown balls with goop in the middle
You need to turn it down more, could your thermometer be inaccurate or might you have turned down the temp too late (after adding the dough)?
Heya ur recipe seems wonderful… Wanna make them tomo for my niece school’s business fair…will they stay good n soft the next day… Plannin to fill them up with jam… Pls reply a bit urgent…
Hi Hanisha! These are best served the same day they are made.
Thank u so much dr…
Sam, Thank you so much for sharing. These donut holes are delicious. The recipe is so versatile you can change the flavour and still enjoy the soft-crispy yumminess of this little dessert.
Thank you for letting me know how you liked them, Ashona!! So glad that you enjoyed them! 🙂
I tried these.They were awesome!!super soft!!thank you:)
Awesome!! Thanks for letting me know how they turned out 🙂
These look delicious! Will this recipe work for donuts too instead of donut holes? 🙂
Yes, I definitely think that would work! However, I haven’t tried it yet so some of the details will be a little different (the time to cook will likely be different). I do have it on my calendar to experiment with making donuts instead of just holes, so check back and hopefully I’ll have that recipe soon, too! 🙂
I feel you on the frying- but these donut holes look totally worth all the oil! 🙂
These are the worst donuts I’ve ever made you instructions are useless the donuts don’t even cool properly the temperature of the oil is perfect at 350F but they still haven’t cooked just got a thick goo in the middle never cool this recipe it has wasted over 2 hours of my life and a fair amount of money not worth it in my eyes on such a useless recipe thanks for nothing what a waste !!!!!!
Peter, you need to TEST the donut holes. That is listed in the instructions for good reason, please see the recipe notes. Potentially your thermometer is inaccurate or you are not waiting for the oil to come back to temperature between batches.
If your donut holes are gooey in the center, a simple fix is to simply cook them longer.
Please be sure to read the instructions thoroughly to save yourself from wasted ingredients and time in the future.
Lol what a nutjob. Your doughnuts were amazing, Peter needs therapy.
Totally agree … hahaha
They were so easy to make and absolutely delish! Not oily, not dry … amazing!
Made them for my niece’s birthday and everybody (all 19) loved them! Yummmm 😋
I had this same problem, waited between batches, tested for longer and shorter times.
the outside got well done many times that it was crumbling and falling off while the inside was still like dough.
played with the temperature a bit in the end to try get it to cook right, but they never turned out good.
also the thermometer is built into the deepfryer so it shouldn’t be malfunctioning.
ended up just baking them, they turn out a bit like short bread, but topped with cinnamon sugar they still taste pretty good.
wish i could have gotten this to work out how you guys did, but in the end this just didn’t work out as described
I am sorry to hear that they didn’t turn out for you, Yuri!
Yuri, I know it sounds overcomplicated to explai this way, but the recipe probably had nothing too do with the problem. Baking is a science. Literally. The reactions the dough can vary with more than the temp of oil. (how it was mixed, too long, too short, quality of the ingredients used, altitude, etc) I grew up in a family bakery and know the recipes by heart, but when I travel to another area I always have to test and tweak the very same recipes I can do in my sleep at home. Don’t give up. Keep tweaking it, then share how you got it to work to save the next baker your frustration.
What a horrible attitude.. Must be a snowflake.
Snowflake. Hahahahahah
Just made these at 430am as I work nights and try to keep to my schedule even on off days. They were wonderful! It was so easy to follow the recipe and it was less than an hour from looking up the recipe to sitting down with fresh warm donuts. Thank you!
I’m SO glad that you loved them, Kris! Thank you for commenting! 🙂
I just whipped these bad mamma jammas up tonight for my husband and myself, on word to describe them…..YUMMMMYYYY!!!!! Thank you for sharing 🙂
Awesome, I’m so glad that you loved them! Thank you for coming back and letting me know how you liked them, Danielle! 🙂
Can i bake them?
They would not be the same, you could experiment but they taste best when fried.
I did tried to make those Doughnut holes and i added chocolate topping. It was so nice and tasty
Curious if I can make a bunch ahead of time? Would they freeze Ok?
I wouldn’t make these ahead of time and freeze, they taste best when eaten the same day that they are made
Just made these with vanilla almond milk and a cinnamon/sugar/cardamom coating, and they turned out SO delicious! I’ve never made donuts before, because I always though it was so hard, but these were a breeze to make. Thanks for recipe.
Woohoo! So glad you loved them, Samira! Thank you so much for commenting! 🙂
Great way to bust the no-fry rule. These look great.