These adorable Easter Sugar Cookies are almost too cute to eat! Perfect for making with kids, this recipe is fun and easy, and the cookies taste just as good as they look. Recipe includes a how-to video!

Cute & Easy Easter Cookies
Step aside, carrot cake–these Easter sugar cookies are about to take over as the star of the Easter dessert table! With their colorfully sugared bodies and and tiny icing faces, these cookies look just like your favorite marshmallow Peeps, minus the gooey filling.
Besides their obvious cuteness, these cookies are so easy and fun to make. You may be familiar with my easy sugar cookie recipe, which is exactly what I’m sharing today, just in Easter form. As always, the dough comes together flawlessly, makes crisp, even cuts, and tastes as good as it looks. It’s been a favorite on the blog for years now, and it’s the perfect choice for Easter sugar cookies!
Why You’ll Love Them:
- NO spreading! These cookies hold their shape after baking, so you’ll get gorgeous cuts every time.
- Can easily be rolled thin for crisp cookies OR thick for soft cookies–you decide!
- They have a wonderful buttery flavor and an equally delicious frosting.
- The frosting is extra simple and is not royal icing (though I do have a royal icing recipe, if that’s what you’re looking for!)
- It’s the perfect recipe to make with kids and could be a great alternative to dying eggs if your family is looking for a new Easter tradition (anyone else make hot cross buns every year?).
What You Need
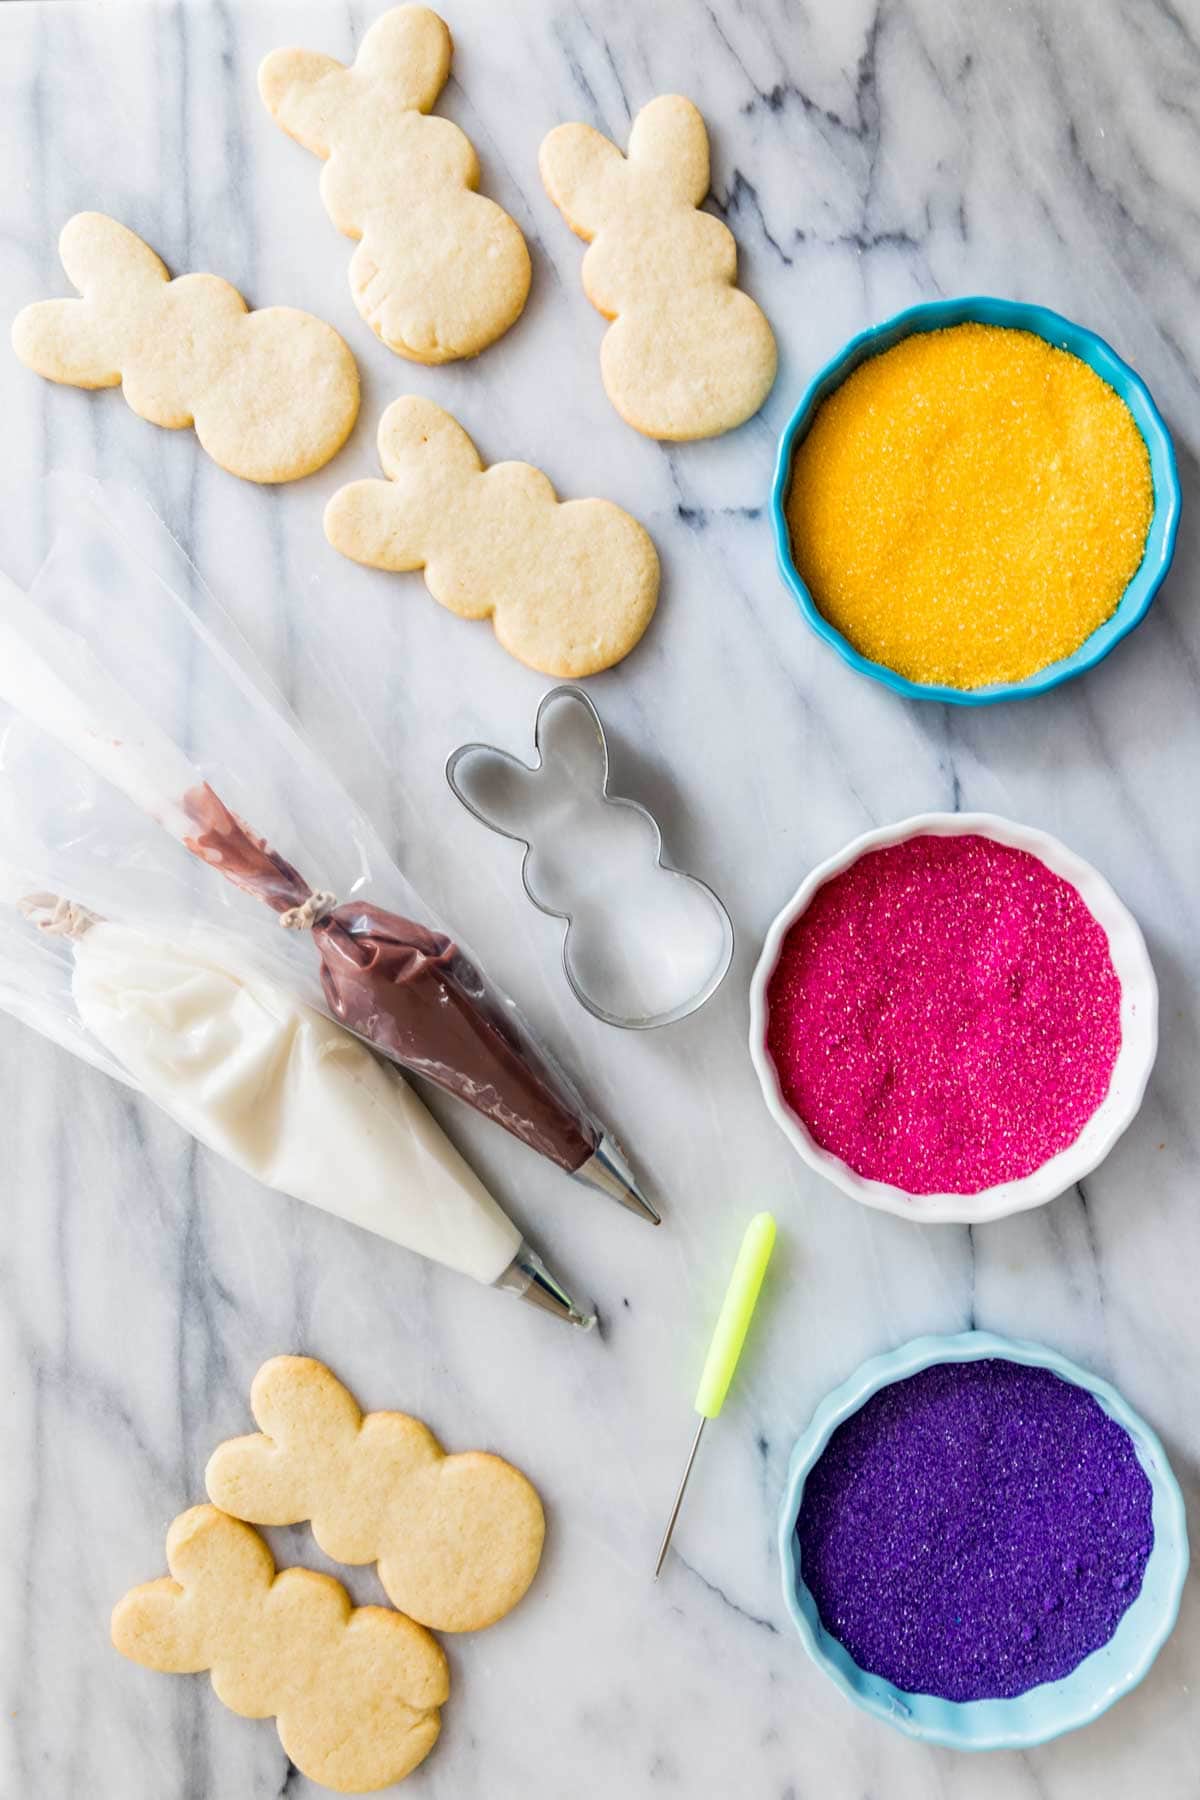
Here’s what I used to make my Easter sugar cookies; I’ll be sure to link to some of the more specific tools in the recipe card so you can use them too!
- Cookie cutter. I used this adorable bunny shaped cutter, but you can always use another cookie cutter of a similar size/shape. Carrots would be cute too!
- Sanding sugars. These can be found in pretty much any grocery store–pick whichever colors you like. Since I’m decorating my cookies to look like marshmallow Peeps, I stuck with colors similar to those.
- Piping bags and tips. Using piping bags and tips makes cookie decorating SO much easier! I like using the Wilton #3 tip for the brown face details and the Wilton #5 tip for the main icing.
- Decorating tool. Use this to help evenly distribute the icing after you’ve piped it on your cookies. A toothpick can work too.
SAM’S TIP: When making your cookie cuts, try to keep them as close together as possible to get the most cookies as out of your dough. Once you’ve made as many cuts as you can, regroup the dough scraps and reroll until you’ve cut all of your cookies.
How to Decorate Easter Sugar Cookies
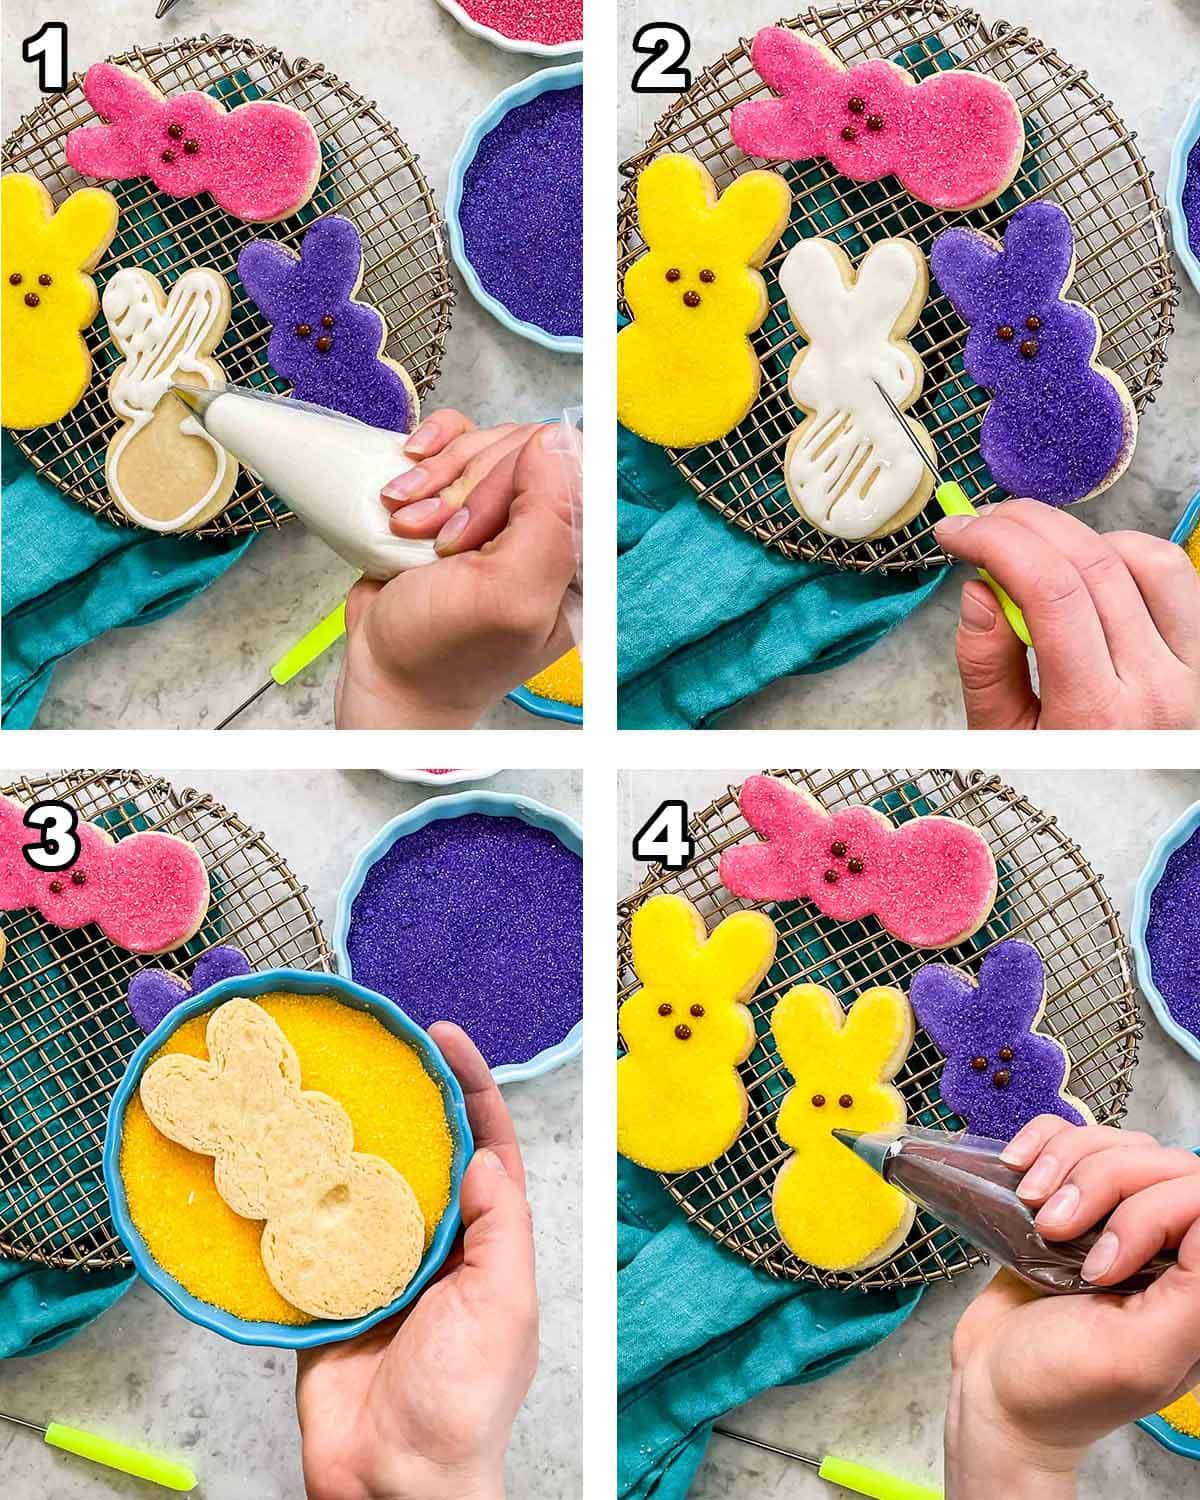
- Pipe a boarder of white icing near (not directly to) the edge of the cookie, then fill it in.
- Use a decorating tool or toothpick to smooth the icing out and fill any gaps.
- Immediately dip your cookie icing-side down in sanding sugar, then remove.
- Use your brown icing to pipe on the finishing details.
SAM’S TIP: If you’d prefer to skip the sanding sugar, your cookies will still turn out beautifully! You can always color your icing with festive food coloring and pipe that on instead. Just be sure to wait until the bodies fully set before adding the face details, or the colors could all bleed together.

Frequently Asked Questions
Your Easter sugar cookies will last for up to ten days in a sealed container at room temperature. You can also freeze them for several months.
You can leave it out, but your icing won’t dry as nicely or as firm. Just a reminder, corn syrup is NOT the same thing as high fructose corn syrup!
It sounds like you may just need to add a little more sugar to thicken it back up. If it ends up too thick, add a tiny bit more milk until the consistency is right. This icing is almost impossible to mess up!

Enjoy!
Let’s bake together! I’ll be walking you through all the steps in my written recipe and video below! If you try this recipe, be sure to tag me on Instagram, and you can also find me on YouTube and Facebook

Easter Sugar Cookies
Ingredients
For Sugar Cookies
- 1 cup (226 g) softened unsalted butter
- 1 cup (200 g) granulated sugar
- 1 large egg room temperature preferred
- 1 ½ teaspoons vanilla extract
- 2 ½ cups (315 g) all-purpose flour measured properly
- ¾ teaspoon baking powder
- ¾ teaspoon table salt
For Frosting (see note for preparing frosting in advance/storing)
- 3 cups (375 g) powdered sugar
- 3-4 Tablespoons whole milk see note
- 2 Tablespoons light corn syrup see note
- ½ teaspoon vanilla extract
- Pink, purple, and yellow sanding sugar
- Brown or black food coloring
Recommended Equipment
Instructions
For Sugar Cookies
- Combine softened butter and sugar in a large bowl (or the bowl of a stand mixer fitted with a paddle attachment) and use an electric mixer to beat until creamy and well-combined.1 cup (226 g) softened unsalted butter, 1 cup (200 g) granulated sugar
- Add egg and vanilla extract and use mixer to stir until thoroughly combined.1 large egg, 1 ½ teaspoons vanilla extract
- In a separate bowl, whisk together flour, baking powder, and salt.2 ½ cups (315 g) all-purpose flour, ¾ teaspoon baking powder, ¾ teaspoon table salt
- With mixer on low-speed gradually stir flour mixture into butter mixture (I like to do this in 4-5 parts, don’t add it all too quickly or the dough could become dry and difficult to manage). Scrape the sides and bottom of the bowl periodically to ensure all ingredients are well-combined and no flour remains.
- Divide dough into two equal parts and form each into a disk. Wrap each in plastic wrap and refrigerate for at least 3 hours or overnight.
- Shortly before removing dough from refrigerator, preheat oven to 350F (175C) and line a baking sheet with parchment paper (if you don’t have parchment, bake cookies directly on an ungreased baking sheet).
- Once dough has chilled, remove from refrigerator and unwrap. Place on a lightly floured surface and dust dough with flour. Use a rolling pin to roll to just under ¼” (0.6cm) thick. Note: If dough chilled longer than 3 hours and/or is too cold/firm to roll and starts to crack, let it sit at room temperature for 15-20 minutes before attempting to roll again. It often helps to use a spatula to scrape up the bottom of the dough to make sure it isn’t sticking to the counter as you roll it, this will make it easier to lift the cookies, as well!
- Use bunny cookie cutter to cut out cookies as close together as possible and use a spatula to lift them to a parchment paper lined baking sheet, spacing cookies at least 2” apart.
- Transfer to 350F (175C) preheated oven and bake for 10-12 minutes or until edges are beginning to turn light golden brown. Allow cookies to cool on baking sheet for at least 5 minutes before using a spatula to transfer them to baking sheet to cool completely. While cookies are cooling, prepare frosting.
Sugar Cookie Frosting
- In a large bowl, whisk together powdered sugar, 3 Tablespoons milk, corn syrup, and vanilla extract until mixture is smooth. Add milk as needed until you have a smooth consistency where, when the whisk is lifted from the frosting, the frosting falls in a ribbon back into the bowl and holds its shape for several seconds before dissolving back into the mixture. Note: if you accidentally make the frosting too thin, simply add more sugar.3 cups (375 g) powdered sugar, 3-4 Tablespoons whole milk, 2 Tablespoons light corn syrup, ½ teaspoon vanilla extract
Decorating
- Measure out ¼ cup of frosting into a separate dish and stir in brown food coloring until you have an even dark brown color. Transfer to a piping bag fitted with a Wilton #3 tip (or similar). Transfer the remaining white frosting to a piping bag fitted with a Wilton #5 tip (or similar). Divide your sanding sugar into separate, shallow dishes that your cookies will fit into. Do not ice cookies until they have cooled completely.Brown or black food coloring, Pink, purple, and yellow sanding sugar
- Work with one cookie at a time. Use the white frosting to pipe an outline near the edge of each sugar cookie (do not go all the way to the edge of the cookie or it will get messy!). Immediately fill the outline with white frosting and use a decorator tool or toothpick to smooth the frosting and fill any gaps (see collage in post or video for a visual).
- Immediately, gently, place cookie frosting-side down in one dish of sanding sugar. Gently shake the dish to ensure all of the frosting is covered in sugar. Carefully lift the cookie and gently tap to shake off excess sugar.
- Place cookies sugar-side up on rack and use brown frosting to pipe eyes and a nose on your bunnies.
- Allow frosting to set completely before enjoying (this may take several hours, I usually let mine sit out overnight).
Notes
Milk
I like to use whole milk, but really any type of milk will work including non-dairy milk If using a thinner milk such as low-fat, start with less milk (1-2 Tablespoons) and add more as needed)Corn Syrup
I recommend using corn syrup which helps give the frosting its proper consistency and helps it to dry firm (and make the cookies stackable once finished). However, if you must you may leave it out, just note that the frosting will not dry as hard.Making Frosting in Advance
Prepare the frosting as instructed then store in an airtight container with a piece of plastic wrap pressed directly against the surface of the icing. It will keep this for several days and may be stored either at room temperature or in the refrigerator. Icing will likely need to be stirred again before using.Nutrition
Nutritional information is based on third-party calculations and should be considered an estimate only. Actual nutritional content will vary based upon brands used, measuring methods, cooking method, portion sizes, and more.

Luke is happy to demonstrate that these cookies are, in fact, NOT too cute to eat 😉









Robert R McBride
Made a double batch for church last week for Easter. Everyone loved them.
Emily @ Sugar Spun Run
Thanks for using our recipe, Robert! 🩷
patrizia
How can I make sanding sugar?
Sam
I honestly have never tried making my own sanding sugar so I’m not sure how to do it. 🙁
Lexi
Absolutely amazing recipe one of my go to!! but I was wondering how long can I store the dough for?
Sam
Hi Lexi! The dough should be good in the refrigerator for 3-5 days. 🙂
Ann Nordyke
Great recipe to do with kids! I did add almond extract to the dough!
Sam
I’m so glad it’s such a hit! 🙂
Brittany Smith
Perfect recipe, THANK YOU!
Sam
I’m so glad you enjoyed them so much, Brittany! 🙂
Lorley
Happy Easter Sam
I made these today for my family and they turned out perfect. Looked exactly like yours. The dough was a pleasure to work with and the cookies tasted wonderful. The icing was the perfect consistency. The decorating was simple yet adorable. I made black eyes and a pink nose on the sugared cookies. Thanks again for another wonderful recipe.
Sam
I’m so glad you enjoyed it so much, Lorley! 🙂
Spring
Very tasty sugar cookie. Simple yet cute.
Christy
We made these cute cookies for our Easter today & they were a huge hit! I was questioned if they were store/bakery bought because they tasted PERFECT! They were so fun to make with my little boy too! I need to go have another one now 😂
Sam
I’m so glad everyone enjoyed them so much, Christy! It’s so much fun baking with the little kids. 🙂
Anne Marie
Hi there! could I decorate them with sugar paste instead of icing? thank you! 😀
Sam
I have never used it, but I think it could work. My understanding is that a lot of people use a buttercream before the sugar paste to help it stick. 🙂
s
Video is giving a playback error.
Sam
I’m sorry for the issues! I just got it fixed today. It should be working just fine now. 🙂
sue
i am going to try this out. can you use store bought sugar cookie dough for the cookie? how long will your dough recipe stay in frig or can you freeze dough?
Sam
Hi Sue! I suppose you could use store bought dough, but I think the flavor won’t be nearly as good. You can keep the dough in the refrigerator for about a week in an air tight container. It should hold up in the freezer for a few months. 🙂
sue
THANK YOU FOR YOUR REPLY. I am going to try this fiday afternoon. i did not know you could freeze your dough!