This is a simple and essentially fool-proof Royal Icing Recipe! It can be used for outlining and/or flooding and includes plenty of tips for adjusting the consistency to be perfect for your needs. Easy to make and no raw eggs required!

The Only Royal Icing Recipe You’ll Ever Need
It’s finally (/already!) December and we are in Christmas cookie season! And Christmas music season, despite Zach’s constant protests…
A while back I shared my sugar cookie recipe and gingerbread cookies complete with a simple decorating frosting. Since then, many of you have been asking me for a classic royal icing recipe to go with them.
Well finally, your requests have been answered. Today I have a classic and easy royal icing recipe. While I’ll admit that the frosting I shared with my sugar cookie recipe is still my personal favorite, this is great if you’re looking for more precisely decorated cookies with a matte finish.
This recipe is great for intricate designs and I have plenty of tips (and a video) so yours comes out perfectly every time. Let’s get started!
What You Need
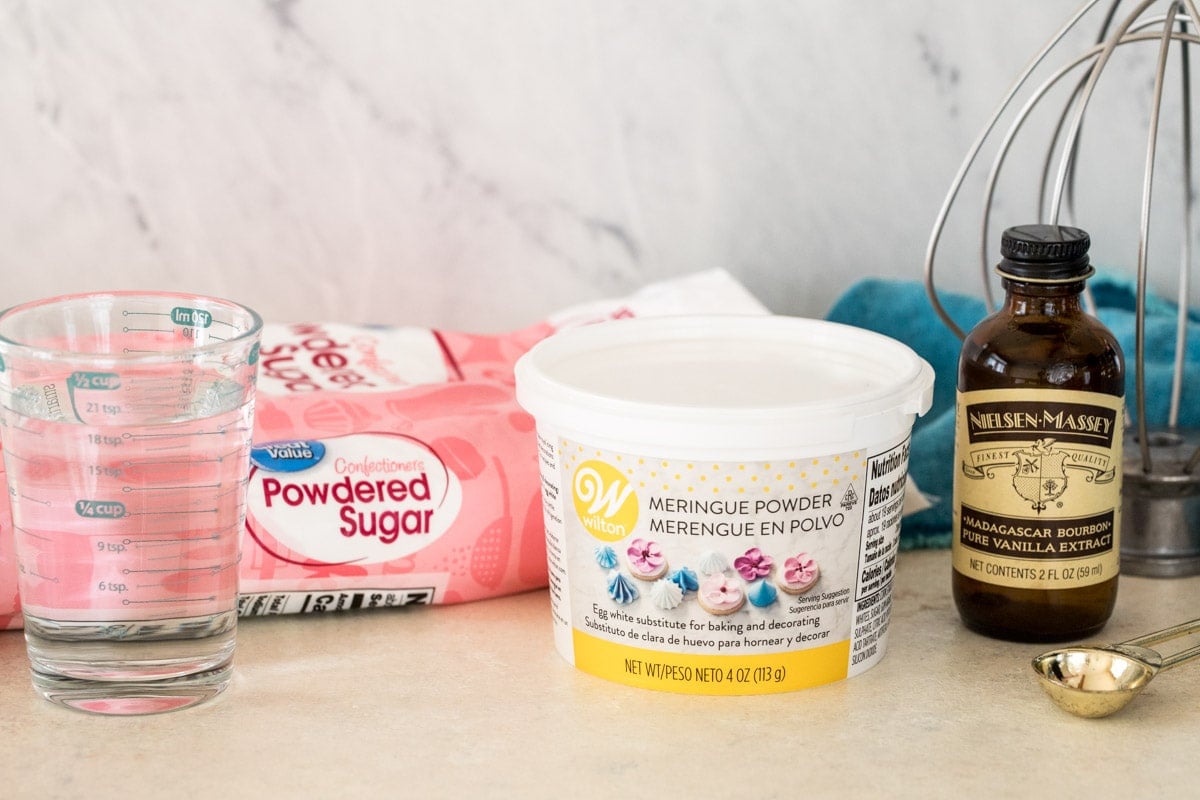
Here’s what you need:
- Powdered Sugar. Often referred to as “confectioners sugar” or “icing sugar”, this will be the base of your icing (and the reason it’s nice and sweet!).
- Meringue Powder. This ingredient is non-negotiable, it’s critical for the firm finish of your royal icing. I have heard that different brands may vary in taste, but locally I’m only able to find Wilton-brand meringue powder and I’ve never received any complaints!
- Water. This is necessary to thin the icing to the proper consistency.
- Vanilla Extract. If you want your royal icing to remain pure white in color, use a clear vanilla extract. You can make the icing a different flavor by substituting or adding different extracts as well, just ensure that they do not contain oil, which can break down the meringue (just check the label).
Royal Icing doesn’t have a great reputation in terms of flavor. While it’ll never taste as good as, say, cream cheese frosting, I think its poor reputation is a little bit unfair, and possibly due to the fact that so many recipes just leave out vanilla extract, which I’ll never understand! This simple ingredient adds a beautiful flavor, don’t leave it out!
How to Make Royal Icing
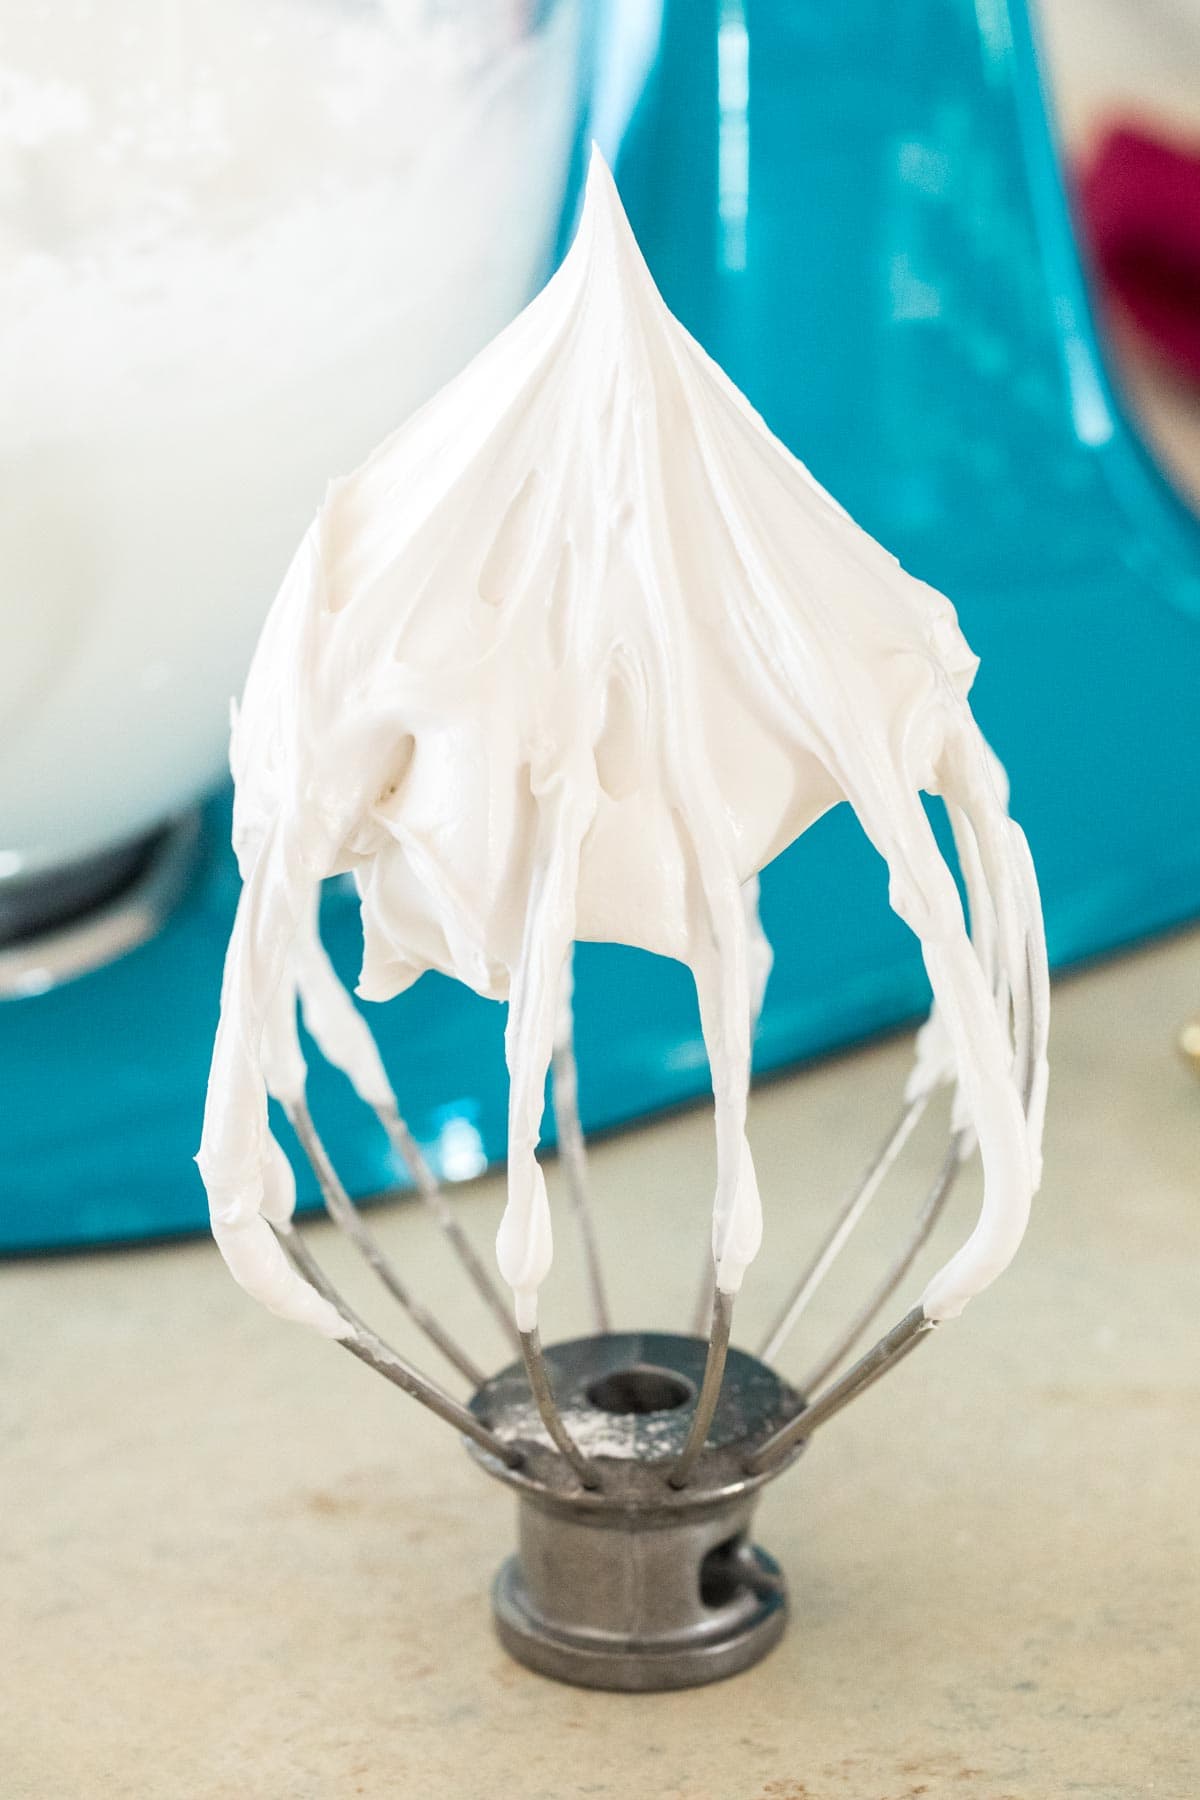
- Combine all of your ingredients in the bowl of a stand mixer and beat until you achieve stiff peaks.
- This stiff icing will be your outlining icing. If you need to color your frosting, divide your frosting into bowls now and color as desired (I recommend using gel food coloring, I linked to the ones I use in the recipe).
- Now divide your colored frosting into two bowls. One will be your outlining icing, you don’t need to do anything to this icing. The second will be your flooding icing. Add water to this icing one teaspoon at a time until you achieve a consistency where the icing that drizzles off of your spoon holds its shape briefly (several seconds) before melting back into the rest of the icing in the bowl.
SAM’S TIP: As when making meringues, it’s critical that you beat your ingredients to stiff peaks when making royal icing. Stiff peaks should be thick, firm, and fluffy and will hold their shape firmly, as depicted in the photo above. If your icing is drooping over, weepy, or not holding its shape, you need to keep whisking.
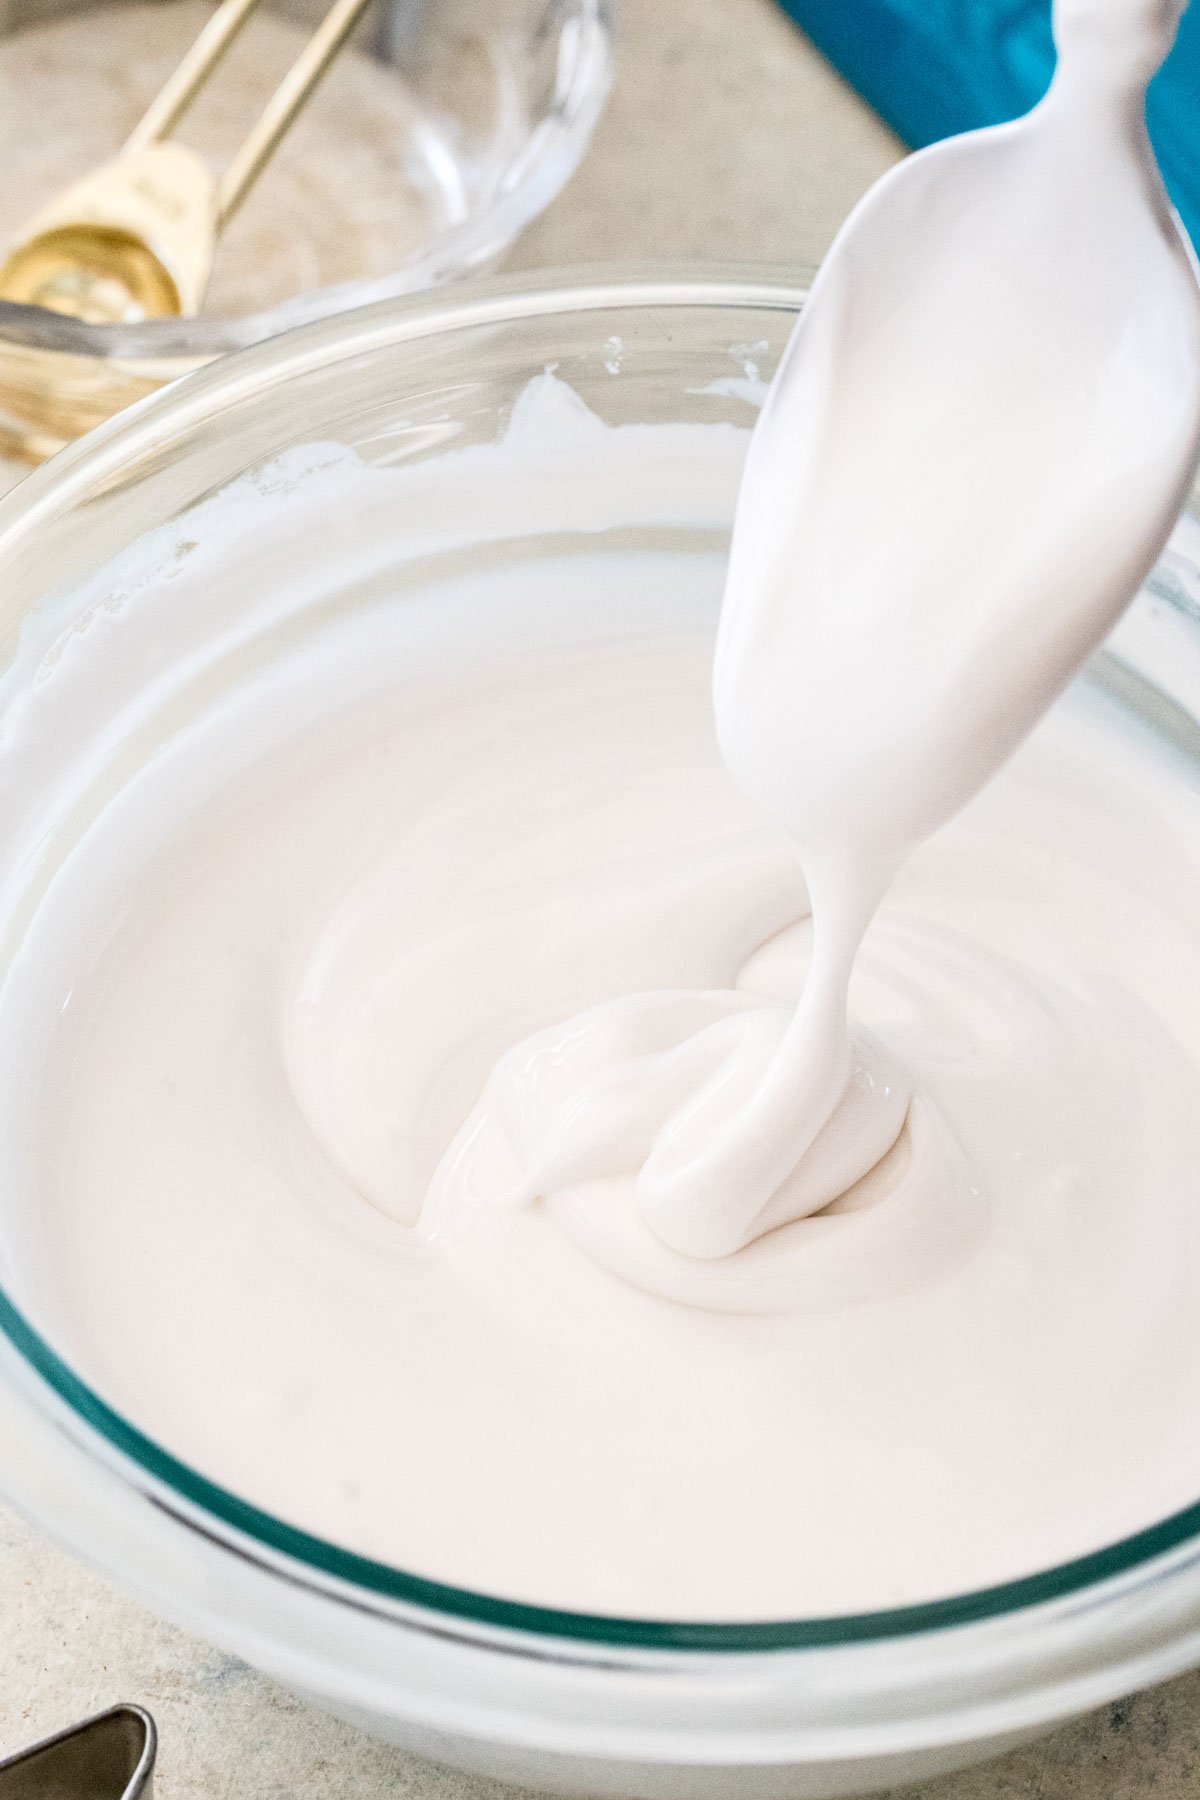
Now all that’s left to do is decorate!
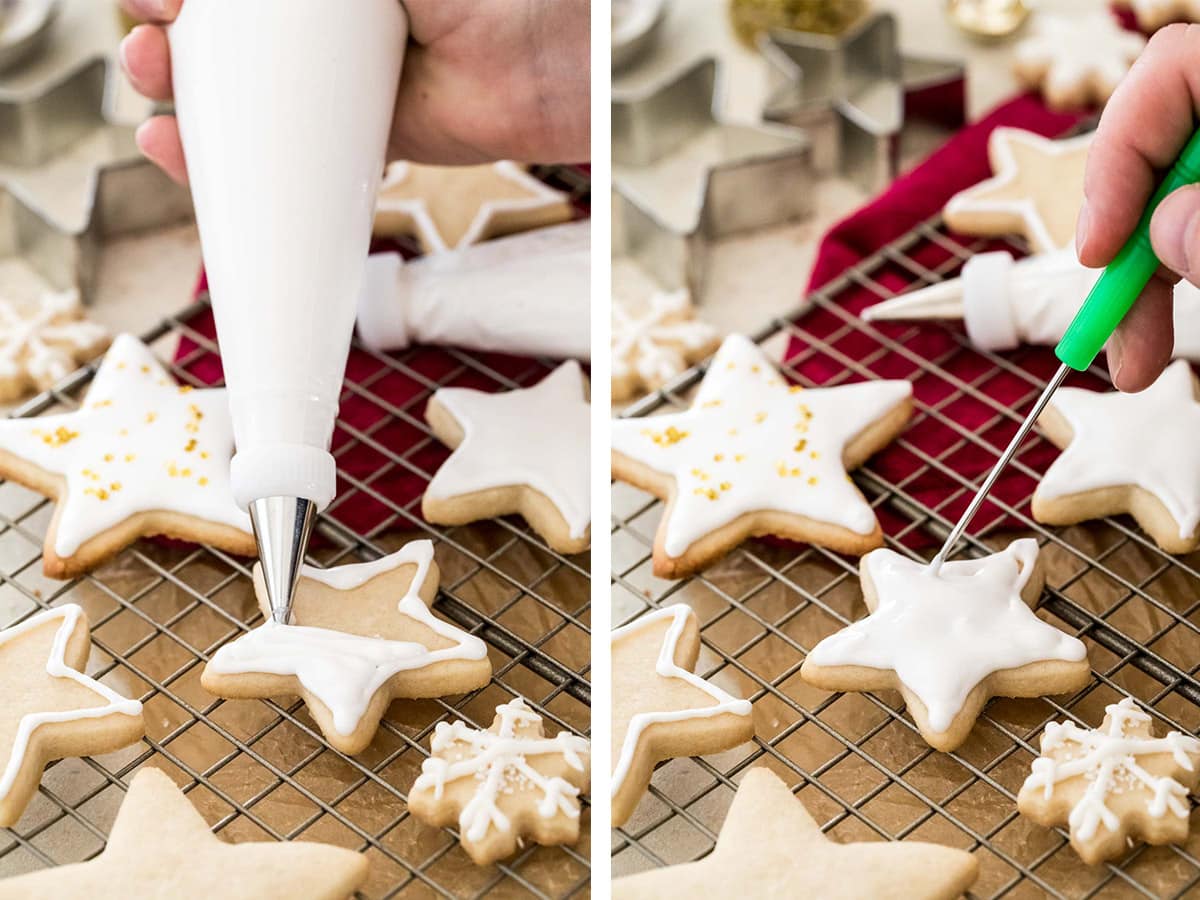
Use your stiff icing for crisp, well-defined outlines and details, and use your thinner icing for flooding and filling. I like to use an inexpensive set of scribing tools to help smooth the thinner frosting, but you can certainly just use a toothpick instead!
Frequently Asked Questions
Yes, royal icing is safe to eat! Many people worry about the safety of consuming royal icing because it is traditionally made with egg whites. However, here we are using meringue powder, so no worry about salmonella here! How sad would that be to have a beautifully decorated cookie that you couldn’t even eat!?
Royal icing that is too thin simply needs to be beaten longer. Keep whipping and things should thicken up!
If your icing is too stiff, simply thin it out by stirring in water, one teaspoon at a time until the desired consistency is reached.
It honestly depends on how thick your layer of icing is. You should allow your cookies to sit for at least several hours for them to dry completely, but to be safe I like to let mine sit overnight. And no, the cookies don’t get stale sitting out overnight!
You can try to speed up the process by turning on a fan over the cookies, but I don’t recommend moving them to the refrigerator (or freezer) to speed up the process.
My royal icing recipe can be made up to a week in advance. Place the icing in an airtight container and, before placing the lid on your container, place a piece of plastic wrap directly in contact with the surface of the icing. Because this recipe is made with meringue powder and not eggs it may be stored in the refrigerator or at room temperature.

Enjoy!
Let’s bake together! I’ll walk you through all the steps in my written recipe and video below! If you try this recipe, be sure to tag me on Instagram, and you can also find me on YouTube and Facebook

Easy Royal Icing Recipe
Ingredients
- 4 cups (500 g) powdered sugar
- 2 ½ Tablespoons meringue powder
- 6 Tablespoons water
- 1 teaspoon vanilla extract you may use other flavorings instead/in addition, but make sure they are not made with oil or they may keep your icing from reaching the proper consistency.
Recommended Equipment
Instructions
- IMPORTANT NOTE BEFORE YOU BEGIN: Your bowl and all utensils must be clean and grease free in order for the icing to whip properly.
- In the bowl of a stand mixer fitted with a whisk attachment or in a large bowl (you will need an electric hand mixer) combine sugar, meringue powder, and water. Beat on low speed until combined, then add vanilla extract (or other flavoring).4 cups (500 g) powdered sugar, 2 ½ Tablespoons meringue powder, 6 Tablespoons water, 1 teaspoon vanilla extract
- Gradually increase mixer speed to high and beat until icing forms stiff peaks (5 minutes or longer).¹
- Divide and color icing as desired (I like to use gel food coloring).
- Icing at this consistency can be used as a stiff outlining icing. To thin the icing for flooding/filling, tint as desired first (so that your outlining and flooding icing is the same tint), divide (so you have one bowl of outlining and one bowl of flooding icing), and then stir your bowl of flooding icing, adding about a teaspoon of water at a time until frosting reaches desired consistency. For me this usually means that if I pull my spoon out of the royal icing, the icing that drizzles off holds its shape for several seconds before dissolving back into a puddle.
To Decorate Cookies:
- First pipe your outlines with your outlining frosting, then fill with your flooding icing. Use the point of a toothpick to swirl/smooth the icing until it is smooth and even.
- Allow cookies to dry completely before stacking/transporting, this will take several hours. I like to let mine dry overnight to ensure they are dried all the way through.
Notes
How to Store Royal Icing:
Royal Icing can be stored at room temperature or in the refrigerator. Transfer frosting to an airtight container and cover with a piece of plastic wrap that’s directly in contact with the surface of the icing before sealing your container. This icing will keep at least several days, but may need to be stirred again before using.My Favorite “Equipment” for Making Royal Icing
- Gel food coloring. A little goes a long way. I love this kit and use it all the time, all of the colors used in the cookies in this post were from the kit I linked to.
- Piping Tips. I like using Wilton sizes 2, 3, and 4, they seem to be the easiest to work with and I have multiple of each size. The kit I linked to is a good starting kit that I use all the time but has a lot more tips than you will likely need
- This is the meringue powder that I buy, but I have heard there are better tasting ones out there!
- Scribing Tools. Toothpicks will work perfectly fine and these are NOT necessary, but I really enjoy using them anyway!
Help! The next day my cookies were splotchy!
I have had this happen to me just once but it did not make me happy! Here is a great tutorial I found for fixing splotchy royal icing. Essentially all you need to do is turn your oven light on (don’t actually turn the heat of your oven on, the heat from the light will be sufficient) and let the cookies sit in the oven overnight. Worked like magic for me, though the cookies did end up being much crisper after a night in the oven (but at least they were beautiful!).Nutrition
Nutritional information is based on third-party calculations and should be considered an estimate only. Actual nutritional content will vary based upon brands used, measuring methods, cooking method, portion sizes, and more.










Phebe
East, simple, amazing recipe! I’ve made two batches of cookies with this recipe and have added additional extracts and ingredients with great results! This recipe is simple and effortless. Love it!
Emily @ Sugar Spun Run
We’re so happy to hear it, Phebe! Thanks for trying our recipe 🩷
Gail Mitchell
Sam, I made this frosting for the first time and left the cookies out overnight. The frosting was firm on top but still mushy under that. To stack them caused indentations. How to I correct this?
Sam
Hi Gail! Did you make a really thick layer or was your frosting particularly wet? Either of these things could cause a longer dry time.
Gail Mitchell
I had to add a lot of water to it to get it thin enough. It was too stiff to flood the cookie with a #4 tip. It was a bit thick too.
Sam
It may have just been too wet and needed more time to dry.
Stefanie
Hi Sam!
Would you consider doing a tutorial on how to fill a piping bag and how to keep the tips from falling off? I have all the bags, tips, etc but I have had a hard time getting the tips to stay on the bag which is incredibly frustrating!
Thank You for all your expert help.
Sam
Hi Stefanie! The easiest way I have found to set up my piping bag is, if using plastic, to stick the tip in the bag before cutting the end of the bag and cut off the end leaving a big part of the tip covered by the bag. If you are using the reusable bag, a couple could help hold the tip in place. I like to put the bag in a glass or tall cup to fill it. I do show a little bit of filling my piping bag in my easy sugar cookie icing recipe. 🙂
Stefanie
Thank You So Much, Sam! This is very helpful.
Tater
Great recipe, nice flavor with a nice tang, clear instructions. I also like that it did not harden rock solid, it dries stiff but easy to bite through.
Penny Greenler
I appreciate the clear detailed directions. You answered all my questions so I feel comfortable making this royal icing. Thanks.
Margie V
Sam how in the world do you keep the colors of adjacent icing from bleeding into each other. My white snowmen are especially awful with colors bleeding into the white, even if I wait until the white is dry before adding other colors. And sprinkles do the same. 🙁
Sam
Hi Margie! I’m sorry this is happening. You can try going lighter on the gel coloring, or making your icing a little bit stiffer. A really humid environment may also be giving you issues.
Alicia House
Hi there! I used to have that problem, but I’ve found that if you let the main color set for a few minutes, the other colors don’t get that bleeding effect.
Jeni
You can get white food gel (I use Ann Clark brand) in your white. This reliably keeps the colors from blending!
Mand
I want to half this recipe, do you know what half of the 2 and 1/2 tablespoons of meringue powder would be?
Sam
You can use 1 tablespoon and 3/4 teaspoon. 🙂
Amy Gibson
Why is it not 1 and 1/4?
Sam
Well it would be 1 and 1/4 Tablespoon but that is a bit awkward to measure so I was just trying to simplify with a teaspoon equivalent.
Trish
Can you store it in piping bags for a few days already premixed with food coloring?
Sam
Hi Trish! It could work, but it has a tendency to start to stiffen so I recommend storing it as instructed in the recipe so it can be stirred if need be. 🙂
Amber
OH MY GOSH! They look amazing!!! I made some for me and my family and we loved them!!
Rachel K
The second ingredient in Wilton Meringue Powder is, in fact, egg whites. I just wanted to be sure anyone with an egg allergy doesn’t think a recipe with meringue powder is safe for them. That said, I do love meringue powder for baking, when I need only the whites.
Arlett
I recently started baking and I had tried another recipe and it was too watery, this one is PERFECT. Great explanation and i just loved how it turned out. this will be my forever recipe.
Sam
I am so happy to hear this, Arlett! Thank you so much for commenting 🙂
Vangie
Great instruction
Bobbi
I love the ideas. Just one question why didn’t you take out your flooding icing before you went to stiff peaks? You just made more work for your self.
Sam
Typically I do, I did it this way in the video to demonstrate how you can come back from stiff peaks if needed 🙂
Garry Griffith
ALWAYS sift your powdered sugar with a rotary hand crank flour sifter, before using it. You will be surprised at how many lumps are left. Sifting will make your icing beautifully smooth.
If you don’t have a rotary sifter, then shake your sugar through a fine mesh strainer.
YoJoLo
King Arthur Flour (online) has meringue powder that is very tasty and highly rated by bakers.
Sugar Spun Run
Thanks so much for sharing. I will be sure to look into it. 🙂