
Homemade Bread
This post may contain affiliate links. As an Amazon Associate I earn from qualifying purchases. Please read my disclosure policy.
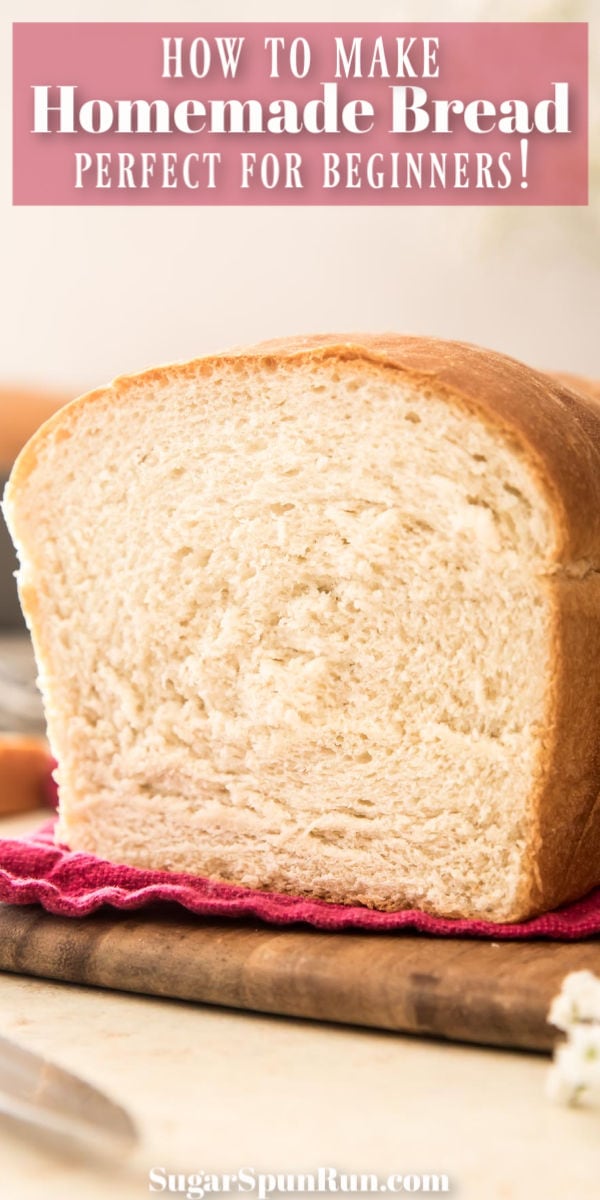
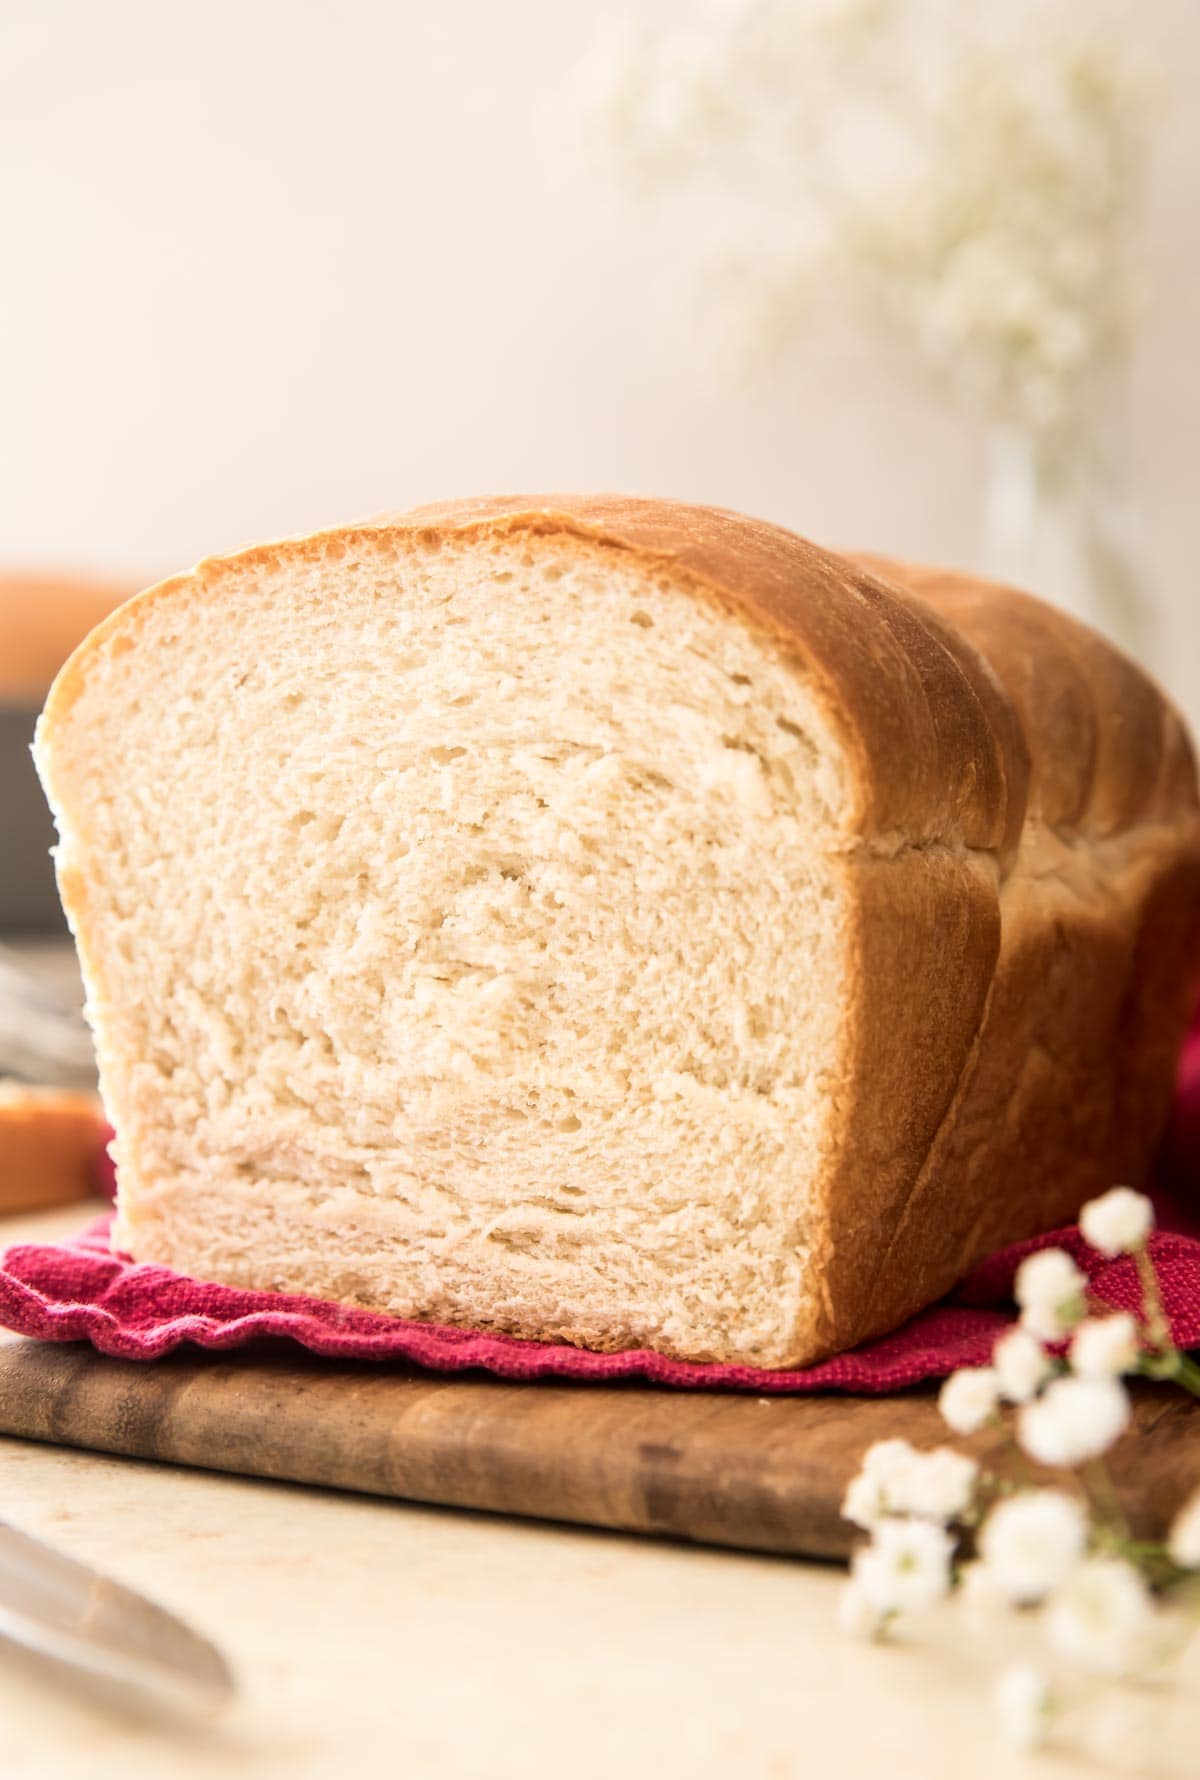
Today I’m sharing an easy Homemade Bread Recipe! Today’s post includes lots of tips, pictures, and a how-to video. I’ve also included plenty of substitutions so you don’t have to make any additional trips to the grocery store. This is the perfect soft and fluffy recipe for new and experienced bakers alike. Makes one loaf, no bread machine and no mixer required!
Every home baker should know how to make a soft, fluffy loaf of homemade bread. Especially during times like this when you can’t always guarantee that you’ll be able to find one in the grocery store.
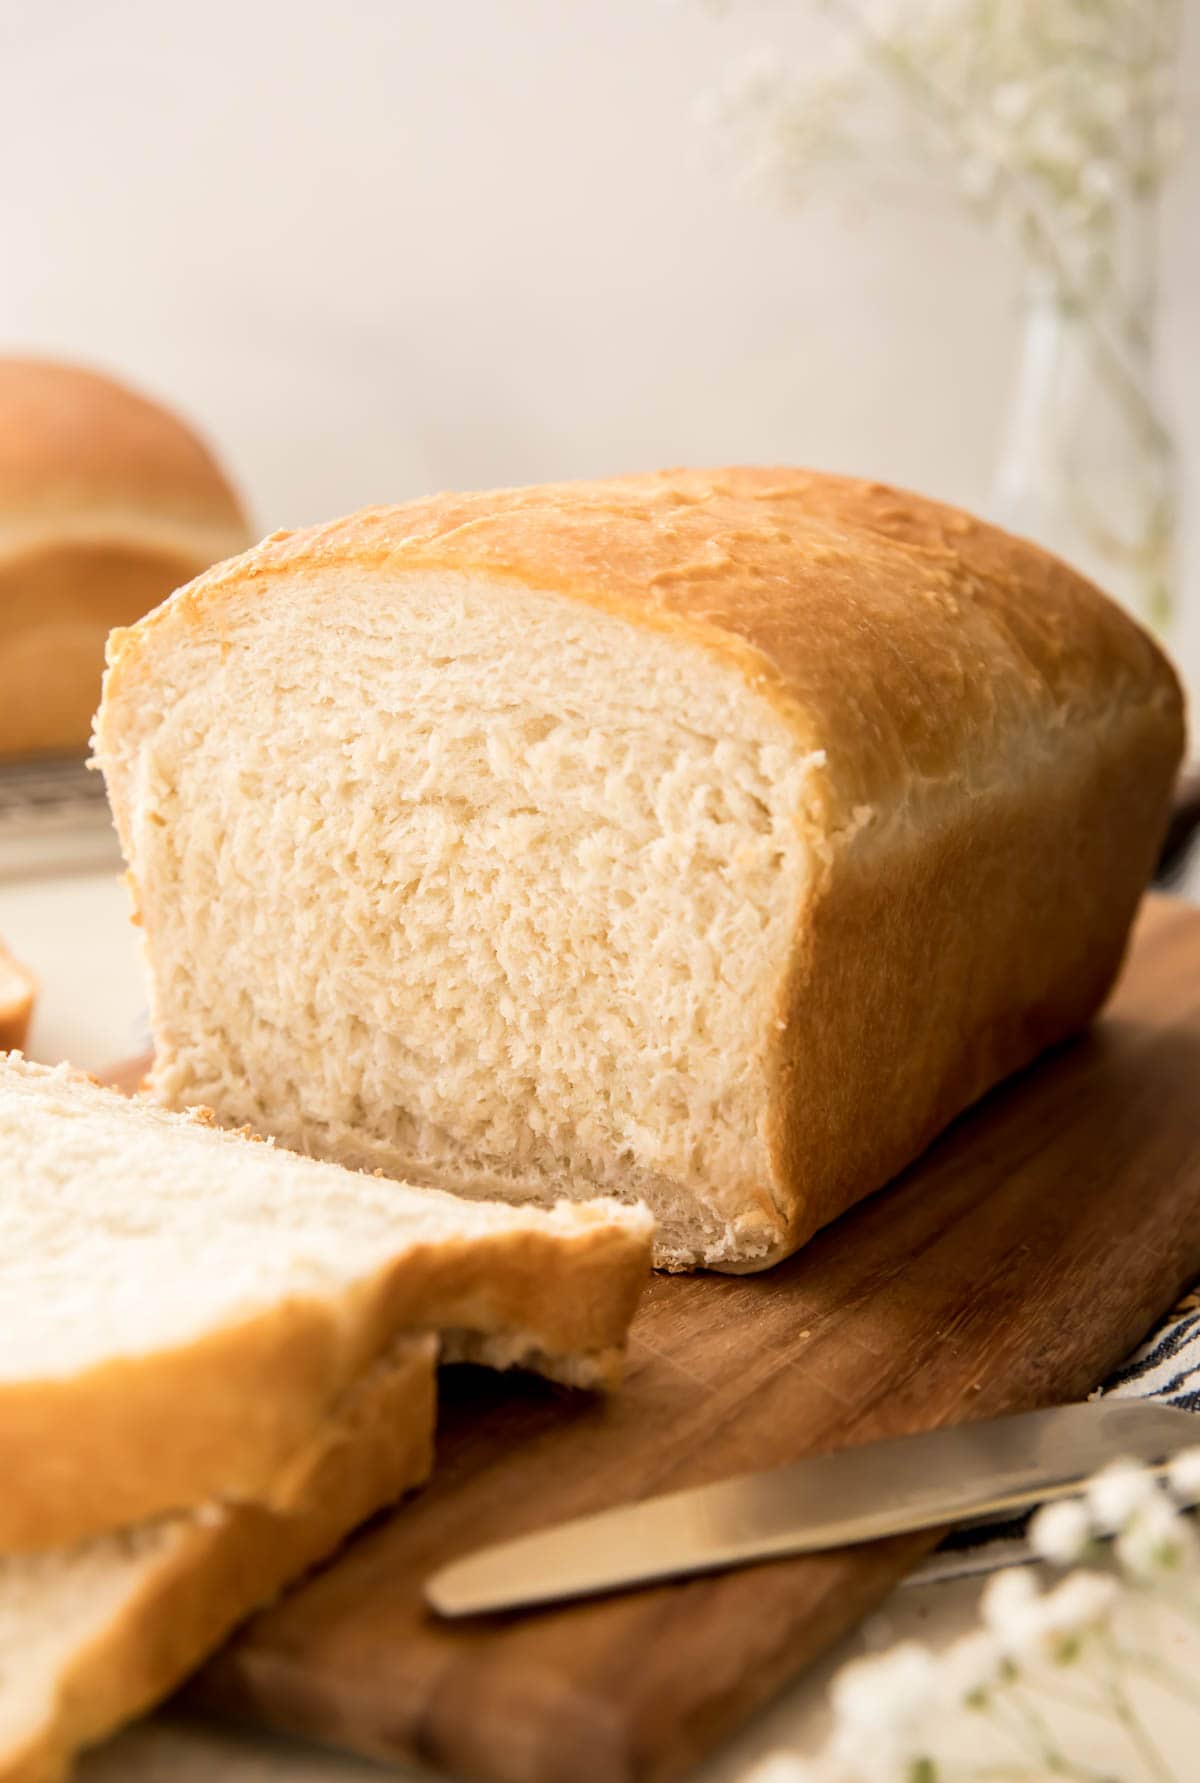
Today I’m sharing a very simple bread recipe. It uses only a handful of ingredients (and I’ve included lots of possible substitutions below), can be made with no mixer or bread machine, and yields the softest, best-tasting bread of your life. This recipe is one that will be appreciated by novice bakers and professional bread makers alike. It can be eaten by itself, covered with butter, or used as sandwich bread (my mom’s recently been using it to make paninis!). You won’t want to go back to store-bought.
If yeast recipes intimidate you, this is actually the perfect recipe to start with. It’s simple and uses basic bread making techniques. If you’re not a novice baker and have been following the blog for a while, well so far we’ve tackled bagels, soft pretzels, and homemade donuts, I think we can handle a simple loaf of bread.
Ingredients and Substitutions
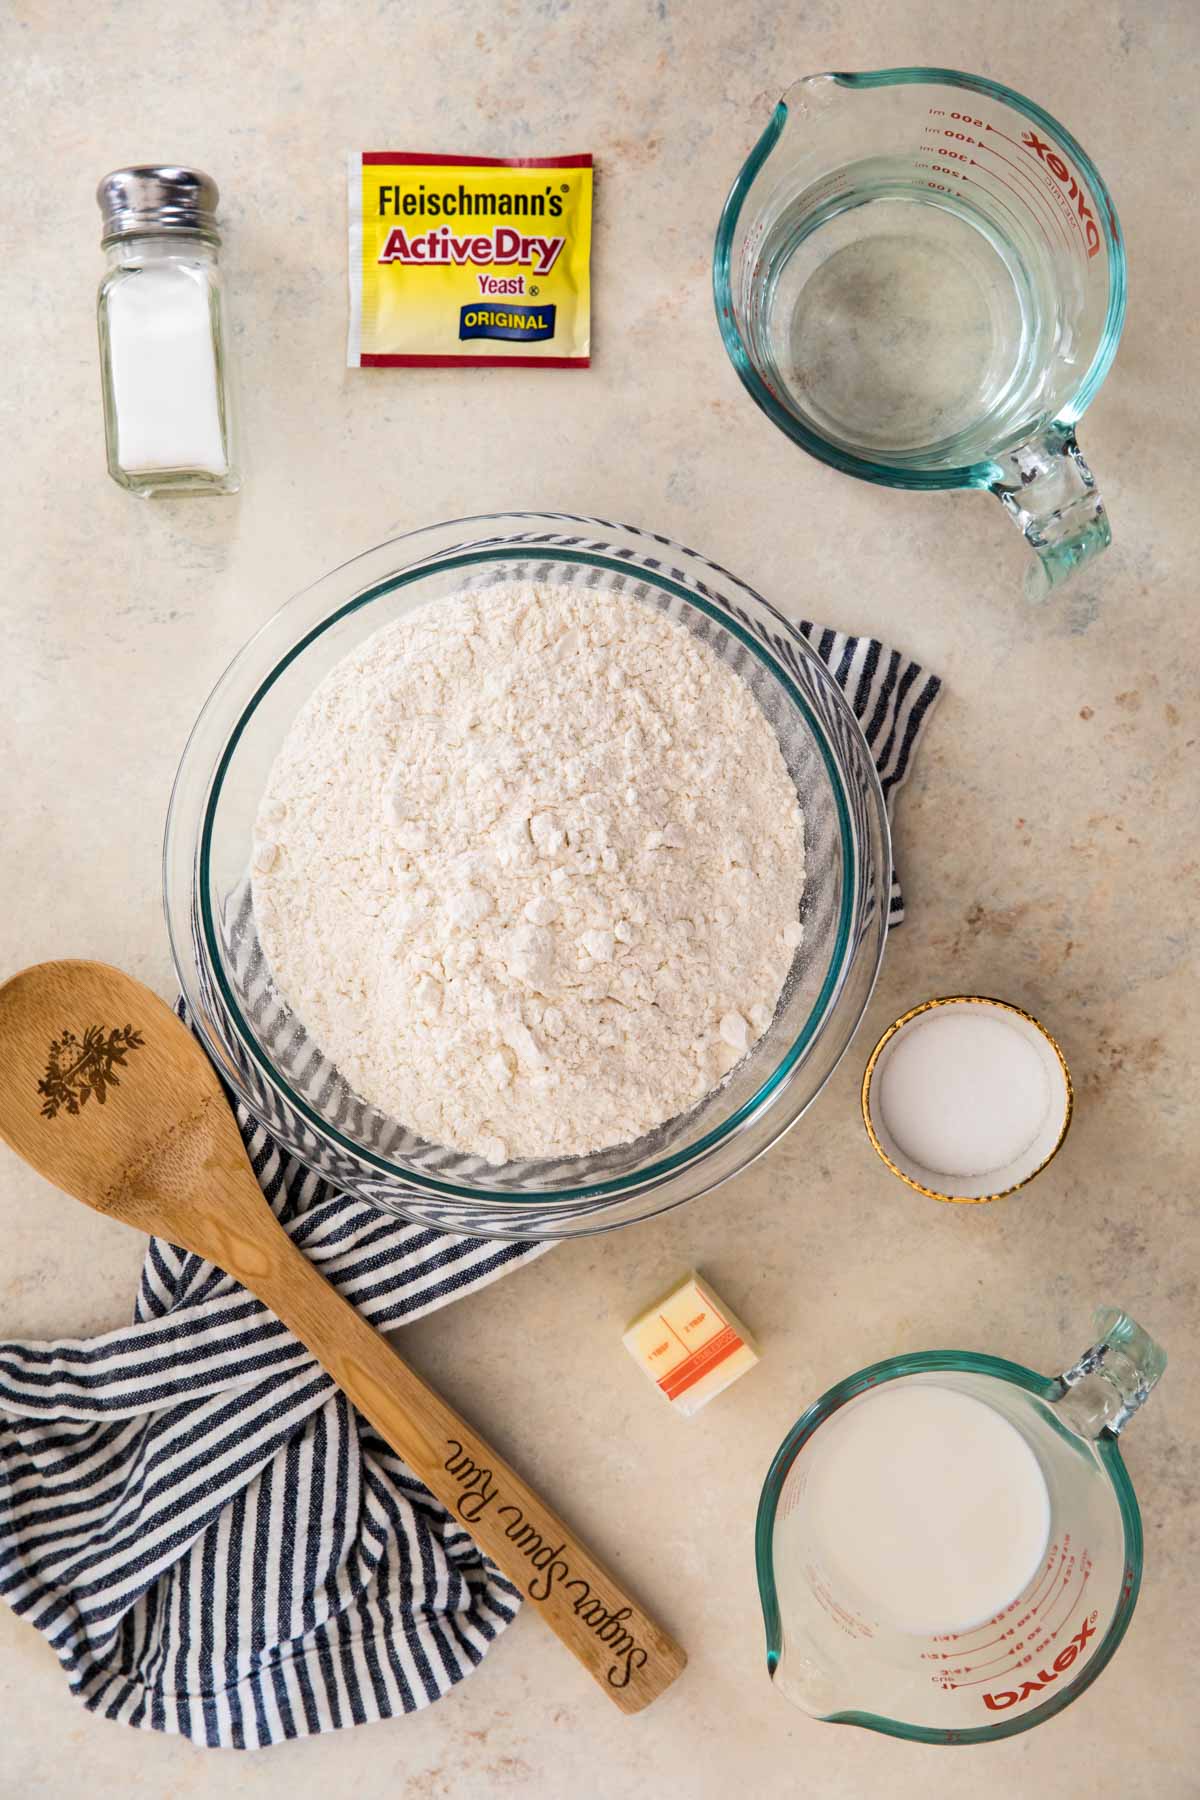
The ingredients needed for today’s bread recipe are very basic: yeast, flour, salt, sugar, butter, water, and milk. I’ve specified my preferences for ingredients that I prefer for best results in the recipe, but I completely understand that right now you may not have exactly the ingredients I’ve called for in your pantry. To help with that, I tested this homemade bread recipe with several substitutions:
- Flour. I recommend bread flour. All-purpose (plain) flour will work, but the bread is a bit less sturdy and is fluffier with all-purpose. Bread flour is more ideal for a sturdier, chewier bread, so if you plan to use this for sandwiches bread flour is your best bet. You can also substitute a bit of the flour (about 1- 1 1/2 cups/125-190g) for wheat flour to make wheat bread, but I don’t recommend a 100% substitution. I do not recommend using self-rising flour, as the bread will likely rise too much and will not turn out properly.
- Yeast. This bread recipe will work with active dry yeast or with instant yeast. No changes are required if you use one or the other. Craving bread but don’t have yeast at home? Try my biscuit recipe instead.
- Milk. Whole milk is my preferences for the softest, most tender bread. However, 2% milk or skim milk will work in a pinch. If you don’t have any milk on hand, you may substitute the milk for additional water.
- Butter. Butter is my preference for the best flavor, but if you don’t happen to have any you can substitute oil. Olive oil, vegetable oil, canola oil… just about any cooking oil will work.
- Sugar. If you don’t happen to have sugar on hand you can substitute an equal amount of honey. You may need to use a bit more flour if you make this substitution.
Hopefully these substitutions are helpful!
How to Make Homemade Bread
- Proof your yeast. Mix it with a mixture of warm water and milk (heat between 105-115F; too hot will kill the yeast and too cool the yeast won’t activate) and a pinch of sugar. Wait 5 minutes for it to get foamy.
- Add remaining ingredients and stir well until the dough reaches the proper consistency (a word on that below).
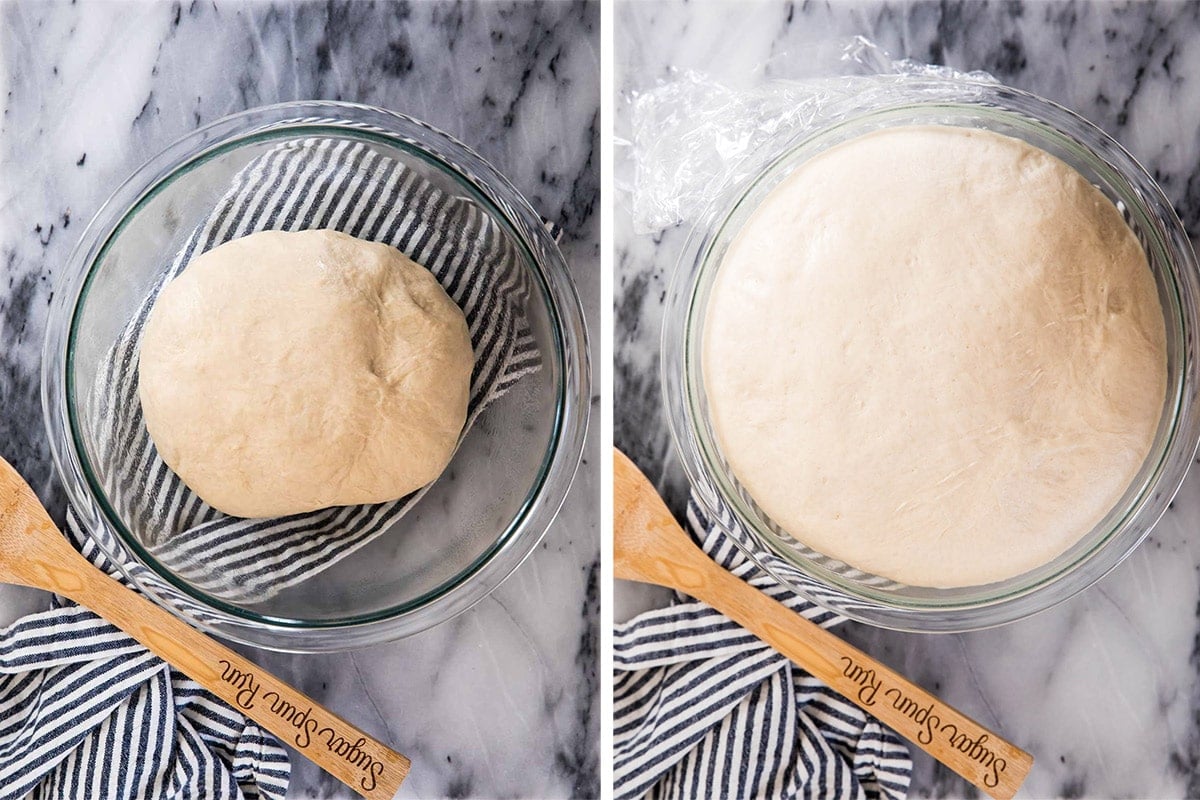
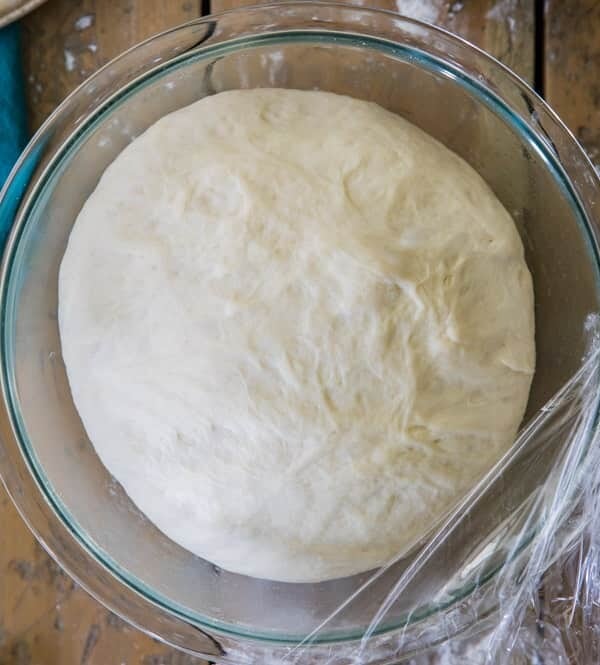
- Place in an oiled bowl, cover, let rise until doubled in size (see images above).
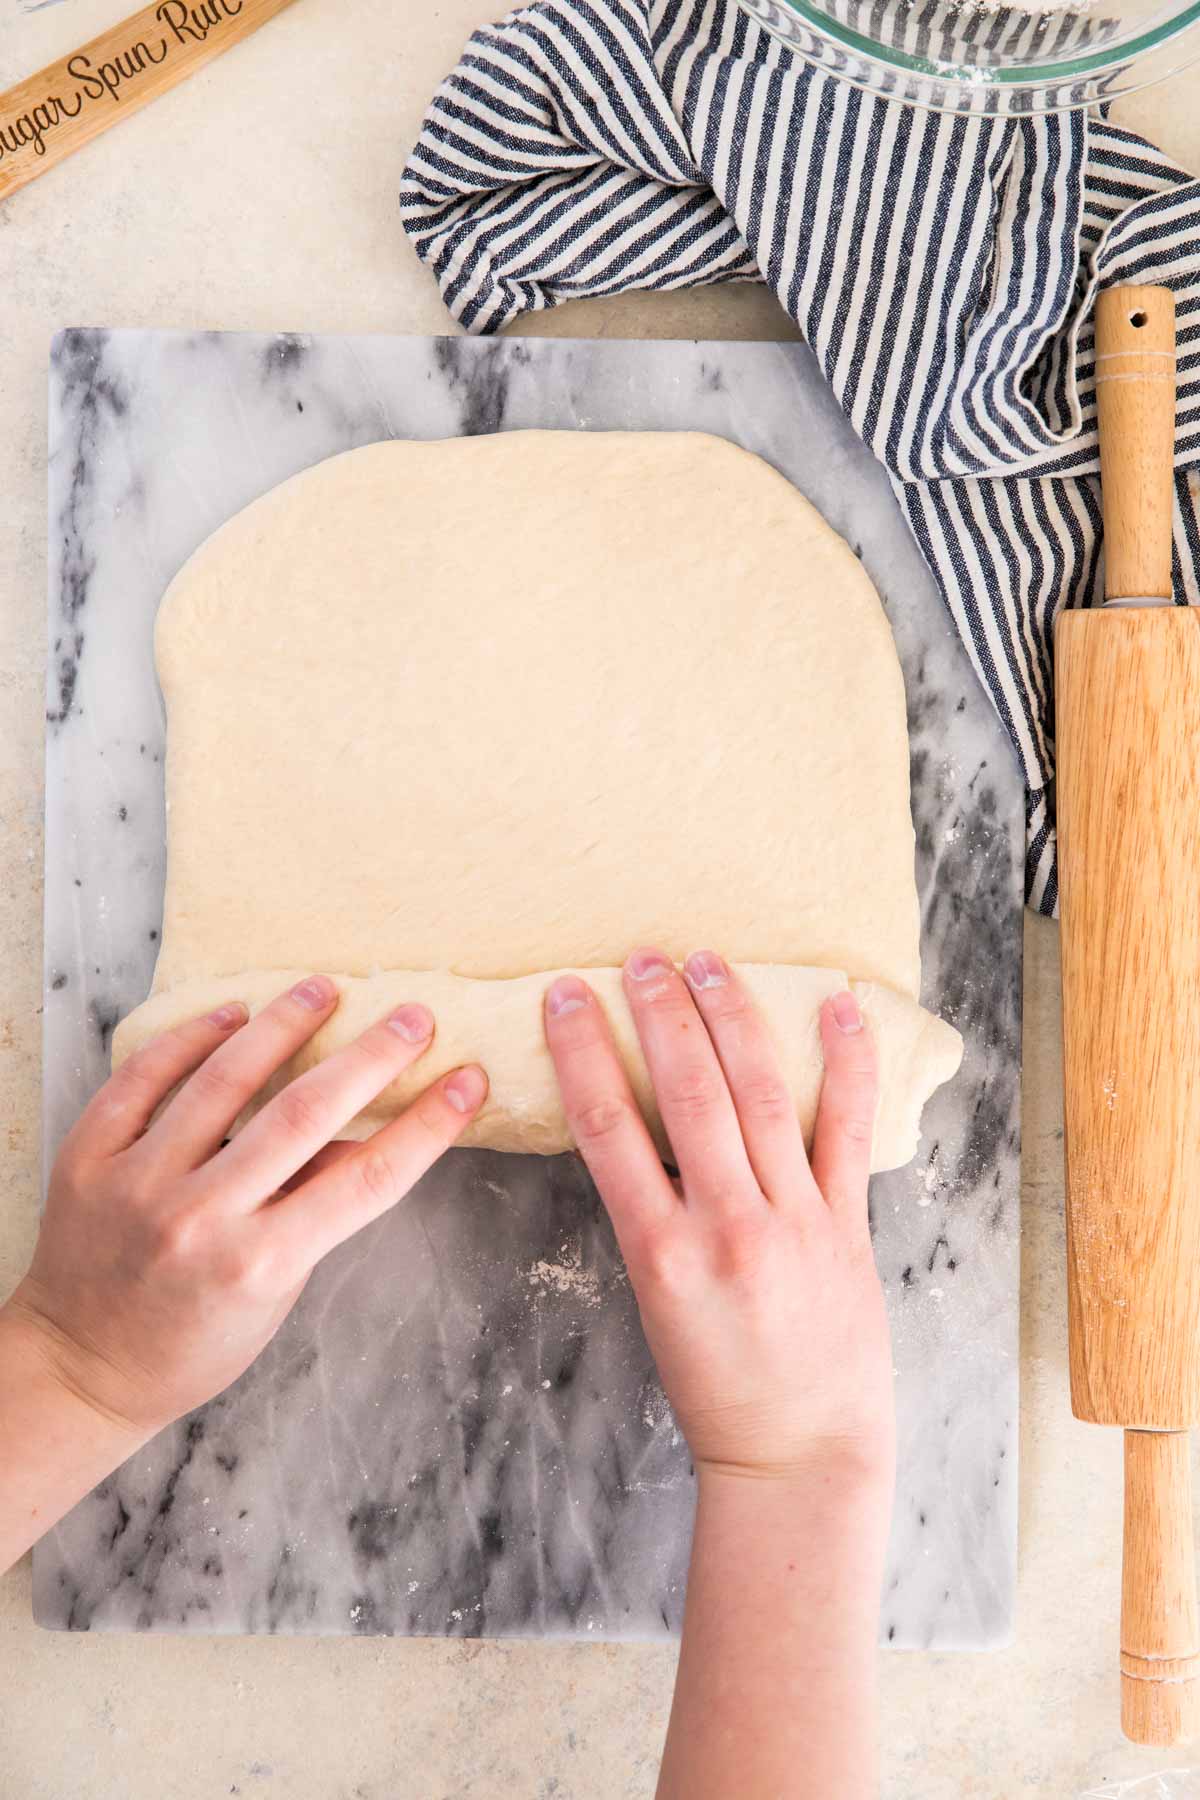
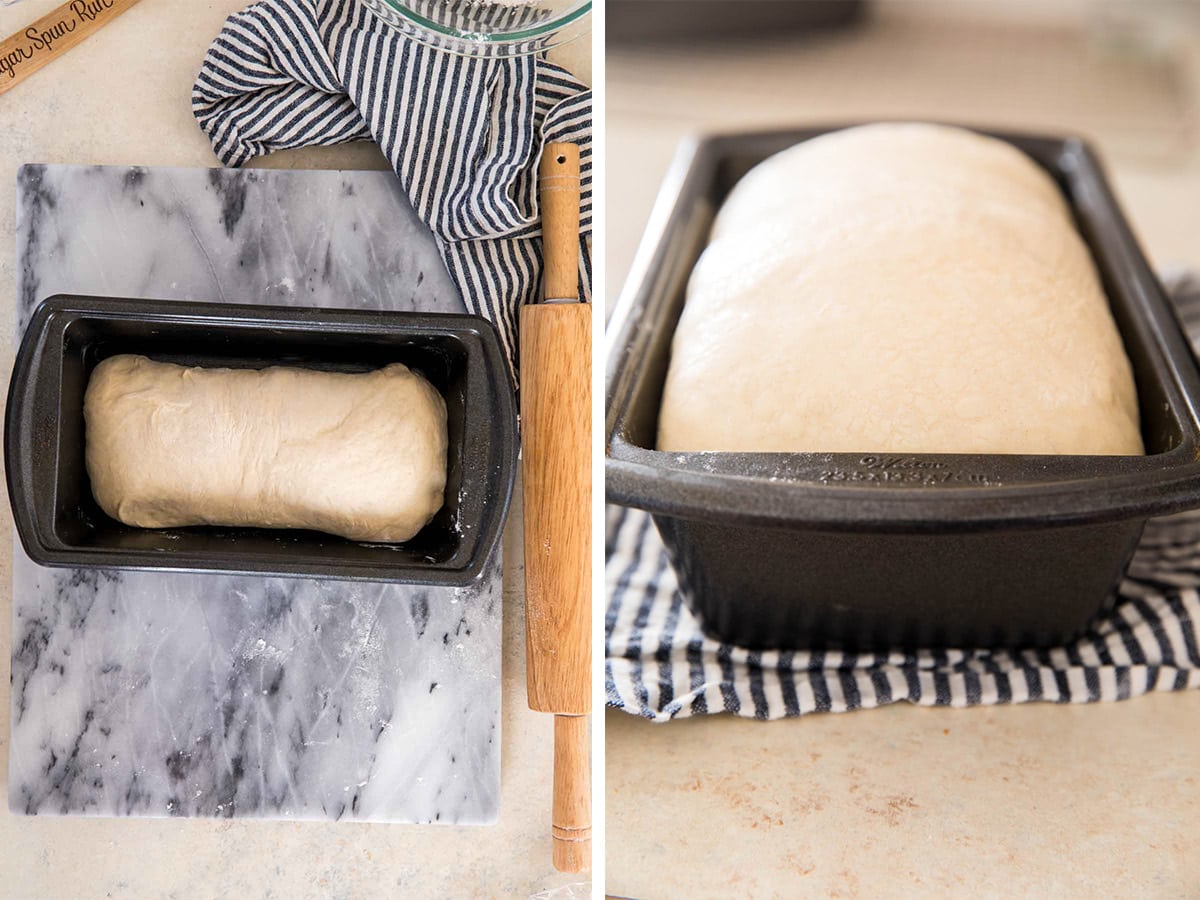
- Deflate and form into an 8×12 rectangle. Roll into a log from the shorter end and pinch the seam. Tuck the ends under and place, seam-side down into a greased 9×5″ bread pan. Let rise until doubled in size (see images below).
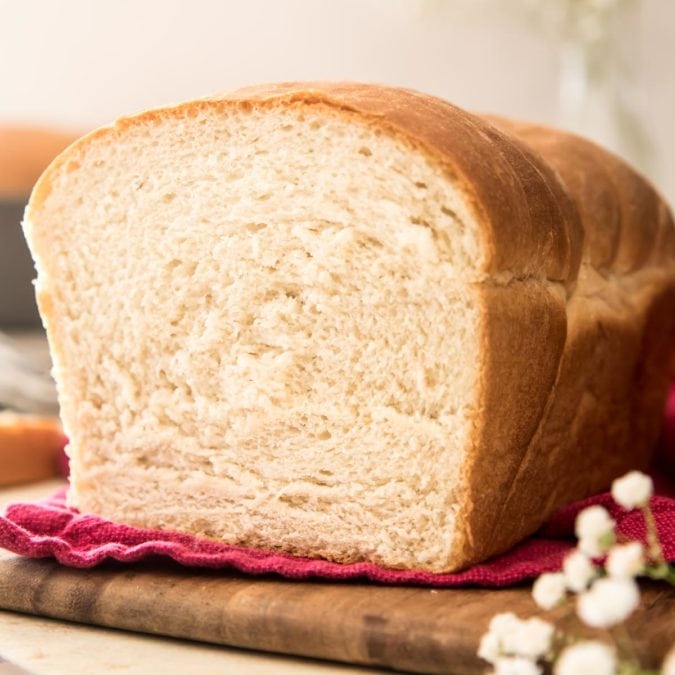
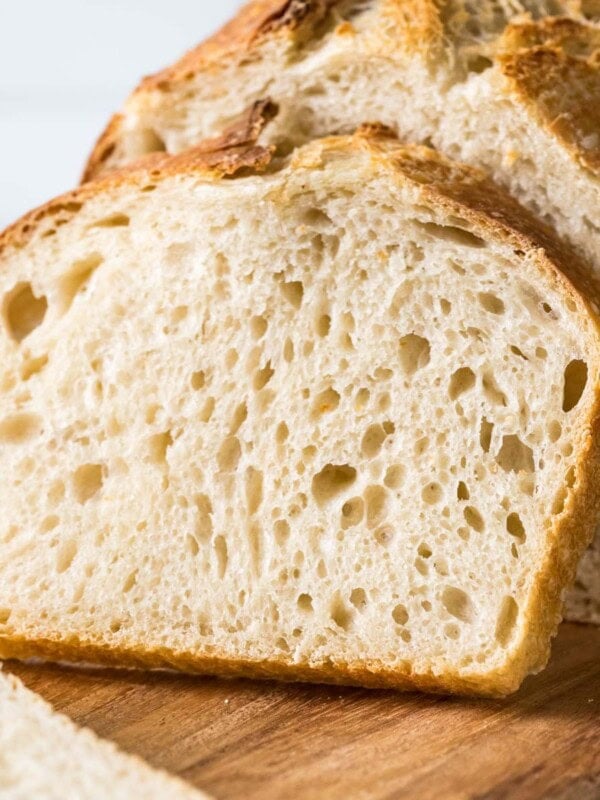
- Bake until golden brown and the bread sounds hollow when tapped! Allow to cool before slicing!
While the easiest way to make this bread recipe is with a stand mixer (and I’ve included notes in the recipe on how to do so), it can also be made just with a large bowl and a spoon (just like my pizza dough). In the video I made it without my mixer, a bit of elbow grease and some manual kneading is required to make it this way.
Getting the Right Consistency
You’ll notice that in this bread recipe I don’t list a precise amount of flour. I indicate 4-5 cups. That’s quite a range and you would never find such vague guidelines on any of my recipes that don’t use yeast!
When you’re baking homemade bread (or other yeast recipes), though, the amount of flour will almost always vary. Rather than using a specified amount of flour and calling it a day, you need to judge based on the consistency of your dough. You’re looking for the dough to cling together and form a ball. It should not stick to your hands but should be slightly tacky to the touch. You may need less flour than I do, or you may need more.
For a visual guide on how your bread dough should look, be sure to check out the video below the bread recipe.
How to Store
Store homemade bread tightly wrapped or in an airtight container at room temperature for 2-3 days. This bread may also be frozen. Let it cool after baking and then wrap tightly in plastic wrap and then in foil and freeze.
If you are interested in making the dough in advance, here is a guide I found on how to freeze homemade bread dough.

This bread recipe is great served alongside baked ziti, stuffed shells, or lasagna soup! Enjoy!
More Bread Recipes to Try:
Are you more of a visual learner? Check out my YouTube channel where I show you exactly how I make this recipe step-by-step in my own kitchen.
Homemade Bread
Equipment
Ingredients
- 2 ¼ teaspoons active dry yeast¹, 1 packet
- 1 ¼ cups (300 ml) water
- ¼ cup (60 ml) whole milk²
- 2 Tablespoons + 1 teaspoon granulated sugar
- 2 teaspoons salt
- 2 Tablespoons butter, softened and cut into 4 pieces
- 4 - 5 cups (500-625 g) bread flour or all-purpose (plain) flour³
Instructions
- Combine milk and water and heat in the microwave (or on the stovetop) until it reaches a temperature between 105-115F (40-46C). Make sure to stir the liquid before measuring the temperature to make sure it is heated evenly.1 ¼ cups (300 ml) water, ¼ cup (60 ml) whole milk²
- Pour warm milk/water mixture into a large bowl or the bowl of a stand mixer. Add yeast and 1 teaspoon of granulated sugar and stir to combine. Allow to sit for about 5 minutes, until yeast is foamy (if yeast does not foam there is something wrong with it, it is likely dead. You will have to throw this out and start over).2 ¼ teaspoons active dry yeast¹, 2 Tablespoons + 1 teaspoon granulated sugar
- Once yeast is foamy, add remaining 2 Tablespoons granulated sugar, salt, butter, and 2 cups (250g) of your flour mixture. Stir well until completely combined (the butter may not be completely combined at this point but as you add more flour it should mix into the dough completely).2 teaspoons salt, 2 Tablespoons butter, 4 - 5 cups (500-625 g) bread flour or all-purpose (plain) flour³
- Gradually add additional flour, stirring well after each addition (if you are using a stand mixer, stir on low-speed with a dough hook attachment), until dough clings together and forms a ball that pulls away from the side of the bowl. Dough should be slightly tacky to the touch but should not be sticky.
- Transfer to a clean surface and knead for about 5-10 minutes until dough is smooth and elastic (or continue to stir with mixer on low-speed with dough hook until smooth and elastic, about 3-5 minutes).
- Transfer dough to a lightly oiled bowl, turn dough to coat the surface lightly with oil, cover and allow to rise in a warm place until doubled in size (about 1-2 hours).
- Once dough has doubled, transfer to a clean, lightly floured surface and use your hands to deflate the dough. Use lightly floured hands or a lightly floured rolling pin to form into an 8x12” rectangle. Starting with one 8” end, roll dough tightly into a log. Pinch the seam to seal the log and tuck the ends of the dough under to form a loaf (see my video below the recipe for a visual).
- Transfer to a lightly greased (I use shortening) 9x5” bread pan. If desired, use a serrated knife to score the bread lengthwise across the top. Cover with a clean towel and allow to rise in a warm, draft-free place until doubled in size and loaf has risen about .5-1” above the edge of the loaf pan. While dough is rising, preheat your oven to 400F (200C).
- Once dough has risen and oven is preheated, oncover loaf and transfer to 400F (200C) oven and bake for 25 minutes or until loaf is golden brown and sounds hollow when tapped,
- Immediately invert onto a cooling rack. Allow to cool a bit before slicing and serving.
Notes
Storing:
Wrap tightly or store in an airtight container in a cool, dry place for 2-3 days. I do not recommend keeping in the refrigerator as it will dry out the bread and make it stale. Bread may be frozen, allow to cool and then wrap tightly in plastic wrap and foil and freeze for up to a month.Nutrition
Nutrition information is automatically calculated, so should only be used as an approximation.
Like this? Leave a comment below!


I was wondering if you have ever doubled this recipe.
Hi Marty! I have not, but I don’t foresee any issues in doing so. 🙂
I double this recipe all the time and it works great. I sometimes have to add a little more/less flour to get the right consistency but I never have any issues.
Awesome bread recipe! No hassle no mixer necessary : ) Among one of my favorites from you Sam!
Thank you!
I’m so glad you enjoyed it, Nichola! 🙂
Can I use this recipe for dinner rolls and hamburger buns?
Hi Joe! I actually have a dinner rolls recipe and a hamburger bun recipe I would recommend following. 🙂
His Sam, been cookin for years but not much real baking. Made the hot cross buns & came out perfect! Keep up the good notes and well timed recipe drops, it’s really helping me learn to be decent baker easily and quick! Was gonna make fresh baked bread to go with my bean soup but I need a loaf pan, tried to check out the link you posted in recommended equipment but the link for the loaf pan says it’s invalid. I think I found the right one based on the pictures you posted but I wanted to make sure. I know the recipe is excellent, it’s just about identical to my mom’s recipe she was blessed with and learned from an old family friend Betty Brown. Always so delicious, especially with bean soup Yummy, can’t wait to try it with these tweaks. 🙂
I just made this for the first time, and as always your recipes never fail. This was the first time I’ve used yeast with one of your recipes, and I had no issues. (I was scared because I haven’t had luck with yeast in the past). I made the mistake of rolling it long ways rather than from the short end to put it in the pan, so the top didn’t come out even, but it still smells and tastes wonderful. Next time I’ll make it pretty. The top browned nicely but my sides were a lot lighter, however, I used an aluminum pan, so thought maybe that is the reason? I also have a glass loaf pan, but wasn’t sure how it would turn out in it vs a metal. I need to get a good metal non-stick coated pan. Anyhow, thanks so much for all of your great recipes!
I’m so glad you enjoyed it so much, Jennifer! The light sides could be the color of your pan, maybe it needed to bake for just a minute longer or maybe your oven temperature is slightly off, but as long as it tasted good that’s really all that matters right? 🙂
Loved it! Made it with 190gr of Whole Wheat and is amazing! Thank you Sam!
I’m so glad to hear this, Camila! Thank you so much for trying my recipe and letting me know how it turned out for you, I really appreciate it! 🙂
By any chance can you use this recipe for a bread machine?
Hi Mary! While I have never tried this recipe with a bread machine myself, someone has commented that they have made it successfully with their bread machine. I hope that helps! 🙂
Can this bread be made without a pan? Thanks!
Hmm I haven’t tried it. It would definitely be pretty flat, but it could turn out. Let me know how it goes. 🙂
This bread is the best and so easy to make. I used to have a different bread recipe but I have switched to this one as my go to. I have made this recipe 4 times in the past couple weeks.
I’m so glad you have enjoyed it so much, Margaret! 🙂
I’m hoping that it comes out like your’s but I don’t think it will with the dough I watched the last part of flattening the dough and rolled up pitch seam and the tucked edges why does it looks it should be 2 loaves it’s not you looks my fault
I’m not quite sure I understand what you are asking here, but this recipe is for 1 loaf of bread.
Sam, if I am baking in .a toaster oven. What temp do I need?
Hi Jeannie! Unfortunately I haven’t baked in a toaster oven so I’m not sure of what/if any modifications need to be made.
Thank you for posting delicious recipes that never fail! I bake a pan of this bread every week, sometimes two loaves! My family and I will never go back to store-bought bread.
No modifications, recipe followed as written.
Thanks, again!
I’m so glad everyone enjoys it so much, Michelle! 🙂
I made this bread and it was amazing!!! It didn’t even last one day at my house so I’ll have to make more soon! If I am allowed to make recipe suggestions, could you possibly look into a cinnamon chip bread recipe similar to how they make it at the Great Harvest Bread Company? You always do such a wonderful job with your recipes, so I know if you did this recipe it would turn out amazing!
I am so glad you enjoyed it so much, Julia! I have actually been working on making a cinnamon swirl bread. I’m getting close, but it’s not quite there yet. 🙂
Amazing! Fluffy, light, and delish!
An electric knife works great for slicing
Amazing!!! I haven’t tried making bread in years because of failed attempts. I used all purpose flour, but other than that I followed your recipe exactly. So easy and it came out incredibly tasty!
Thank you!!
I am so glad you enjoyed it so much, Blair! 🙂
I had two questions: what thermometer brand do you use? And how do you get “sandwich-sized” slices when you cut it? I found it really difficult to cut normal sized slices, not that I am complaining about eating more of this delicious bread! Maybe it’s because I used all purpose flour instead of bread flour or that I don’t have a bread knife?
I rated earlier with just my girls and I having tried the bread. My husband flipped out about how amazing your bread is!! He said we no longer needed to buy store bought! He is a bread snob and only prefers whole wheat, so that’s saying alot! He did ask if you had a whole wheat recipe, so if you ever get a chance to make a recipe for that, we will totally be making it!
Hi Blair! I use an instant read thermometer from Alpha Grillers. I found it on Amazon. It’s actually meant for grilling but it works well here. A bread knife would definitely help with making thinner slices as you’ll be able to saw through the bread much, better. I’m so glad everyone enjoys it so much. 🙂
This might be a stupid question but how could I make this into a wheat or honey wheat variation. I am a super novice at baking but made this recipe and IT WORKED. So now I want to use it as our daily bread!
Thank you,
Laura
I’m so glad you enjoyed, Laura! I have some notes in the post about making this into a whole wheat bread (see in the ingredients/substitutions section in the post under flour). You can substitute the sugar for honey, and you can also melt together a bit of honey with a splash of water and brush it over the bread after it’s freshly baked for even more honey flavor. I hope that helps! 🙂
I love this recipe…make homemade bread so fast!! Thank You!!
I’m so glad you enjoy it so much, Maureen! 🙂
I think I cheated. I used my bread machine to mix and bake the bread. Was perfect. Of course I took all the credit. Wanted to say I found the hot water from a Keurig is perfectly 106 degrees.
I am so glad that you enjoyed it, Jackie! Thanks for sharing the Keurig tip too. 🙂