
Brown Butter Chocolate Chip Cookies
This post may contain affiliate links. As an Amazon Associate I earn from qualifying purchases. Please read my disclosure policy.
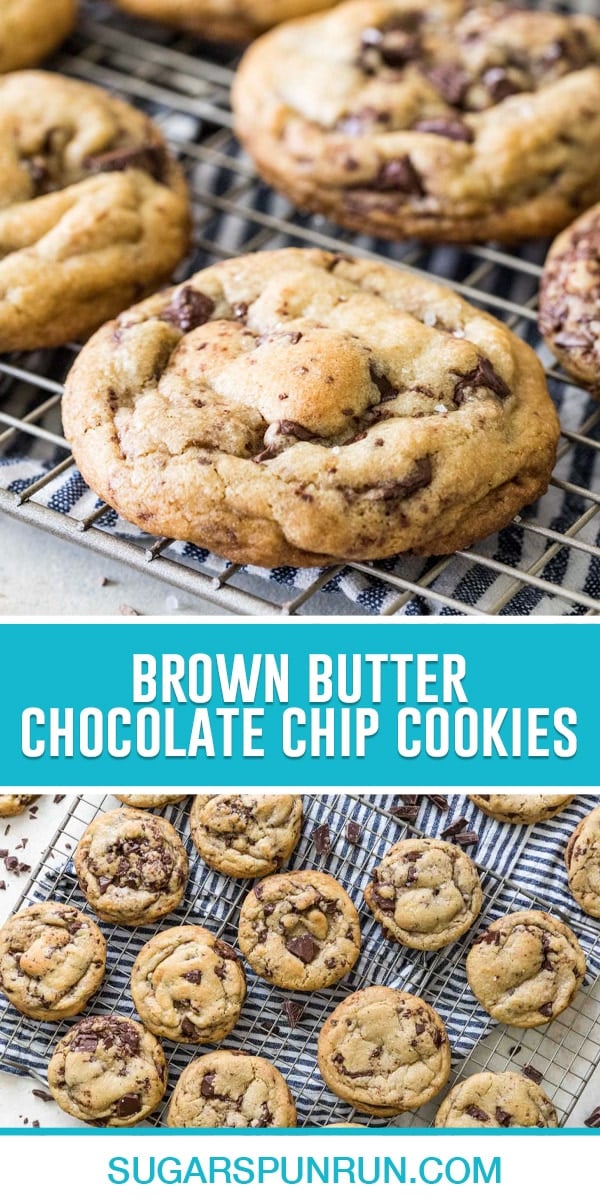
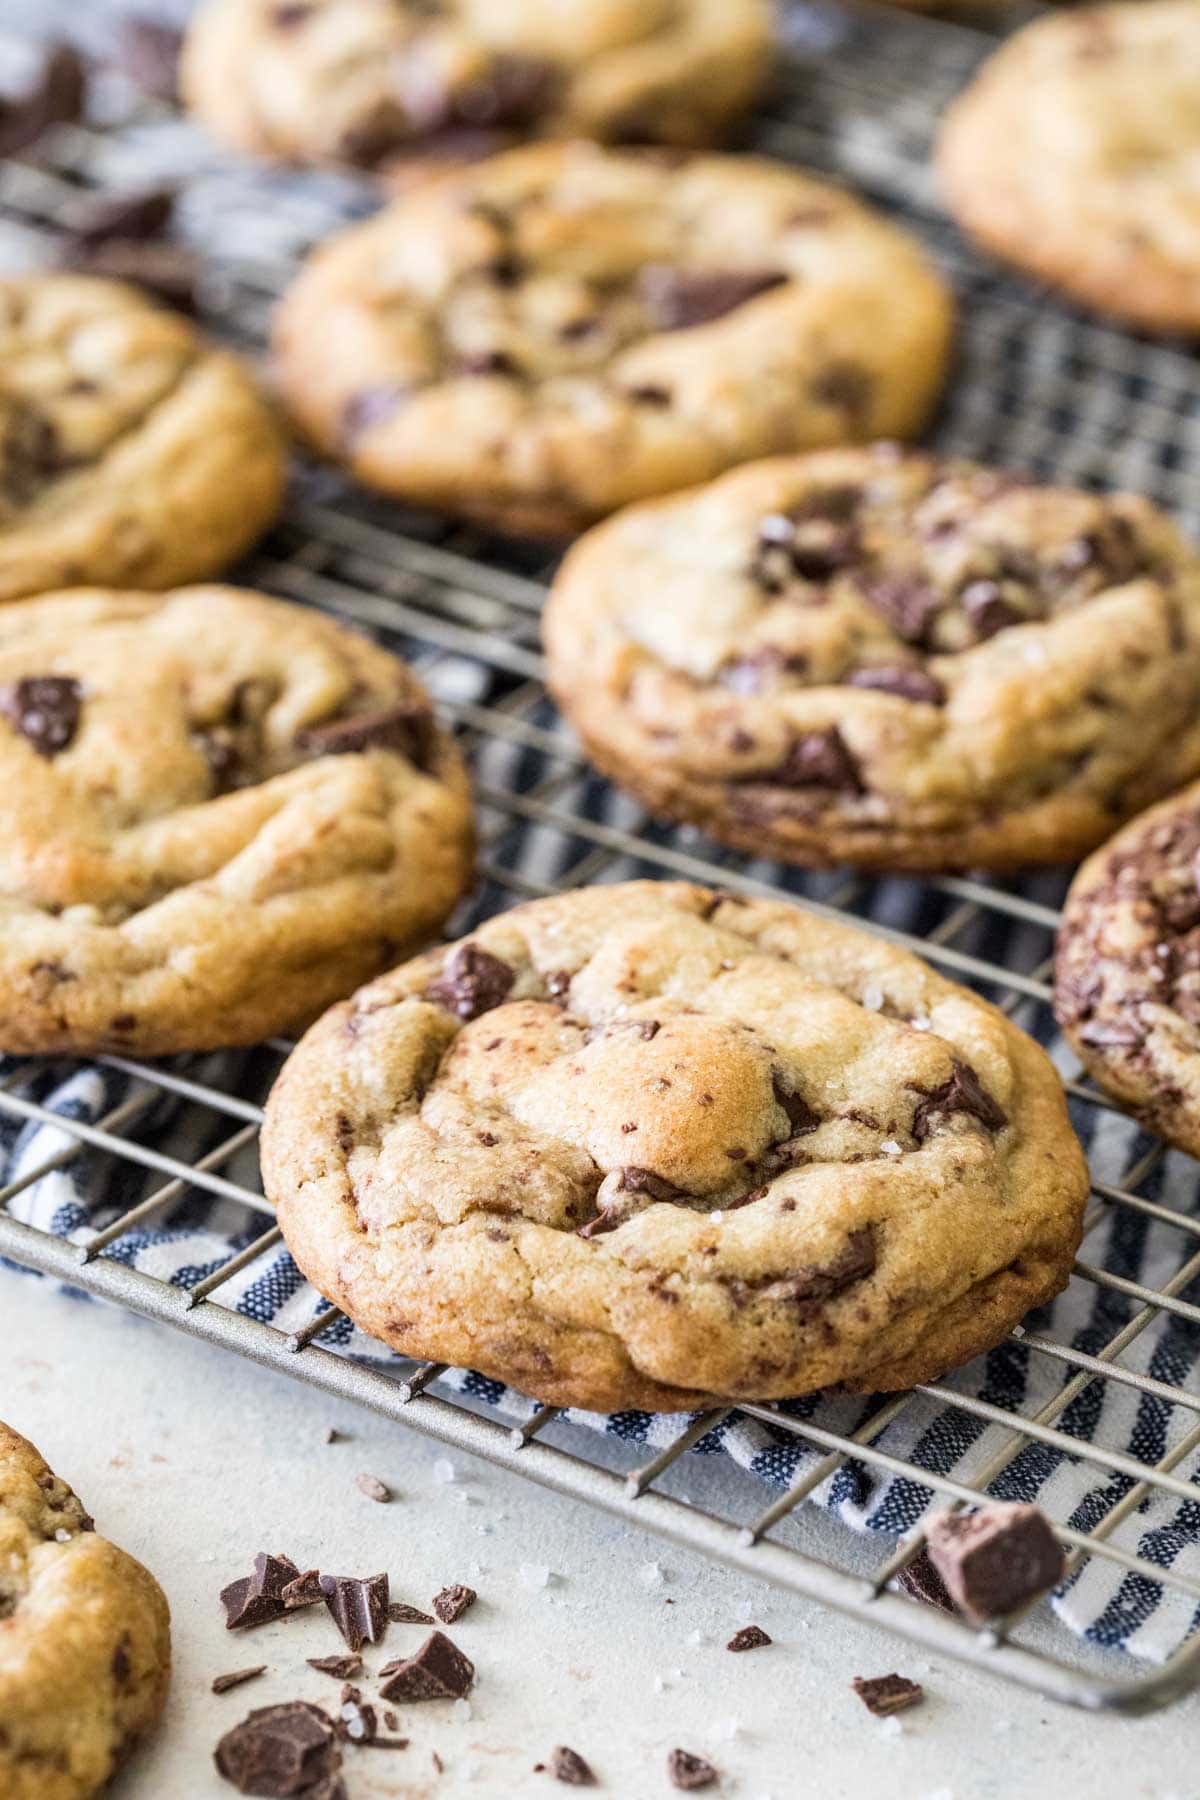
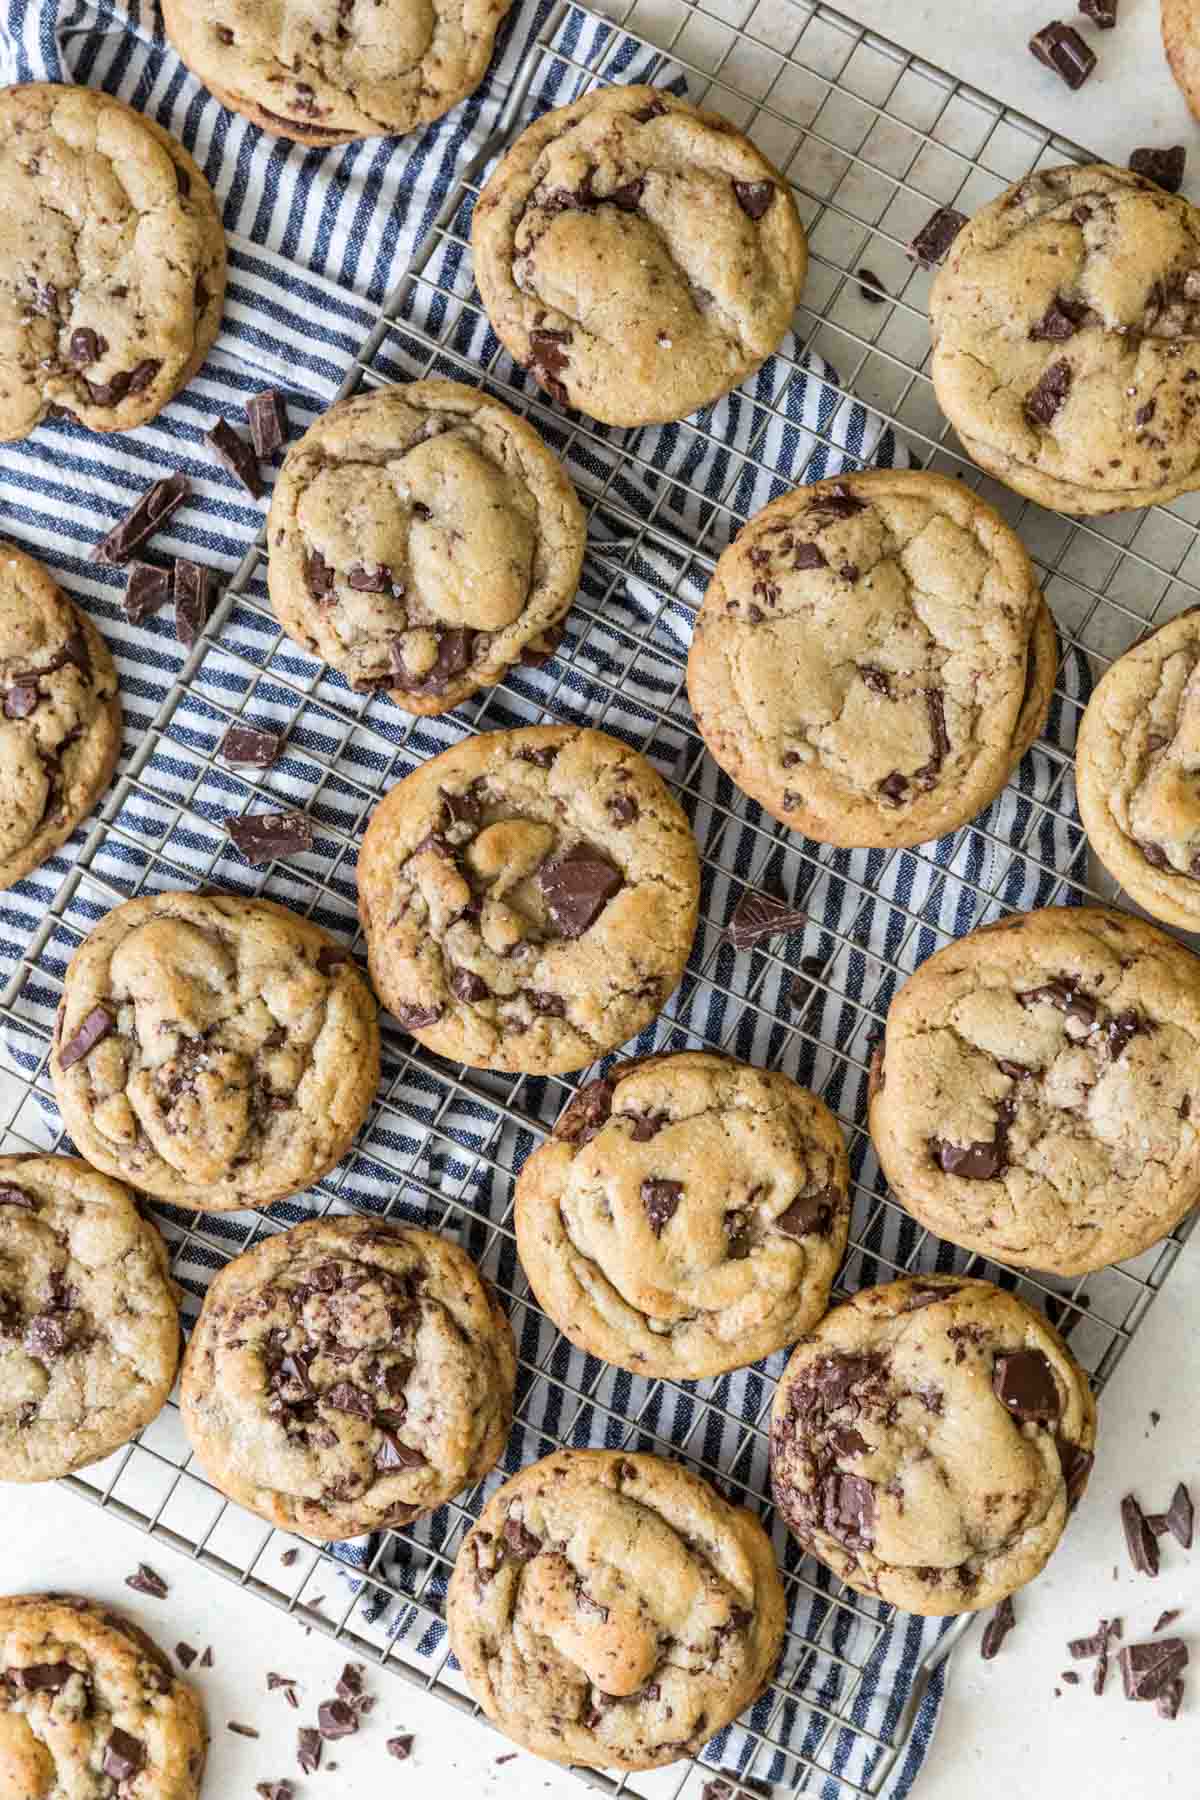
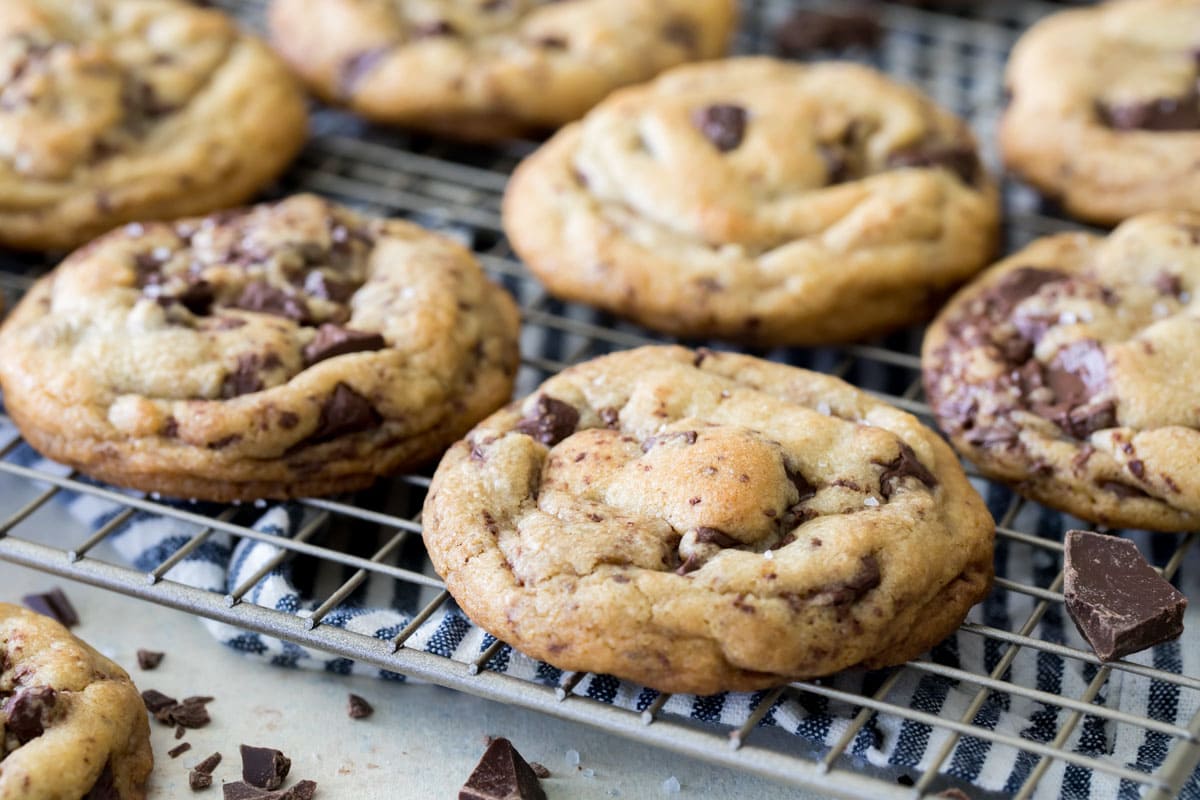
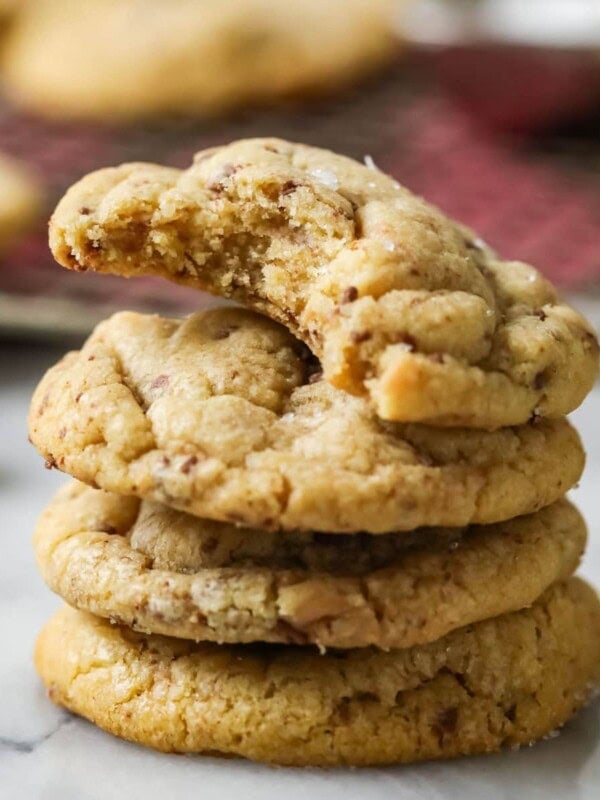
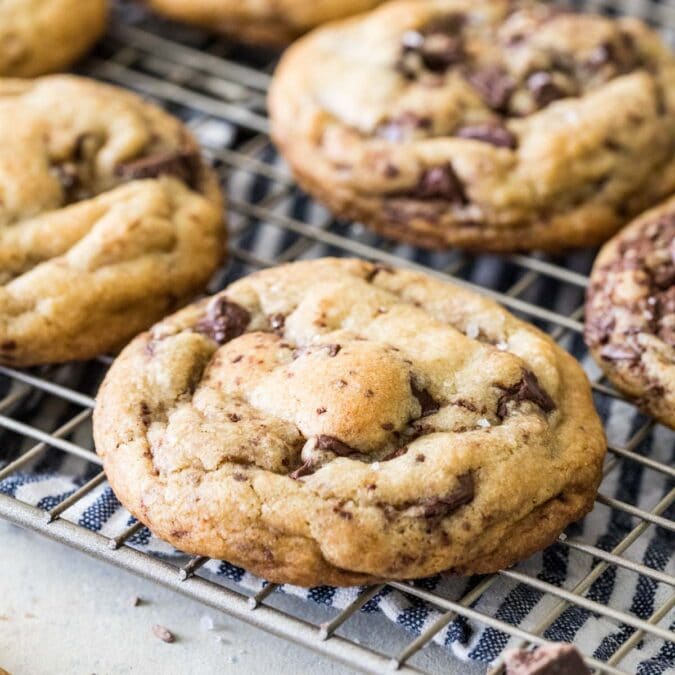
Meet your new go-to: brown butter chocolate chip cookies. This classic recipe gets a gourmet upgrade thanks to the rich, nutty flavor infusion of browned butter. They’re thick, gooey, loaded with melty chocolate and topped with a sprinkle of sea salt. A longtime reader favorite (with hundreds of rave reviews)!
Browned Butter Chocolate Chip Cookies (Chewy & Gourmet)
Not to be dramatic, but this isn’t your standard chocolate chip cookie recipe. Brown butter chocolate chip cookies have one game-changing, not-so-secret ingredient that takes them from good, to gourmet. If you’ve been paying attention, I’m sure you’ve guessed it by now: it’s brown butter.
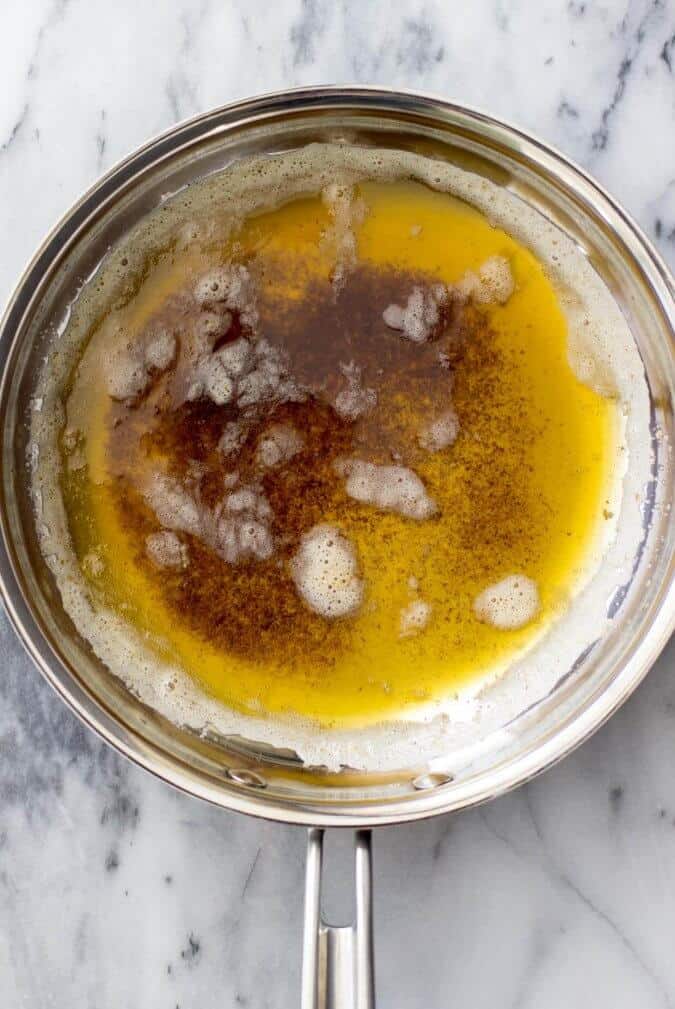
To brown the butter, we cook it on the stovetop until the water evaporates and the milk solids are toasted. Might sound complicated, but it’s an easy process once you get the hang of it and I’ll walk you through it step by step. These extra few minutes of your time are well worth it to infuse a deep, nutty, toffee-like flavor onto every bite of your cookies.
Why You Need to Try These:
- Browned butter adds incredible flavor. By taking the extra time to brown the butter, we unlock deep nutty flavor with toasty notes of caramel and toffee that you can’t get from just plain melted butter.
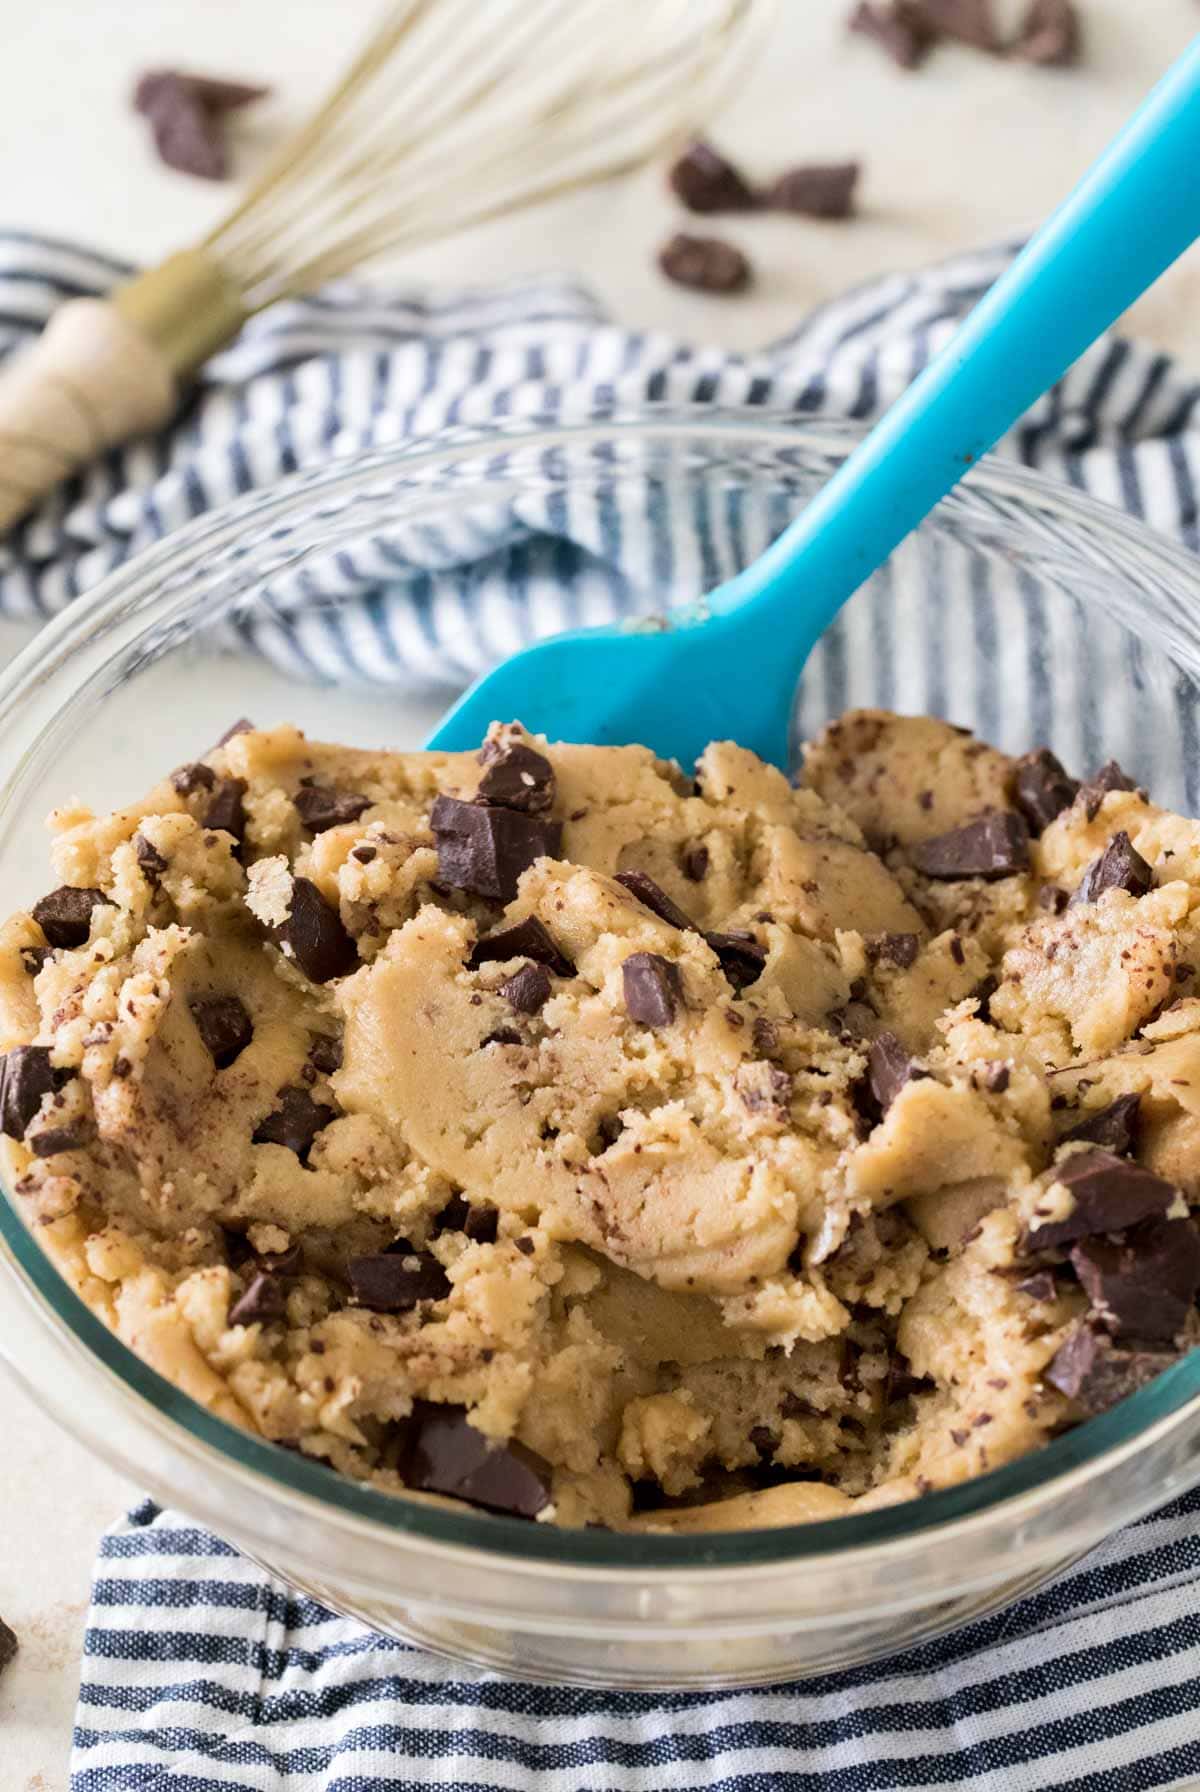
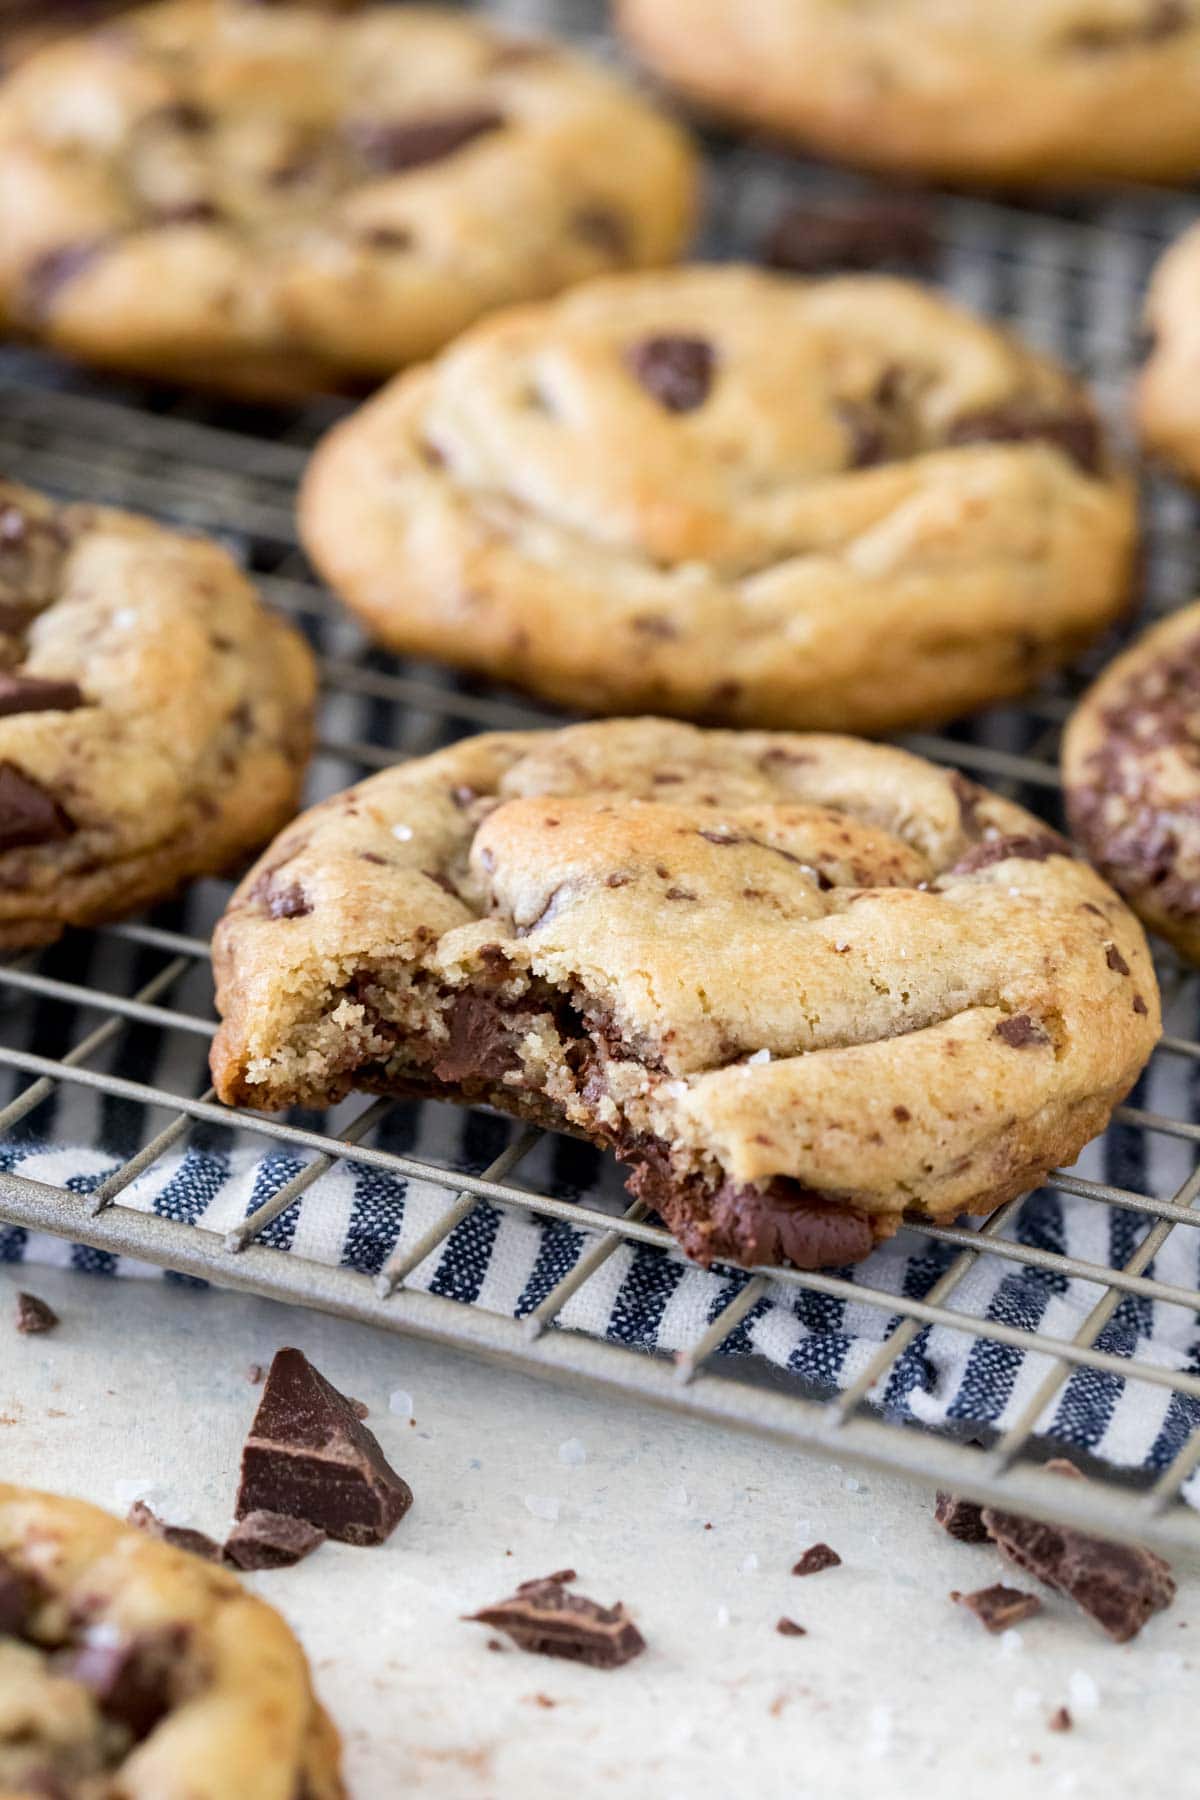
- Pools of melty chocolate in every bite. We opt for chopped chocolate for rich chocolate puddles throughout the cookies. While some browned butter chocolate chip cookies will overwhelm the dough with chocolate, I was intentional about not doing that here and carefully striking just the right balance so the chocolate is present but highlights the dough without overwhelming it.
- Flaky sea salt puts things over the top. It’s a simple addition, but it elevates the cookies to gourmet status. Don’t go overboard, though, a light sprinkling is perfect.
Ingredients
Despite their gourmet flavor, brown butter chocolate chip cookies use humble, everyday ingredients (it’s all about how we use them that sets this recipe apart). Here’s what you need:
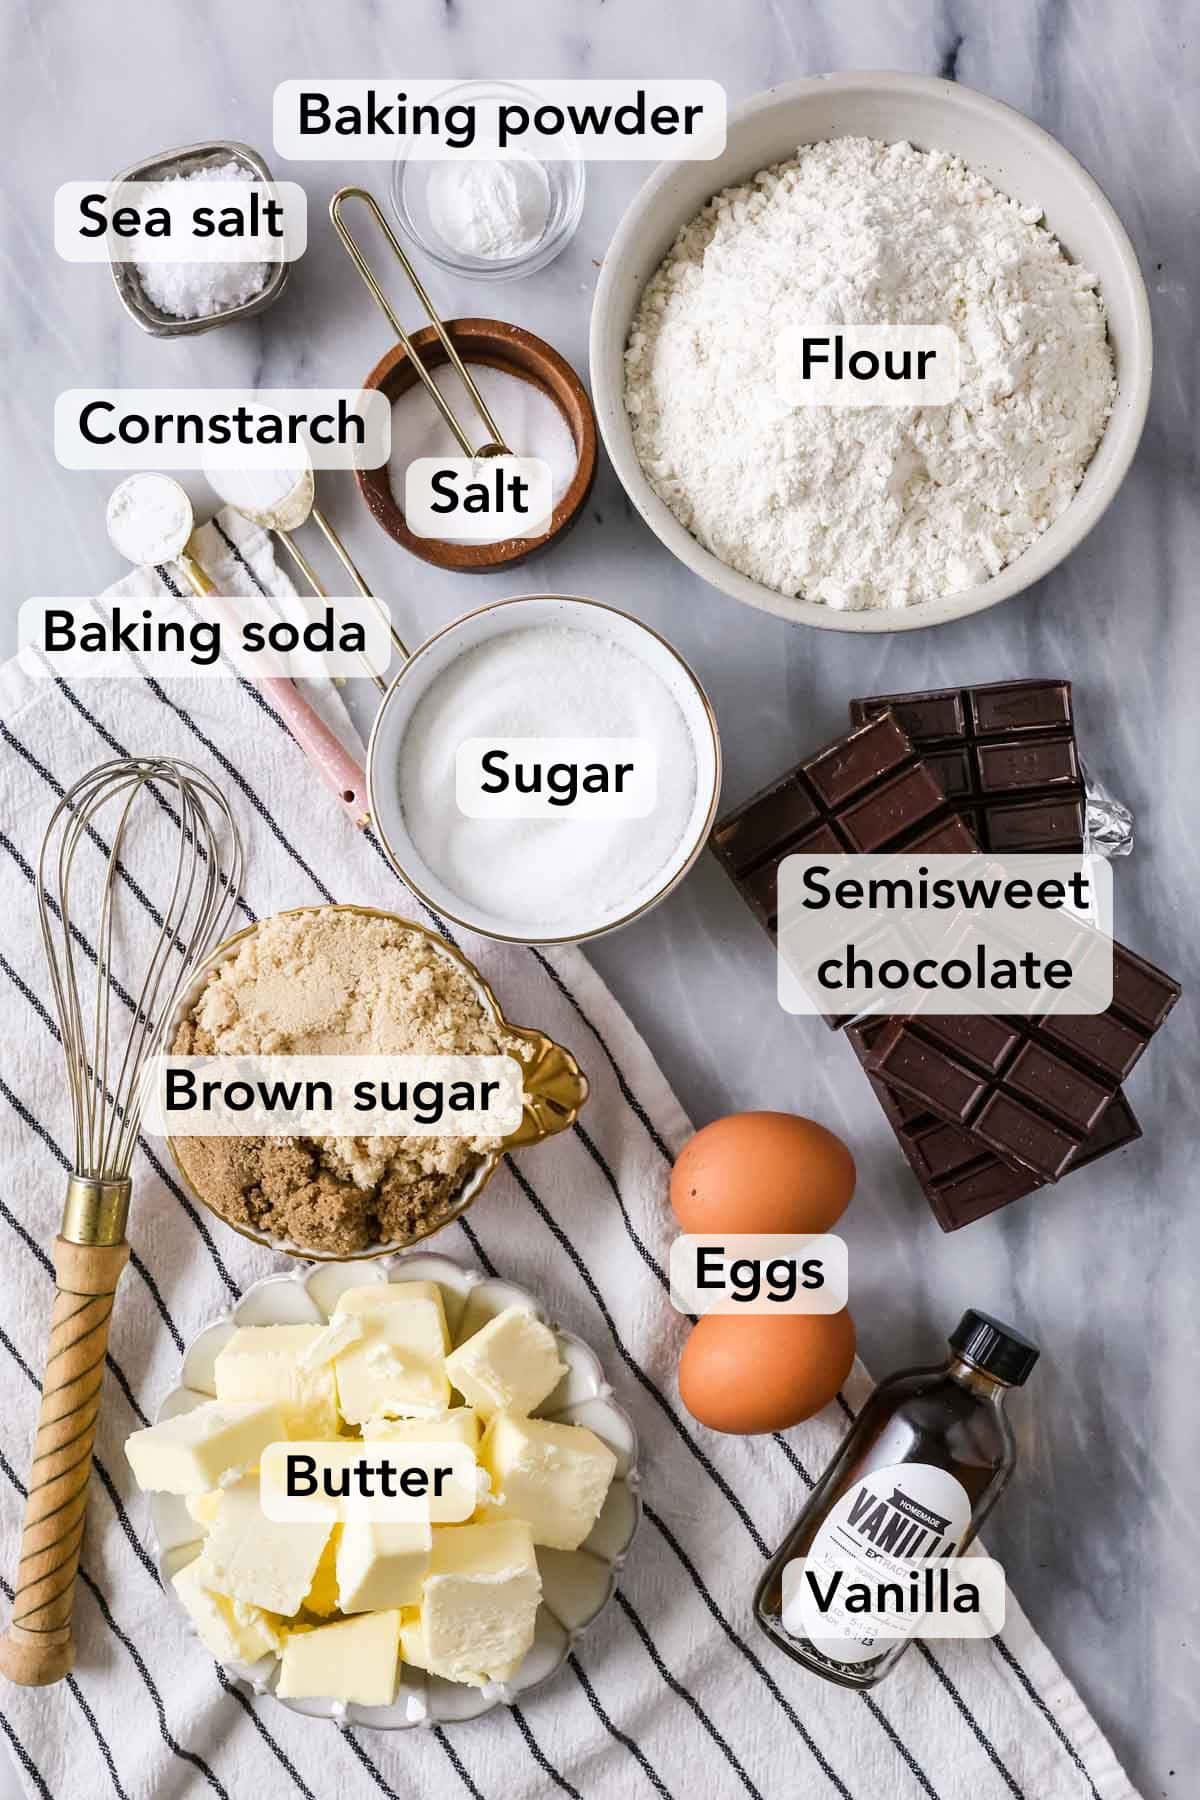
- Butter. We start with regular butter, then brown it on the stovetop (we’ll talk in more deatil about this below). The process only takes a few minutes, but it’s very important that you let the butter cool after browning, which usually takes about 30 minutes to an hour. It’s not necessary for the butter to re-solidify, but it should not feel warm to the touch.
- Sugar. We’ll use a blend of brown and granulated sugar. For the brown sugar, you can stick with all light brown or level things up (my recommendation) by using an even split of light brown and dark brown. The extra bit of molasses from the dark brown sugar adds an extra something to the cookies (all about that depth of flavor here!).
- Eggs. We need all of our ingredients to be the same temperature so they combine properly. This means our eggs and butter both need to be room temperature. I usually set my eggs out the night before I’m going to be baking. If you forget to set yours out, read my tip below!
- Chocolate. I know I call these brown butter chocolate chip cookies, but I honestly prefer to use chopped semisweet (or even dark) chocolate bars. I include instructions in the recipe for using regular chocolate chips, if that’s your preference.
SAM’S TIP: If you tend to forget to set out your eggs ahead of time, read my post on how to quickly bring eggs to room temperature! It can help save you a lot of time.
Remember, this is just an overview of the ingredients I used and why. For the full recipe please scroll down to the bottom of the post!
How to Make Brown Butter Chocolate Chip Cookies
Step 1: Brown the butter
Brown butter (more formally known by its French name: Buerre Noisette…fancy!), is simply butter that’s been cooked until all of the water evaporates and the milk solids begin to turn brown. The end result is a rich, flavorful butter with a nutty, toffee-like aroma.
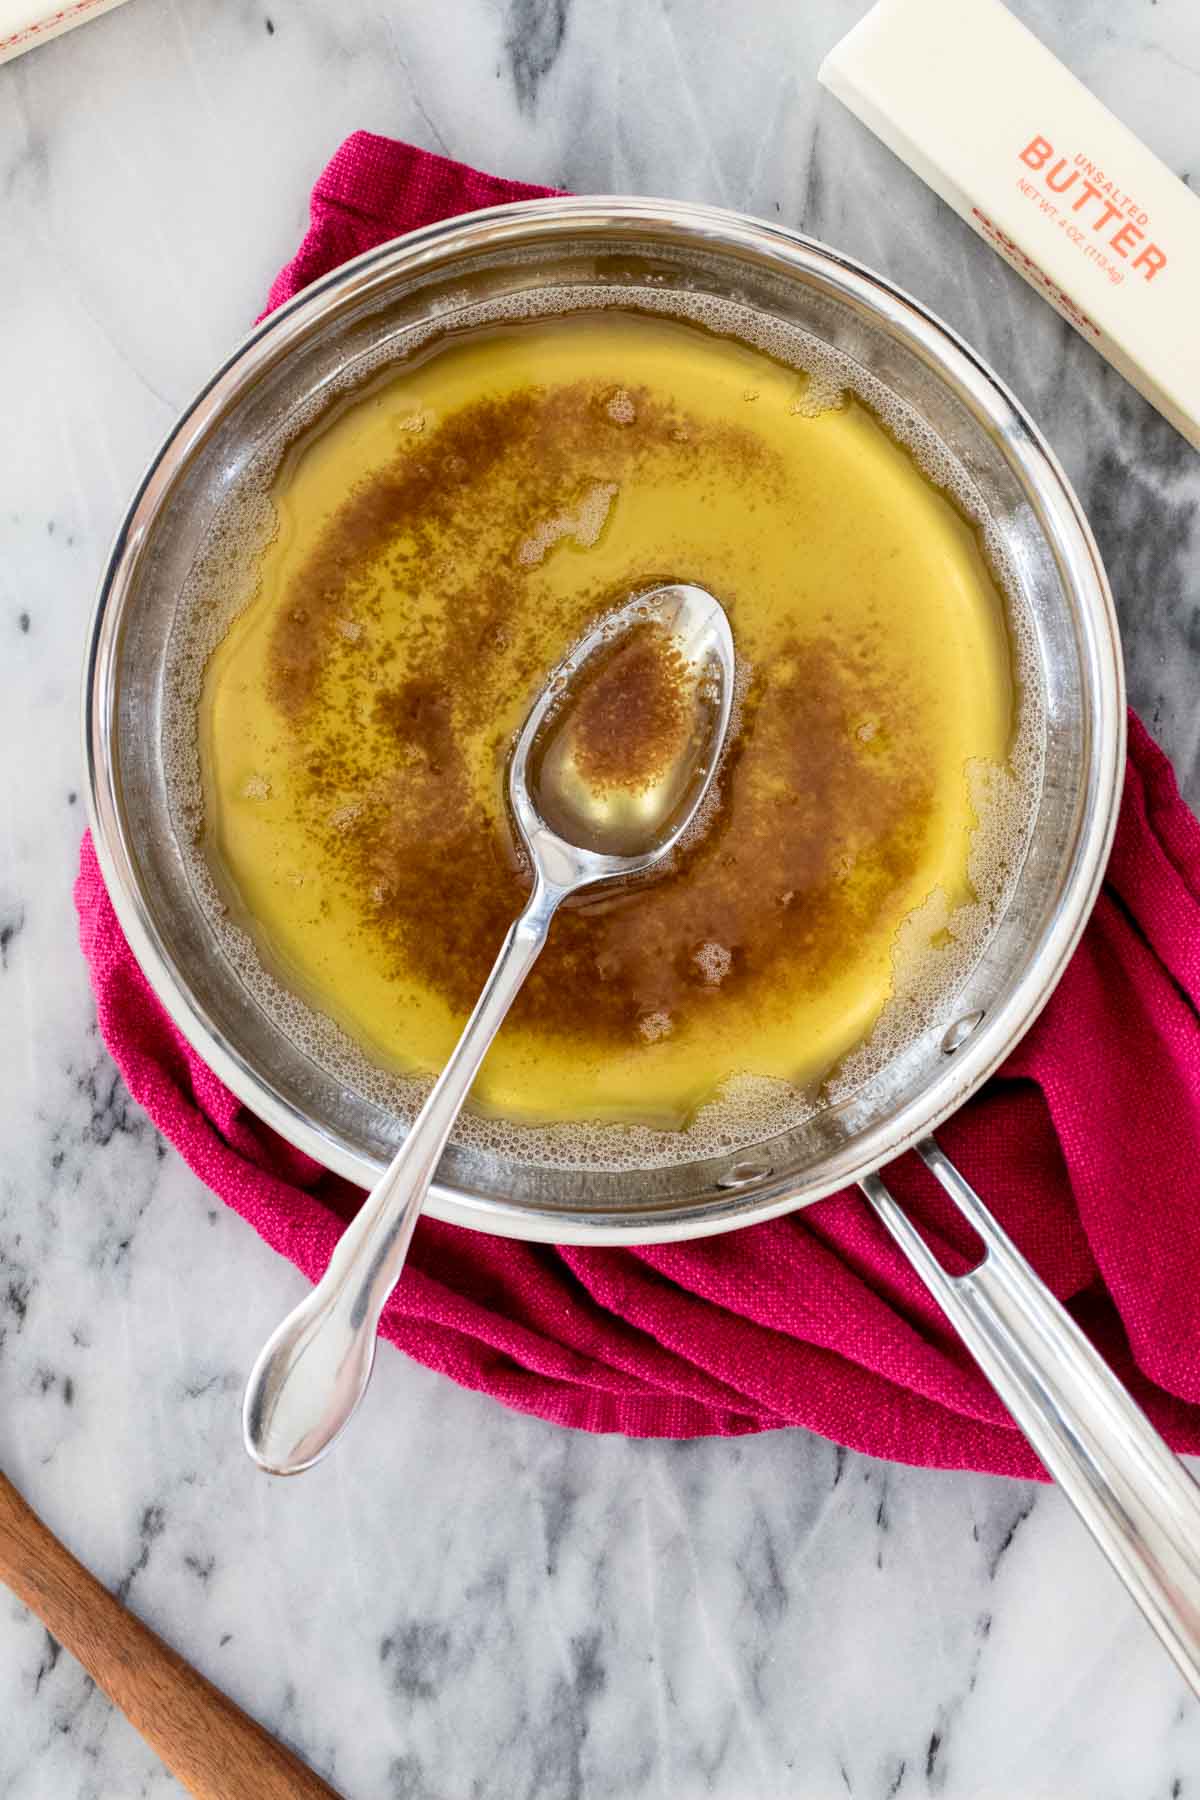
Cook the butter over medium heat, stirring constantly. It will foam, sizzle, and pop after melting, keep it moving so nothing burns (just stirring with a spatula works fine). Once the sizzling stops, pay extra close attention. You’ll notice browning beginning to occur on the bottom of the pan. Once you see plenty of brown (not black!) bits, remove from heat and immediately pour it into a heatproof mixing bowl (if you keep it in the pan, it could continue to cook from the residual heat and burn).
The browned butter needs to cool completely before you move on to the next step. It doesn’t need to re-solidify, but it should not feel warm to the touch.
Once you master this technique, you’ll be using it all the time… I recommend you use your new skill in my butter pecan cake or brown butter snickerdoodles next 😉
Step 2: Make the dough
The brown butter chocolate chip cookie dough comes together pretty quickly and easily. I’ll reiterate (because it’s important) that your butter must be cooled, or it’ll melt the sugar and you’ll have a greasy, thin dough that spreads all over your cookie sheet.
Eggs and vanilla go in with the butter and sugar, the dry ingredients are whisked separately then added, then add your chopped chocolate. While chocolate chips work, trust me and make your cookies that much more gourmet by swapping them out for chopped chocolate (the chocolate is way more melty and delicious this way).
Step 3: Chill, scoop, and bake
No one loves waiting for their dough to chill, but it’s a worthwhile step. It helps develop the flavor, helps the cookies stay thicker and spread less, and isn’t just in the recipe to annoy you. So, chill your dough.
Then, scoop your cookies into 2-Tablespoon scoops, roll them in to smooth balls between your palms (not mandatory, but makes them bake up prettier), and bake. Give your cookies breathing room on the baking sheet or they’ll all run into each other and make a mess (2″ is good).
While the cookies are still warm, sprinkle with a bit of flaky sea salt (I like Maldon, I’ll link to it in the recipe card), then let them cool.
SAM’S TIP: Slightly underbake your cookies! When they are ready to come out of the oven, the edges will be just starting to turn a light golden brown, and the centers may still look a bit underdone. The cookies will finish cooking outside the oven on their cookie sheets and will stay soft and chewy for days.
Frequently Asked Questions
Browned butter chocolate chip cookie dough can be made up to a week in advance. If you’d like to do this, just store it in your refrigerator (in an airtight container or tightly covered with plastic wrap) until ready to use. The flavors will actually develop even more as the dough sits.
Keep in mind that if your dough has chilled for longer than 30 minutes, it will likely be pretty firm when you go to scoop it, so you’ll likely need to let it sit at room temperature for a bit before it’s scoopable. Because of this, I prefer to roll the dough into balls right after making it and chill the balls in an airtight container. Note they don’t always spread as much after chilling this way… but I like a good cookie.
The most likely cause is your butter being too warm when you added your sugars. The warm butter can melt the sugars and leave you with a greasy, messy cookie dough that will spread like crazy. Unfortunately there is no way to fix this (even chilling the dough won’t help 😞). This is why it’s very important to let your butter cool before moving forward with the recipe!
If you don’t think your sugar is melted , I would recommend adding a bit more flour, a spoonful at a time, until the dough matches the consistency shown in the video.
On the other hand, if your cookies aren’t flattening out at all, you may have over-measured your flour. I can’t stress enough how helpful it is to use a kitchen scale!
I’ve received a lot of questions about this (on most of my browned butter cookies, actually), but no, you do not need additional liquid or to add water to this recipe. The loss of water is accounted for and important for this recipe to work as it is.
I’d love to hear what you think of these browned butter chocolate chip cookies, please let me know what you think!
Enjoy!
More Ways to Use Brown Butter:
Brown Butter Chocolate Chip Cookies
Equipment
- Kitchen Scale (not required, but recommended for best results)
Ingredients
- 1 cup (225 g) unsalted butter, cut into Tablespoon-sized pieces
- 1 cup (200 g) light or dark brown sugar¹, see note
- ⅔ cup (135 g) white sugar
- 2 large eggs, room temperature
- 1 ½ teaspoons vanilla extract
- 2 ¾ cups (340 g) all-purpose flour
- 1 teaspoon cornstarch
- 1 teaspoon baking powder
- 1 teaspoon baking soda
- ¾ teaspoon salt
- 10 oz (285 g) semisweet chocolate², see note
- flaky sea salt for sprinkling, <- (click the link for the Maldon salt I use)
Instructions
Brown the butter
- Place butter in a medium-sized saucepan (preferably a light colored one–this will make it easier to tell once your butter has browned) and melt the butter over low/medium-low heat.1 cup (225 g) unsalted butter
- Once melted, increase stovetop heat to just above medium heat.
- Swirl and scrape the sides of the pan constantly with a wooden spoon or heatproof spatula – butter will foam and pop. Once the this noise slows, you should notice brown bits beginning to form on the bottom.

- Once you notice browning (and you smell that beautiful nutty aroma of browned butter), remove from heat quickly and pour into a large, heatproof bowl.
- Allow butter to cool at room temperature until no longer warm to the touch before proceeding with the recipe.
Cookie Dough
- Once your butter has cooled, add sugars and stir well.1 cup (200 g) light or dark brown sugar¹, ⅔ cup (135 g) white sugar
- Add eggs and vanilla extract and stir until dough is uniform.2 large eggs, 1 ½ teaspoons vanilla extract
- In a separate, medium-sized bowl, whisk together flour, cornstarch, baking powder, baking soda and salt.2 ¾ cups (340 g) all-purpose flour, 1 teaspoon cornstarch , 1 teaspoon baking powder, 1 teaspoon baking soda, ¾ teaspoon salt
- Gradually add the flour mixture to butter mixture, stirring until ingredients are completely combined.
- Add chocolate and stir well so that chocolate is well distributed through the batter.10 oz (285 g) semisweet chocolate²
- Cover cookie dough bowl with plastic wrap and chill in the refrigerator for at least 30 minutes.
- About 15 minutes before dough has finished chilling/before you are ready to bake, preheat oven to 350F (175C) and line cookie sheets with parchment paper.
- Once dough has finished chilling scoop by about 2 Tablespoon-sized portions. Gently roll the dough between your palms so that you have a round ball, then place cookie dough at least 2″ apart on prepared cookie sheet.
- Bake on 350F (175C) for 10-12 minutes or until edges are just beginning to turn golden brown (cookies should still be quite soft when you remove them from the oven, and may even appear slightly underbaked in center).
- Let cookies cool for about a minute then sprinkle lightly with flaky sea salt. Allow cookies to cool completely on baking sheet before removing, then enjoy!flaky sea salt for sprinkling
Notes
¹Brown sugar
I like to use half light and half dark brown sugar, just because I usually have both on hand and like the blend. Either variety will work fine in this recipe, though. Cookies made with light brown sugar will be lighter in color, cookies made with dark brown sugar will be darker in color and slightly richer in flavor.²Chocolate
You can substitute chocolate chips instead, you’d need about 1 3/4 cups chocolate chips.³Brown Butter Note
If you’ve never browned butter before and are nervous about the process, make sure to watch my video at the top of the recipe card so you can see exactly how I do it. Very important: make sure it cools until no longer warm to the touch before using.Storing
Store in an airtight container at room temperature for up to a week.Nutrition
Nutrition information is automatically calculated, so should only be used as an approximation.
Like this? Leave a comment below!
I originally published this recipe May 2017. Post updated to be more helpful and a new video added January 2026, recipe remains the same.


If you are a fan of slightly crispier cookies, can you leave the corn starch out? How soft are these cookies and what do you recommend for a slightly crispy cookie?
Hi Chris! These are a pretty soft cookie. You could substitute the cornstarch for flour and baking a little bit longer, but these were designed to be a soft cookie. 🙂
I made these cookies and OMG, they are Amazing! The best cookies I have ever made! The brown butter adds much flavor! I used a 3 inch cookie scoop. Make them! You won’t regret it!
I made these exactly as the recipe states and they are amazing!
Best cookie recipe I’ve tried. Everyone loves them. The brown butter is a game changer for sure. Thank you for always sharing awesome recipes!
I made these cookies. Sam these are so good. I can’t say if they taste more flavourful after a few days. As they were gone the first day. Loved the browned butter flavour. Made the butter pecan cake as well. So great. I make a lot of your recipes. Lemon Blueberry cake was amazing as well. I made your white cake for my daughters wedding. It was delicious. I had tried a lot of recipes before settling on your recipe.
I’m so glad you enjoyed the cookies so much Karen! I’m very happy to hear everything has turned out so well for you. That’s a lot of pressure making a wedding cake so I’m really happy to hear that one went well! 🙂
These were so good! I made a second batch and added caramel bits to it. My family was asking for more! Definitely a recipe keeper.
Yum, we love that idea Leslie! Thanks for letting us know how it went for you 😊
Did not come out great. Tried a few times and had a friend try as well. Kinda disappointed since the reviews are so high.
Hi Niko! I’m very sorry to hear this! What happened to the cookies? Did you make any substitutions? I may be able to help troubleshoot. 🙂
Didn’t make any substitutions. They looked nothing like the picture. Didn’t thin out at all. Tasted a little grainy. Maybe too much flour? Multiple times they came out the same with multiple people so idk lol.
Did you weigh your flour? It’s the best way I’ve found to prevent adding too much flour.
If I want to make the cookies dairy-free, can I follow the same recipe useing margerine instead of butter?
Hi Sarah! I wouldn’t recommend it here. The margarine doesn’t have milk solids that will brown. I would recommend checking out my worst chocolate chip cookies or second best chocolate chip cookies. The margarine will work in those. 🙂
Can you freeze left over dough? Thank you.
Sure thing! I like to scoop the cookie dough balls, wrap them individually in cling wrap and then store in a freezer bag. 🙂
Ok! Thank you!
How many days do these cookies stay soft for once they’re baked?
They should stay nice and soft for 5-7 days in an air tight container. 🙂
Hi, could I double this recipe?
Sure thing! 🙂
Hi Sam, do you know why my cookies aren’t flat like yours? They’re coming out still pretty fluffed up (but they don’t taste “cakey”). I used 1 tsp cornstarch, 1 tsp baking soda, and 1 tsp baking powder. I chilled them for 4 hours, but they were out on the counter for a good while before I put them in the oven. Could there by any other reasons? Does it matter? haha
Hi Kristen! I’m sorry you are having this issue, and it’s even more odd that they sat out for a long while before baking and they didn’t spread. The most likely culprit here is too much flour. Do you happen to weigh your flour? Honestly, as long as they still taste excellent that’s the important thing. 😉
Thanks for writing back! We kind of figured it out. The balls were just not spreading, so rather than balls, I made them pretty flat to begin with by pushing the balls down. They started to come out perfect then. So weird, I don’t get it. I weigh *everything* and followed the recipe to a T. Any chance it’s the Kerrygold butter I used? I’ll try regular American butter next time. Anyway once I figured it out they came out AMAZING. I used bittersweet chunks instead of semi as well. Maybe my chunks were too big? lol
Hmm that’s interesting. I use Kerrygold all the time when I make them for myself so I don’t think that was your issue here. The size of the chunks shouldn’t keep them from spreading the way they should either. 🙁
Sorry to blow up the comments here. Haha. OK, so I thought about what else it could have been. I did change my baking powder between batches. Same brand, but the one I used when they wouldn’t flatten was from May (7 months old), and the one I used when they did flatten on their own was brand new. Could *that* be it?
Another thing I wanted to ask about was why they softened after being in containers overnight. They were chewy inside/crispy on the outside after completely cooling, but once I put them in containers and then took them out to eat the next day, they were completely soft.
If you’re ever up for it, it would be awesome to have a video about how to store and transport baked goods properly so their texture doesn’t change. I am still so baffled by this.
Ahhhh. I bet the baking powder was probably bad, and if that wasn’t it I’m really stumped. I’d think the flour was off but if you weighed everything that’s not the issue here. They really shouldn’t soften in a container overnight so that’s really odd too. I really appreciate your efforts to figure this out. It’s refreshing to see someone try to figure out an issue instead of just blaming the recipe. I like the idea for a post storing and transporting cookies. I will certainly add it to my list. That could be very helpful. 🙂
I absolutely love these cookies.. took them to work and they all loved them.. thank you so much for these… everything I have made from you is great 😊
Browned butter is a nice touch. Loved them. Another 5☆ recipe.
These cookies are supreme, my all time favorite cookie recipe. I do however change one thing to make they more chewy and soft. I omit the baking soda and just do 3 tsp of baking powder. They turn out absolutely fabulous. They’re flavorful, ooey gooey, soft, and have everyone I give them to ooh-ing and ahh-ing. Top tier Sam, thank you for gifting the world with these heavenly cookies👌
I’m so glad you enjoyed them so much, Serena! 🙂
I’ve tried several Brown Butter Chocolate Chip Cookies recipes and this is the best in show. These are perfect! Highly recommend.
Very nice recipe. Great tasting! My cookies ended up flatter than yours in the video. Any ideas why? 🙂
Hi Susanne! Flatter cookies can occur if the butter is still a bit too warm when added, or if too little flour was used. We have a post on how to measure flour that might help. We’re happy the cookies tasted great at least!
I just got done making these cookies and I have got to say they are the best chocolate chip cookies I have ever made. Thank you so much for the recipe and you were right about the brown butter tasting so good in these cookies.
The brown butter really makes a difference! We’re so happy you loved the cookies Misty ❤