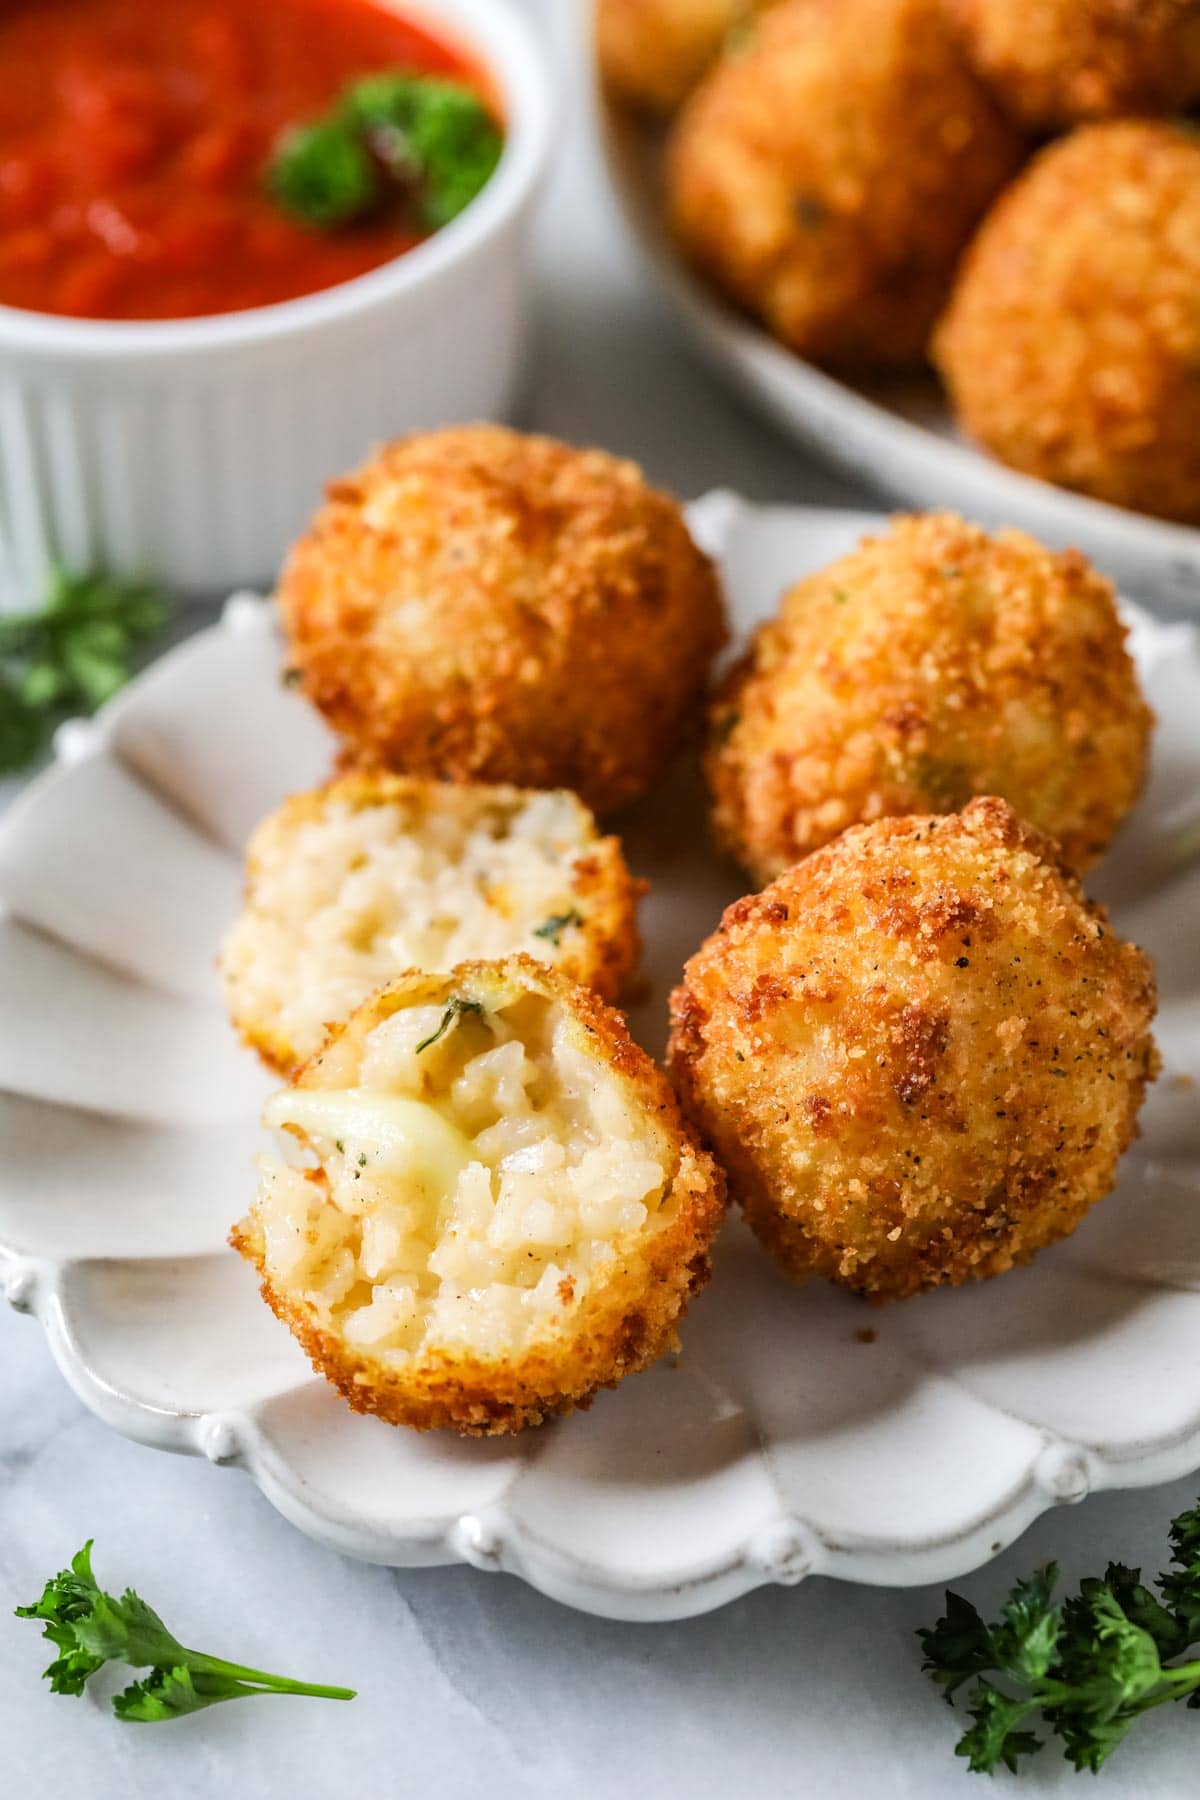
Arancini are perfectly crispy and cheesy Sicilian fried rice balls. Between preparing the risotto and deep frying, the process may seem intimidating but it’s really not and I’ll be walking you through all the steps with how-to photos and a step-by step video! I fill mine with mozzarella, but you can use peas, ham, or whatever you like!

Italian Fried Rice Balls
Arancini, aka Sicilian fried rice balls, are a quintessential Italian street food. If you’ve never had them, you’re in for a treat! The outside is golden-crisp, and the interior is soft with pearly risotto and a melty mozzarella core. Serve them with a side of marinara sauce for that classic flavor!
These rice balls are super versatile and adaptable; you can dress things up by adding some garlic in with the onion, or add ham or peas to the filling (you can even skip the mozzarella). I like this more basic but super flavorful version, though.
Why You’ll Love This Recipe
- Crispy, even coating from my proven breading technique borrowed from my mozzarella sticks, coconut shrimp, and jalapeno poppers.
- Can be made with leftover risotto or fresh. I include instructions for making fresh risotto if that’s what you’d prefer, or you can use 3 ¾ cups of leftover risotto.
- Customizable filling options; I like using cheese, but feel free to add peas, ham, or use meat sauce!
- Tastes great plain, but is even better with a dipping sauce of marinara, vodka sauce, or arrabiata sauce (if you like it spicy!).
Ingredients
Let’s review a few of the key ingredients in this recipe before we get started.
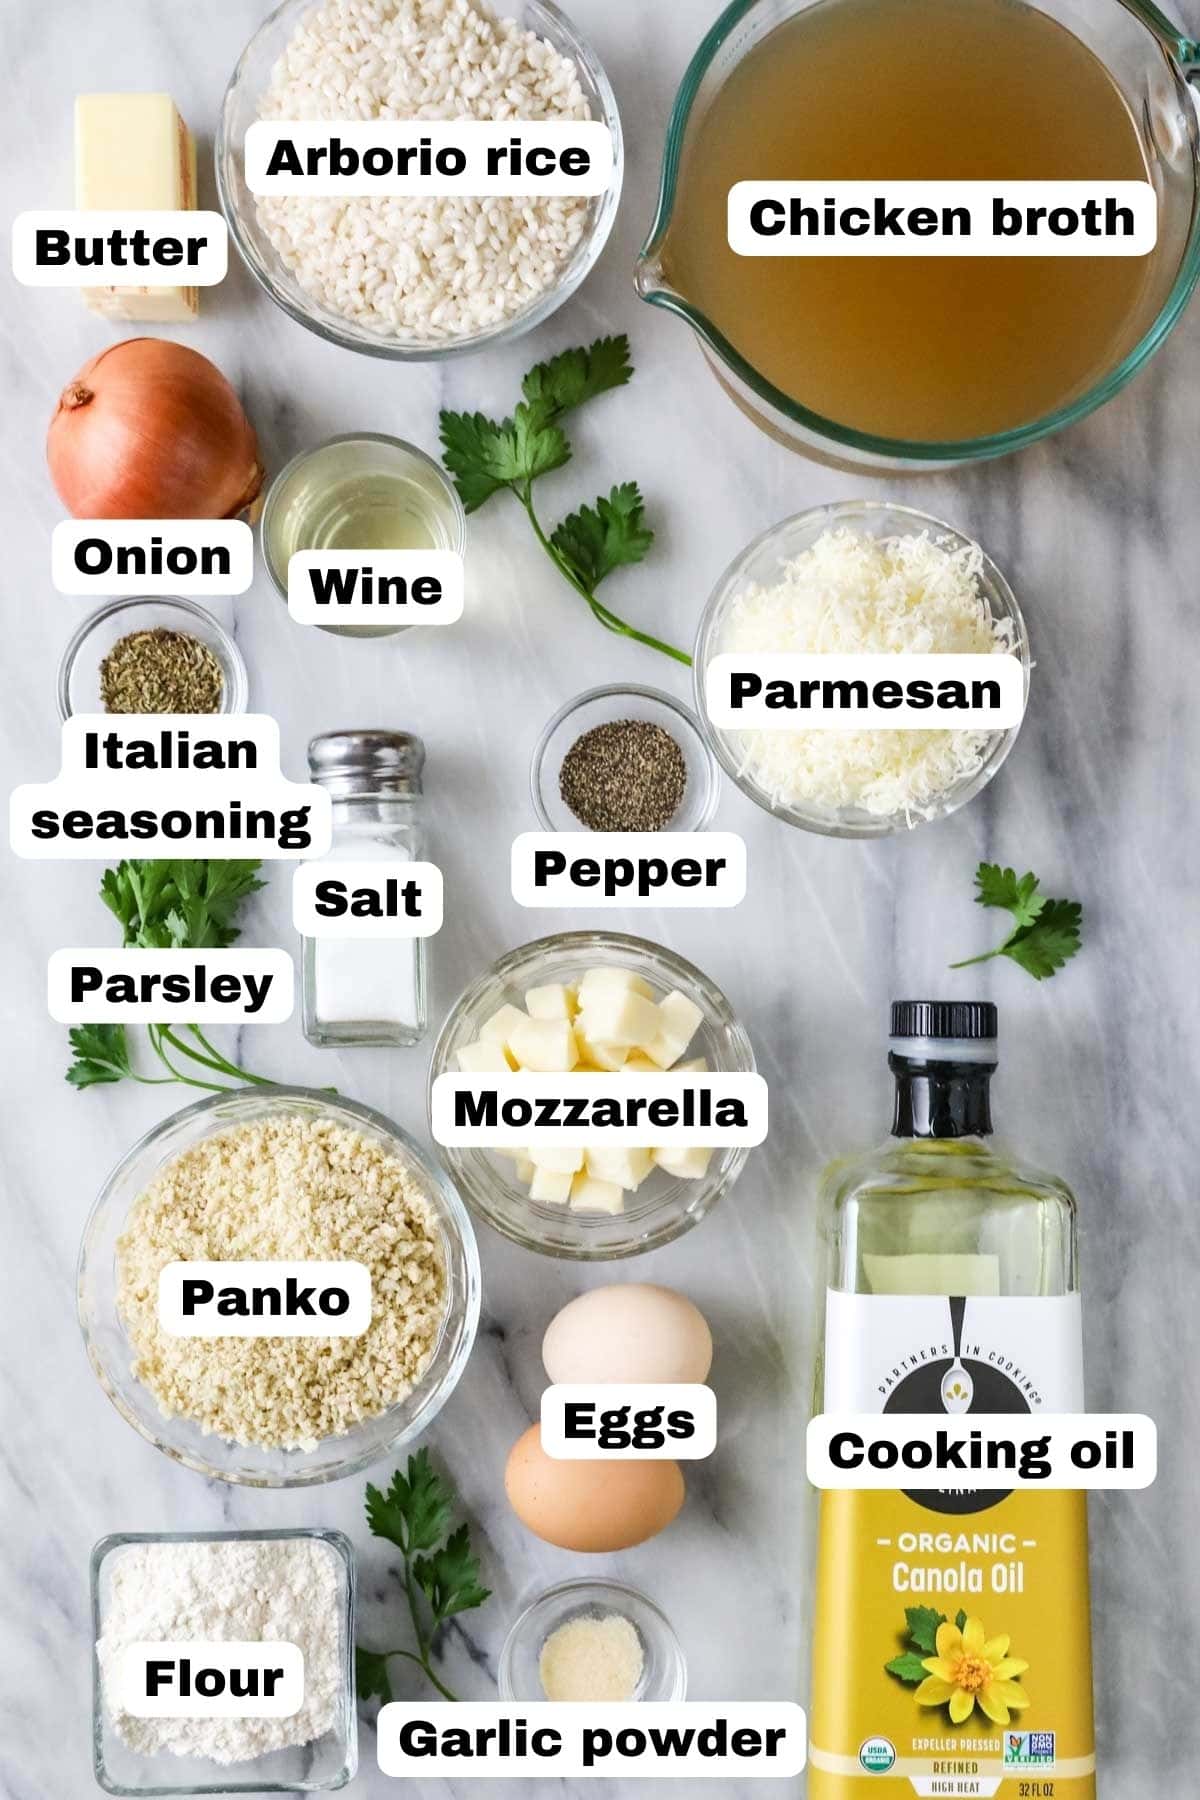
- Arborio rice. Arborio rice is the best choice (and the best choice when making risotto), as it is starchy and will help our arancini keep their shape. Carnaroli rice could be used instead, but most likely arborio will be most accessible at your grocery store.
- Cheese. We’ll use parmesan cheese in the risotto itself and mozzarella as our filling. Make sure your parmesan is freshly shredded (do it yourself!) and use a block of mozzarella for the filling (not the fresh mozzarella that comes in a ball, that can be much too wet). The mozzarella will need to be diced so that the rice can be neatly rolled around it.
- White wine. A bit of wine is used to flavor the risotto, though you could substitute more broth or chicken stock if you don’t keep wine on hand. If using wine, choose a dry white wine like Pinot Grigio.
- Plain panko. We flavor this ourselves with a simple blend of seasoning and cheese (though you could use Italian panko in a pinch). This serves as our breading and ensures a perfectly crispy exterior on our arancini. Note that we won’t be using this straight from the container; I like to crush the panko into fine crumbs first. This is my secret for an even, crisp coating!
- Oil. Use a good oil for frying, like vegetable oil or canola oil. Avocado oil should also work (it’s just quite expensive!).
This is just an overview of the ingredients I used and why. For the full recipe please scroll down to the bottom of the post!
How to Make Arancini
Prepare the Risotto
If you’re using leftover risotto you can of course skip this step (and I even already have a step-by-step guide in my standalone risotto recipe), but I thought it would be helpful to walk through the whole process, rather than just skip to the breading and frying!
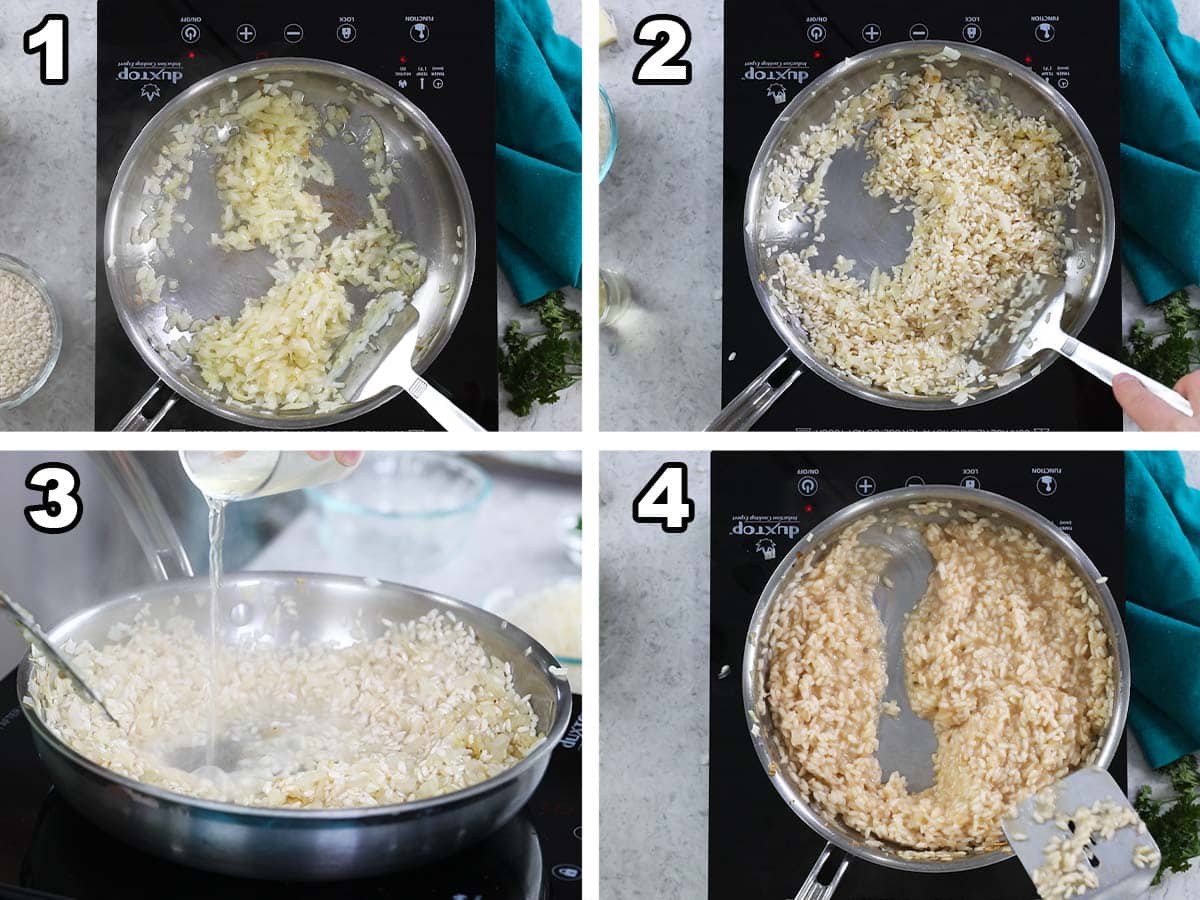
Before you begin, pour your chicken broth into a saucepan and warm it over low heat. To cook the risotto, you’ll be adding broth throughout the process and you want it to be warm, otherwise it can cause the cooking time to take much longer and could make the rice end up mushy.
- Cook the onion in melted butter until softened and translucent (I like to cut my onion nice and tiny so it blends well with the rice).
- Stir in the rice and cook until coated in butter and lightly toasted. This is key for developing flavor!
- Drizzle in the wine and cook until it’s completely absorbed.
- Gradually add the warm chicken broth a bit at a time, only adding the next addition once the previous one has fully absorbed. Stop once your risotto is al dente (a bit firm to the bite, you don’t want to overcook it or it’ll be mushy); you may not need all of the liquid, or you may need more. When it’s finished cooking, you’ll notice that if you scrape your spatula through the rice it gently and slowly rolls back in on itself.
Finish & Cool the Risotto
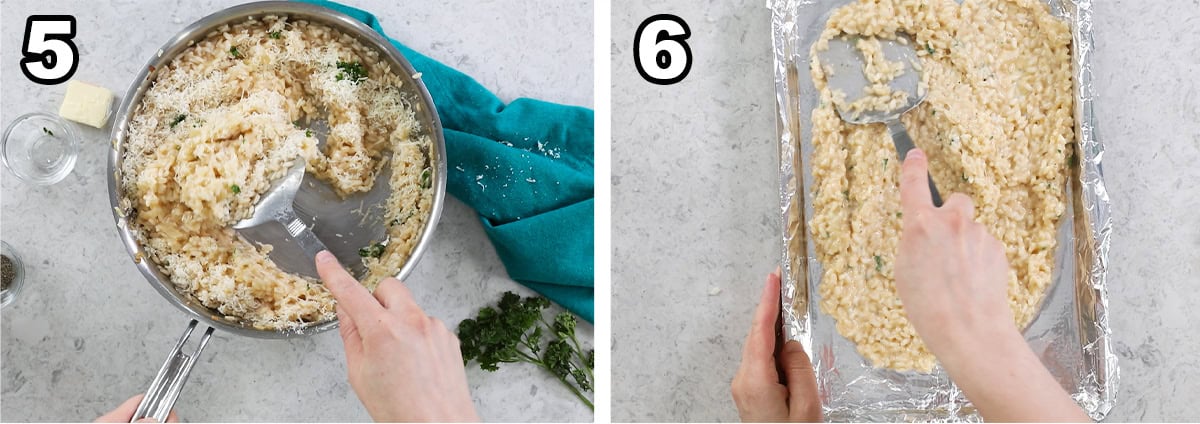
- Remove the risotto from the heat and stir in the butter, cheese, and parsley. Taste test for more salt and pepper (between the salt in the broth and parmesan I rarely need to add salt).
- Spread onto a baking sheet, then cover and place in the fridge. If you’re not in a hurry to make the arancini, you can just put this in any container and cover and refrigerate, but spreading it out like this speeds up the cooling process so you can get to frying faster!
Assemble & Fry
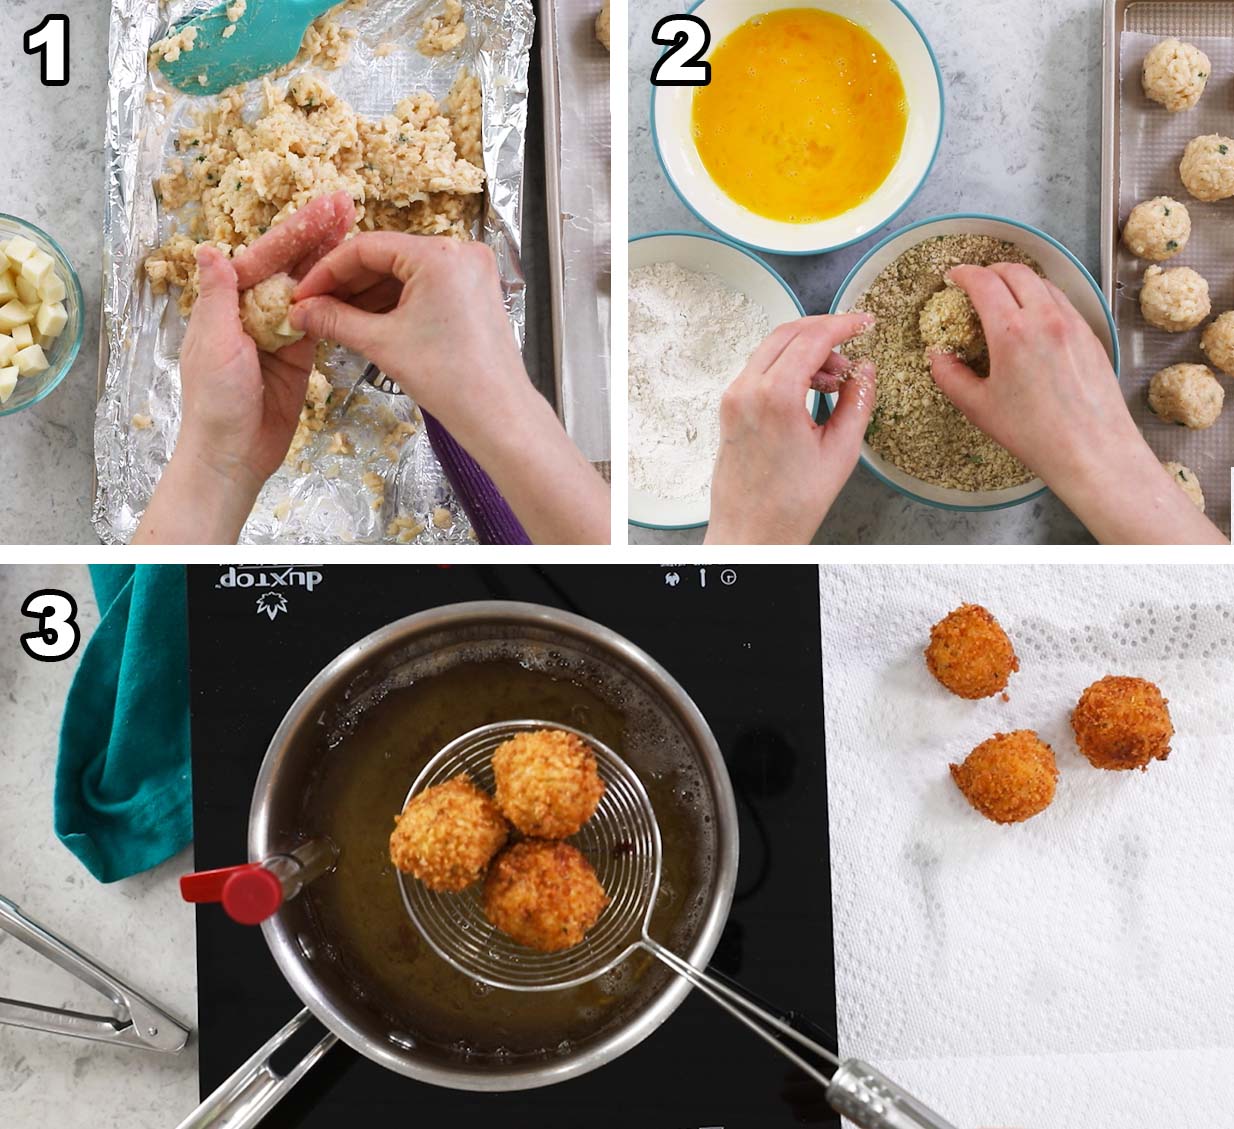
- Form the risotto into balls (I use a 1 ½ tablespoon cookie scoop for this, I linked to mine in the recipe card). Press a cube of mozzarella in the center of each one, then form the rice evenly around so the cheese is entirely concealed.
- Coat: roll each rice ball through flour, then eggs, and finally panko. Place in the fridge while your oil heats.
- Fry in hot oil, working with 2-3 arancini at a time. Once golden brown, remove to a paper towel lined plate or cooling rack. Let your oil come back to temperature before frying your next batch.
SAM’S TIP: Take care to place the mozzarella in the very center of the arancini. If it’s exposed or too near the edge, it could spill out while frying (a tragedy!).
Tips for Frying
- Set up your station ahead of time. I like to have a rimmed cookie sheet topped with a cooling rack and paper towel beside me so I can let the arancini drain after frying.
- Heat slowly and use a thermometer. I keep my stovetop just below medium heat. Any higher and I find it becomes too hot too quickly and burns the outside.
- Keep your arancini in the fridge until the oil is hot. This helps them hold their shape so they don’t fall apart when you add them to the hot oil.
- Fry just 2-3 arancini at a time. Adding too many at once can drop your oil temperature and create soggy arancini.
- Let the oil come back to temperature after frying each batch, as it generally tends to cool as it cooks the arancini. Adding the next batch too soon can cause soggy, inconsistent results.
SAM’S TIP: A cookie scoop is ideal for getting uniform arancini that cook at the same rate. Of course, you could make yours smaller (or bigger!) if you want.

Frequently Asked Questions
Yes! Feel free to fill your arancini with meat sauce or ragu (arancini al ragù), ground beef, sausage, or ham (arancini al burro). Peas are another common filling option, and mushrooms or spinach would be delicious too!
This tends to happen if too much flour is used in the breading process. Do your best to gently tap/shake off any excess flour after rolling through the flour and before dipping in the egg. If the egg doesn’t completely coat the rice balls, there’s just too much flour (and then the crispy breading won’t be able to stick, either).
If the risotto is too dry (it should be a bit sticky — make sure it’s well covered while it is refrigerated so it doesn’t dry out!) this could make it difficult to hold its shape and prone to falling apart. You can try to fix this by adding a bit of beaten egg to help things cling together better.
Other issues include stuffing with too much filling (you need to make sure it’s completely wrapped by the rice), not rolling the rice balls tightly enough (I really like to pack mine into a cookie scoop, this helps a lot), or not using enough of the coating. If your arancini becomes too warm, it could also be more likely to fall apart, so make sure to refrigerate before frying.
Also make sure your oil is the proper temperature and that you do not try to cook too many at once (which will cause the oil temperature to drop too quickly). If the oil is not hot enough, the arancini may fall apart while cooking.

Arancini make a great appetizer for baked ziti or fettuccine alfredo! Or, you can simply enjoy them for dinner with a side salad–I won’t judge!
Enjoy!
Let’s bake together! Subscribe to my newsletter to be notified of all the newest recipes, and find my free recipe tutorials on YouTube 💜

Arancini
Ingredients
For Risotto (see note)
- 4 cups (946 ml) chicken broth
- 4 Tablespoons (57 g) unsalted butter divided
- 1 (160 g) heaping cup finely chopped yellow onion (about 1 medium onion)
- 1 (200 g) heaping cup Arborio rice
- ¼ cup (60 ml) white wine
- 1 cup (95 g) freshly shredded parmesan cheese
- 1 Tablespoon finely chopped fresh parsley or 2 teaspoons dried
- Salt and freshly ground black pepper to taste
For Filling
- 2.5 oz block whole-milk mozzarella cheese cut into ½” (1.25cm) cubes
For Breading & Frying
- 1 ½ cups (106 g) plain Panko
- 1 teaspoon Italian seasoning
- ½ teaspoon dried parsley
- ¼ teaspoon garlic powder
- ½ teaspoon ground black pepper
- ¼ teaspoon table salt
- 2 large eggs
- ½ cup (65 g) all-purpose flour
- Neutral oil for frying (I use vegetable oil)
- Marinara sauce for serving
Recommended Equipment
Instructions
For Risotto
- Pour chicken broth into a small or medium-sized saucepan and keep warm over medium-low heat while you prepare the risotto.4 cups (946 ml) chicken broth
- Warm a large skillet over medium heat. Add 3 Tablespoons of butter and, once melted, add onion and stir frequently until softened (about 3-5 minutes)4 Tablespoons (57 g) unsalted butter, 1 (160 g) heaping cup finely chopped yellow onion
- Add rice and stir until all the grains are coated with butter and appear moistened and rice smells slightly nutty and fragrant (about 1-2 minutes, you want to just lightly toast the rice).1 (200 g) heaping cup Arborio rice
- Slowly drizzle wine into the pan and stir until all wine is evaporated from the pan.¼ cup (60 ml) white wine
- Add about ½ cup (118ml) of the warmed chicken broth and stir until all of the broth has been cooked out. Repeat this step with the remaining broth, adding no more than ½ cup (118ml) at a time, until rice is al-dente (cooked through, but still firm to-the-tooth and not mushy). It’s possible that you won’t need to add all the liquid or that you may need a bit more liquid. If you need a bit more you may use more warmed broth or warm water if you don’t have more broth. Once finished cooking, you’ll notice the rice will roll back in on itself when cut a trail through the risotto with a spatula.
- Remove from heat immediately and add the remaining Tablespoon of butter, parmesan cheese, and parsley. Stir well until butter and cheese are melted. Taste-test and add more salt and pepper if/as needed.1 cup (95 g) freshly shredded parmesan cheese, 1 Tablespoon finely chopped fresh parsley, Salt and freshly ground black pepper
- Cool slightly, then spread risotto onto a baking sheet (this will speed up the cooling process, but if you’re not in a hurry you can cool the rice in a regular bowl), cover with plastic wrap and refrigerate for at least 30 minutes/until completely chilled before proceeding.
Assembly
- Once rice is nearly cooled, begin preparing your breading station.
- Breadcrumbs: Place panko crumbs in a zipper bag and beat with a rolling pin until crumbs are fine. Add into a shallow dish with Italian seasoning, parsley, garlic powder, pepper, and salt and stir to combine.1 ½ cups (106 g) plain Panko, 1 teaspoon Italian seasoning, ½ teaspoon dried parsley, ¼ teaspoon garlic powder, ½ teaspoon ground black pepper, ¼ teaspoon table salt
- Eggs: Crack the eggs in a separate bowl and beat vigorously with a whisk until well-beaten.2 large eggs
- Flour: Add flour to a third shallow bowl.½ cup (65 g) all-purpose flour
- Stuff: Remove chilled risotto from the refrigerator and scoop into level 1 ½ Tablespoon (30g) sized balls. Press a cube of mozzarella cheese into the center and form the risotto evenly around it so the mozzarella is concealed in the center. Repeat until all risotto has been used.2.5 oz block whole-milk mozzarella cheese
- Bread: Work with one ball of risotto at a time, Roll through the flour and shake off excess flour, then dip in the beaten egg. Be sure to let excess egg drip off and make sure the entire ball is coated with egg (if there is too much flour it will be difficult for the egg to adhere). Finally, roll through the panko mixture and ensure the ball is entirely coated with panko. Return to baking sheet and refrigerate while you heat your oil.
Frying
- Fill a medium-sized, heavy-bottomed saucepan 2-3” (5-7cm) with cooking oil and fit a frying thermometer so it is suspended halfway in the oil. Heat over medium-low heat (don’t turn heat up too high or it will heat too quickly and could burn your arancini) until temperature reaches 350F (175C). Once temperature is reached, remove arancini from refrigerator and cook, 2-3 balls at a time, until golden brown (this is typically 90-120 seconds for me, but will vary depending on your oil). Remove to a wire rack or a paper towel lined plate and repeat with remaining arancini. Make sure oil returns to temperature before adding remaining arancini to the oil.Neutral oil
- Allow arancini to cool slightly before serving with warmed marinara on the side (sometimes we’ll top the arancini with a dusting of fresh-grated parmesan and fresh parsley).Marinara sauce
Notes
Risotto
If using leftover or premade risotto you will need about 3 ¾ cups.Making in advance
You may form and bread the arancini balls then store in an airtight container for up to 3 days before frying them.Freezing
After shaping and breading the arancini, place on a baking sheet and freeze for 30 minutes (so they get solid and manageable). Then transfer to an airtight container and freeze for up to 2-3 months before frying. Note that arancini will likely take longer to cook from frozen.Storing
Like all fried foods, arancini is best served warm shortly after frying. However, you may allow them to cool completely then refrigerate in an airtight container (don’t refrigerate warm or they’ll become soggy) and store for up to 3 days. To reheat, place in a 350F (175C) oven and cover loosely with foil. Cook until warmed through (about 15 minutes or so)Nutrition
Nutritional information is based on third-party calculations and should be considered an estimate only. Actual nutritional content will vary based upon brands used, measuring methods, cooking method, portion sizes, and more.






Taryn
I have not made these yet, I just wanted you to know that you have a video for making a German pancake when it’s supposed to be a video making arancini 🙂
Casey @ Sugar Spun Run
Thank you so much for letting us know, Taryn! So sorry about that, we’ve just updated it!
Jean Briese
Made this for my book club and they couldn’t stop raving about it! It was perfectly crisp and so creamy and delicious. One commenter said, “I had these in Italy, and these are just as delicious!” Another commenter said, “I had these at a local restraraunt and they were not good, so I didn’t think I like them, but these are delicious. Your video made it easy and allowed me to reach perfection with my first (double batch) This recipe is a keeper. Even if its time consuming, I did make and fry both batches, ate one and froze one batch to be served at the book club a week later. I simply reheated the frozen arancini in the airfryer right before serving and popped them into a 200 degree oven to make sure the inside was completely warmed. It was perfection !
Emily @ Sugar Spun Run
We are so happy everyone enjoyed them so much, Jean! Thanks for using our recipe and coming back to leave a review–we really appreciate it 🩷
Jeanette
I had never heard of arancini. And I always thought I was a little too low class for risotto. No one told me how easy it was to make! I’m sold. Delicious. Crisp and melty. Arancini for everyone. Breakfast and lunch and dinner.
Sam
You can never have too much! 🙂
Linda
These look delicious. Could they be done in an air fryer?
Sam
Hi Linda! I haven’t tried it, but I think it could work. 🙂
Dezi
Could you use a deep fryer and fresh mozzarella?
Sam
Yes. Make sure the mozzarella is well dried. 🙂