
Thumbprint Cookies
This post may contain affiliate links. As an Amazon Associate I earn from qualifying purchases. Please read my disclosure policy.
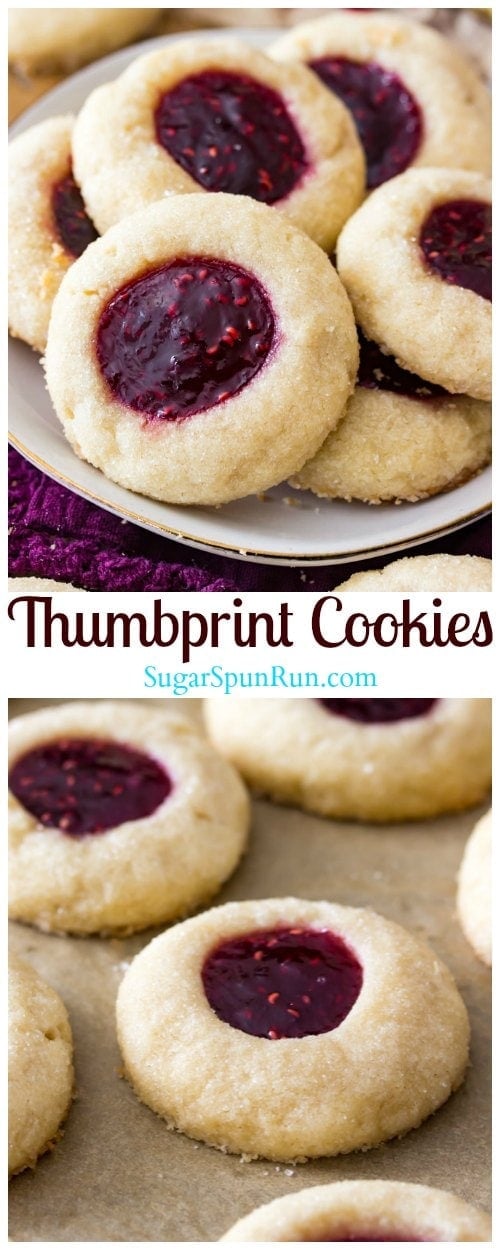
These classic thumbprint cookies are made with a simple sugar cookie dough, rolled in sparkling sugar, and then indented and filled with your choice of jam! These are an all-time favorite cookie recipe, and the filling options are absolutely endless!
We had our first snow here this past weekend! It was a light snow that’s pretty much all melted away by now, but Saturday (which also happened to be my birthday) was beautiful. It was so cozy in my kitchen with the glow from the Christmas tree and Christmas music playing, and to top everything off I had a batch of these thumbprint cookies baking in the oven, which I shared that evening when my family came over.
Even though the birthday cake that Zach made me was the dessert star of the show, I also had these thumbprint cookies out for a bite-sized treat option (because you can’t have too many desserts), and everyone loved them. Even Andi liked them, though she only ate the edges of the cookies and wouldn’t eat the jam filling because of seeds (I’d think that was ridiculous if I wasn’t exactly the same way at her age).
These thumbprint cookies are easy to make and the taste is incredible — they have soft, sweet interiors, sugared exteriors (though you can leave off the sugar if you’d like) and jam filled centers. Let’s get started on how to make the perfect thumbprint cookies.
Tips for perfect thumbprint cookies:
- For perfectly soft cookies that don’t spread: Whenever possible, I recommend using a scale to measure out your ingredients. It is so, so easy to over-measure or under-measure flour when using cups, causing your cookies to be too hard or to spread when they shouldn’t. If you don’t have a scale already, here is the one that I use in my own kitchen (affiliate link), it’s inexpensive and accurate and I can’t even bake without it anymore.
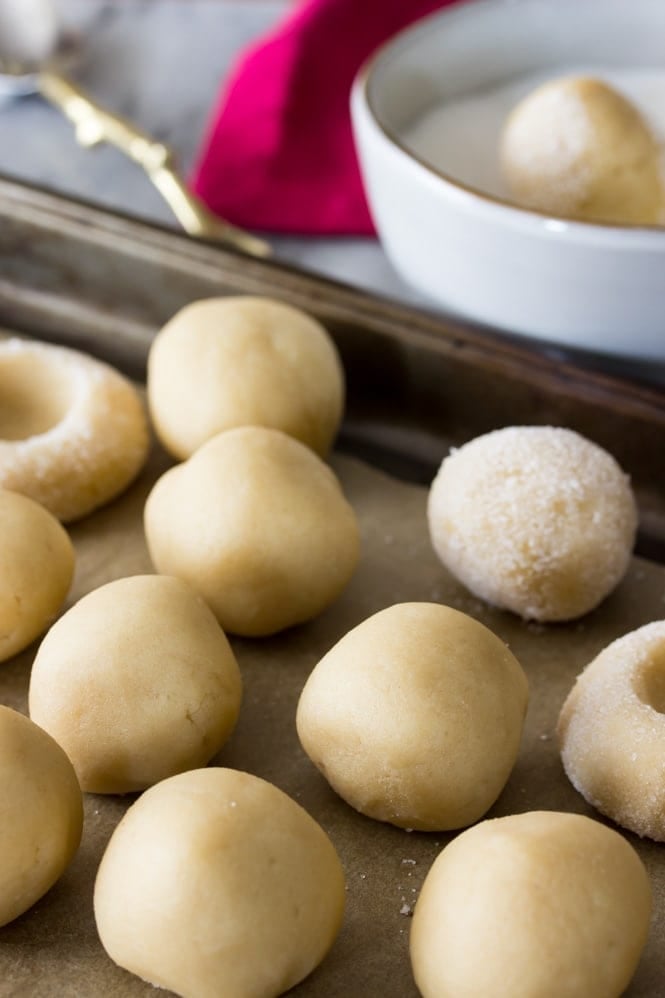
- For thumbprints that don’t crack: This dough is firm enough that you should be able to roll it into balls right after mixing it together (no chilling). Roll the balls between your hands until they are really, really smooth and there are no lines or cracks in the dough. Roll the cookie dough in sugar (optional) and then gently use your thumb or a teaspoon to slowly press an indent into the cookie. If you see the dough starting to crack anyway, you can usually press the dough back together successfully!
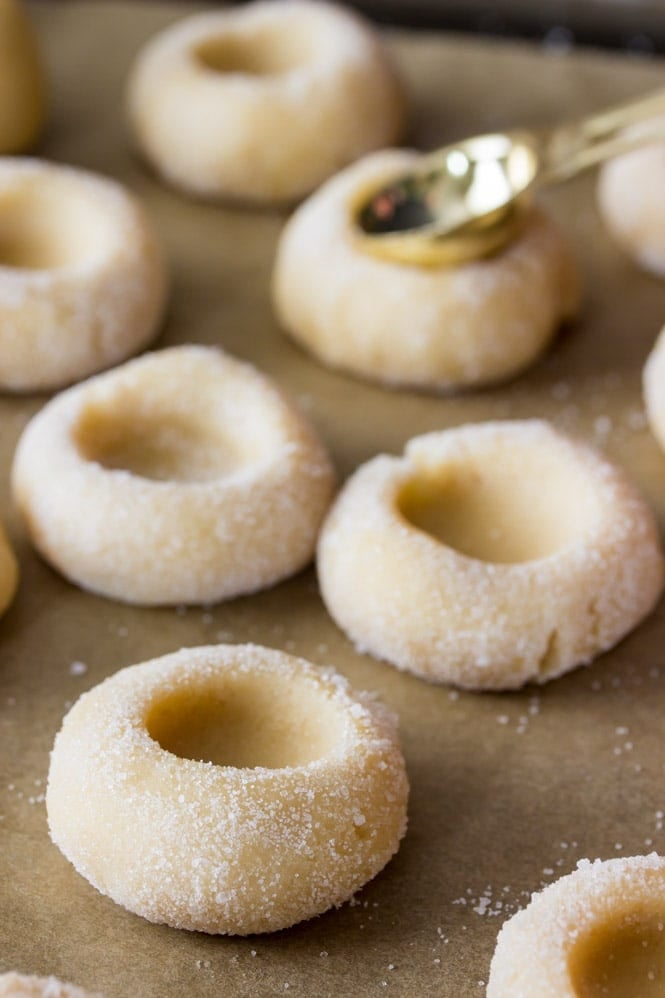
- Thumbprint Cookie Filling: I know that not all recipes do this, but I recommend adding the jam/preserves (you can use either) before baking the cookies. If the jam is too firm and isn’t easy to drop into the cookies, then place it in a microwave-safe bowl and heat it in the microwave for just a few seconds, just until it is easy to stir (you don’t want the jam to be hot, just more fluid and cooperative).
- Another tip to prevent spreading: This is a good rule of thumb for just about every cookie recipe. Never place your cookies on a hot cookie sheet. Make sure your cookie sheet has cooled completely before placing your next batch of cookies, otherwise they’ll start melting before they can start baking, and they’re much more likely to spread.
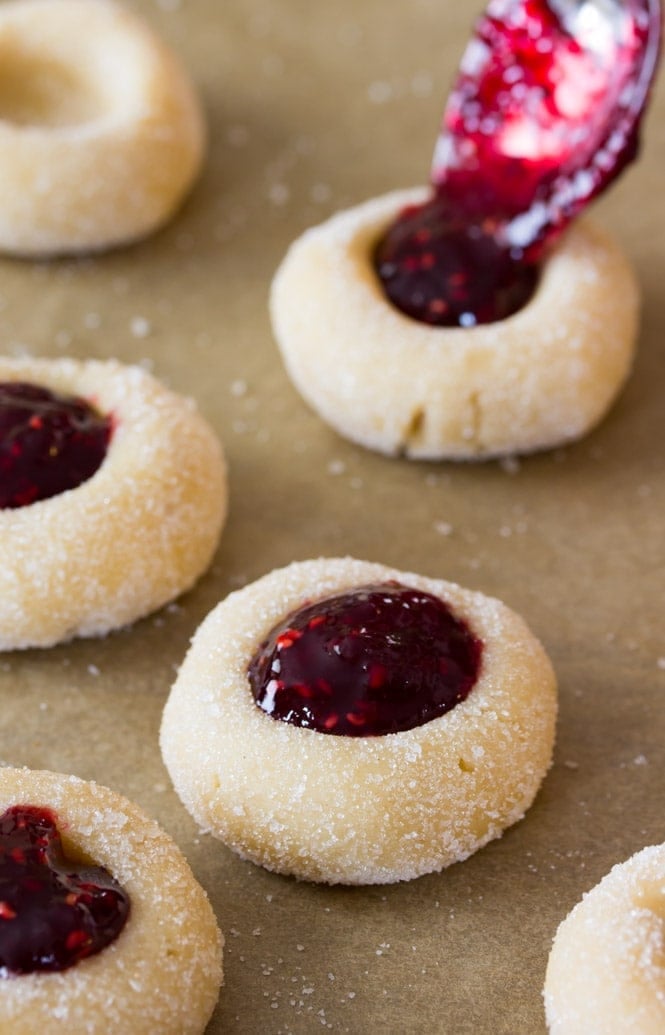
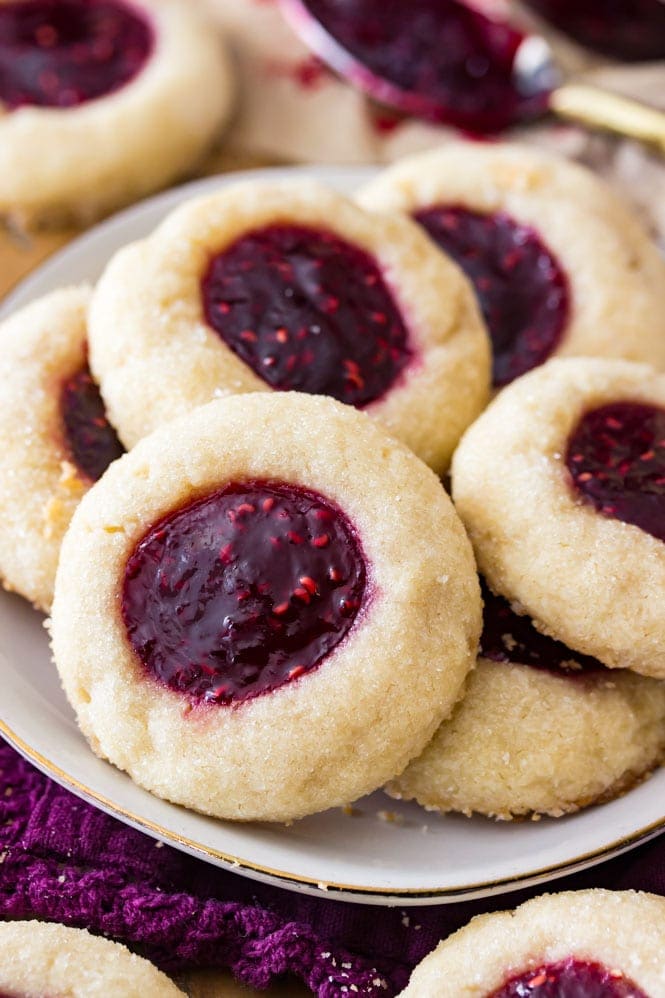
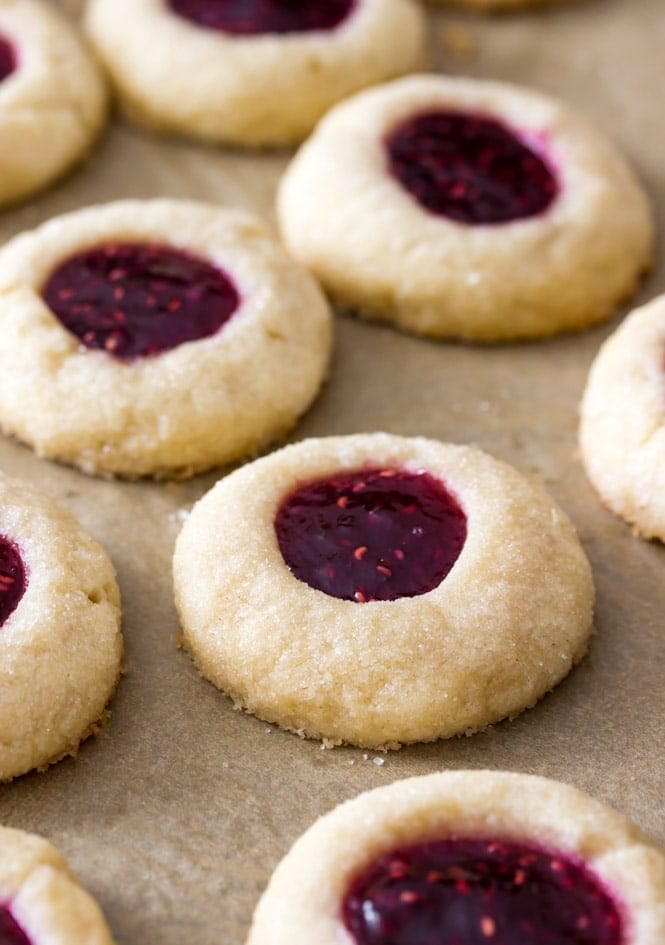
I used raspberry preserves in this recipe and really loved the way that the slightly tart raspberry flavor melded with the sweet sugar cookie bases. You can use any variety of jam or preserves that you prefer, though, I know that apricot and strawberry are popular options. You can also definitely opt for a seedless option, I liked the texture of the raspberry seeds (something my 12 year old self would be in utter shock to hear), but know that not everyone does!
As I mentioned above, I really recommend adding the jam before baking the cookies, but if you forget you can add it afterwards (you’ll need to re-indent the cookies immediately after they come out of the oven with a rounded teaspoon if you wait). As the cookies cool the jam will settle and firm up, and while it’ll remain slightly tacky even when cooled, they’re still firm enough that I stacked these thumbprint cookies on a platter to serve them over the weekend.
Enjoy, and I’d love to know what your favorite filling is!
If you like thumbprint cookies, make sure to check out my bourbon-infused chocolate version, my peanut butter and chocolate version, and my key-lime version!

Thumbprint Cookies

Ingredients
- 1 cup (226 g) unsalted butter, softened to room temperature
- ⅓ cup (70 g) sugar
- ⅓ cup (70 g) light brown sugar, tightly packed
- 1 large egg yolk
- ¾ teaspoon vanilla extract
- 2 ¼ cup (280 g) all purpose flour
- 2 teaspooons cornstarch
- ½ teaspoon salt
- ½ cup sugar, for rolling (optional)
- ⅓ cup (105 g) jam or preserves, flavor of your choice -- I used raspberry preserves for this recipe
Instructions
- Place butter in the bowl of a stand mixer (you may instead use a large bowl and an electric hand mixer) and beat until creamy.1 cup (226 g) unsalted butter
- Scrape down the sides of the bowl, add sugars, and beat, gradually increasing mixer speed to medium-high until ingredients are well-combined (about 30-60 seconds).⅓ cup (70 g) sugar, ⅓ cup (70 g) light brown sugar, tightly packed
- Add egg yolk and vanilla extract and beat well.1 large egg yolk, ¾ teaspoon vanilla extract
- In a separate bowl, whisk together flour, cornstarch, and salt.2 ¼ cup (280 g) all purpose flour, 2 teaspooons cornstarch, ½ teaspoon salt
- With mixer on low speed, gradually add flour mixture to wet ingredients until completely combined. This dough will seem very dry and crumbly, so be sure to pause occasionally to scrape the sides and bottom of the bowl. If it starts to strain your mixer you can use your hands to finish working the dough together.
- Scoop cookie dough into 1 Tablespoon-sized balls and roll very well (so that the dough is round and there are no cracks/seams in the cookie dough -- this will help keep your thumbprints from cracking).
- Roll in granulated sugar (if using) and place on a wax-paper covered plate or small cookie sheet. Use your thumb or the rounded back of a teaspoon to gently press an indent in the center of the cookie dough. Repeat until all of the dough has been used.½ cup sugar
- Transfer cookie dough to freezer and chill for 30 minutes.
- Once dough is done chilling, preheat oven to 375F (190C) and place your jam in a small microwave-safe bowl. Heat briefly (about 5-10 seconds) or until jam is not hot but is no longer firm and is easy to stir.⅓ cup (105 g) jam or preserves
- Spoon jam into each thumbprint, filling each indent to the brim.
- Once oven is preheated, place cookies at least 2" apart on a parchment paper-lined cookie sheet and bake on 375F (190C) for 11 minutes or until edges are just beginning to turn golden brown.
- Allow cookies to cool completely on baking sheet before enjoying.
Nutrition
Nutrition information is automatically calculated, so should only be used as an approximation.
Like this? Leave a comment below!
This post contains affiliate links, which means that if you purchase anything through these links I will get a small commission at no extra cost to you. Please view the disclosure policy for more information.


I never make these right. Finally I followed this recipe and they were awesome. Dough was very dry but worked out well.
Hi, Kimberlee! I’m glad you that you enjoyed them! I’m sorry you had dry dough, they should come together with more mixing. The dryness in this case helps keep them from spreading. 🙂
Have u ever frozen these?
Hi, Dana! I have not frozen them personally, but you shouldn’t have any issue freezing them. 🙂
Thank u. Will try and let u know! They look so good.
Made this recipe twice now and the cookies turned out great! The first batch went to my wife’s book club… There were no survivors… :). I added a half-a-teaspoon of almond extract to the second batch and they were equally wonderful! Awesome recipe and thanks for sharing!
Thank you so much, Randy! I am glad everyone enjoyed them. 🙂
HI can you explain the reason for using cornstarch in your recipe.
Thanks
Makes them soft & helps them to hold their shape and keep from spreading 🙂
Absolutely love your recipe! I thought I would go completely “from scratch” and fill the with blackberry jelly that I made from wild blackberries. Yum! I rolled them in sparkling sugar which made them look so pretty. I didn’t use a tablespoon, but opted to is a teaspoon to scoop the dough. I liked the fact that they were so cute, but that size is deadly!! Lol. You can pop them too easily into you mouth! Thank you for this recipe.
Ooo that filling sounds excellent! I am so glad you enjoyed them, Annette! 🙂
I just talked to you about my cookies looking horrible. Looking back over your recipe and thoughts, I haven’t actually used just 1/3 cup of jam. I just put the jam in the center and fill. I think I’m pretty sure I’m putting in too much jam and possibly not making a deep enough indent in the cookie. Question-why only 1/3 cup jam? Are we only supposed to use that amount for the cookies? So we shouldn’t just put the amount of jam in the cookies that we want? The cookies are delicious, but I want them to also look delicious! 🙂 Thank you!
Hi, Erin. That is just an approximation. I want anyone making the recipe to make sure they have enough on hand. Use as much or as little as you need. 🙂
Help! I’m not sure what is going wrong?’ They taste delicious, but the jam goes everywhere! They taste delicious but look horrible! 🙁 I follow your directions exactly. Am I putting too much jam in? You say to fill them to the brim, and so I do. Any suggestions?
Made three kinds of cookies for work. I’m not so sure many of these are going to make it…. they keep accidentally fall in my mouth.
😂I know exactly how that goes! At least you are enjoying them. 🙂
These cookies are absolutely wonderful and I had zero problems with the dough. Great recipe and extremely functional at this time of year because you can use different jams for the inside as well as various nuts on the outside.
Thank you so much! I am so glad you enjoyed the cookies. 🙂
Thanks for this recipe! I have been making the same thumbprints every Christmas for the last 20 years with raisin bran cereal in the dough (sounds strange but they are very good). Anyway, I thought I’d try something new this year and I stumbled upon this recipe. They are my new go to! Perfect texture and taste! I made a couple of batches for gifting but my family ate them all so I will be baking more this week.
Thanks again,
Natasha B 🍡
😂I am glad everyone enjoyed them, Natasha! Hopefully you can get a few batches done without them disappearing. 🙂
Just making my 2nd & 3rd batch of these! I took the first one to a cookie exchange and they disappeared fast. Thanks for this rdcipe@
I am so glad you enjoyed them, Karen! 🙂
In oven now, 11 mins they haven’t even started to bake let alone be done. Can still put thumbprint in them. Back in and will watch. So as 15 mins.. but oh my delicious!.
My dough is very dry!
Hi, Carol. It is a pretty crumbly dough, at first. You really need to keep beating it. It will come together. 🙂
Awesome cookies! My whole family LOVES them!!!
I am so glad everyone enjoyed them, Ashley! 🙂
Thank you for this recipe! All my thumbprint cookies have failed miserably before (personal failing, I suppose), but these turned out amazing without any tweaks. The crispness the sugar adds is great, especially given that thumbprints tend to be soft. I did notice that my dough was quite wet, but that seems to have worked out no problem.
I am so glad you enjoyed them, Kristy! 🙂