
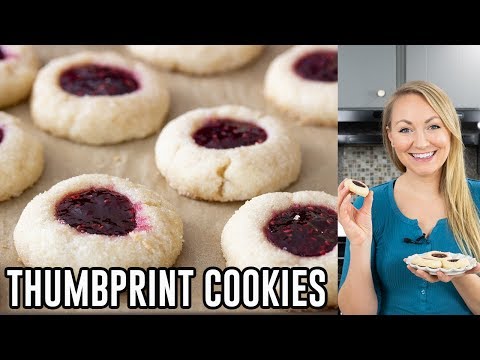
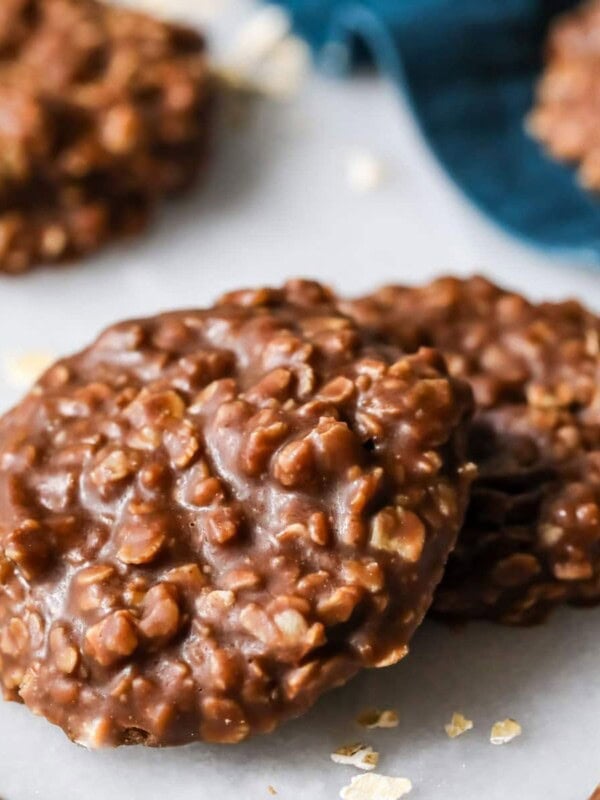
Thumbprint Cookies
This post may contain affiliate links. As an Amazon Associate I earn from qualifying purchases. Please read my disclosure policy.
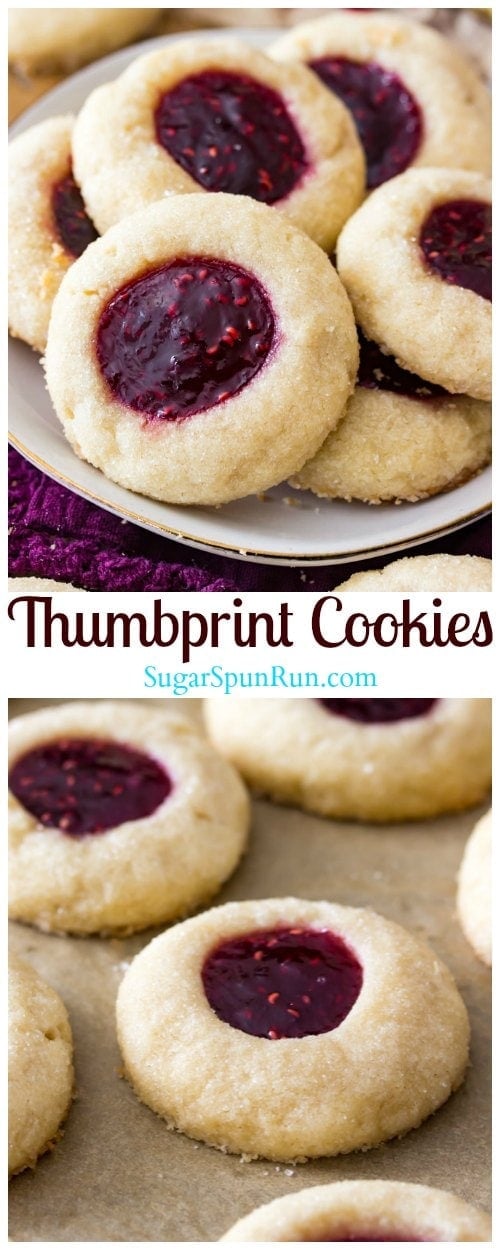
These classic thumbprint cookies are made with a simple sugar cookie dough, rolled in sparkling sugar, and then indented and filled with your choice of jam! These are an all-time favorite cookie recipe, and the filling options are absolutely endless!
We had our first snow here this past weekend! It was a light snow that’s pretty much all melted away by now, but Saturday (which also happened to be my birthday) was beautiful. It was so cozy in my kitchen with the glow from the Christmas tree and Christmas music playing, and to top everything off I had a batch of these thumbprint cookies baking in the oven, which I shared that evening when my family came over.
Even though the birthday cake that Zach made me was the dessert star of the show, I also had these thumbprint cookies out for a bite-sized treat option (because you can’t have too many desserts), and everyone loved them. Even Andi liked them, though she only ate the edges of the cookies and wouldn’t eat the jam filling because of seeds (I’d think that was ridiculous if I wasn’t exactly the same way at her age).
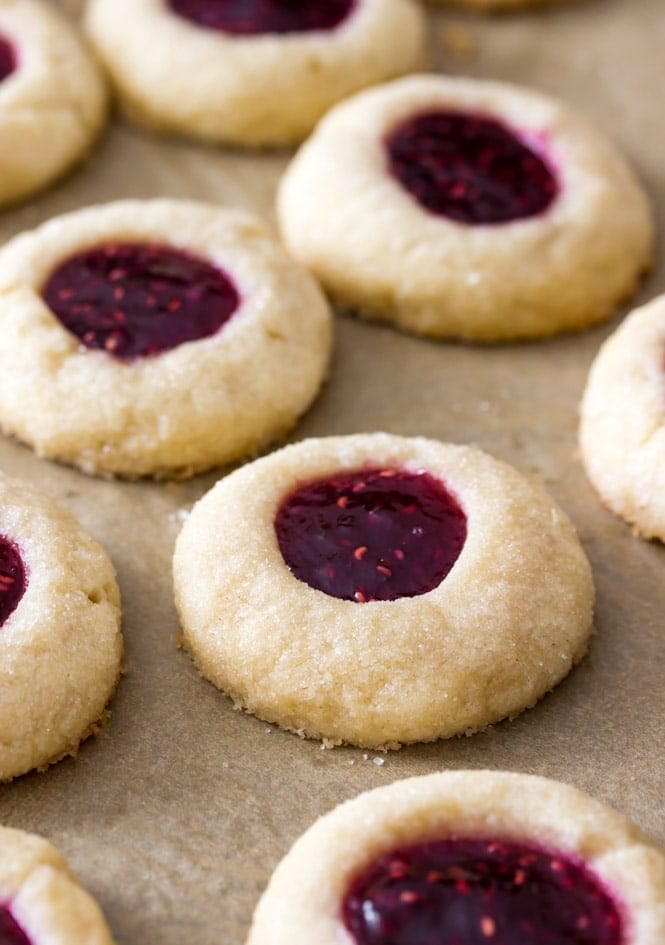
These thumbprint cookies are easy to make and the taste is incredible — they have soft, sweet interiors, sugared exteriors (though you can leave off the sugar if you’d like) and jam filled centers. Let’s get started on how to make the perfect thumbprint cookies.
Tips for perfect thumbprint cookies:
- For perfectly soft cookies that don’t spread: Whenever possible, I recommend using a scale to measure out your ingredients. It is so, so easy to over-measure or under-measure flour when using cups, causing your cookies to be too hard or to spread when they shouldn’t. If you don’t have a scale already, here is the one that I use in my own kitchen (affiliate link), it’s inexpensive and accurate and I can’t even bake without it anymore.
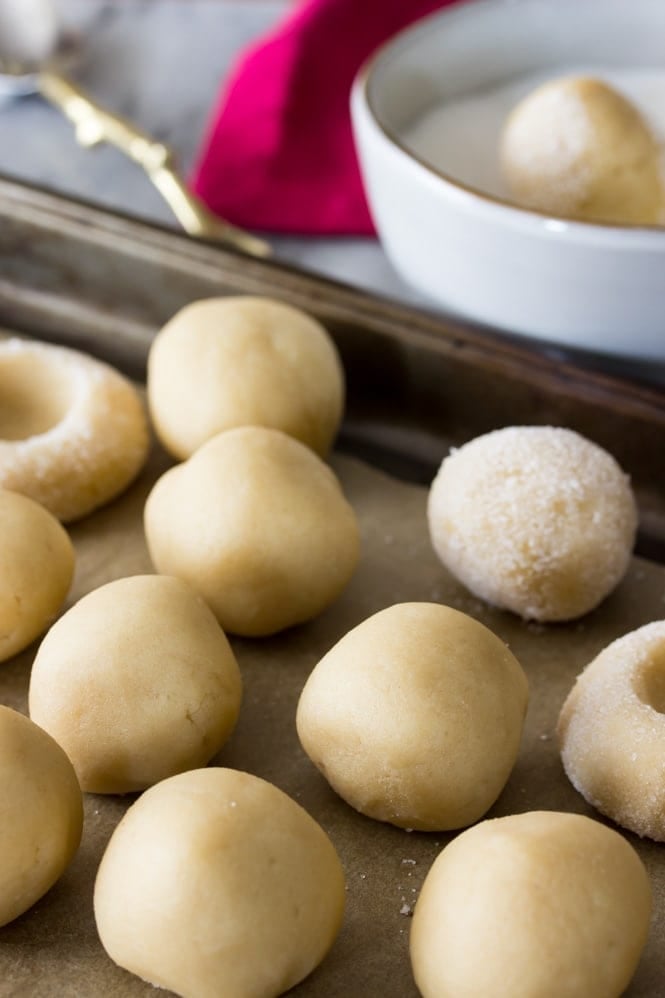
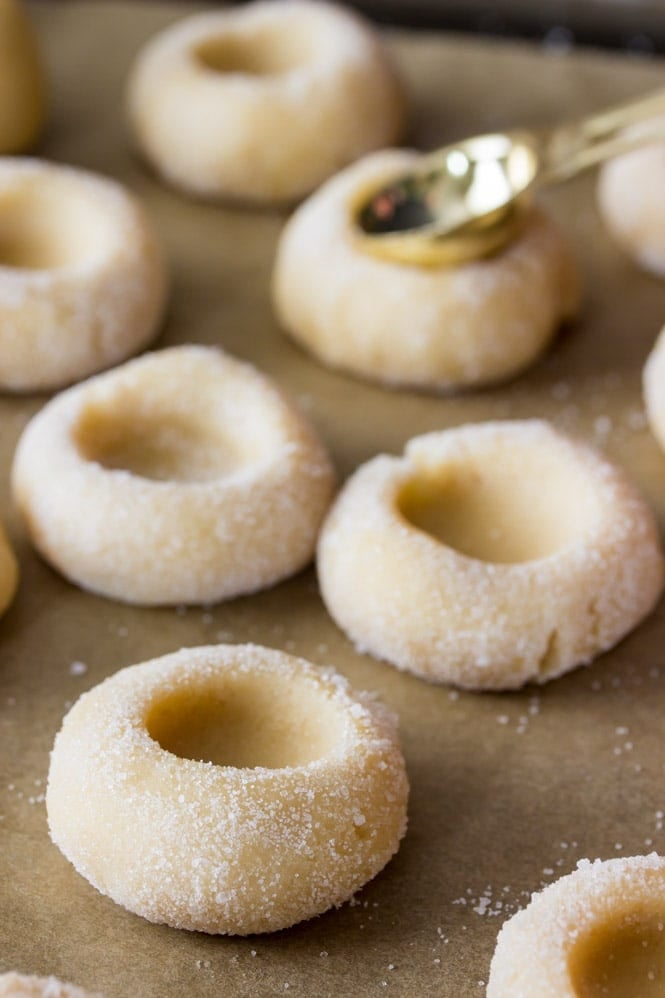
- For thumbprints that don’t crack: This dough is firm enough that you should be able to roll it into balls right after mixing it together (no chilling). Roll the balls between your hands until they are really, really smooth and there are no lines or cracks in the dough. Roll the cookie dough in sugar (optional) and then gently use your thumb or a teaspoon to slowly press an indent into the cookie. If you see the dough starting to crack anyway, you can usually press the dough back together successfully!
- Thumbprint Cookie Filling: I know that not all recipes do this, but I recommend adding the jam/preserves (you can use either) before baking the cookies. If the jam is too firm and isn’t easy to drop into the cookies, then place it in a microwave-safe bowl and heat it in the microwave for just a few seconds, just until it is easy to stir (you don’t want the jam to be hot, just more fluid and cooperative).
- Another tip to prevent spreading: This is a good rule of thumb for just about every cookie recipe. Never place your cookies on a hot cookie sheet. Make sure your cookie sheet has cooled completely before placing your next batch of cookies, otherwise they’ll start melting before they can start baking, and they’re much more likely to spread.
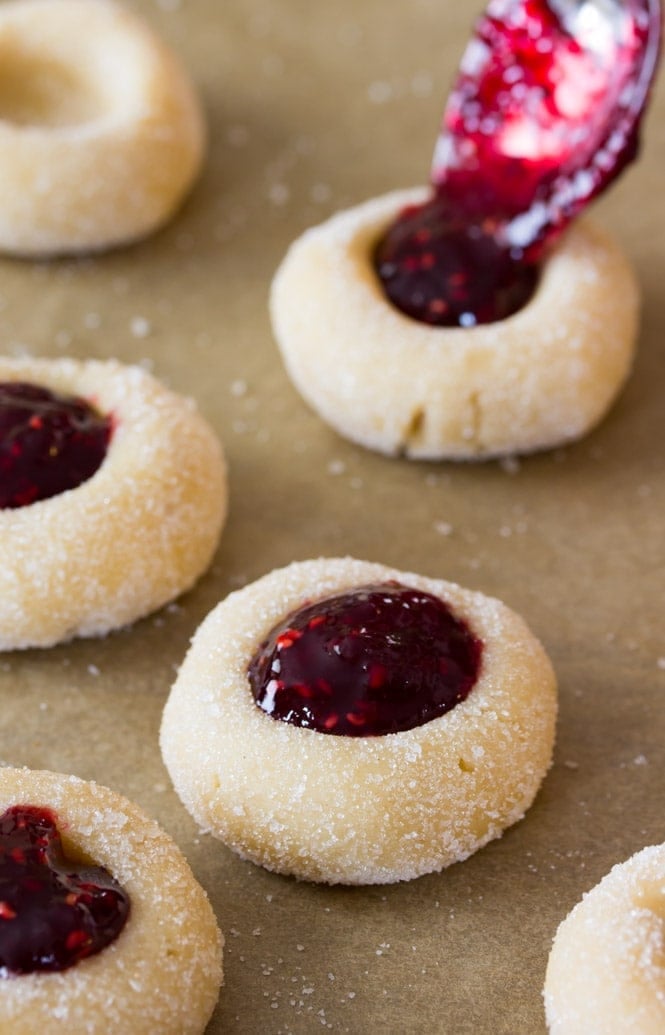
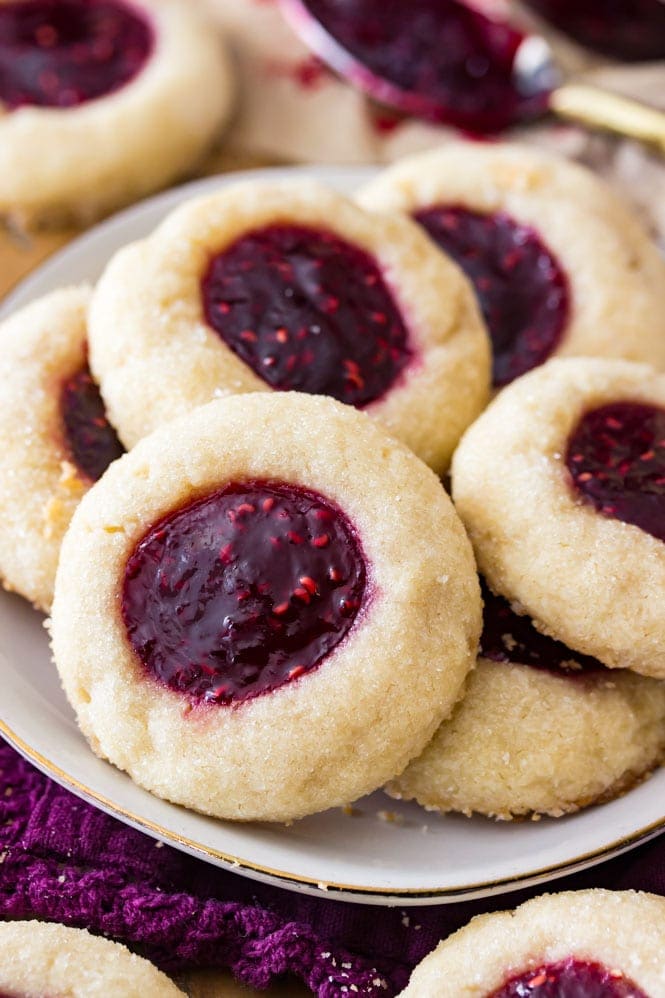
I used raspberry preserves in this recipe and really loved the way that the slightly tart raspberry flavor melded with the sweet sugar cookie bases. You can use any variety of jam or preserves that you prefer, though, I know that apricot and strawberry are popular options. You can also definitely opt for a seedless option, I liked the texture of the raspberry seeds (something my 12 year old self would be in utter shock to hear), but know that not everyone does!
As I mentioned above, I really recommend adding the jam before baking the cookies, but if you forget you can add it afterwards (you’ll need to re-indent the cookies immediately after they come out of the oven with a rounded teaspoon if you wait). As the cookies cool the jam will settle and firm up, and while it’ll remain slightly tacky even when cooled, they’re still firm enough that I stacked these thumbprint cookies on a platter to serve them over the weekend.
Enjoy, and I’d love to know what your favorite filling is!
If you like thumbprint cookies, make sure to check out my bourbon-infused chocolate version, my peanut butter and chocolate version, and my key-lime version!

Thumbprint Cookies
Ingredients
- 1 cup (226 g) unsalted butter, softened to room temperature
- ⅓ cup (70 g) sugar
- ⅓ cup (70 g) light brown sugar, tightly packed
- 1 large egg yolk
- ¾ teaspoon vanilla extract
- 2 ¼ cup (280 g) all purpose flour
- 2 teaspooons cornstarch
- ½ teaspoon salt
- ½ cup sugar, for rolling (optional)
- ⅓ cup (105 g) jam or preserves, flavor of your choice -- I used raspberry preserves for this recipe
Instructions
- Place butter in the bowl of a stand mixer (you may instead use a large bowl and an electric hand mixer) and beat until creamy.1 cup (226 g) unsalted butter
- Scrape down the sides of the bowl, add sugars, and beat, gradually increasing mixer speed to medium-high until ingredients are well-combined (about 30-60 seconds).⅓ cup (70 g) sugar, ⅓ cup (70 g) light brown sugar, tightly packed
- Add egg yolk and vanilla extract and beat well.1 large egg yolk, ¾ teaspoon vanilla extract
- In a separate bowl, whisk together flour, cornstarch, and salt.2 ¼ cup (280 g) all purpose flour, 2 teaspooons cornstarch, ½ teaspoon salt
- With mixer on low speed, gradually add flour mixture to wet ingredients until completely combined. This dough will seem very dry and crumbly, so be sure to pause occasionally to scrape the sides and bottom of the bowl. If it starts to strain your mixer you can use your hands to finish working the dough together.
- Scoop cookie dough into 1 Tablespoon-sized balls and roll very well (so that the dough is round and there are no cracks/seams in the cookie dough -- this will help keep your thumbprints from cracking).
- Roll in granulated sugar (if using) and place on a wax-paper covered plate or small cookie sheet. Use your thumb or the rounded back of a teaspoon to gently press an indent in the center of the cookie dough. Repeat until all of the dough has been used.½ cup sugar
- Transfer cookie dough to freezer and chill for 30 minutes.
- Once dough is done chilling, preheat oven to 375F (190C) and place your jam in a small microwave-safe bowl. Heat briefly (about 5-10 seconds) or until jam is not hot but is no longer firm and is easy to stir.⅓ cup (105 g) jam or preserves
- Spoon jam into each thumbprint, filling each indent to the brim.
- Once oven is preheated, place cookies at least 2" apart on a parchment paper-lined cookie sheet and bake on 375F (190C) for 11 minutes or until edges are just beginning to turn golden brown.
- Allow cookies to cool completely on baking sheet before enjoying.
Nutrition
Nutrition information is automatically calculated, so should only be used as an approximation.
Like this? Leave a comment below!
This post contains affiliate links, which means that if you purchase anything through these links I will get a small commission at no extra cost to you. Please view the disclosure policy for more information.


I would like to make these for a cookie exchange! How many cookies does this recipe make if I follow the exact recipe? Thanks!
Hi Nancy! I normally have this question answered right above the video. This one will make about 24 cookies. 🙂
These came out fantastic! Do I store them in refrigerator or counter top if I’m serving them tomorrow?
I would store at room temperature in an airtight container 🙂
These turned out amazing!!! I didn’t have cornstarch so just added a tiny bit more flour and sugar. Also I used just white sugar. So delicious!
I’ve never been a thumbprint cookie fan but my bestie is so I made these for her. Of course I had to try one to make sure they were ok. O. M. G. These are amazing! I use Knott’s boysenberry preserves, and used the smaller end of a wine cork for the “thumbprint” which worked great. Next I want to try these with orange marmalade and a jalapeño jelly.
That’s so fun that Shelby tried them. I am 59 . I know we’ve made them since I was 20 ! The fun thing is Shelby wanting to try all different jam now! Good for you. Always try something new. ❣️
Have you frozen these after baking?
I’m trying the recipe right now and can’t wait to eat them!
Hi Meagan! I have not tried freezing them myself but they should do well being frozen. 🙂
Thumbprint cookies are my favorite and I try a new recipe every year. I won’t have to look any further – these are the best! Thanks for the recipe and the video.
these cookies are delicious!! only question, my jam spread on some of the cookies, do you think In added to much jam?
Hi Mary Ellen! I think it may have been a bit too much jam.
How much by size or weight should each ball of dough be? A ball that fits in 1tbs is gigantic, a table spoon is half a sphere so theoretically youd need two tablespoons to make a ball and its super big. Is there a better measurement for this or a better way to phrase this step?
Hi Kat! The size is 1 Tablespoon, which would be the amount of dough that fits in one (not two) Tablespoon-sized measuring spoon. You will then roll this amount of dough into a ball as mentioned in 6. I would take a peek at the video if that doesn’t clear things up, but I hope you love the cookies!
As I am not good at eyeballing. I weighed the dough and divided by 24. It came to 31g per cookie.
I’ve never made these and have always wanted to. I have a question: can you use lemon curd or Nutella in these? If so, would it be better to put the curd/Nutella in before or after baking and should the curd/Nutella be warmed up a bit before they’re placed in the print? Thank you so much!
Hi Hannah! Lemon curd would be great in these! I would add it before baking. If it’s difficult to spread into the thumbprint I would warm it a bit first. Enjoy!
Thank you for including weights! I’m much more confident in my results when I know my measurements are accurate. I didn’t roll my cookies in sugar; instead, I drizzled them with melted white chocolate after they cooled off. I used pear cinnamon jam for half of the cookies and raspberry pear for the other half. Everyone who tried them loved them. Highly recommend this recipe!
You’re so welcome Sheila! We love baking with weighted measurements here at Sugar Spun Run 😊 Your version of these cookies sounds simply divine; thanks so much for sharing and reviewing. Enjoy!
My old thumbrint recipe dosn’t work for me anymore, I always spreads, do you think these could be rolled in finely chopped nuts?
Hi Terry! Definitely! Roll the dough between your palms briefly to warm it before rolling through the nuts to help them stick. Please let us know how they turn out for you 🙂
Thank you!
This recipe is great but I’m using them with cookie cutter shapes and have a question. My cookies come out either undercooked under the jelly or burnt on edges. Do you think I could bake them without jelly in the indent and add it after they are baked? Would that help them cook better in middle?
Hi Leah! I haven’t tried this but I do think it would be fine to add the jelly after baking.
Thumbprint cookies are the bane of existence. My family loves them and I hate to bake them. Previous recipes I have baked spread too much, were crumbly or the dough was too wet to shape. But not this one! This one is perfect!
I followed the recipe to the “T”! They held their shape, had a nice crunch and of course, they were delicious! It’s time for me to delete all the other thumbprint cookie recipes I had previously saved.
Thank you for add your tips and detailed instructions.
Signed,
A Reformed Thumbprint Cookie Maker
Delicious prepared per recipe.. brown sugar a great addition. Got beautiful thumbprint cookie presses from Williams Sonoma. Instead of making balls, could I roll them out to half inch thickness and use the presses?
We don’t see why not! Let us know how they turn out for you with that method, Linda 😊
I made these for the first time, I didn’t put them in the freeze. They worked out and they were delicious. They were gone so quickly.
My granddaughter has requested these cookies and said they were her favourite.
They are so easy to make.
I made these having measured the flour in my measuring cup. I also added accidentally baking powder( What was I thinking?)Anyway as the mixture was having its end flour added, the last 40 grams I stopped as it looked the driest I have ever seen. However the little girls and I squeezed the mix Together and made balls. Did not chill them. Cooked them. Hey presto Beautiful cookies.My daughter has made this recipe before likes it and has done it several times.
But the baking powder was my mistake. Lucky they turned out so well.Thanks for this recipe!