
The Best Pizza Dough Recipe
This post may contain affiliate links. As an Amazon Associate I earn from qualifying purchases. Please read my disclosure policy.
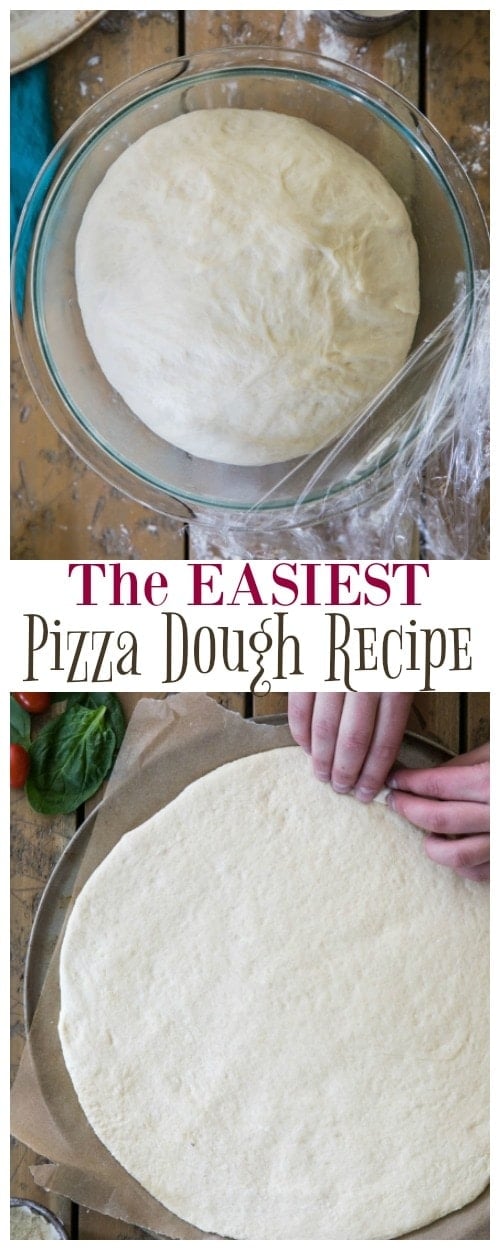
This is the easiest, best pizza dough recipe. With just 6 ingredients and no fancy flours required (I’ve included instructions for using all-purpose or bread flour), this pizza crust requires just one bowl (no stand mixer, though you can use one if you’d like), about 3 seconds of kneading, and just 30 minutes to rise.
If you’re uncomfortable working with yeast or making your own pizza dough at home, I’ll walk you through every step of the process in my video just below the recipe. You’ve got this!

It’s a little silly how excited I am to share this recipe with you today. It’s pizza dough, not exactly glamorous or sexy and it was honestly pretty boring to photograph (how do you make a ball of dough look fun and appealing in pictures, please tell me!).
But as someone who has struggled with baking even the most simple recipes with yeast, perfecting this pizza dough was definitely a triumph for me and I’m really happy to announce that there’s nothing to be afraid of! Yeast baking isn’t all that scary or hard, and you too can make your own super simple pizza crust at home in a matter of minutes, no fancy ingredients required.
I kept this pizza dough recipe as simple and approachable as possible. It’s made with all-purpose flour (and notes on how to substitute that flour, in case you want to get fancy 😉), no stand mixer needed, and only the most minimal amount of kneading required.
Below I’ve tried to ask some of the most frequently asked questions about making your own pizza dough. Let’s get to it.

What is the best flour for making homemade pizza dough?
Many pizza-making-pros will likely argue that bread flour is best for making homemade pizza. However, I rarely keep any flours in my pantry that are more exotic than all-purpose flour, so when I was working on this recipe I first and foremost made sure that it worked perfectly with regular old all-purpose flour.
I did make a point to test this recipe (repeatedly, we ate a lot of pizza last week) with bread flour and it works very well when made that way, too. I find that the biggest difference is that using bread flour gives my pizza dough a crispier crust, while the all purpose flour yields a softer one.
Can I flavor my Pizza Dough?
Pizza dough on its own is obviously important as a base for your favorite pizza, but it’s also kind of… bland. Shockingly, something made primarily of flour and water isn’t super exciting to the taste buds, and most of the flavor will come from whatever toppings you add.
I do usually try to spice up my crust just a bit, though, by adding a dash of garlic powder (usually around a 1/4 teaspoon) and sometimes dried basil leaves (dried oregano could also work for you but I absolutely loathe oregano) into the dough before you add your oil and water.

How do you stretch out pizza dough?
You can use a rolling pin or you can use your hands. If you’re especially skilled, you can toss it up in the air and spin your dough like an Italian pizza artist, but I definitely lack the ability to tell you how to do that one.
I prefer to use a rolling pin and roll the dough out into a circle (or more like an amoeba-shape, since I can’t roll a perfect circle to save my life). Alternatively you can use your hands to flatten and stretch the dough until it reaches the desired width.
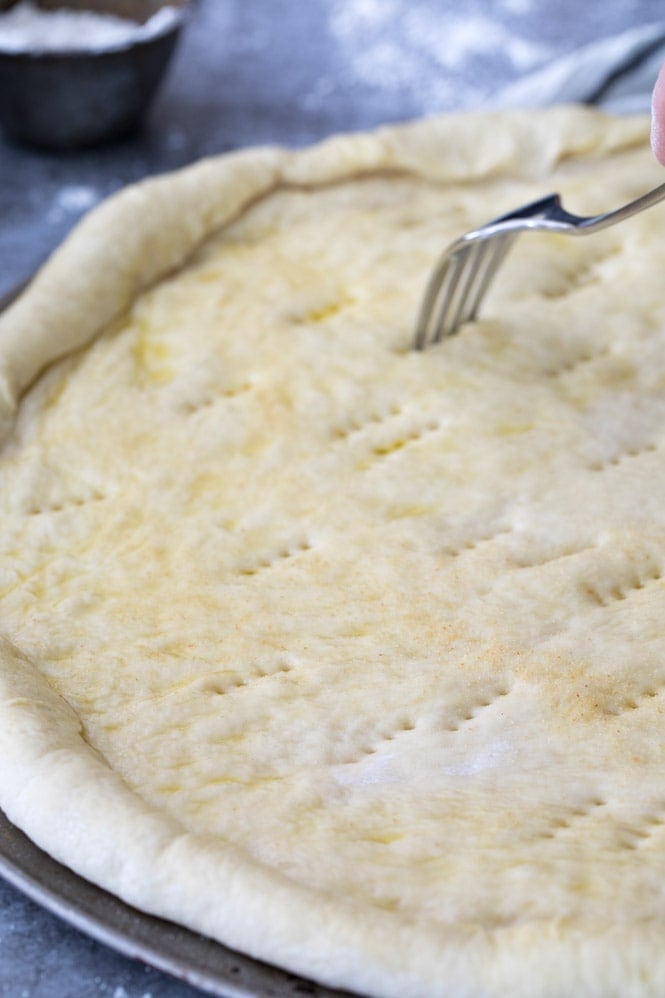
Then use your hands to pinch the edges to make a crust or fold over the edges (I always fold mine over because it gives me a thicker crust, which I love), brush the entire surface of the pizza generously with olive oil, and then use a fork to poke holes over the center of the dough to prevent any bubbles from forming while it bakes.
How do you make Homemade Pizza?
You can use this pizza dough recipe to make your own homemade pizza using any toppings you’d like (I love making Margherita pizza and have even made a BBQ chicken version using my BBQ pulled chicken).
I included instructions in the recipe, but once you’ve prepared your pizza dough, just add your favorite toppings and bake in a 425F oven for about 15 minutes (you may need longer if you add a lot of toppings). Do make sure you let your oven preheat properly and use an oven thermometer as possible, my oven takes a while to reach that temperature and usually “tells” me it’s ready when it’s not even close.

OK, are you guys sick of hearing about my beloved pizza dough recipe yet? In case you just can’t get enough, I also made a video just below that you can watch so you can see exactly how your dough should look in every step.
How to Make Homemade Pizza Dough

If you enjoy watching these videos, please subscribe to my YouTube Channel to be notified every time I publish a video!
The Best Pizza Dough Recipe
Ingredients
- 2-2 ⅓ cups all-purpose flour OR bread flour¹, divided (250-295g)
- 1 packet instant yeast², (2 ¼ teaspoon)
- 1 ½ teaspoons sugar
- ¾ teaspoon salt
- ⅛-¼ teaspoon garlic powder and/or dried basil leaves, optional
- 2 Tablespoons olive oil, + additional
- ¾ cup warm water³, (175ml)
Instructions
- Combine 1 cup (125g) of flour, instant yeast, sugar, and salt in a large bowl. If desired, add garlic powder and dried basil at this point as well.
- Add olive oil and warm water and use a wooden spoon to stir well very well.
- Gradually add another 1 cup (125g) of flour. Add any additional flour as needed (I've found that sometimes I need as much as an additional ⅓ cup), stirring until the dough is forming into a cohesive, elastic ball and is beginning to pull away from the sides of the bowl (see video above recipe for visual cue). The dough will still be slightly sticky but still should be manageable with your hands.
- Drizzle a separate, large, clean bowl generously with olive oil and use a pastry brush to brush up the sides of the bowl.
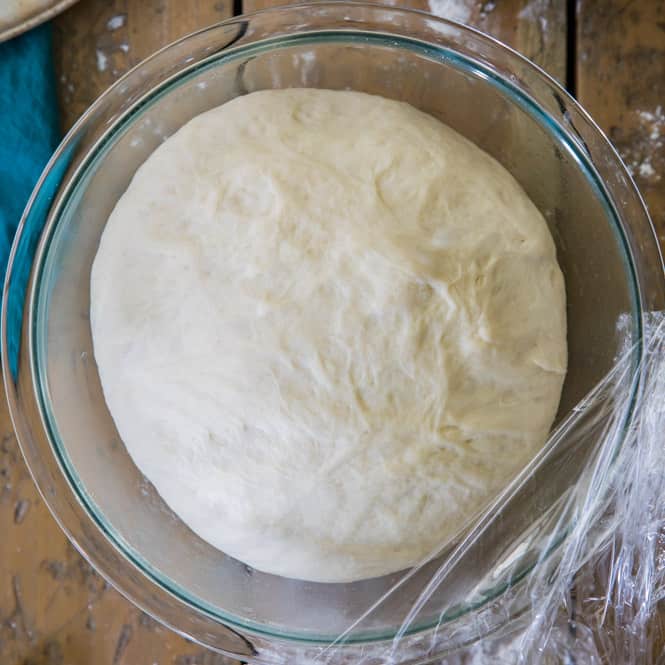
- Lightly dust your hands with flour and form your pizza dough into a round ball and transfer to your olive oil-brushed bowl. Use your hands to roll the pizza dough along the inside of the bowl until it is coated in olive oil, then cover the bowl tightly with plastic wrap and place it in a warm place.
- Allow dough to rise for 30 minutes or until doubled in size. If you intend to bake this dough into a pizza, I also recommend preheating your oven to 425F (215C) at this point so that it will have reached temperature once your pizza is ready to bake.
- Once the dough has risen, use your hands to gently deflate it and transfer to a lightly floured surface and knead briefly until smooth (about 3-5 times).
- Use either your hands or a rolling pin to work the dough into 12" circle.
- Transfer dough to a parchment paper lined pizza pan and either pinch the edges or fold them over to form a crust.
- Drizzle additional olive oil (about a Tablespoon) over the top of the pizza and use your pastry brush to brush the entire surface of the pizza (including the crust) with olive oil.
- Use a fork to poke holes all over the center of the pizza to keep the dough from bubbling up in the oven.
- Add desired toppings (see the notes for a link to my favorite, 5-minute pizza sauce recipe!) and bake in a 425F (215C) preheated oven for 13-15 minutes or until toppings are golden brown. Slice and serve.
Notes
Making in Advance:
To make in advance, let the dough rise covered at room temperature as indicated in the recipe, then deflate it, wrap it tightly so it doesn't dry out, and store in the refrigerator for up to several days or it will freeze for up to a month. Top your pizza off with my favorite, easy, homemade pizza sauce!Nutrition
Nutrition information is automatically calculated, so should only be used as an approximation.
Like this? Leave a comment below!


Hi Sam,
I’m taking a new medication that requires me to be on a very low sodium diet. Do you think if I omit the salt, the crust will still turn out? Might oat flour work? Many thanks!
Hi Deb! I honestly am not sure about the oat flour, unfortunately. I do think that it would probably still be OK without salt (though if you can get away with reducing it rather than omitting it I would recommend that instead). I hope that helps!
Thank you so much for this recipe! I’m assuming this will work wonderfully for calzones but wanted to ask first. We have a favorite pizza place, but no one can make a calzone good enough for me 🙂
Yes, quite a few people have commented that they’ve used this recipe to make calzones! Enjoy 🙂
Wow, I am totally excited now to make this dough and give it a whirl for my favorite calzone. I live in an area where calzones are anything you can find to throw in a pizza crust and seal it up and say… here is your calzone. I prefer original calzones like you get from pizza places in New York City like when I was a kid. Thank you again for the great recipe. I’ll let you know how it works out.
You’re very welcome, I hope you love it, Alexandra!
So happy to see a “straight-forward” kind of recipe with simple ingredients and exact easy instructions. Just reading this recipe tells me it will be just what I am looking for and I cannot wait to make it. Kudos to Sam Merritt
I hope you love it, Joann! 🙂
Awesome dough! Turned out amazing. We really enjoyed your recipe that we’ve added it to our weekly routine meals! Thank you.
I am so glad everyone enjoyed the dough, Sheila! 🙂
Great pizza dough! Was easy to make and my husband and I loved it! Will definitely be making this again. I was wondering if you could use the same recipe(minus basil and garlic) and make this as bread instead?
Hi Jamie! I’m glad you enjoyed the dough. I use it for my garlic knots recipe, but I’m not sure how it would do as a loaf of bread.
Loved this crust. Watched the video with my 7 year old and then we made it together. Only tip I would add from this rookie is to transfer the dough to pizza pan BEFORE adding toppings. Ours was slightly stuck to the counter so it almost fell apart when I tried to move it. We made 2 crusts for our family of 6 and had leftovers. So easy and good!
I am so glad everyone enjoyed the pizza dough, Michelle! You definitely want to transfer it to the pan first next time. It will be much easier and hopefully a more enjoyable experience. 🙂
Waiting for my dough to rise!
I hope you love it! 🙂
Looks great … I’m going to try tonight. Can you please tell me… we like our pizza thin. Can I get 2 12” pizzas or should I plan to double the recipe?
Hi Sara! You should plan to at least increase the recipe by 50%. You can always discard any extra dough you may have. I hope you love it! 🙂
Pizza was a hit last night ! I ended up doubling the recipe. I’m glad I did because we needed it. Next time I’ll probably double the recipe and make 3 pizzas just to get a little thinner crust. I had noticed one person was considering baking the crust a little before putting the toppings on … I’m wondering if anyone has done this and if the crust turned out well?
Thanks for all your delicious recipes!!! My fam thanks you to 😉
I am so glad everyone enjoyed the crust. I have heard back from a few people saying they have tried it with success, but bake times are kind of all over the board for me to have a good recommendation for you since I haven’t tried it myself.
I made this and it’s awesome! Can I freeze this dough?
Hi Lia! I have not frozen this dough myself, but others have with success. You would need to let it rise first, then make sure to wrap it tightly and store in the freezer. 🙂
Just made this and omg SOOO good! This was the easiest recipe I’ve found yet and turned out amazing! Thanks for sharing 🙂
I am so glad you enjoyed the pizza dough, Lacy! 🙂
The crust is smooth and elastic enough too. Good flavor I think I’ll add more spice and garlic. Easy recipe. Thank you for sharing.
I am so glad you enjoyed the dough, Terri! 🙂
That was good!
Thank you so much, Juanita! 🙂
Can you rest the dough for longer than 1 hour without it over rising? If so, should you refrigerate it?
Hi Melissa! I have heard others have let it rise longer without an issue. I would be worried it would fall in on itself. If you need to keep the dough for longer, I would recommend punching it down after it rises cover it tightly and store in the refrigerator. 🙂
Good recipe. I am by no means good with yeast dough, but this was quck and easy and turned out really well!
Next time, I’m either going to split the dough in half or get a bigger pan. I used a 14″ pizza pan. It gave us a thicker crust, closer to a Sicilian style, but we like our Pizza really thin. I also added about half a teaspoon of minced garlic to the dough. I could have used a bit more, but it was a good idea to do so. Most likely, I’ll also use a bit less salt, which is just a personal preference.
In any case, This is a goodvrecipe,band I can see myself using it to make bread, stromboli, and dinner rolls. Highly recommend.
So glad to hear you enjoyed the pizza dough, Carol! Thanks for commenting 🙂
I am about to make this again (it was incredible before!) but am wondering- can I cook the crust prior and cook it with toppings later or will that mess up the crust?
Hi Kyle, I haven’t tried it this way. It might make the crust a bit more crisp but I don’t see why it wouldn’t work.
I cooked ourpizza dough for 4 minutes. Then pulled it out of the oven. Brushed with olive oil lightly, then applied thin sauce. It turned out delicious. I will do it like this from now on. It cooked so much better on the bottom.