
The Best Pizza Dough Recipe
This post may contain affiliate links. As an Amazon Associate I earn from qualifying purchases. Please read my disclosure policy.
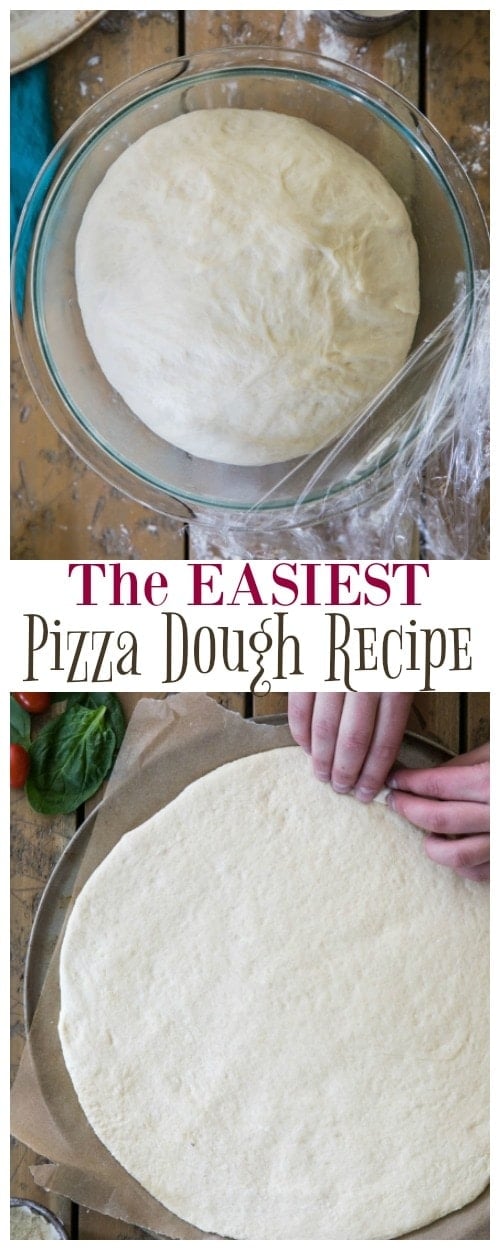
This is the easiest, best pizza dough recipe. With just 6 ingredients and no fancy flours required (I’ve included instructions for using all-purpose or bread flour), this pizza crust requires just one bowl (no stand mixer, though you can use one if you’d like), about 3 seconds of kneading, and just 30 minutes to rise.
If you’re uncomfortable working with yeast or making your own pizza dough at home, I’ll walk you through every step of the process in my video just below the recipe. You’ve got this!

It’s a little silly how excited I am to share this recipe with you today. It’s pizza dough, not exactly glamorous or sexy and it was honestly pretty boring to photograph (how do you make a ball of dough look fun and appealing in pictures, please tell me!).
But as someone who has struggled with baking even the most simple recipes with yeast, perfecting this pizza dough was definitely a triumph for me and I’m really happy to announce that there’s nothing to be afraid of! Yeast baking isn’t all that scary or hard, and you too can make your own super simple pizza crust at home in a matter of minutes, no fancy ingredients required.
I kept this pizza dough recipe as simple and approachable as possible. It’s made with all-purpose flour (and notes on how to substitute that flour, in case you want to get fancy 😉), no stand mixer needed, and only the most minimal amount of kneading required.
Below I’ve tried to ask some of the most frequently asked questions about making your own pizza dough. Let’s get to it.

What is the best flour for making homemade pizza dough?
Many pizza-making-pros will likely argue that bread flour is best for making homemade pizza. However, I rarely keep any flours in my pantry that are more exotic than all-purpose flour, so when I was working on this recipe I first and foremost made sure that it worked perfectly with regular old all-purpose flour.
I did make a point to test this recipe (repeatedly, we ate a lot of pizza last week) with bread flour and it works very well when made that way, too. I find that the biggest difference is that using bread flour gives my pizza dough a crispier crust, while the all purpose flour yields a softer one.
Can I flavor my Pizza Dough?
Pizza dough on its own is obviously important as a base for your favorite pizza, but it’s also kind of… bland. Shockingly, something made primarily of flour and water isn’t super exciting to the taste buds, and most of the flavor will come from whatever toppings you add.
I do usually try to spice up my crust just a bit, though, by adding a dash of garlic powder (usually around a 1/4 teaspoon) and sometimes dried basil leaves (dried oregano could also work for you but I absolutely loathe oregano) into the dough before you add your oil and water.

How do you stretch out pizza dough?
You can use a rolling pin or you can use your hands. If you’re especially skilled, you can toss it up in the air and spin your dough like an Italian pizza artist, but I definitely lack the ability to tell you how to do that one.
I prefer to use a rolling pin and roll the dough out into a circle (or more like an amoeba-shape, since I can’t roll a perfect circle to save my life). Alternatively you can use your hands to flatten and stretch the dough until it reaches the desired width.
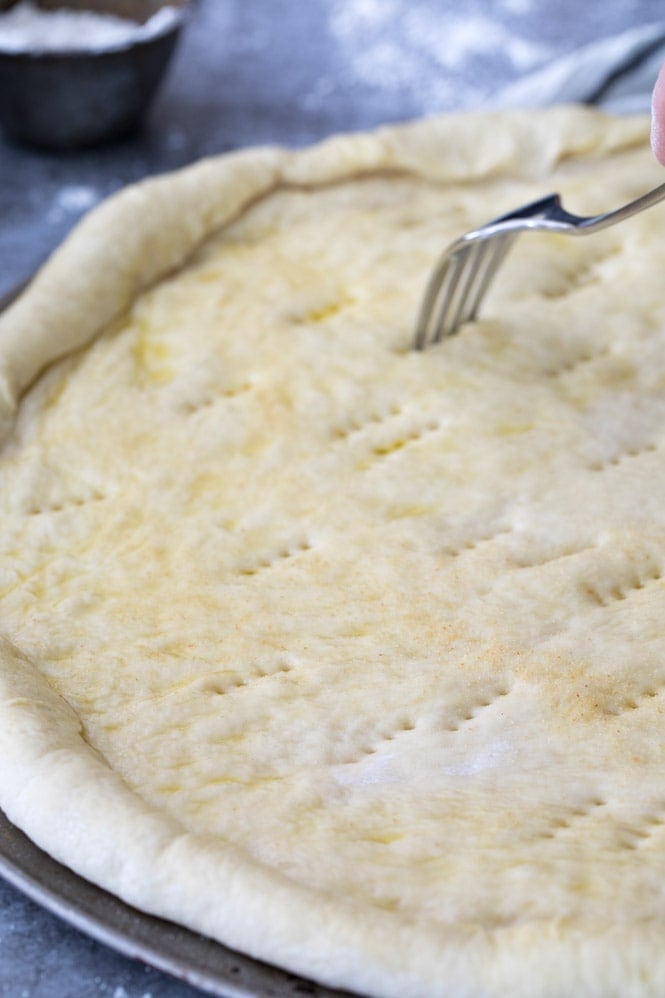
Then use your hands to pinch the edges to make a crust or fold over the edges (I always fold mine over because it gives me a thicker crust, which I love), brush the entire surface of the pizza generously with olive oil, and then use a fork to poke holes over the center of the dough to prevent any bubbles from forming while it bakes.
How do you make Homemade Pizza?
You can use this pizza dough recipe to make your own homemade pizza using any toppings you’d like (I love making Margherita pizza and have even made a BBQ chicken version using my BBQ pulled chicken).
I included instructions in the recipe, but once you’ve prepared your pizza dough, just add your favorite toppings and bake in a 425F oven for about 15 minutes (you may need longer if you add a lot of toppings). Do make sure you let your oven preheat properly and use an oven thermometer as possible, my oven takes a while to reach that temperature and usually “tells” me it’s ready when it’s not even close.

OK, are you guys sick of hearing about my beloved pizza dough recipe yet? In case you just can’t get enough, I also made a video just below that you can watch so you can see exactly how your dough should look in every step.
How to Make Homemade Pizza Dough

If you enjoy watching these videos, please subscribe to my YouTube Channel to be notified every time I publish a video!
The Best Pizza Dough Recipe
Ingredients
- 2-2 ⅓ cups all-purpose flour OR bread flour¹, divided (250-295g)
- 1 packet instant yeast², (2 ¼ teaspoon)
- 1 ½ teaspoons sugar
- ¾ teaspoon salt
- ⅛-¼ teaspoon garlic powder and/or dried basil leaves, optional
- 2 Tablespoons olive oil, + additional
- ¾ cup warm water³, (175ml)
Instructions
- Combine 1 cup (125g) of flour, instant yeast, sugar, and salt in a large bowl. If desired, add garlic powder and dried basil at this point as well.
- Add olive oil and warm water and use a wooden spoon to stir well very well.
- Gradually add another 1 cup (125g) of flour. Add any additional flour as needed (I've found that sometimes I need as much as an additional ⅓ cup), stirring until the dough is forming into a cohesive, elastic ball and is beginning to pull away from the sides of the bowl (see video above recipe for visual cue). The dough will still be slightly sticky but still should be manageable with your hands.
- Drizzle a separate, large, clean bowl generously with olive oil and use a pastry brush to brush up the sides of the bowl.
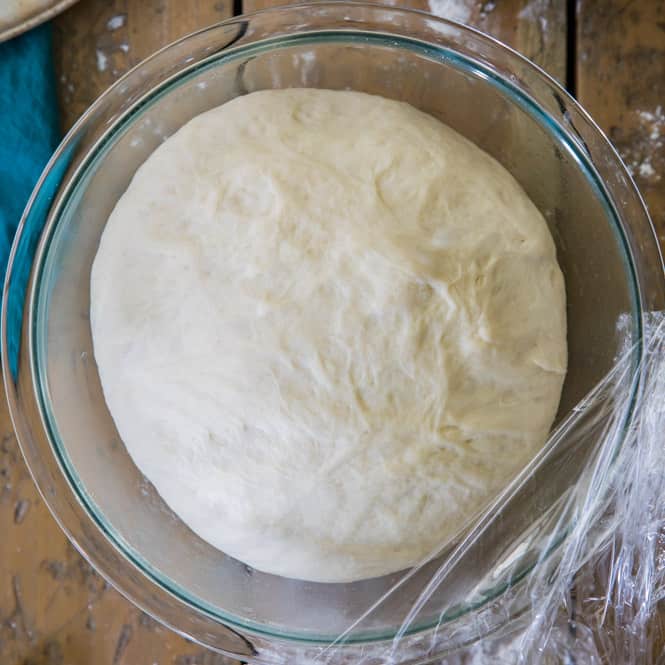
- Lightly dust your hands with flour and form your pizza dough into a round ball and transfer to your olive oil-brushed bowl. Use your hands to roll the pizza dough along the inside of the bowl until it is coated in olive oil, then cover the bowl tightly with plastic wrap and place it in a warm place.
- Allow dough to rise for 30 minutes or until doubled in size. If you intend to bake this dough into a pizza, I also recommend preheating your oven to 425F (215C) at this point so that it will have reached temperature once your pizza is ready to bake.
- Once the dough has risen, use your hands to gently deflate it and transfer to a lightly floured surface and knead briefly until smooth (about 3-5 times).
- Use either your hands or a rolling pin to work the dough into 12" circle.
- Transfer dough to a parchment paper lined pizza pan and either pinch the edges or fold them over to form a crust.
- Drizzle additional olive oil (about a Tablespoon) over the top of the pizza and use your pastry brush to brush the entire surface of the pizza (including the crust) with olive oil.
- Use a fork to poke holes all over the center of the pizza to keep the dough from bubbling up in the oven.
- Add desired toppings (see the notes for a link to my favorite, 5-minute pizza sauce recipe!) and bake in a 425F (215C) preheated oven for 13-15 minutes or until toppings are golden brown. Slice and serve.
Notes
Making in Advance:
To make in advance, let the dough rise covered at room temperature as indicated in the recipe, then deflate it, wrap it tightly so it doesn't dry out, and store in the refrigerator for up to several days or it will freeze for up to a month. Top your pizza off with my favorite, easy, homemade pizza sauce!Nutrition
Nutrition information is automatically calculated, so should only be used as an approximation.
Like this? Leave a comment below!


Loved the recipe… I’ve had my share of failures with pizza base, but this was not fussy and had the perfect texture when baked. Thanks for sharing!
I am so glad you enjoyed the dough, Amrita! 🙂
This is my go-to pizza crust recipe! Other recipes I’ve used brown deceptively quickly, leaving a soggy or under-cooked bottom. This recipe is crisp, chewy, and delicious every time! Thank you!!!
I am so glad you enjoyed the crust, Katie! 🙂
Traded in my mom’s crust recipe for this one! FAN~tastic crust!!!
I am so glad you enjoyed it, Tami! 🙂
Couldn’t be easier. Used this as a base for a focaccia that called for a “pizza dough” to start. Used Pamelas GF flour since my daughter is Celiac so I used a stand mixer with a bread hook to stir since GF doughs are very grabby. Came out great. Will be using this as our standard pizza crust going forward since it was so easy.
I am so glad you enjoyed the crust, Alan! 🙂 I’m happy to hear that the gluten free flour worked out well for you. 🙂
This is my go-to recipe I let it rise in a big stainless steel bowl. I let the bowl sit on a HUGE COFFEE CUP inside the coffee cup is steaming hot tap water it will help dough rise!
I am so glad you enjoy the dough, Matt! 🙂
How would this recipe differ if using whole wheat flour?
Hi Carrie! I think you could do a half whole wheat, half white flour and still have a great crust. 🙂
I just made my very first pizza and im so glad that i stumbled with your dough recipe! It turned out to be perfect! Thanks for sharing this recipe!
Hi Jahve! I am so glad you enjoyed the pizza! 🙂
Loved the recipe came out perfect the 1st time for me. The crust was even lightly crispy and flakey. My family loved the pizza. Thank you for posting this recipe.
I am so glad everyone enjoyed the dough Lecca! 🙂
Awesome and easy recipe. Came out great! Thank you!
I am so glad you enjoyed it, Amy! 🙂
Terrible recipe, very stiff and has nothing to do with the pizza showed in the video, it’s a recipe for bread dough not pizza, a vad one also! Thank you for wasting my time and effort!
Hi Mariam! I’m confused, the recipe in the video is literally the recipe listed in the post? Sorry to hear it didn’t turn out for you, happy to help troubleshoot if that might help.
Hi Miriam,
I tried the recipe for pizza dough yesterday and it was okay, apart from I forgot to prick the dough and wondering is this the reason my grease proof paper stuck to the dough once cooked and I had trouble trying to peel off
,.
So today I made another one without useing grease proof paper, and I remembered to prick the dough, and it is absolutely fine, .
Thank you
Wow, way to be a horribly rude person. Move Along and enjoy your terrible life.
This is remarkable! My picky, wont eat anything adult child loved it. Said it was better than Mtn. Mikes… Thank you so much!
I am so glad everyone enjoyed the dough, Toni! 🙂
Foolproof n yummy!! Excellent n thank you!
So happy to hear you enjoyed, Bennie! Thank you for commenting 🙂
I have tried so many times with so many recipes to make a dough that had good consistency and good taste and thanks to you I finally found one I’ll use forever! I was doubtful as it seemed too easy and the method sort of unconventional but It IS so easy and it’s IS delicious and IS NOT gooey!
I am so glad you enjoyed the dough, Andrea! 🙂
Hi Sam! I was wondering if you can store the dough in the refrigerator for a day or a few hours after you make it. Thank you so much, I’m definitely going to try this recipe! 🙂
Hi Jake! I know others have stored it for a day or two with success. Just make sure you wrap it tightly so it doesn’t dry out. You will want to let it rise first before refrigerating. 🙂
If I’m using a pizza stone what temperature and time do you suggest? Made it on a cookie sheet and it was great but I wanted to try my stone.
Hi Terri! The temperature shouldn’t change for a pizza stone, but I don’t have one myself so I don’t know how long it would need to bake. 🙂
The most important thing to remember with a pizza stone is to heat it thoroughly at a very hot temperature. That generally means 500 F+ for no less than an hour. Once fully heated, the pizza will take 8-12 minutes to fully bake.
(In a professional 800+ oven it would take 3-4 minutes). The reason for the long preheat is because the stone absorbs the heat like a sponge, but it takes a long time to fully heat through. Once hot, it will bake and char the crust at the same rate that it takes for the oven to melt and brown the toppings. Also, consider baking your pizza on the top rack of the oven. This effectively simulates the narrow deck of a professional pizza oven, cooking and browning the top of the pizza with the reflected heat from the ceiling of the oven.
I have baked on a stone for many years. For pizza, heat the stone 475F for about 20 min so it gets very hot throughout the stone. Slide your dough onto the stone using a “peel” because if you’re making pizza on a stone a lot, you need one. Bake pizza until it’s done. About 20 min.
Mmmmm pizza!! Thanks for the recipe (and for the several other ones you’ve shared and we’ve enjoyed)! This crust is so easy, so yummy. Maybe I have workday aggression to let out, but I still like to knead the heck out of my dough for about 5 minutes and it seems to do the trick, both for the angst and crust texture! Any left over frustration is an espresso martini’s problem to deal while I prep and taste test toppings. That all said, I believe kneading more gives you looser/lighter texture, so that might not be the desired effect, but that’s my preference anyway. I use King Arthur bread flour, which also should give a lighter crust.
I echo Adam’s comment regarding getting your stone HOT HOT HOT first. I don’t warm mine for a whole hour, but will give that a whirl and back off each time until I get to a happy place. I’m 475F, maybe a half hour stone warm up, and about 13 min cook time, but I watch it like a ravenous hawk from maybe 8 minutes on. But I’m going to crank that up and see if I can more charring to happen. It really does take practice with your own dough and equipment to get that perfect balance of dough and topping doneness. Oooh, speaking of that delicious pizza char – a few years back we bought the kettle pizza oven attachment for the Weber grill. I highly recommend. Game changer. We’re talking like 4 minutes at 650F. Makes fun pizza parties. But being that it’s April and still snowing here, I have to make do with the indoor oven most of the year.
I use semolina flour for our pizza peel. Corn flour is recommended a lot for pizza slippage, and I don’t mind that when we do pizzas on the Weber – for lack of a better way to say it, those pizzas are more “rustic” and the added texture kind of works, but I prefer a less texture with this crust and in the oven. One last little thing is the all important crust seasoning. I live in NE Ohio and DeLallo (PA) products are sold here. Hands down the best pizza seasonings! If you can get your hands on their Italian herb or garlic and cheese, do so, and prepared to have your world rocked. We may not see the sun here for 9 months of the year, but… DeLallo 🙂 Happy pizza-ing!